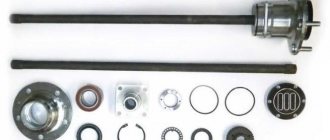
Replacing the rear beam of Lada 2106 (VAZ 2106)
If, when starting your “six” from a stop or driving on an uneven road, knocking noises are heard from the rear axle, and the rear of the car moves to the side on potholes, then most likely the rear suspension of the VAZ 2106 requires repair.
Most often, the rubber bushings of the reaction rods or transverse rods are to blame for the loss of vehicle stability on the road. Less commonly, the cause of unstable behavior on the road is faulty shock absorbers and springs. The price of “classic” rear suspension elements is low, and replacing them is not difficult.
Rear suspension device of VAZ-2106
You will be interested:How dangerous is the new coronavirus?
This design is a type of dependent suspension in which movement in the vertical plane of one rear wheel causes a change in the position of the other.
The rear axle is attached to the body by means of four longitudinal rods: two short, two long. The rods are connected to the body brackets through rubber silent blocks.
Vibrations that occur when the vehicle moves are damped using springs and hydraulic shock absorbers. The springs are installed with their lower ends into cups welded to the edges of the rear axle through polyurethane or plastic gaskets. The upper ends rest against the body through rubber inserts.
The travel of the rear suspension of the VAZ 2106 correlates with the length of the shock absorber rod. To prevent the spring from being subjected to maximum deformation during compression, its travel is limited by rubber buffers. Another rubber cushion, which prevents the rear axle from hitting the body, is installed above the rear axle gear housing.
Each shock absorber is fixed to two points. Through rubber hinges, the top is attached to the eyes on the body, and the bottom is secured to the bridge brackets with bolts.
Preparatory work
Before removing the beam, it is necessary to remove the shock absorbers and suspension springs. For this operation, in addition to standard keys and heads, you will need a pry bar, a jack and spring ties.
The order of operation is as follows:
- Drive the car into the pit, put the handbrake on, and install wheel chocks under the rear wheels.
- Loosen the upper nuts of the front shock absorbers located in the engine compartment (to prevent the shock absorber rod from turning, it should be held with an open-end wrench).
- Unscrew the top nuts and remove them along with the washers and springs (the location of the elements must be remembered, this will be useful during assembly).
- Unscrew the nuts securing the shock absorbers to the lower arms.
- Pull out the shock absorbers.
- Loosen the front wheel mounting bolts.
- Raise the car on a jack, place the front part of the car on supports, remove the front wheels (special supports or ordinary bricks are located under the side members at the point where they connect to the body).
Further actions are performed sequentially for the right and left levers:
- Unscrew the nuts securing the lever two turns (otherwise it will be difficult to lift it with a jack).
- Raise the end of the lever with a jack and remove the stabilizer rubber bracket by unscrewing the fastening nuts.
- Partially unscrew the nuts securing the lower ball joint and knock it out of the knuckle with a hammer (it is better to use a special puller instead of a hammer).
- Move the stabilizer through the top pin using a pry bar.
- Lower the lever and remove the jack.
- Lift the upper arm and pull out the suspension spring, prying it up with a pry bar from below.
Reinstalling the parts is done in the reverse order. Before installing the springs, they should be compressed with ties.
Replacing shock absorbers
If diagnostics reveal faulty springs and shock absorbers, then it is better to change them. It is impossible to repair the springs yourself, because this requires heat treatment, and the cost of the VAZ 2106 rear suspension shock absorbers is low enough to try to restore them.
Shock absorbers are changed with the car standing on the ground. It is more convenient to do this in the inspection hole. To do this, the car is set to the handbrake. On the side of the rear wheels, unscrew the lower bolt securing the shock absorbers. To do this, you need two 19mm open end wrenches.
The upper mount is located on the wheel side. A pin is welded to the body and is inserted into the upper eye of the shock absorber. The fixing nut must be unscrewed with the same key.
After this, a new shock absorber is installed, and everything is assembled in the reverse order. If you just need to replace the rubber bushings of the shock absorber, then the same work is performed.
Beam dismantling
The VAZ 2107 beam serves as the basis for attaching the lower suspension arms, so before removing it, the arms must be unscrewed. To dismantle the lever, simply unscrew the two nuts securing the lever axis to the beam.
The car engine is also attached to the beam. Before removing the beam, it is necessary to secure it to the hoist using the eye on the cylinder head located between the carburetor and the tee. Before hooking the engine onto the hoist, it is necessary to remove the air filter so as not to damage it. Once the engine is suspended, you can begin to remove the beam.
Unscrew the nuts securing the engine mounts to the beam.
Support the beam so that it remains in place after unscrewing from the side members. To do this, you can use a stack of boards, placing them under the part.
Unscrew the beam fastening bolts running in the horizontal plane, then the nuts of the bolts running vertically.
Raise the front of the car, controlling the beam so that it does not fall from the supports.
Repair without welding
Thresholds 2106 are very rarely repaired without welding. This is due to the fact that the “youngest” car is 13 years old, such a service life for metal is critical. If necessary, you can patch corrosion holes with metal patch or use epoxy resin, putty or fiberglass. Necessary tools that will be needed for repair:
- sandpaper R-80;
- fiberglass cover;
- epoxy resin;
- rubber spatula, roller (optional);
- solvent;
- rust remover;
- automotive putty;
- aluminum powder;
- primer;
- enamel.
Repair with epoxy resin and fiberglass goes through the following stages:
- Clean the area of corrosion with sandpaper and rust remover until bare metal.
- Prepare epoxy resin, be sure to add aluminum powder to the mixture, this will reduce the fragility of the material after drying.
- Degrease the defect on the threshold.
- Apply a thin layer of glue to the surface and cover the damage with a piece of fiberglass. Cut the patch larger than the damaged area.
- If necessary, apply several layers of fiberglass, coating each layer with epoxy resin.
- Roll each layer with a roller to remove excess air.
Epoxy glue dries for at least 12 hours at an air temperature of 20 degrees; if the repair is carried out in a damp garage, it will take at least 24 hours to dry.
If it is necessary to update the body after winter, then the repair procedure is similar; if there is no corrosion, the surface is cleaned, primed, and painted.
Process technology
The VAZ 2106 body is straightened immediately before painting the restored part:
- The surface to be treated is cleaned of dirt, washed, dried and degreased. Remove old paint from the working surface.
- Use frequent gentle blows of a hammer to smooth out the dent. If the defect is deep, then the process is performed from the edge of the damage, and gradually moves towards its center. Metal substrates are placed on the reverse side of the area to be restored. They must have the appropriate shape.
- Metal breaks are repaired using a welding machine. Next, the weld is ground.
- The area restored from damage is covered with putty. It levels the work surface.
- The putty part is sanded and painted.
The putty should be applied in a thin layer. Otherwise, the paint will become covered with numerous cracks and begin to fall off.
Rear axle VAZ 2106. Device. Gear ratio
The standard structure of the rear axle, which is equipped with the VAZ 2106, consists of a traverse and a gearbox. It is to the first that the latter is attached. It contains the main gear, which has a drive pair of gears, as well as a differential.
Rear axle VAZ 2106. Diagram
Explanation of the VAZ 2106 rear axle diagram:
- Wheel brake drum mounting bolt;
- Guide pin;
- Axle bearing oil deflector;
- Brake drum;
- Cast iron brake drum ring;
- Rear axle wheel cylinder;
- Fitting for bleeding the brake drive;
- Axle bearing;
- Bearing lock ring;
- Rear axle beam flange;
- Axle shaft seal;
- Suspension spring support cup;
- Rear axle beam;
- Upper suspension rod mounting bracket;
- axle guide;
- Differential bearing nut;
- Differential box bearing;
- Differential box bearing cover;
- Breather;
- Differential satellite;
- Main drive driven gear;
- Left axle shaft;
- Axle gear;
- Rear axle gear housing;
- Drive gear adjusting ring;
- Bearing spacer;
- Drive gear bearing;
- Drive gear oil seal;
- Oil seal deflector;
- Flange-fork universal joint;
- Screw;
- Oil deflector;
- Main gear drive gear;
- Axle of satellites;
- Axle gear support washer;
- Differential box;
- Right axle shaft;
- Brackets for fastening suspension parts;
- Axle bearing thrust plate;
- Rear brake shield;
- Rear brake pad;
- Friction lining;
- Axle shaft flange.
Malfunctions of the rear axle gearbox:
- during its operation, loud noises are heard;
- the external temperature regime of the housing increases;
- This part is constantly jamming.
In these cases, it is recommended to completely replace the components and checking the oil fluid level is indispensable. That is, you will need to buy an oil seal, bearings, and an axle shaft. However, you can immediately purchase a used rear axle.
At the same time, despite the strength characteristics of the fastening, it, due to its design features, does not have a complex structure. Therefore, even a driver who has minimal knowledge of locksmithing can handle it.
Video review on how to determine what is buzzing:
In some cases, repair work is carried out. Here, experienced mechanics must take into account one nuance - the gear ratio. Size is also of great importance. The key factor is the cost of repairs.
The gear ratio is the ratio of the number of teeth of the driven gear and the drive gear, one of the main parameters of any transmission.
The gear ratios of the VAZ classics vary and are equal:
- 3.9 — gear ratio in the “six” VAZ 2106;
- 4.1 - in the “troika” VAZ 2103;
- 4.3 - in the “kopeck” VAZ 2101.
How a faulty suspension affects the movement of the car
The suspension may have several faults. Each of them influences the car’s behavior on the road in its own way.
- Rocking when braking and when starting - this is caused by faulty shock absorbers. Their job is to dampen spring vibrations. In addition, a non-working shock absorber leads to excessive roll of the car when entering a turn at speed.
- Knocks in the area of the rear suspension of the VAZ 2106 indicate wear of the rubber inserts. If the sound occurs at the moment of starting and braking, then it may be the silent blocks of the longitudinal rods. Knocking on bumps indicates the need to replace the rubber bushings of the shock absorber mounts. The third type of knocking occurs when turning, when the rear of the car skids. This indicates the need to replace the longitudinal thrust bushings. Its function is to hold the rear axle in an exact position relative to the body. But the centrifugal force that occurs at the moment of skidding displaces the body relative to the bridge, which leads to knocking.
Fastening the beam to a VAZ 2107
The front beam of the VAZ 2107, due to its transverse location in the engine compartment, is also called a “cross member”. The car engine and lower suspension arms are attached to it. If the beam has fatigue cracks, damage, or is deformed in such a way that it allows the required wheel alignment angles to be set, it needs to be replaced. This is a very labor-intensive procedure that requires dismantling, subsequent installation and adjustment of front suspension parts. During the operation, the engine must be suspended on a traverse or hoists. It is better to carry out the work with a partner, and the replacement should be done in a pit or a lift.
Preparatory work
Before removing the beam, it is necessary to remove the shock absorbers and suspension springs. For this operation, in addition to standard keys and heads, you will need a pry bar, a jack and spring ties.
The order of operation is as follows:
- Drive the car into the pit, put the handbrake on, and install wheel chocks under the rear wheels.
- Loosen the upper nuts of the front shock absorbers located in the engine compartment (to prevent the shock absorber rod from turning, it should be held with an open-end wrench).
- Unscrew the top nuts and remove them along with the washers and springs (the location of the elements must be remembered, this will be useful during assembly).
- Unscrew the nuts securing the shock absorbers to the lower arms.
- Pull out the shock absorbers.
- Loosen the front wheel mounting bolts.
- Raise the car on a jack, place the front part of the car on supports, remove the front wheels (special supports or ordinary bricks are located under the side members at the point where they connect to the body).
Further actions are performed sequentially for the right and left levers:
- Unscrew the nuts securing the lever two turns (otherwise it will be difficult to lift it with a jack).
- Raise the end of the lever with a jack and remove the stabilizer rubber bracket by unscrewing the fastening nuts.
- Partially unscrew the nuts securing the lower ball joint and knock it out of the knuckle with a hammer (it is better to use a special puller instead of a hammer).
- Move the stabilizer through the top pin using a pry bar.
- Lower the lever and remove the jack.
- Lift the upper arm and pull out the suspension spring, prying it up with a pry bar from below.
Reinstalling the parts is done in the reverse order. Before installing the springs, they should be compressed with ties.
Beam dismantling
The VAZ 2107 beam serves as the basis for attaching the lower suspension arms, so before removing it, the arms must be unscrewed. To dismantle the lever, simply unscrew the two nuts securing the lever axis to the beam.
The car engine is also attached to the beam. Before removing the beam, it is necessary to secure it to the hoist using the eye on the cylinder head located between the carburetor and the tee. Before hooking the engine onto the hoist, it is necessary to remove the air filter so as not to damage it. Once the engine is suspended, you can begin to remove the beam.
Unscrew the nuts securing the engine mounts to the beam.
Support the beam so that it remains in place after unscrewing from the side members. To do this, you can use a stack of boards, placing them under the part.
Unscrew the beam fastening bolts running in the horizontal plane, then the nuts of the bolts running vertically.
Raise the front of the car, controlling the beam so that it does not fall from the supports.
Beam installation and suspension assembly
The new VAZ 2107 beam is installed in the reverse order of removal. When installing the engine on the beam, it is necessary to control the location of the pillow pins so that they fit into the mounting holes.
If there are no spring ties, they can be replaced with a jack and wire. To do this, you need a screw jack, used on Zhiguli and Muscovites, and steel wire. It is worth noting that this operation is very risky - if the wire breaks, the spring can “shoot”. The procedure itself looks like this:
- Raise the jack bar up so that a spring can be inserted between it and the base.
- Using two or three wire loops, tighten the spring to the jack so that it does not bend in an arc or jump out during compression.
- Compress the spring, gradually lowering the jack bar.
- Secure the spring with wire twists in a compressed state.
- Extreme caution must be used when using this method.
- If possible, be sure to use a specialized spring tie and not a jack.
- The spring must be compressed enough so that it can be easily installed, but no more. Otherwise, problems will arise when removing twisted wires.
After installing the spring in place, the wire twists must be removed using pliers. They should be removed carefully and evenly so that the spring does not bend, but falls into place.
If you find an error, please select a piece of text and press Ctrl+Enter.
Rear suspension of VAZ 2106 - design, repair, design features
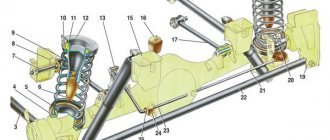
The rear suspension of the VAZ 2106 is dependent and includes a guide device, elastic elements and devices that dampen body vibrations. The rear axle beam is pivotally connected to the body using reaction rods: two lower 3 (Fig. 6.2) and two upper longitudinal 17 and one transverse 22 rods. Longitudinal rods transmit pushing and braking forces from the drive wheels through the rear axle beam to the body. The transverse rod keeps the body of the VAZ 2106 from lateral displacement. The reaction rods are attached to the body brackets and the rear axle beam through rubber-metal hinges, which are structurally identical and differ only in size. The hinge consists of a rubber bushing 2 installed in the eye of the rod, a spacer bushing 1, which passes through the hole in the rubber bushing, a thrust washer and a bolt securing the rod. The elastic elements of the suspension consist of twisted cylindrical springs 9, two main buffers 6 of the compression stroke and an additional 16. Springs under a static load of 295 kgf are sorted into two groups A
and
B.
_
The groups are marked similarly to the front suspension spring groups, i.e. group A
- yellow stripe, group
B
- green. The spring installed in the suspension rests with its upper end on the support cup 10 through a rubber insulating gasket 11, which is located in the stamped steel cup 12 of the body. The lower end of the spring rests on the cup 5 of the rear axle beam through an insulating plastic spacer 4. The main buffers 6 are installed inside the springs and secured with a mushroom-shaped clamp in the holes of the upper supports 10. An additional buffer 16 is installed on a bracket bolted to the bottom of the body. The damping device consists of two hydraulic shock absorbers.
NOTE Possible malfunctions of the rear suspension, their causes and methods of elimination are listed in the section, see “Possible malfunctions of suspensions, their causes and methods of elimination.”
Rice. 6.2. Rear suspension of the VAZ 2106:
1 - spacer sleeve; 2 — rubber bushing; 3 — lower longitudinal rod; 4 — lower insulating gasket of the spring; 5 — lower spring support cup; 6 — compression stroke buffer; 7 — bolt for fastening the upper longitudinal rod; 8 — bracket for fastening the upper longitudinal rod; 9 — suspension spring; 10 — upper spring cup; 11 — upper insulating gasket of the spring; 12 — spring support cup; 13 — rod of the rear brake pressure regulator drive lever; 14- rubber bushing for shock absorber eye; 15 — shock absorber mounting bracket; 16 - additional compression progress buffer; 17 — upper longitudinal rod; 18 — bracket for fastening the lower longitudinal rod; 19 — bracket for fastening the transverse rod to the body; 20 — rear brake pressure regulator; 21 — shock absorber; 22 — transverse rod; 23 — pressure regulator drive lever; 24 — holder of the lever support sleeve; 25 — lever support sleeve; 26 — washer; 27 — spacer sleeve
- Author: admin
Rate this article: Share with friends!
Parking brake of the VAZ 2106 car - device, design features
Front suspension of the VAZ 2106 car - design, design features
