Changing the cabin filter on a VAZ-2110 with your own hands
A cabin filter is found in almost every modern car. The VAZ-2110 is no exception. Another name for this filter element is a stove or heater filter. Some car enthusiasts not only do not change cabin filters, but do not even know where it is located. This is a fundamentally wrong approach, since air enters the cabin through this device.
Location of the cabin filter on the VAZ-2110
On a car, the cabin filter is located under the windshield on the passenger side.
The cabin filter is hidden under this decorative grille.
On models produced since 2003, this element is located horizontally, but before 2003 it was located vertically. At the same time, these consumables are not interchangeable, so when purchasing, be sure to specify which filter is needed.
In order to find this element on the car, you should carry out the following manipulations:
- Open the hood.
- Find the protective grille on the passenger side.
- This is where this filter element is located.
What is a cabin filter for?
Owners of VAZ classics have different attitudes to such issues: some believe that the absence of this element does not cause any harm to health, because drivers drove cars before it appeared, others treat their health more responsibly and try to install a filter on the car without providing for its presence. One way or another, most drivers consider such a filter element to be an analogue of an oxygen mask, allowing them to protect both the driver and passengers of the vehicle from fine particles. It’s not worth talking about people suffering from allergies (for example, to pollen) - with the onset of warm weather, for this category of citizens, staying in a car that is not equipped with a cabin filter turns out to be a real disaster.
The design of a modern filter element includes several layers, each of which is designed to retain polluting particles of a certain size. The highest quality ones have a layer containing particles of activated carbon, which makes them a reliable means of protection against unpleasant odors. That is, they work at the molecular level, preventing the penetration into the cabin of even those particles that the human sense of smell is not able to sense. But having a cabin filter is not a panacea that will protect you everywhere and always.
Over time, the filter element becomes saturated with the particles it is supposed to retain, resulting in a deterioration in its air permeability. This affects:
- efficiency of purification of air coming from outside;
- a decrease in the amount of oxygen in the cabin, which causes a decrease in driver concentration (proven fact);
- an increase in moisture content in the air, leading to fogging of windows.
That is why it is so important to monitor the condition of the filter element and, if it is heavily soiled, replace it. Unfortunately, the reality is that this filter clogs quite quickly
In any case, the manufacturer’s stated regulated 15 thousand kilometers between replacements is a clearly overestimated period. If you really value your health, this operation should be performed approximately twice as often, since the cost of the filter element is low, and the replacement itself can be performed quite quickly.
How to determine if the filter needs replacing
Dust flying out of the air ducts indicates the terrible condition of the cabin filter.
The cabin filter needs to be changed periodically. If, when purchasing a car, it is not known when the previous owner changed the filter, it is better to replace it immediately, since it is inexpensive. If you don’t want to spend even a little money, you can make a list when replacement is necessary:
- If the air inside the car has acquired a damp smell.
- Along with the air, a large amount of dust begins to fly out of the ventilation holes.
- The filter membrane has become dirty, which is immediately noticeable by its grayness.
Car manufacturers recommend replacing this element based on the total mileage. For the city, this figure is equal to 10–15 thousand mileage, for rural areas – up to 25 thousand.
Types of filters
Carbon filter.
Cabin filters come in simple and carbon types. Currently, it is not recommended to install simple filters that do not contain carbon, as it absorbs unpleasant odors. As for the choice, it is quite wide. The main thing is not to forget to mention in the store what kind of filter is needed. Cars before 2003 need one filter, and cars after 2003 need another.
Articles
The most popular elements are those with the following article number:
- 21110-8122021-83. This modification is suitable for VAZ-2110 after 2003 release.
- NF-6001c "Nevsky Filter". This filter can be installed on cars up to 2003.
Replacing a new filter
Many people consider the new type filter to be a less successful solution compared to the old one. The fact is that now not only the filter protects the interior from dust, but it itself must be protected from dirt and moisture.
The manufacturer did not take this into account, so independent modification is required so that the part can perform its direct functions.
The removal itself is also more tedious: after the frill, you also need to unscrew 4 screws with a Phillips screwdriver, then remove the cover, then the filter itself.
Replacing with a new one is not much different, but installation requires more care since you need to take into account the air direction indicated on the label.
To simplify the DIY replacement process, it is recommended to borrow a frill from Priora. Self-refinement of the frill (as mentioned above) can also help.
Actually, modification is required due to lack of tightness. That is, the cabin air filter itself is capable of working normally, but the problem is that the connection itself is leaky, like many other things, to be honest.
Any VAZ is rightfully considered a treasure trove for a skilled craftsman. There are a lot of things here that need to be improved with your own hands, but the scope for imagination is unlimited, plus the price limits for parts and various consumables allow you to experiment.
In this case, you need to take care to eliminate the cracks where the filter is installed. Gaps can be eliminated using available materials such as foam rubber, rubber, etc.
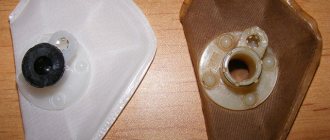
If you use filters that are not made of special material that protects against moisture (they are more expensive), then take care of your own protection. A removable cap can be made, for example, from a plastic bottle (this modification applies specifically to the horizontal view).
For other protection - from grass, leaves, dirt and dust, the filter itself is also protected in different ways: using a fine mesh made of metal or plastic. Some even use a nylon stocking.
Protecting the VAZ 2110 air filter from dirt and large debris
Removing the cabin filter on a VAZ-2110
To replace the filter, do the following:
- First you need to remove the windshield wipers. To do this, you need to unscrew a nut on each device. After this, you need to pull the wipers up and remove first one, then the second.
We turn off the wipers with a key of 10.
- The next step is to remove the decorative caps that cover the screws of the wind decorative grille.
Remove the plugs and unscrew the 4 Phillips screws.
- First you need to unscrew all the screws of the grille, then unscrew the two nuts securing the grille at the bottom.
We unscrew the screws securing the heat and sound insulation.
- After all the manipulations associated with unscrewing, you need to remove the wind grill.
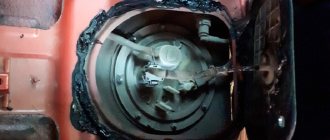
Having removed the trim, we see the cabin filter under the grille.
After this procedure, you will see a filter, but this will only happen if your car was manufactured after 2003. If the filter is visible, you need to unscrew all the screws holding the cover and remove it. After this, all that remains is to install the new part.
Here he is, all dirty and covered in dust.
Types of cabin filters
There is no official classification of products designed to provide high-quality protection of the car interior from dust and other pollutants that are abundantly present in the atmospheric air. However, experts distinguish two large subgroups of cabin filters:
- conventional dustproof ones, the main task of which is to prevent microparticles of a certain size from entering the cabin;
- coal, designed, among other things, to prevent external odors and substances harmful to human health that are in a gaseous or suspended aggregate state from penetrating into the car.
Conventional filters are made from special paper or synthetic fibers. The first such car filters were single-layer, but now the de facto standard is the presence of two layers: the first carries out rough cleaning, preventing small twigs, insects and other contaminants of similar sizes from penetrating further. The second layer performs final cleaning of the inlet air flow from fine particles and dust.
The advantage of carbon filters is their ability to resist the penetration of unpleasant odors from outside. This is achieved through the use of certain additives and activated carbon in the third layer. As is known, activated carbon is an excellent adsorber that qualitatively absorbs a wide range of volatile substances. It also does not allow the passage of the smallest particles of soot present in car exhausts, as well as powdered rubber - the result of abrasion of car tire treads on the road surface. A carbon filter can be distinguished from a regular one purely in appearance: it has a darker color, while a regular one is made from white synthetic fiber or special paper.
Domestic car enthusiasts are used to saving on everything they can. Even if he belongs to the category of very disciplined drivers, accustomed to performing all maintenance operations on time. In particular, it is not uncommon to reuse cabin filters after cleaning and washing them. There are also individuals who do not want to spend even 500 rubles on this consumable, preferring to make it from available materials - foam rubber, padding polyester and the like. Such a replacement of the VAZ-2112 cabin filter, as a rule, is characterized by extremely low efficiency - homemade filters retain no more than 20-30% of dust, which makes such an operation pointless.
Features of the “vertical arrangement”
If after removing the wind grille you do not see the filter, do not be upset. This means that it is vertical and can only be found by touch.
In older models, the filter is located deeper in the housing, but can be easily reached by hand.
Before installing a new filter element, you need to make sure that there is no dirt at its location. Any debris found there should be removed immediately. If you have an old vacuum cleaner, it is ideal for this procedure.
If you do not clean the location of the element, then dirt will immediately fall on the new part, which will make the entire procedure practically useless.
Replacing the old and new VAZ-2110 cabin filter
You can replace the air purifier in the VAZ-2110 cabin yourself. The steps are as follows:
- Unscrew the nuts on the windshield wipers and remove them. The wipers are removed only after unscrewing the bolts; you will need a 10mm wrench.
- Carefully remove the decorative caps that hide the screws of the decorative wind grille. After removing the plugs and the Phillips, the screws are unscrewed. There are only 4 of them.
- All the grille screws are unscrewed, then 2 nuts that secure the grille.
- Remove the heat and sound insulation fastening.
- Remove the windscreen. Remove the trim; behind it there will be a cabin filter.
This list of actions is suitable for the “ten” released after 2003. The last step is to unscrew the screws that secure the purifier and replace it with a new one. If after all the steps you still haven’t seen the filter device, then don’t be upset, your car just has a vertical model. To do this, you need to look for it by touch with your hands.
Before installing a new clean cartridge, you need to clean the case from dirt and dust; you can use a vacuum cleaner and be sure to wash it with glass cleaner. It is important to ensure that all surfaces are dry and clean before installing the main part. Finish by installing the windshield and doing all the steps in reverse order.
Make sure that the material is installed the right way, as if it is placed incorrectly, the part will be useless. Carefully examine the new packaging or take a photo of the part before removing it.
Installing a new part
Before installing a new filter, wipe the housing from dust!
The new part is simply placed in place of the old one.
In this case, you need to make sure that there is no moisture at the installation site. Installation of the wind grill occurs in the reverse order.
We insert a perfectly clean new filter into place.