The braking system ensures the safety of the car. One of the main components of this system is the brake pads. The braking efficiency depends on their reliability and quality. The pads have a certain service life, so it is necessary to periodically check and replace them.
What are they used for?
When you press the brake pedal, the pressure in the hydraulic system increases and the pads are pressed against the surface of the brake disc or drum. Structurally, a brake pad is a plate on which a lining made of a special material is attached. It contains various components: special rubbers and resins, ceramics, synthetic fibers. The composition may vary depending on the manufacturer. The main requirements that the lining must meet are high wear resistance and the ability to withstand high temperatures, resistance to destruction, but at the same time the material must cause minimal wear of the brake disc.
What are there
The VAZ 2106, like other “classics”, has disc brakes at the front and drum brakes at the rear.
Front brakes
The front end braking system is designed as follows:
- The brake disc is attached to the hub.
- The caliper is fixed to the steering knuckle of the suspension and holds two working cylinders.
- The brake pads are located between the disc and the cylinders.
When you press the brake pedal, the pistons move out of the cylinders, press on the pads and clamp the brake disc together. As a result, the car gradually slows down. The more force is applied to the brake pedal, the harder the pads clamp the disc.
The front brake pads are flat and smaller in size compared to the rear ones.
Rear brakes
Drum brakes on the VAZ 2106 consist of a drum itself, two shoes, a hydraulic cylinder and springs located under the drum. The pad linings are fixed using rivets or adhesive. The lower part of the pads rests against the supports, and the upper part rests against the cylinder pistons. Inside the drum they are tightened by a spring. To allow the wheel to rotate freely when stopping the car is not required, there is a gap between the pads and the drum.
When the driver presses the brake pedal, fluid is pumped into the slave cylinder, causing the pads to spread apart. They rest against the drum, thereby causing the rotation of the wheel to slow down.
Which ones are better
Owners of Zhiguli cars are often faced with the issue of choosing brake pads. The modern auto parts market offers products from different manufacturers. The parts differ in both quality and cost. The following brands of brake pads can be installed on VAZ cars:
- Ferodo (UK). The best products for brake systems that can be found on the automotive aftermarket today. The products are of high quality because they are made from reliable materials.
Prices for brake pads for VAZ 2106 start at 350 rubles. (AvtoVAZ) and reach 1,700 rubles. (ATE).
Adjusting the brakes
To correctly perform operations on adjusting the rear wheel brakes and handbrake , you can use the following recommendations:
- prepare the necessary tools for this case: a 13 mm open-end wrench, pliers, a combination wrench for fastening wheels, a 17 mm socket wrench. and probe 0.1-0.15 mm.
- place the car on an overpass or inspection ditch
- remove the rear wheel caps and loosen the wheel bolts
- raise the rear of the car and install stands
- Unscrew the wheel mounting bolts and remove the wheels.
It should be recalled that performing the described operation is quite inconvenient, since an assistant is required, who must be in the car while checking the brakes and carry out your simple commands.
If such an assistant is found, he, at your command, must press the brake pedal, and at this time, by rotating the drum, you determine whether the pads are in contact with the drum mirror.
If adjustment is required:
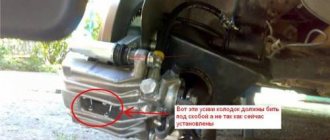
- keeping the pads pressed, turn the nut of the adjusting eccentrics 1 and 2 until they come into contact with the pads
- After releasing the brake pedal, turn the nuts in the opposite direction by about 10° so that the gap between the pads and the drum mirror is 0.10 - 0.15 mm.
- use a feeler gauge to check the set gap
- To be more sure, press the brake pedal sharply 3 - 4 times and check the gap again. If necessary, the adjustment should be repeated
- install the wheels, tighten their mounting bolts and check for ease of rotation. The wheels should rotate completely freely.
Scheme for adjusting the gap between the brake pads and the brake drum
There are times when the required gap between the pads and the drum cannot be established. This is a symptom of excessive wear on the brake pads and should be replaced with new ones.
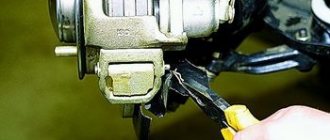
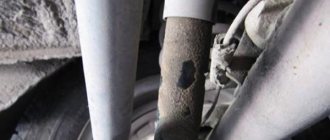
The linings are replaced, naturally, with the drums removed. Removing a brake drum, even in a service station, is a rather labor-intensive operation.
The fact is that during operation, as a result of electrochemical corrosion, a drum cast from an aluminum alloy is, as it were, “welded” to the flange flange of an axle shaft made of steel. There are numerous recommendations and tips on how to quickly remove the drum.
It should be recalled that the use of various types of pullers does not give the desired result; moreover, the puller most often breaks the drum collar.
The easiest way to remove the drum is to use two mounting bolts 1, which are screwed into the technological holes 2 until the drum separates. However, as practice has shown, this method is effective when the car is “young”, i.e. its mileage is 3-5 thousand km.
If you cannot remove the drum using this method, you can do the following as a last resort:
- unscrew the guide pins from the drum
- lubricate the drum seat on the axle shaft with engine oil, start the engine and press the brake pedal
- engage first gear.
With the help of the described manipulations, it is almost always possible to free the drum, since it is held in place by the blocks, and the axle shaft rotates.
While rotating, the axle shaft makes a very unpleasant squeaking sound, but after 10 - 15 seconds, you can turn off the engine, release the brake pedal and remove the drum.
Brake pad malfunctions
The following characteristic signs indicate problems with the pads:
- sounds unusual for brake operation (creaking, squealing, grinding);
- car skidding when braking;
- the need to apply more force to the brake pedal;
- black or metal dust on wheels;
- increased braking time;
- The pedal does not return to its initial position when released.
Screech
Brake pads must be changed when the friction material thickness reaches 1.5 mm. If this is not done, a grinding (squealing) sound will occur. In addition, such sounds may be present when installing low-quality pads.
If the brake pads are heavily worn, a squealing or grinding noise may occur when braking.
Shocks when braking
The appearance of shocks during braking can be caused either by the condition of the pads themselves, or by a damaged surface of the brake disc or drum, soured pistons in the cylinders, or other malfunctions. To identify the problem, you will need to disassemble the brake mechanism and carefully inspect the parts for wear and damage.
Car skidding
There can be many reasons for skidding - severe wear of the pads, damage to the discs, loose caliper mounts or suspension malfunctions.
Once a situation arose with my car when, while braking, the car began to pull to the side. It would seem that it is necessary to diagnose the brake system. However, after a detailed examination, I discovered that the cause of this phenomenon was a damaged longitudinal rod (rod) of the rear axle. It was simply torn from the eyelet. After replacing this part the problem disappeared.
Video: why a car pulls to the side when braking
Stiff or soft pedal
If you notice that the pedal has become unusually tight or, conversely, soft, then most likely the pads have become unusable and will have to be replaced. Additionally, it is worth inspecting the hoses supplying fluid to the brake cylinders and the cylinders themselves. If the piston sticks in them, then the problem with pedal stiffness may also manifest itself because of this.
Appearance of plaque
Plaque can appear both when using low-quality pads, which leads to their rapid erasure, and with normal parts. However, in the second case it should be minimal. Dust can also appear during aggressive driving, i.e. during sudden starts and braking.
The appearance of black coating on wheels can be caused by active driving.
From personal experience I can say that after installing the front pads from AvtoVAZ, I observed black dust on the discs. The plaque was clearly visible because the discs were painted white. From this I can conclude that the appearance of black dust from the process of erasing the pads is a normal phenomenon. Perhaps installing more expensive parts will help get rid of this phenomenon. However, if you are sure that the car has good quality pads and their condition is normal, then there is no reason to worry.
Pedal sticking
If the brake pedal does not move back when pressed, this indicates that the pad is sticking to the disc. This phenomenon is possible in frosty weather when moisture gets on the brake elements, but it would be useful to inspect the pads. If the car cannot be stopped for a long time when you press the pedal, then the reason lies in worn out pads or air getting into the hydraulic system. You will need to inspect the brake components and possibly bleed the brakes.
Replacing rear brake pads on VAZ 2101-2107 cars
Reasons why you should start replacing the rear brake pads on VAZ-2101, VAZ-2104, VAZ-2105, VAZ-2106, VAZ-2107, Classic cars:
- The thickness of the rear brake pads is less than 2mm
- The lining of one of the pads has come off the metal surface (brake pads are always replaced as a set).
- oil or brake fluid getting on the linings.
List of tools and choice of work location for replacing rear brake pads on VAZ-2101-2107, Classic cars. Everything is simple here. It is better to carry out the work on a viewing hole or a lift, for two reasons - convenient access to the parking brake adjustment mechanism and the ability to quickly remove a stuck rear brake drum. An arsenal of necessary tools: a hammer, pliers, socket wrenches for 12, 13 and 7. Also, a special hook for removing and installing the tension springs of the rear brake pads will be useful. You can make such a device yourself or buy its analogue at the car market. Yes, you can do without it, using a screwdriver or pliers, but it will waste much more nerves.
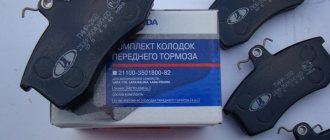
Front brake pads ATE VAZ 2101-2107 (set)
- We guarantee fast processing of your order during business hours (we work from 11-00 to 20-00, Saturday and Sunday are days off).
- We guarantee reliable packaging of your order (when sending it by Russian Post or transport company).
- We guarantee the fastest possible dispatch of your paid order (within 2-4 business days after receipt of payment).
- We guarantee a refund or exchange for another product (with recalculation) within 14 days from the date of receipt of the order (the product must be in good condition, without traces of installation, delivery costs are not reimbursed).
- We guarantee a free exchange of goods (transportation costs at our expense) if the purchased goods turn out to be defective.
Payment Methods
Delivery in Russia and abroad
Pickup in Moscow
- Description
- Reviews
APPLICABILITY: VAZ 2101, 2102, 2103, 2104, 2105, 2106, 2107.
The largest manufacturer of automotive security systems in the world!
The company's work is divided into 2 areas: Continental Temic - electronic components and Continental Teves - one of the world-famous manufacturers of electronic and hydraulic brake systems, chassis control systems, electronic air suspension systems, sensors.
Continental Teves works closely with Continental Temic as part of the joint operation of Continental Automotive Systems (CAS), which allows them to jointly create unique solutions.
ATE Products:
— Brake discs — Sports brake discs (Power Disc) — Motorsports brake pads (Power Pad) — Brake pad kits — Repair kits — Brake master and slave cylinders — Clutch master and slave cylinders — Brake calipers — Handbrake and clutch cables — Brake hoses
ATE supplies its products to all major car manufacturers, including VAG (VW, AUDI, SKODA), FORD, GM, BMW, TOYOTA, etc.
Replacing the rear brake pads of a VAZ 2107
Removal
This can be done both in the pit and on a lift. The main thing is to gain access to the torso of the handbrake. We put the “shoes” under the front wheels and get started.
Important! To change the rear pads, you need to remove the drum, and to do this, you cannot put the car on the handbrake or raise the handbrake lever to the top position. In this case, they will spread out in different directions, press against the walls of the drum and it will not be possible to remove it.
If you change pads, no matter the front or rear brakes, always change them in pairs - on two wheels of the same axle. Thus, there will be uniform wear and the wheels will brake with equal efficiency. Otherwise, you may spin out during emergency braking.
- Release the cable for adjusting the handbrake tension.
This is necessary so that the pads are not separated. Even a slight dilution can make it difficult to remove the brake drum. Let us remind you that the cable adjusting nuts are located under the car, in the center under the bottom. They are easy to find, one cable runs from the front of the car, and through these nuts it splits into two rear wheels.
- We hang the wheel, put stops under the front wheels, remove the wheel
- We clean the contact area between the drum and the axle shaft from dirt and rust.
You can use a metal brush or knife. We fill this place with WD-40; if it is not there, we make a WD-40 with our own hands and wait.
- We unscrew the guide pins and try to remove the drum from the axle shaft.
Often a bummer awaits us at this stage. He may get stuck well and won’t want to take off. In severe cases, he does not even move, there is no backlash. What to do in this case?
There is a folk method. In order to move the drum at least a little and rip it off the axle shaft, you need to start the car and accelerate the car into second gear as hard as possible and sharply press the brake. In most cases, the drum will fall off the axle shaft, sometimes it will fly out in the direction the wheels are moving.
Let's move on to the second stage of removal. The drum has some play, wobbles, spins around its axis, but does not want to come off the brake mechanism. In this case, you can use an impact tool - a hammer or use bolts as pullers.
The first option is more rigid, there is a chance of damaging the drum or splitting it into pieces. We climb into the hole, take a wooden block, place it against the edges of the drum and tap it with a hammer. Make a couple of blows on one side, turn the drum, make a few precise blows on the other side. Thus, it will gradually come off the brake pads. The main thing is that he doesn’t go skewed and catch the wedge.
The second option is bolts, like pullers. When unscrewing the guide pins, pay attention to the technological holes in the drum. They, unlike the holes for the pins, are threaded. We select bolts of the required diameter, usually “13”, and screw them in. We begin to tighten them evenly. They rest against the axle shaft, we twist them further. They pull the drum from the brake mechanism along the thread.
Important! The second option can be used if there is play in the drum and it rotates freely around the axle axis. Otherwise, you can “turn” the head of the bolts without achieving results.
Video on how to remove a brake drum, method 1 - severe case:
Video on how to remove a “stuck” drum using bolts as pullers (Method 2):
- Remove the washers of the support cups.
For ease of dismantling, it is recommended to start with a pad without a handbrake lever. Scroll the top washer until the pin matches the slot in it.
Recommendations
If for some reason you do not want to install new ones, then you can swap the inner pad with the outer one. Thanks to this, their wear will be uniform, and they will brake with uniform force.
Front brake pads are replaced when the friction lining thickness is 1.5 cm or less. With such wear, you will be bothered by squeaks and squeaks when you press the brake, and the quality of braking will be worse.
Remember, a properly functioning braking system is the key to safe driving.
Before you start removing it, it is recommended to buy a repair kit for the front calipers. It includes: “gulls”, guide fingers, and their springs. This is necessary so that during the replacement process the pressure springs may “fly out” in an unknown direction, the fingers will not want to lick out of their seats, they will have to be cut off, the guide springs and “gulls” may lose their elasticity.
Before installing the fingers, it is recommended to lubricate them with a thin layer of lubricant (lithol) so that they fit freely into the holes. If the new pad does not want to “climb” into place, you need to try to recess the piston of the brake cylinder even more or lightly tap it with a hammer, driving it in. Knock only on the steel part of the block, without catching the feredo. It will fit in with tension, but after several tens of kilometers it will rub in and take its position.
Before leaving, be sure to press the brake pedal several times to bleed the brakes. During the replacement process, we compressed the cylinder pistons; now they need to be returned to their original position so that they press the pads against the brake discs. Don't be alarmed, the pedal may fall to the floor the first two times. After the brake fluid fills the cylinders, it will regain its former elasticity.
We remove the old ones
We jack up the rear wheel of the VAZ 2107 and remove it. You must first take the necessary safety measures: install shoes under the wheels, place a safety stand under the body. This task is usually not difficult. Next it will be a little more difficult. It happens that the brake drum gets stuck to the axle shaft, and it is impossible to remove it using standard means.
In this case, the drum is “torn off” - the guides are unscrewed, the car is started, the gear is engaged and the speed is increased, and then the brake is sharply pressed.
Be very careful when performing this operation - ensure that the VAZ 2107 is securely secured so that it does not fall off the jack.
- We remove the brake drum and check the condition of the brake pad linings. In addition to wear, there may be a partial breakage of the linings, since, unlike the front ones, the rear ones are not solid. We determine whether one or both pads need to be replaced.
- Using a flat-head screwdriver, remove the lower tension spring;
- Using pliers, remove the spring clamps from the guides, turning them until the slots match;
- Using a screwdriver, press on one end of the upper spring and remove it.
This is the last action, after which nothing holds the pads anymore, and they fall.
Sequence of actions when replacing rear pads
Preparatory stage: a set of automotive tools, rags, liquid for removing deposits, a new parking brake cable, graphite-based lubricant.
- We install the car on the inspection hole, fix the front wheels with wheel chocks, remove the rear wheel;
- Underneath the bottom, we unscrew (loosen) the handbrake cable for the convenience of carrying out maintenance work;
- Gently tap the drum guide bolts with a hammer. During operation and installation/disassembly, the bolts stick and are difficult to unscrew. If tapping does not help, spray with liquid to remove deposits, wait 10 minutes, then start unscrewing;
- After removing the drum cover, pay attention to the position of the parking brake lever. If it is not located near the lever, it means it is jammed and must be replaced. If you ignore this signal, it will be problematic to install the drum in its normal position;
- Remove the upper pressure spring, press the strut support, and turn it until it completely coincides with the slot. Remove the two cups and the spring from the stand;
- Disconnect the cable shank from the handbrake lever. We clean the disc from dirt, deposits, and rust;
- We carry out troubleshooting of the brake cylinder and seals. If there are signs of wear, leakage, or deformation, replace it with a new repair kit;
- We remove the parking brake lever from the old pads, take out the cotter pin and washer;
- Please note that the left and right levers are different and not interchangeable. Next, you need to install a spacer bar and move the pads apart. When installed correctly, the lugs are vertical;
- We start a new cable, fix it in the eye;
- We install new pads and assemble the structure in reverse order. If you have any difficulties with installation, it is better to watch the video presented in this manual.
The final stage: adjusting and tensioning the handbrake lever. In accordance with the requirements of the instruction manual, the handbrake should clamp the pads already at 5–6 clicks. Exceeding the norm indicates weakening, and decreasing indicates excessive tension.