A modern car is literally crammed with complex electronics, which are not so easy to repair. It is for this reason that car owners, at the slightest problem with on-board electrical devices, do not fool themselves, but immediately contact the nearest car service center. However, there are exceptions to this rule. For example, if the diode bridge on a VAZ 2107 is burnt out, then you can completely refrain from visiting a car service center and replace the burnt-out device yourself. Let's figure out how this is done.
- Signs and causes of diode bridge failure
- How to ring a diode bridge on a VAZ 2107
We check the diode bridge with a regular light bulb
- Checking the diode bridge for open circuit
- Checking the diode bridge with a household multimeter
- Sequencing
The main function of the diode bridge on the VAZ 2107
The diode bridge is an integral part of the VAZ 2107 generator. The car's generator produces alternating current. And the main task of the diode bridge is to convert the alternating current of the generator into direct current of the on-board network with subsequent charging of the battery. That is why car enthusiasts usually call a diode bridge a rectifier block. The peculiarity of this unit is that it allows direct current to pass only towards the battery. The current passed through the diode bridge is subsequently used to ensure the operation of the heater, low and high beam headlights, side lights, audio system, etc.
It will not be possible to charge the VAZ 2107 battery without a diode bridge
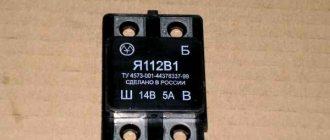
The charging voltage in a VAZ 2107 car ranges from 13.5 to 14.5 volts. To provide the required voltage, 2D219B diodes are most often used in the diode bridges of this car.
Finding a 2D219B diode on sale is becoming more and more difficult every year
And there is a diode bridge inside the VAZ 2107 generator. And in order to get to the bridge, the car owner will first have to remove and disassemble the generator. There are no other options.
Diagnostics
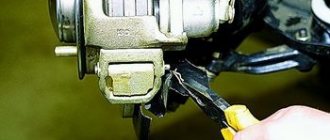
The diagnostic procedure must be carried out on a dismantled generator device, so the unit must first be removed. When the mechanism is dismantled, the plastic cover is removed from it, as mentioned above, the DM is located immediately behind it (the author of the video about self-diagnosis with a multimeter is Ramil Abdullin).
For diagnostics you will need a tester - a multimeter - the test is carried out as follows:
- First, the multimeter should be activated in ohmmeter mode. Having done this, the positive probe of the tester must be connected to the diode bus.
- In the same way, connect the negative probe of the tester to the corresponding contact on the diode bridge.
- Next, you need to monitor the tester readings. If the diode bridge is in working condition, then the tester display will show values close to infinity. If there are no such values, then most likely the DM is inoperative and should be replaced. But the diagnosis does not end there.
- Next, you will need to swap the location of the probes, that is, the negative contact is connected to the positive one and vice versa. Having done this, again look at the multimeter reading on the display. If there are no failures in the operation of the DM and the device as a whole is functioning normally, then a value of several hundred Ohms should appear on the tester screen.
- If the DM is equipped with an additional diode, then you can check it too. In this case, the diagnostic procedure is performed in a similar way; you just need to repeat all the steps.
Photo gallery “Self performance test”
Signs and causes of diode bridge failure
As mentioned above, a generator equipped with a diode bridge is the most important component of a car. If the alternator fails for some reason, the battery will stop charging. And this is the only sign of a faulty diode bridge. Without additional recharge, the battery will work for a few hours at most, after which the car will be completely immobilized. A diode bridge fails when one or more diodes burn out in it. Here are the reasons why this happens:
- moisture has entered the generator. Most often, this is condensation that forms on the internal surfaces of the generator in the autumn-spring period, when relatively warm weather alternates with frosts;
The diode bridge burned out due to moisture getting into the VAZ 2107 generator - The diode has simply exhausted its resource. Like any other part, the diode has its own service life. The manufacturer of 2D219B diodes claims that the service life of their products is about 10 years, but after this period no one guarantees anything to the car owner;
- The diode burned out due to the negligence of the car owner. This usually happens when a novice car enthusiast tries to “light” his car from another car and at the same time confuses the battery poles. After such an error, the entire diode bridge and part of the generator usually burn out.
Generator diode bridge repair
Greetings!
The following short article will be of interest to those who are interested in repairing everything themselves.
We will talk about how to repair a generator diode bridge.
Everything is written using the example of a generator from Delta Autotechnik. This generator was installed on an Opel Vectra B with an X25XE engine and worked on the car for about 1 year. Signs of a malfunction in the battery charging system were: at first, spontaneous blinking of the charging lamp, then this lamp lit up constantly.
Removing the generator on this machine is a very labor-intensive task. The generator is located in a very inconvenient place (inconvenient not because it is inconvenient to talk about it)). To remove the generator, you need to unscrew the front part of the muffler, and unscrew and pull the right axle shaft out of the gearbox. They wrote somewhere on the forums that you can unscrew the right side of the subframe and, lowering it, pull out the generator. In general, hemorrhoids are still the same. Because of all this, you want to blame the generator or voltage regulator, or diode bridge, as a last resort. It’s better to double check a hundred times and make sure that it is the generator that is to blame. First you need to measure the voltage on the battery with the engine running. If the voltage is less than 13 V, then the charge is not happening.
Important note! Do not disconnect the battery from the on-board power supply of a running vehicle to check the functionality of the generator. Why? Read the article about checking the generator.
Then you need to check the voltage directly at the generator contacts going to the battery. What if something happened to the wire. On the above car, you need to measure quickly, since the exhaust pipe of the muffler is nearby, and it heats up almost immediately after starting the engine. If there is no voltage coming from the generator (or less than 13 V), then sadly, you need to remove the generator from the car.
Next, we separately check the voltage regulator and diode bridge.
I recently purchased a very good compact multimeter that you can always carry in your car. Here's his review. You can order one using this link.
In my case, 2 diodes burned out, but the rest swollen, most likely from overheating
Therefore, it is better to replace all 6 diodes with new ones.
First you need to find out what current the new diodes should be rated at. If the generator is 100-amp, then you can take 35 A diodes (since there are 3 diodes for each pole). The voltage can be taken from 200 V and above. I chose diodes from HC-Cargo . This is the first thing that was found. And the website has photos of diodes, which is very convenient. If you search on the website of this company, you need to sequentially select Alternator Components -> Alternator Parts -> Rectifiers -> Rectifier Parts -> Diodes. Next, a very important parameter is the diameter of the diode if the diode is press-fit . It is advisable to measure the diameter of old diodes. In my case, the diodes had a press-in diameter ( OD ) of 12.7 mm (1/2″). Positive polarity ( Polarity Positive ) means that the pressed-in part is the cathode, and the protruding lead ( Lead ) is the anode. For negative polarity ( Polarity Negative ) everything is exactly the opposite. For the rectifier bridge of the generator you need 3 diodes of positive polarity and 3 negative. For the Delta Autotechnik generator, I ordered diodes with article numbers: 130911 and 130912.
Replacing diodes. Everything below applies to the generator from Delta Autotechnik. But the principle is the same for everyone. I did this option, but everyone can come up with their own replacement option. The diodes are pressed into aluminum plates. To press out old diodes you will need a punch with a diameter slightly smaller than the diameter of the diode. And if there is a tube with a diameter of 14-15 mm, then it is better to place it on the opposite side. And just use a hammer to knock out the old diodes. New diodes must be pressed in on the same side from which the old ones were knocked out. It is also better to place the handset on the opposite side. Then, it is better to drive new diodes through a wooden block.
Before pressing in new diodes, it is better to check again with a multimeter which diodes are pressed into which plate of the diode bridge.
Diodes with negative polarity (Polarity Negative) are pressed into the plate that lies below and has contact with the generator housing. The diode bridge is assembled in the reverse order of disassembly.
The generator housing is very rough. Therefore, before installing the bottom plate with diodes, which has contact with the generator housing, it is better to lubricate the place where it contacts the housing with a thin layer of thermal conductive paste. The paste is applied in a very thin layer, just to fill the smallest surface irregularities and create a homogeneous environment to improve heat transfer.
The diode bridge is installed in its place. The winding terminals are clamped and/or soldered to the corresponding bridge contacts.
Leave a message:
[contact-form-7 id=”3550" title=”Contact Form 1"]
See also:
Repair of generator diode bridge updated: November 23, 2019 by Deneb-80
What causes the need to replace diodes
Someone will say that it is much easier to take and replace the diode bridge completely. However, the cost of a diode bridge for a foreign car varies from 1000 to 4000 rubles, sometimes the price is even higher. Depends on the brand of the car, the type of generator, whether it is an analogue or an original. New diode bridge or under contract. You ordered a diode bridge online, you thought it was new and original, but an unscrupulous storekeeper put a Chinese equivalent in your package. Go figure it out right away.
Many, having replaced the diode bridge on their generator, prefer not to throw away the old one, but to repair it and leave it in their stash.
The question is that not everyone can independently remove a bad diode and press in a new one. It is best to turn to the services of professional craftsmen at a service station. The diode bridge repair process is streamlined and will not take much time.
For example, in auto repair shops in Lyubertsy, repairing a diode bridge will cost only 800 rubles. For this symbolic amount you get a reliable and tested “native” diode bridge, especially since the company has a cumulative discount system, so there is every chance of getting a diode bridge even cheaper. For more details about prices, see the price list.
Checking the diode - how to do it right
Based on the fact that a diode is a semiconductor device that passes current only in one direction, let’s begin the test.
· The diode bridge must be removed. Diodes need to be checked individually, disconnected from the general circuit. The test must be performed in the “diode check” position.
· We touch the bottom of the diode with one of the probes, and its terminal with the other. The amount of resistance depends on the power of the semiconductor. The resistance should be in the range of 400 - 800 Ohms, that is, the diode passes current in this direction.
· Swap the probes. A unit on the multimeter screen is evidence that there is no conductivity in this direction. This means the diode is locked and intact.
· Otherwise, if the tester shows the presence of resistance (current flow) in both directions during testing, this indicates a diode malfunction.
Important to remember. When checking diodes located on the same plate, the resistance should not differ. The permissible maximum is 5 Ohms, no more. The presence of a diode with a large difference in readings indicates its poor performance and subsequent charging problems. Therefore, it is advisable to change the diode.
Checking diodes with a tester is very conditional; you can more accurately verify the integrity of the diode only under load, for example, by connecting a lamp to the circuit or on a diagnostic test bench at a service station.
Rectifier design
In the literal sense, a rectifier is not able to “straighten” alternating voltage. This unit received its name because of the operating principle of the diodes included in it:
- alternating current periodically changes the direction of movement in the circuit;
- diodes pass it in only one direction and cut off currents of reverse polarity;
- so that power surges in the network are invisible to the powered consumer, 3 diodes are installed in one direction, the remaining 3 in the other.
Currently, high-power diodes have a classic design; low-power semiconductor devices of this type are made in the form of a silicon junction on a board. However, to remove high temperatures from the body or silicon junction, both modifications are either embedded in the heat sink plate or equipped with their own individual radiators.
If a silicon junction or a full-fledged diode in the housing breaks down, the diode bridge of the generator or individual semiconductors included in its composition must be replaced.
Main diode bridge
The lower figure shows sinusoids and the direction of current movement in the generator and diode bridge.
The positive value is conditionally taken to be the voltage directed to the 0 point of the stator winding. After the rectifier, the current in the consumer load flows only in the positive direction, that is, from the “+” of the generator to its mass “-”.
Therefore, the power diode bridge (main) uses large-sized 25 - 30 A diodes, the power of which can be further increased due to the additional rectifier arm discussed below.
Purpose of the rectifier
Since alternating current generators are more advanced, compact and repairable compared to direct current modifications, a generator diode bridge is added to the design by default to convert alternating current to direct current.
In other words, without a rectifier assembly, electricity will be generated by the generator windings, but will become unusable for the on-board network and battery. Headlight lamps, air conditioning compressor windings and electrical circuits of other consumers will burn out, and the engine will not be able to start.