Disassembly
Required : engage first gear and place shoes under the wheels. Prepare a narrow chisel, a 30mm socket, pliers, a needle file and a standard set of tools. The wheel bearing can be replaced on a level surface, but it is more convenient to do so on an inspection ditch or a lift.
Procedure:
- Remove the hub cap.
- Straighten the dented shoulder of the wheel bearing nut in two places using a narrow chisel.
- Loosen the hub bearing nut using a 30mm socket. The head and driver must be strong enough to transmit the required force.
| If while driving you notice that there is something humming in the front suspension, then most likely the problem is in the front wheel hub, in the bearing. You can replace the front wheel bearing yourself, but this will require some experience. |
Loosen the wheel mounting bolts, and then hang both front wheels, otherwise the anti-roll bar will interfere with dismantling, pushing the suspension elements up. Remove the wheel, the brake pad guide together with the caliper and the brake disc (tie them so that they do not hang on the brake hose).
Installation of parts for repair and replacement
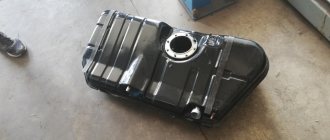
Replacing the front hub is not difficult if you have sufficient qualifications. To do this, you need to study its structure and the sequence of work. Then you need to prepare the following tools:
- jack for lifting a car;
- a set of different heads;
- wrenches for “17” and “22”;
- a special puller used to remove ball joints;
- a universal key for unscrewing the wheel.
To ensure safe work, a rigid and reliable support is installed under the vehicle, and the wheels are secured with shoes to prevent rolling. Replacing the rear hub requires the same measures. Removing the front hub of a VAZ 2110 is carried out in the following order.
- Use a punch or screwdriver to remove the protective plastic cap covering the bearings in the center. If it is damaged, you will need to install a new one.
- Using a chisel, the shoulder of the bearing nut is straightened.
- The car is secured using the handbrake and boots. You also need to engage first gear.
- The nut is loosened using a strong 30mm socket.
- The wheel nuts are loosening.
- Both front wheels are supported using jacks or a lift, following the safety precautions described above. It is important to suspend both wheels, otherwise the transverse stabilizer will not allow the hub to be removed.
- We remove the wheel and the brake caliper, which is bolted to the back of the VAZ hub along with the pads, and move it to the side so as not to damage the hose. If you have an anti-lock braking system, the ABS sensor is removed.
- Remove the brake disc. It should move freely, since it is attached only to the wheel studs.
- Completely unscrew the nut from the front hub axle. Remove the support washer.
- Using a little force, we remove the main part. If this does not happen, then you need to pass two diametrically opposed bolts through the brake disc, which are screwed into the holes of the hub. Then pull the disc forcefully.
Failures in the chassis of the car, design and fastening of the hub
Experienced motorists can easily diagnose problems with the car's chassis. These include:
- body swaying when turning or braking;
- uneven abrasion of the tire surface;
- easy compression of shock absorbers or leakage;
- constant deviation of the car to the side from straight-line movement;
- increased vibration;
- extraneous sounds when driving.
The causes of these phenomena are most often unacceptable wear of suspension parts, poor mounting of shock absorbers, and incorrect wheel alignment. Broken joints and deformation of at least one lever can also cause trouble. The front wheel hub of the VAZ 2110 is most susceptible to failure in front-wheel drive cars, to which this model belongs.
Most cars with front-wheel drive have independent telescopic front suspension and hydraulic shock absorbers with springs. Stabilizers are located on the lower wishbones. The hub itself is attached to the lower arm through a ball joint with a nut and to the shock absorber with bolts. It communicates with the steering rod through the steering knuckle.
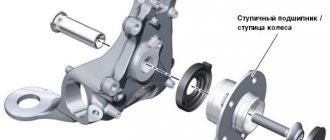
The part is cast from durable steel, and inside it there is a bearing, which is the most vulnerable element. Its failure is indicated by extraneous noise when moving. The brake disc and brake caliper with pads are also attached to the hub. Unlike the rear hub, the front hub is more complex, so repairing it requires more care and skill.
How to replace the front wheel bearing of a VAZ 2110 without dismantling the steering knuckle
In order to quickly remove the wheel bearing without removing the hub itself and the entire steering knuckle, you need to secure it well, put the car on the handbrake, remove the wheel (after unscrewing the hub nut with a “30” wrench).
After this, you need to perform all the same steps as when replacing a brake disc: remove the caliper and the brake disc itself. To dismantle the hub you will need 2 head bolts and a brake disc. We screw the studs (bolts) evenly into the hub through the holes of the brake disc. Next, you should gradually pull off the hub with sharp jerks. Or use a hammer to knock it out through the disk.
As a result, the hub will come out of the steering knuckle, leaving the inner part of the bearing on it, and the outer part in the steering knuckle (trunnion).
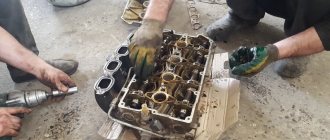
To press out the bearing, perform the following steps:
Pressing out the bearing with a puller
- Remove the retaining ring (it’s most convenient to use a ring puller).
- Using the socket “17” we unscrew the ball joint.
- We move the rod and lever down, move the steering knuckle and pull out the grenade.
- To press out the bearing, you need to use a special puller (article 77722), which consists of a bolt, a support washer, a cup, large, medium, small washers and a nut.
- Before installing the puller, it is necessary to remove the second retaining ring from the inside of the steering knuckle.
- On the same side we install the puller cup, and on the outer side we install a washer and screw the nut onto the bolt.
- By gradually tightening the nut, you will be able to press out the bearing.
- After removing the old bearing, you need to replace the retaining ring from the inside of the knuckle (it will support the new bearing).
- Then we press in the new product using the same puller, turning it in the opposite direction.
Finally, install the hub, brake disc and caliper in reverse order.
1.6.3 Fastener dimensions
Fastener dimensions
For many reasons, vehicle manufacturers are using metric fasteners more and more widely. However, it is important to know the difference between the sometimes used standard (also called American, or SAE standard) and the more universal metric fasteners in the system of measures, since, despite the external similarity, they are not interchangeable.
All bolts, both standard and metric, are classified by diameter, thread pitch and length. For example, a standard 1/2 - 13 x 1 bolt is one-half inch in diameter, 13 threads per inch, and 1 inch long. A metric bolt M12 - 1.75 x 25 has a diameter of 12 mm, a thread pitch of 1.75 mm (the distance between adjacent turns) and a length of 25 mm. Both bolts are almost identical in appearance, but are not interchangeable.
In addition to the characteristics listed, both metric and standard bolts can be identified by inspection of the head. For starters, the distance between the flats of a metric bolt head is measured in mm, while that of a standard bolt is measured in inches (the same is true for nuts). As a result, a standard wrench is not suitable for use with metric fasteners, and vice versa. In addition, the heads of most standard bolts usually have radial notches that determine the maximum permissible tightening force of the bolt (strength rating). The greater the number of notches, the higher the permissible force (on cars, bolts with a strength rating of 0 to 5 are usually used). The strength class of metric bolts is determined by a numerical code. The code numbers are usually cast, as for standard ones, on the head of the bolt (on cars, bolts of strength classes 8.8, 9.8, and 10.9 are usually used).
| Marking of bolt strength class (top - standard/SAE/SS, bottom - metric). |
Also, standard nuts can be distinguished from metric ones by strength class marks. To identify the strength of standard nuts, dot marks are used that are stamped on one of the end surfaces of the nut, while metric nuts are marked using numbers, again. The greater the number of points, or the higher the digital code value, the higher the permissible tightening force of the nut.
The ends of metric studs are also marked according to their strength class. Large studs are marked with a digital code, while smaller ones are marked in the form of a geometric figure.
It should be noted that a significant part of the fasteners, especially those with strength classes from 0 to 2, are not marked at all. In this case, the only way to distinguish a standard fastener from a metric one is to measure the thread pitch, or compare the thread with a uniquely identified one.
Standard fasteners are often also called, in contrast to metric, SAE standard fasteners, however, it should be remembered that only small fasteners fall under the SAE classification. Large fasteners with non-metric threads are American Standard (USS) fasteners.
Since fasteners of the same geometric size (both standard and metric) can have different strength classes, when replacing bolts, nuts and studs on a vehicle, attention should be paid to whether the strength class of the new fastener being installed matches the strength class of the old one.
Strength class markings for standard hex nuts
| Strength class | Class Identification |
| Hex nut - strength class 5 | |
| Hex nut - strength class 8 |
Strength class markings for metric hex nuts
| Strength class | Class Identification |
| Hex nut - strength class 9 | |
| Hex nut - strength class 10 |
Marking of strength class of metric studs
Standard (SAE and USS) bolt dimensions/markings
| G - Strength Marking L - Length (in inches) T - Thread Pitch (threads per inch) D - Nominal Diameter (in inches) |
Dimensions/markings of strength class of metric bolts
| P - Strength class L - Length (in mm) T - Thread pitch (distance between adjacent threads in mm) D - Nominal diameter (in mm) |
Metric thread sizes
| M-6 | 9 - 12 N•m |
| M-8 | 19 - 28 N•m |
| M-10 | 38 - 54 N•m |
| M-12 | 68 - 96 N•m |
| M-14 | 109 - 154 N•m |
Pipe thread sizes
| 1/8 | 7 - 10 N•m |
| 1/4 | 17 - 24 N•m |
| 3/8 | 30 - 44 N•m |
| 1/2 | 34 - 47 N•m |
American Standard Thread Sizes
| 1/4 — 20 | 9 - 12 N•m |
| 5/16 — 18 | 17 - 24 N•m |
| 5/16 — 24 | 19 - 27 N•m |
| 3/8 — 16 | 30 - 43 N•m |
| 3/8 — 24 | 37 - 51 N•m |
| 7/16 — 24 | 55 - 74 N•m |
| 7/16 — 20 | 55 - 81 N•m |
| 1/2 — 13 | 75 - 108 N•m |
Symptoms of malfunction
Replacing the VAZ 2110 wheel bearing is necessary when the following symptoms appear:
- The rolling round elements gradually destroy the clip. After this, their arrangement becomes disordered. This is accompanied by a strong crunch, which is clearly audible in the cabin.
- After a long run of the car, gaps form between the bearing parts. This manifests itself in the form of vibration. It extends to the steering column and body.
- The car begins to pull to the side. This also happens when the elements are faulty.
Price of hub and bearing for VAZ 2110
A factory hub produced by AvtoVAZ (21100-3104014-00) costs from 1300 to 1600 rubles. This is the most reliable option.
Analogues:
- Riginal (RG21083103012) — 950 rub.
- VolgaAvtoProm (21080-310301200) — 650 rub.
A proven version of the front wheel bearing is the original AvtoVAZ element (21083103020). Its cost is about 470 rubles.
There are several options for bearing analogues:
- FAG (713691010) - 1330-1500 rub.
- SKF (VKBA 1306) - 1640-2000 rub.
- HOLA (NB721) - 545-680 rub.
- HOFER (HF301046) — 380 rub.
- KRAFT (KT100505) — 590 rub.
- FEBEST (DAC34640037) — 680 rub.
The German company “FAG” and the Swedish “SKF” offer the most reliable front hub bearings for the VAZ 2110. These bearings differ from others in high quality and extend the life of the hub itself. But the worst option, according to car owners, is HOFER.
Features of tightening the hub nut
Not understanding how hard to tighten the wheel nuts
It's better not to take this job. If you overtighten them, a breakdown will occur, and if you don’t tighten them, then spinning may occur and the seat under the bearing will deteriorate. Anyone who is not confident in their knowledge can use a spring cantor, but you can do it in a simpler way. Ratchet drivers most often cannot provide sufficient force, and the tools designed for this are expensive.
To prevent damage and perform the job correctly, for broaching
It is recommended to use a lever that is a meter or a little longer. If a fine thread pitch on a car hub may require a force of 20 Nm, plus it will be necessary to turn the key another 90°, in total such efforts will give a very decent tightening torque. Anyone who remembers physics can make a simple calculation. To do this, you need to know your weight and the length of the lever. A value of 20 Nm is equal to a force of two kilograms with a lever length of a meter.
Force, then with what torque to tighten the hub nut
, depends on the individual characteristics of the vehicle. Torque recommendations for even the same bearing often vary. They depend on the quality of the metal of the hubs, the strength of the nuts, axles, and threads. Usually 19-23 kgf/m is enough. If the bearing weakens and the gap reaches 0.06-0.08 millimeters, this will significantly affect the reduction in the service life of the entire mechanism.
Experts who have worked in car repair shops for many years recommend tightening the hub nuts every 15-20 thousand kilometers. In this case, it will be useful to loosen them a little by one or two turns. It is best to have the car raised with a jack. To carry out this process, many advise using a tubular spanner, because it has thick walls and there is room for a wrench, and it is more powerful. Thanks to a special adapter, you can use a pipe.
Modern cars are equipped with crimp nuts that do not need to be locked. They have belts and they will press themselves into the grooves of the axle. You don’t need to put all your hundred kilogram weight on the key; it’s actually twice as hard as necessary. Knowing exactly what torque to tighten the hub nut
you can avoid losing a wheel on the way, before this a knock will occur when turning, and the car may fly into a ditch.
A tightly stuck nut is a common problem. It is often encountered by motorists, plumbers, cyclists and mechanics. It always takes a lot of effort and time to unscrew a rusty nut.
There are several ways to make this difficult task easier. But before you apply various tricks, familiarize yourself with the reasons that lead to soured nuts and safety precautions.
Which way does the hub nut unscrew?
Yes, you may very well be one of the lucky ones who won't need any extra effort as the problem with unscrewing the hub nut may simply be a matter of going in the wrong direction.
So, we take the wrench and, when your car is far from new, try, if the nut does not lock, on the left wheel, unscrew the nut counterclockwise, and on the right wheel, unscrew it clockwise. In modern brands, it is usually necessary to unscrew the hub counterclockwise .
Before you start unscrewing the hub nut, do not forget that it comes off when the car is standing on the wheels and the stops are placed under them. On the side from which the nut will be unscrewed, a stop is securely installed.
Although if the nut is located deep and the brake disc is ventilated, then you can try to unscrew it (fixing it with a powerful screwdriver) and only after making sure that the car is securely secured. Remember about personal safety precautions: protect your eyes, do not overdo it, because in the spirit of enthusiasm you can accidentally get hurt or damage the car body.
Unfortunately, in most cases, it is not enough to use a wrench with a large lever; you have to use additional tools and special mixtures. Let's consider the other options.
Diagnostics
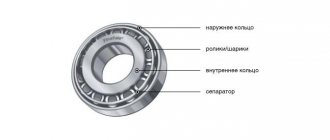
The wheel hub contains single row roller bearings . There are 2 of them. They require care while the vehicle is in use. This maintenance includes changing the lubricant and adjusting the gaps.
To check the clearance or play, you need to hang the wheel and rock it a little. A simple adjustment does not always get rid of the backlash. If noise occurs when the wheel rolls, most likely the front wheel bearing on your VAZ 2110 needs to be replaced because it has failed. It is not uncommon for two bearings to break at once.
Check whether the bearings rotate freely on the axle, whether there are any jams, and there should be no signs of wear or chipping on the rings. If this is available, you should definitely figure out how to change the bearing.
The easiest way to unscrew/tear off a hub nut
The easiest way can be considered the following, but it involves completely replacing the nut. Don't worry, any method does not guarantee the safety of this part. To easily unscrew or tear the hub nut out of place (an option for all brands - from VAZ to foreign cars with a groove on the shaft), you need to take:
Unscrewing the VAZ hub nut using a drill
- New nut.
- Drill or screwdriver.
- Drill up to 3 mm.
- Chisel.
- Hammer.
- You need to drill the nut along the groove to counteract it.
- Using a chisel and hammer, simply break the nut and remove it, then replace it.
- If throwing away the nut is not possible, then you will have to sweat - and in the literal sense of the word too.
Unscrewing the hub nut on a VAZ: “burn, hit and twist!”
Now let’s look at the methods that may be the only effective ones in your case, but that doesn’t make them any less radical, even barbaric.
Strong hammer blows
If you hit the hub, you hit the bearing! If you are going to make a replacement, then go ahead! If you value the bearing, avoid this method.
Warming up the hub nut with a burner. Not recommended!
Using the burner
The law of physics is guaranteed to work, and the body (read: hub nut) will expand. And this will make it much easier to remove the stubborn part. There is one “but”: not only this one part heats up, but also everything else in the area of the burner. For example, a bearing. And it’s better not to allow this. As a more gentle option, we can suggest using a soldering iron and... patience. You'll need it.
Jumping on a lever
A chisel will help you remove the hub nut.
The “method” is fraught with the danger of unexpectedly breaking off the edges of the nut, breaking the key, and so on. Just don't do it.
Take a chisel and make notches on the edges
An increase in diameter, of course, makes the hub nut unsuitable for further use, but it will be easy to unscrew it.
Part selection
Knowing the dimensions of the bearing, its selection is carried out. In addition to the VAZ 2110, it is used in brands 2108, 2109, 2111 and 2112.
Its parameters are as follows:
- internal diameter size – 34 mm;
- external – 64 mm;
- height - 37 mm.
You can select the product from domestic manufacturers:
- Saratov plant. Available with the “SPZ” marking. The products are considered one of the best in the country.
- Samara plant. Produces low quality products. Their mileage does not exceed 20 thousand km. Hub parts have a low price. Often purchased to save money.
- Vologda enterprise. The plant's products have a low price. At the same time, it is reliable. Details are difficult to fake.
If you want to buy a reliable product, you should pay attention to imported manufacturers. It will cost more, but with quality guarantees.
These include the following companies:
| German, which produces the LGR-4703 series | |
| Italian Marel: 2108-3103020M | |
| Sachs products | |
| Japan - SNR (R172.03) |
To identify a fake, you should use a needle file. The outer ring is highly hardened. The file does not leave scratches on its surface. If they appear, it means it is not a high-quality fake.
Chemical
Now we will consider methods for those who do not rely on the help of physics, but want to solve the problem with the help of chemistry. Your laboratory should have: kerosene, white spirit, acidified sulfuric acid, zinc, plasticine, hammer, water, sandpaper, wrench, chisel.
Attributes of the chemical method for unscrewing the nut
We moisten the nut and bolt with kerosene (experienced people recommend making a mixture of White Spirit and kerosene), applying a swab to them, it doesn’t matter whether it’s cotton or gauze. After some time - from an hour to a day, and with repeated attempts, you may find that the hub nut can be easily unscrewed. But even here you cannot do without force: at a minimum, you will probably have to work with sandpaper to clean the parts from rust. If even after this things don’t work, you should help with a hammer: tap it on the edges of the hub nut.
If in this case you are not successful, make a small container out of plasticine, secure the hub nut on top, pour water with sulfuric acid into it, and put zinc in the container. A chemical reaction begins that does a very good job of removing rust. Usually a day is enough for even advanced corrosion to go away from a part. Finish the job with a wrench. But this method is valid only in the case when the reason is that the nut is tightly stuck and/or rusted, and if it was simply tightened, neglecting the required tightening torque (to “be sure”), then you just need to tighten it.
Reasons why you should start unscrewing the VAZ 2110 hub nut
The main reason is a malfunction of the car's chassis, and delays are not welcome. The problems that arise are caused by problems with the hub nut. If it is damaged, the car will move from side to side while driving, and the wheel will seem to hold weakly and become loose.
Imagine that suddenly a situation arose: on the road, without special conditions, you had to change a tire, everything was done in a hurry, so mistakes were made. What could this lead to? Threads are broken and bolts are loosened, that is, the fastenings become unusable, which means you need to think about how to tighten the VAZ 2110 hub nut and whether it’s worth buying a new one.
Wheel replacement
Initially, you will need to remove the bearing from the hub and take a good look at it. We check that if it calmly returns to its place and fits tightly, then the part does not need to be changed. But sometimes the situation is the opposite, all the components are worn out, so there is play, and it is undesirable at the location of the bearing, then the issue of how to tighten the VAZ 2110 hub nut cannot be solved; more decisive actions will have to be taken. Under no circumstances should you drive a car with a loose wheel.