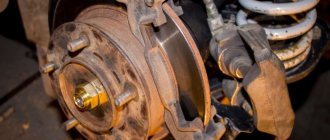
How to check the front wheel wheel bearing on a Chevy Niva
The failure of the unit is indicated by the appearance of a low hum from one of the wheels. The sound does not disappear when cornering and intensifies as the vehicle speed increases.
If you notice this, you should immediately carry out a diagnosis, since if the wheel bearing seizes while driving, the consequences and costs can be very high.
The upcoming replacement of the Niva Chevrolet front wheel bearing is determined as follows:
- the front wheel of the car is suspended with a jack;
- rotate it by hand and check the play.
Signs of bearing wear:
- Extraneous noise and metallic knocking.
- Noticeable play is checked by rocking the wheel perpendicular to its axis.
- Vibration in the cabin when driving.
Before carrying out repairs, for clarity, watch the video of checking the front hub of a Chevrolet Niva:
Video: “Checking the front wheel bearing”
Video: “Signs of a bearing failure”
How to change a wheel bearing on a Niva
The steps to replace the front bearing after removing the nut can be divided into 4 stages:
- Removing and disconnecting the steering knuckle and brake drum along with the hinges, from the strut and CV joint.
- Pressing out old parts.
- Pressing in new wheel bearings (two for each wheel).
- We put the unit back together and tighten the nut and adjust the gap.
For repairs, you will need a standard set of plumbing tools. We also recommend that you familiarize yourself with the structure of the node.
Required set of tools for work:
- A 30mm socket wrench to loosen the nut;
- Screwdriver to unscrew the brake caliper;
- Set of sockets and ratchet;
- Round nose pliers;
- Hammer;
- Mandrel or pipe for pressing;
- Puller with claws (if possible);
- Puller with claws;
- Jack and vice;
- Torque wrench to properly tighten the hub nut.
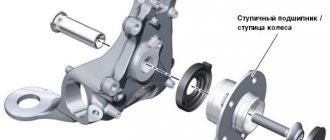
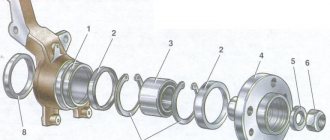
We place the car on a flat surface, engage first gear, remove the handbrake, and put chocks under the wheels. This completes the preparation. Also, before repairing, it is necessary to study the location of the elements of the car’s chassis according to the diagram: (pay attention to the steering knuckle - position 27, bearing - position 9).
Removing the front hub
The first stage begins with the following actions:
- Loosen the wheel and hub nuts. You need to carefully remove the decorative cap, then lift the replacement side and lower it onto the stops. We place wheel chocks under the rear wheels.
- We remove the front wheel using the well-known method, freeing it from the bolts. Next, you need to carefully remove the decorative cap.
- Unscrew the hub nut. To do this, you need to unlock it with a screwdriver. Remove the cone washer and unscrew the ABS sensor (if equipped).
- After that, the pads are removed and the caliper bolts are unscrewed, and the casing bolts are also unscrewed. The caliper itself, after being removed with wire, is attached to the upper arm.
Next, you need to remove the entire rotating mechanism from the CV joint splines along with the ball joints. To do this, several operations are performed:
- Press out the steering rod ball pin using a puller, having first unscrewed the fasteners, as shown in the photo.
- Unscrew the pin bolt on the top ball. supports and pull it out of the socket.
- The lower ball joint must be disconnected from the lever by unscrewing 3 nuts.
- Once all the joints are disconnected, you can safely remove the entire assembly and begin replacing the wheel bearing.
How to change the wheel bearing of a Niva Chevrolet: replacing the front hub and rear hub bearings
Let us immediately note that the replacement process is not simple and requires certain knowledge and experience. Let's take a closer look at how to change the wheel bearing of a Chevrolet Niva on the front axle. To replace the front wheel bearings, the following tools are required:
- torque wrench, 30 hex head, minus flat head screwdriver;
- wrenches “17” and “19”;
- pullers, mandrel for pressing, press, hammer;
- penetrating lubrication, new bearing;
- wrench, chisel.
To replace Niva Chevrolet wheel bearings, it is necessary to carry out a number of preparatory work:
- place the car on a flat surface, placing it on a pit or lifting it on a lift;
- loosen the fastening nuts and bolts of the front axle wheel disk;
- Remove the wheel rim along with the hub nut cover.
Replacing the front wheel bearing of a Niva Chevrolet is performed as follows:
- by removing the decorative cap and tearing off the hub nut (front hub on Niva Chevrolet), holding the hub with a suitable wrench, avoiding turning, unscrew the nut;
- Using flat screwdrivers, spread the brake system pads and unscrew the mounting bolts of the bar;
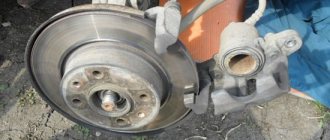
- Having disconnected and moved the brake caliper to the side, tie it with wire to the suspension elements so that it does not load the brake hose, and also to protect the non-adjustable bearing;
- remove the brake disc by carefully tapping a rubber hammer from the eye of the steering knuckle, pressing the pin into the steering tip, after disconnecting, move the tip to the side and secure it at a certain distance;
Next, you need to remove the mounting bolts of the shock absorber strut and the steering axle and unscrew the mounting bolts connecting the knuckle and the ball joint with a “19” key (we use penetrating lubricant).
- release the drive axle shaft from the hub nut, and then do the same with the thrust washer;
- dismantle the hub from the steering knuckle using a press, press the part with a puller focusing on special holes specifically provided for this;
- using a lift, remove the two locking rings from the knuckle and dismantle the bearing;
- clean the seat for the new ring (the front hub of the Niva Chevrolet and the rotary washer are cleaned);
- We install a new bearing support ring;
- Using a special type of lubricant, lubricate the seat and the bearing itself;
- Having installed the bearing in the spacer ring, press it into the steering knuckle socket;
- Reinstall the steering knuckle in reverse order and adjust the clearance in the hub bearing.
Now let's move on to how to change the Niva Chevrolet wheel bearings on the rear axle. Replacing the rear wheel bearing is similar, but slightly different from similar work on the front. To replace the rear wheel bearing on a Chevrolet Niva, you will need the following tools: a flat-head screwdriver, a “24” socket head, pullers, and pliers.
As in the case of replacing the front bearing, the car must be prepared by placing it on a pit or a lift. Next, remove the wheel and brake drum, dismantle the axle shaft and separate it from the bearing and ring. The general sequence of work performed when removing the rear bearing is the same as when removing the front bearing.
Let us also add that when dismantling and installing a bearing, it is necessary to pay attention to the condition of the seals, protective covers, boots, etc. Even the slightest damage to the protective elements is not allowed, since water and dirt if they get on the bearing will quickly damage even a new element
Pressing out and dismantling old bearings
The removed assembly and steering knuckle do not require further disassembly. The only thing you need to do is remove the old oil seal using a regular flathead screwdriver, holding the hub assembly in a vice. It is not recommended to use them in the future; new ones are installed, just like the bearing.
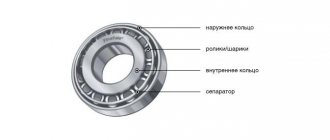
Inside the fist, there are two tapered angular contact roller bearings. They are installed at random and form a hub unit.
- To begin dismantling, it is enough to separate the brake disc mounts from the wheel turning mechanism.
- Don't forget to remove the seals.
- The small race of the inner bearing can be removed without any problems by hand.
- Next, at the same time, using the adapter, you need to knock out the outer roller bearing race from the pipe, as shown in the photo below.
- After separation, one ring with a separator remains on the hub, and the second remains inside the knuckle. The old clip is pulled off with a special puller equipped with grips.
- The second part of the part is knocked out of the trunnion through a spacer made of soft metal in the form of a rod or carefully with a screwdriver.
- The attachment is placed against the clip and light blows are applied, moving it in a circle.
- After this, the old grease should be carefully removed from the cavity.
Installing new bearings in the steering knuckle
It is important to know:
Manufacturers do not lubricate their bearings and rings very generously, so you will have to add the missing amount of grease yourself. Litol-24 in an amount of 40 g is suitable, apply lubricant to the separator and rollers before replacing the Niva front hub.
- We insert a new outer race of the inner and outer roller bearing into the prepared hole of the steering knuckle. We press the clips on both sides, in the same way as they were installed at the factory.
- Next, apply lubricant to the raceways and spread it in an even layer.
- We insert the inner race and close it with an oil seal. Lightly press the boot with a mandrel of the required size. We do the same on the other side, install the clip and boot.
- Now we insert the hub into the steering knuckle, namely into the holes of the installed roller bearings.
- The hub must be inserted smoothly and without distortion. In some cases, depending on the actual mounting diameters, pressing through a press will be required. In this case, a spacer was used.
- Replacement is complete. We install the assembled unit in the reverse order. Read about adjustments below.
If there is no hydraulic press or puller, replace it using a hammer and a mandrel (or using an old ring). This option is not recommended, but is demonstrated in the video for your reference.
- The outer race is inserted into the hub socket and driven without distortion through a wooden spacer.
- For its final landing, you can take a pipe of a suitable diameter or a mandrel.
- Then a separator is placed inside, and the assembly is assembled using the reverse algorithm.
Video: “Method of replacing a wheel bearing without a press”
The procedure for adjusting the bearing clearance:
- After assembling the unit, tighten the locknut to a torque of 19.5 N.*M (or 1.95 kgf.m), turning the hub itself to the sides.
- We loosen it back and tighten it to a torque of 6.8 N*M (or 0.68 kgf.m).
- We check the gap according to the diagram, the limits are from 0.02 to 0.08 mm.
- We lock the locknut by bending the edges.
It is important to know about the adjustments:
We recommend that you visually watch the adjustment process in the two videos presented below.
Video: “Adjusting wheel bearings”
Video: “Diagnostics of the gap in the hub assembly”
Adjusting the clearance in Niva hubs
After installing a new bearing, a new wheel nut should also be used. The wheel must be on the car.
Adjustment of the front hubs on the Niva and Chevy Niva is carried out as follows:
- Screw the hub nut all the way and loosen slightly.
- Checking the play. If it persists, tighten the nut.
- We check the play again.
- The procedure is carried out until the backlash disappears.
- Use a sledgehammer to break a tire or drive a Niva a couple of meters.
- A small backlash appears. We also tighten the nut and leave it barely noticeable.
- Now the nut can be tightened.
Attention! You should drive the car for one day, after which, adjust the bearing again.
This is how wheel bearings are replaced and adjusted on Niva 2121, 21213, 21214, 2123 and Lada 4×4.
What is a non-adjustable bearing and why is it installed on a Chevrolet Niva
The problem with standard wheel bearings is that they need to be constantly adjusted during vehicle operation. If this is not done in time, they will fail, creating a howl or hum when moving. You can save yourself from such problems by installing non-adjustable hubs or double-row bearings.
On sale you can find reinforced, non-adjustable hubs with double-row bearings. According to the manufacturer, this modernized unit has the following advantages:
- there is no need to adjust (the bearing tightening is precisely set during its production);
- no need for regular lubrication;
- eliminates rotation of bearings on the hub;
- eliminates wear of bearing seats on the steering knuckle and hub;
- a ball bearing reduces friction in the hub assembly;
- The service life of the hub is increased due to thickening
A good way to strengthen the suspension is to install non-adjustable double-row wheel roller bearings on the Niva instead of the standard ones. But there is one nuance - such products have a different outer diameter; there are 2 ways to solve this problem:
- 1) Boring the “native” fists for a double-row p/w;
- 2) Insert a set of spacers and fix both roller bearings, making them non-adjustable;
- 3) Buy and supply a ready-made kit.
For options 1 and 3, a SKF bearing marked SKF IVECO BTH-1024 C is suitable. For the second option, you need to purchase a special set of bushings, the installation of which is described in the video below.
Video: “How to make non-adjustable bearings from adjustable bearings”
Reworking the hub and installing a non-adjustable bearing
Such a hub, for an adjustable bearing, can be made from a standard part. It is necessary to bore the hole to the size of the bearing +50 microns (0.05 mm) for interference, and press it into the resulting mounting hole.
- According to the instructions provided, we dismantle the old parts.
- We grind the hub to the required diameter ourselves or order it from a turner in your city.
- We press in a new double-row ball bearing, for example SKF IVECO BTH-1024 C.
- Install the retaining ring.
- We install a spacer (washer) of about 3.5 mm and a seal (the size of the washer is determined using additional measurements).
- The process is complex, so it is recommended to watch it in video format.
Video: “Installing a non-adjustable bearing”
Video: “Installing reinforced bearings”
Video: “Replacing an IVECO bearing”
Now let’s look at the question of choosing a suitable bearing for replacement, both in the case of a conventional replacement and for conversion to a double-row reinforced one.
Unregulated
As a rule, the Niva has a standard adjustable hub, which requires periodic adjustment. But in order to get rid of this inconvenience, non-adjustable hubs for the Chevrolet Niva were developed, which have such positive qualities as:
- No maintenance required. They don't need to be adjusted
- The bearing in the device does not rotate
- It is filled with special lubricant from the factory, so there is no need to lubricate it.
- Due to the fact that the work occurs thanks to the ball bearing in the unit, friction is reduced
- There is no wear on the seat in the rotary cam
- Not adjustable as it is tightened from the factory
- No need to change the bearing
- Long service life which is equal to 100-120 thousand kilometers
Therefore, thanks to all the positive characteristics listed above, many car owners change the standard part to a non-adjustable one.
It is also worth noting that the non-adjustable part can be produced as a reinforced Niva Chevrolet hub, which solves the problem of wear of the oil seals on the steering knuckle. It is best to choose companies such as VolgaAvtoprom, IVECO, OmegaInterAuto.
The main disadvantage of this unit is its high price, but by installing this part you can forget about the problems that appear in the standard element. By installing a reinforced version of your SUV, the cross-country ability will increase and reliability will increase, and having a standard set of tools, you can make an independent replacement without any problems.
How to choose a replacement part and bearing number
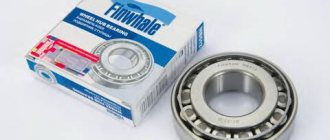
Once you are convinced that the bearings need to be repaired, you should select a hub bearing in the retail chain based on three main criteria (by default, single-row tapered roller bearings are installed - the new kit must have a nut):
- Chevrolet Niva front hub part number: 2007108 (catalog number - 2121-3103020-10, bearing according to GOST - 2007108, foreign equivalent according to ISO - 32008).
- You need to buy two roller bearings in the kit.
- Dimensions of the Chevrolet Niva front hub bearings: height – 19 mm, internal diameter – 40 mm, external diameter – 68 mm.
- The cost of a new set of parts for the hub, including double-row bearings, as well as suitable manufacturers, are presented in the table below.
Table - Recommended manufacturers, numbers and articles of hub bearings
| N p/p | Manufacturer | Catalog number | Price for 2021, rub. | Additional Information | |
| Dimensions (mm) and parameters | Applicability | ||||
| Standard sets of two bearings | |||||
| 1 | Volzhsky standard, Russia | 2007108 | 200 | Inner diameter - 40 mm; Outer diameter - 68 mm; Width -19 mm; Weight - 0.278 kg; Number of rollers in the bearing - 21 pcs.; Roller dimensions - 7/11x19 mm; Dynamic load capacity - 40 kN; Static load capacity - 52 kN; The maximum rated speed is 7000 rpm. | Chevrolet NIVA trim levels L, LC, LE, GL, GLC. In that case Restyling 2021. |
| 2 | VPZ, Russia | 32008 | 200 | ||
| 3 | SKF, Sweden | 32008X/QSKF | 770 | ||
| 4 | KOYO, Japan | 32008JR | 880 | ||
| Double row bearings (for reinforcement) | |||||
| 1 | OPTIMAL, Germany | 681 923 | 2200 | Inner diameter - 40 mm; Outer diameter - 73 mm; Width - 55 mm; Number of raceways - 2 pcs.; Seal - Yes. | Likewise |
| 2 | RUVILLE, Germany | 4013 | 2480 | ||
| 3 | SKF, Sweden | BTH-1024 C VKBA 3551 | 2300 | ||
It is important to know:
Parts of satisfactory quality last about 20 thousand km, mileage with high-quality products exceeds 30 thousand km. The most popular products from the Volzhsky and Samara plants are labeled SPZ-GROUP. The average price of a wheel bearing is 1000 rubles.