Repair of voltage regulator relay on VAZ 2107
Usually the fact that the VAZ 2107 has a voltage regulator is remembered when a problem arises with charging the battery.
To be completely precise in the definitions, the voltage relay comes to mind immediately as soon as it turns out that, despite the presence of charging, the battery is almost completely discharged. Let's take a closer look at why a voltage regulator is needed in a VAZ 2107 car. Without going into the intricacies of electronics, the voltage regulator is designed to regulate the voltage at the generator output depending on the engine operating mode. It is quite natural that as the speed changes, the voltage level also changes. And if it drops to 12 volts or lower, the battery stops charging.
Therefore, if you suspect a malfunction in the VAZ 2107 charging system, you must first check the voltage at the battery terminals. This can be done using a regular voltmeter or multimeter (tester). In normal mode, the voltage should be approximately 13-14 volts. If it falls below 13, you should pay attention to the relay; it may need to be replaced.
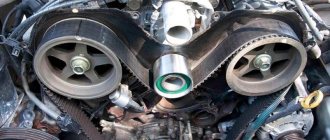
Depending on the type of generator used in the car, the regulator can be internal three-level and external. The internal one is built into the generator and is usually used in VAZ 2105 and 2107 cars, while the external one is used in earlier classic models and is located in the engine compartment on the left arch.
Depending on the type of regulator, replacing it has its own characteristics. Replacing the external regulator is no problem. Using a size 8 wrench, unscrew the two fastening nuts and disconnect the wires from terminals 15 and 67. The new relay is installed in the reverse order. After checking that the wires are connected correctly to the terminals of the regulator, and that its body is in reliable contact with ground, you can start the engine and measure the voltage again to ensure that the fault has been eliminated.
The internal three-level one is somewhat more difficult to change due to limited access to the generator. But, despite this, the task is quite doable even without removing it. Replacing the regulator, as in the case of an external one, comes down to disconnecting the wires and unscrewing two mounting screws using a Phillips screwdriver. After this, the relay is removed from the generator housing. Installing a new regulator occurs in the reverse order. After assembly, the voltage level is checked.
It should be noted that the regulator is not always replaced due to its failure. Recently, more and more often, car enthusiasts have resorted to replacing the generator along with the relay from an old model to a new one. This kind of tuning becomes possible thanks to the complete interchangeability of both models. The reason that prompts car owners to take such a step is the high efficiency that distinguishes the three-level regulator from the standard one.
New type relays provide the required voltage level in automatic mode. Plus, it has a wider adjustment range than the standard one, so the battery receives an optimal charge. Under such conditions, the service life of the battery is significantly increased. In the schematic diagram of the electrical circuits of the VAZ 2107 shown below, the relay is indicated by the number 7.
VAZ 2109 generator voltage regulator - installation and repair
The VAZ 2109 car model began to be produced back in the early 90s. Nowadays, this model is significantly different from older editions - it is more comfortable and easy to use. The health of the car depends largely on the constant current power - the voltage regulator and relay are responsible for this.
Determining electrical system faults
One of the main advantages of the new VAZ 2109 is fuel injection. This type of supply of the fuel mixture is significantly more economical than the carburetor method. In addition to fuel consumption, the injector also improves the vehicle's driving characteristics. For the injector to work properly, the computer or, as motorists call it, “brains” must also work correctly.
In turn, the operation of the computer, as well as all electrical sensors and devices, directly depends on the constant current power. The device that is responsible for supplying power to the vehicle's devices is called a voltage regulator. The main sign of a malfunction of this element is the readings of the voltmeter on the instrument panel.
Also, if while driving the car your fuel consumption has noticeably increased, but at the same time the car began to pull worse, then this is one of the main signs of failure of the voltage regulator relay. This type of breakdown manifests itself especially well in the dark. At this time, dimensions and other electrical appliances are involved, which significantly increase power consumption. If it is not enough, then the instruments and dimensions light up very dimly - it’s time to change the relay!
First aid for a car
The first thing to do in such cases is to check the battery terminals; perhaps they are not making good contact. If there is poor contact at the battery terminals while driving, it will not be charged sufficiently, which may cause problems during further operation of the car. To fix this problem, you need to lubricate the terminals and tighten them.
If your car's alternator fails, you need to have it repaired immediately. Most often, the voltage regulator fails. The failure of this generator element has rather unpredictable consequences. While driving, the regulator controls the required amount of current for the car; if it fails, the voltage in the network changes and can be either more or less. Very often, fuses blow at high voltages.
The VAZ 2109 voltage regulator is located directly in the car’s generator itself. When it fails, most often the generator relay breaks. It consists of several elements such as an electromagnet, an armature and a switch. These elements interact with each other when electric current is applied to them.
Repairing a generator - VAZ features
To check the car's power supply, you need to take measurements at the battery terminals. To do this, you need to start the car and let it run for a few minutes. After this, take readings with a terminal tester. Next, turn on all possible car devices, dimensions, tape recorder, heating and repeat the measurements. With a properly functioning voltage generator, as well as its regulator, the average voltage in the network should be 12–13 Volts.
The most normal voltage in a VAZ 2109 car is 14.1 Volts. If your readings are more or less than the acceptable average, then you need to start repairing your generator. First of all, you need to check the ground on the generator block. It often happens that it oxidizes under the influence of moisture. Because of this, it may not carry enough current to the vehicle. This terminal is located on the generator block; it needs to be cleaned and lubricated.
Another reason for a lack of vehicle current is a sufficiently worn or loose alternator belt. Using a belt, the generator is driven by the operation of the car engine. If the belt is not tensioned enough, it will slip while driving. Thus, the car generator will not perform the required number of revolutions, and accordingly, the required amount of current will not flow.
If the generator does not produce enough voltage, the battery is not fully charged, which significantly affects its service life. To fix the problem, you need to replace the belt or tighten it. It is very important not to overtighten it, as during movement it will stretch much faster or may even burst. You should not buy belts of dubious production - a low-quality belt wears out very quickly, dries out and stretches.
We repair the voltage regulator and relay
Removing the voltage regulator in a VAZ 2109 car is not difficult. The technical features of this car model allow this work to be performed without removing the generator. The only tools you will need are standard screwdrivers and wrenches.
To replace the voltage regulator in a VAZ 2109, the first thing you need to do is purchase a new element. Nowadays, this will not be difficult, because it is sold in any auto store. Recently, the use and application of three-level regulators has become widespread. However, VAZ cars are still produced with standard regulators.
Therefore, it is better to entrust the replacement and connection of a three-level voltage regulator to an experienced electrician, because this process requires a slight modernization of the generator contact group.
The main difference between the three-level regulator and the standard one is the new relay. The three-level regulator relay is much better in performance and quality than the standard one. This type of regulator makes the voltage more stable and of higher quality and protects the entire electrical system of the car from significant fluctuations in the network. Before performing any type of replacement work, it is recommended to charge the battery. After completion, install everything in the reverse order and take new measurements with a tester at the battery terminals.
Checking the VAZ 2107 voltage regulator relay
If you suspect a malfunction, you should check the voltage directly at the battery terminals. If the voltage is below 13 or greatly exceeds 14 volts, there may be several reasons:
- voltage regulator relay malfunction;
- generator breakdown;
- poor contact in the electrical connections between the battery, alternator and relay.
The serviceability of the VAZ 2107 charging relay can be checked by disconnecting it from the vehicle’s on-board network. This is easy to do with the external one - just remove a couple of terminals from it and unscrew the nuts securing it to the body using a size 8 wrench. It is more difficult to dismantle the internal relay, but the operation is quite feasible without dismantling the generator. To do this, you need to unscrew a couple of screws securing the relay to the generator housing.
There are three reasons for a relay malfunction:
- poor contact of the relay with the terminals of the brush holder (relevant for new types of relays);
- breakdown of semiconductors;
- open circuit in the device.
To check the VAZ 2107 relay-regulator, you need a voltmeter or test lamp and an adjustable current source with a voltage of 12-22 volts.
To check, you need to connect the minus of the power supply to the relay ground or terminal “W” (depending on the type of relay), and the plus to terminal “B”.
A voltmeter or test lamp must be connected to the brushes or relay output. If the relay is working properly, when a voltage of 12-14 volts is applied, voltage should appear at the output (brushes) (the control lamp lights up). When a voltage of 16-22 volts is applied, the lamp should go out. If the lamp is constantly on, then the relay is broken. If it does not light up regardless of the input voltage, it is broken. In both cases, the relay must be replaced, since it cannot be repaired.
Important: the reason for the lack of charge voltage may be wear or “sticking” of the generator brushes. The brushes must protrude from the brush assembly by no less than 5 mm. With an external regulator relay, this indicator is controlled separately, after disassembling the generator.
Types and location of voltage regulators
As you know, the VAZ 2107 car began to be produced a very long time ago. And over the years, not only different motors were installed on it, but also different voltage regulators. On the earliest models, the relay regulators were external. On later “sevens” the regulators were internal three-level. Let's take a closer look at these devices.
External voltage regulator VAZ 2107
It is the external voltage regulator that many motorists in the old fashioned way call a “relay-regulator”. Today, external voltage regulators can only be seen on very old “Sevens” produced before 1995. These cars were equipped with an old generator model 37.3701, which was equipped with external relays.
The external regulator was located under the hood of the car; it was mounted on the left front wheel arch of the car. As a rule, external relays were made on the basis of a single semiconductor, although after 1998 on some VAZ 2107 there were external regulators made on a common printed circuit board.
External relays had certain advantages:
- Replacing the external regulator was fairly easy. It was held on by only two bolts, which were not difficult to reach. The only mistake that a beginner could make when replacing this device is to mix up terminals 15 and 67 (they are located next to each other on the regulator);
- the cost of the external regulator was quite affordable, and they were sold in almost all car stores.
Of course, the device also had disadvantages:
- bulky design. Compared to later electronic regulators, the external relay seems very large and takes up too much engine compartment space;
- low reliability. External VAZ regulators have never been of high quality. It is difficult to say what is causing this: the low quality of individual components or the poor build quality of the device itself. But the fact remains a fact.
Internal three-level voltage regulator
Internal three-level voltage regulators began to be installed on the VAZ 2107 starting in 1999.
These compact electronic devices were built directly into car generators.
This technical solution had its advantages:
- compact sizes. Semiconductors were replaced by electronics, so now the voltage regulator fits in the palm of your hand;
- reliability. It’s simple: there’s nothing special about electronic devices that breaks. The only reason why a three-level regulator could burn out is a short circuit in the on-board network.
There are also disadvantages:
- difficulty of replacement. If there were no particular problems with external regulators, then to replace the internal relay the car owner first needs to get to the generator. To do this, he will have to remove the air filter and a couple of air ducts, which requires patience and time;
- difficulty of acquisition. As you know, the VAZ 2107 has long been out of production. So getting new components for the “seven” is becoming more and more difficult every year. Of course, this rule does not apply to all details. But internal three-level voltage regulators for the VAZ 2107 are among the parts that are not so easy to find today.
Replacing the VAZ 2107 voltage regulator relay
If the external relay of the VAZ 2107 generator breaks down, you should replace it with a new one. If the cause of the breakdown lies in the brushes, only the brush assembly must be replaced.
The old internal relay-regulator can be replaced with a new “three-level” one, which provides more reliable voltage stabilization, taking into account the temperature conditions and the load on the generator.
They are called three-level because of three pre-configured adjustment modes that can be switched manually. The switch itself is installed separately from the relay, in a place convenient for the driver and protected from moisture and dirt.
When installing a new relay regulator, you need to pay special attention to the quality of the electrical contacts. If necessary, it is necessary to clean the terminals and nuts securing the external relay to the housing.
To avoid a short circuit, connect the ground wire to the battery only after installing the relay and power wires.
Types of relay regulators
All regulators that were used on VAZ cars at different times can be of only 2 types:
- External regulator.
- Three-level internal regulator.
Starting with the 2105 and 2107, the factory installed only internal relays on the alternator. How to replace and configure the voltage regulator relay on a VAZ 2107? Detailed instructions, step-by-step photos and videos clearly demonstrate the process. Replacing generator bearings on a VAZ-2110. External ones were used on older models and they were removed from the generator, since they were not particularly compact. On these machines, the relay was installed under the hood on the mudguard on the left.
If there was a need to change the external regulator, then this was done simply and simply - it was in an accessible place, attached directly to the body with screws, and was trivially easy to remove. The main thing that had to be taken into account when replacing it was the correspondence of the terminals to pins 67 and 15. It was quite simple to check the correct connection of the new relay using the diagram, start the engine and carry out the freeze again.
Signs of brush failure on a VAZ 2107/VAZ 2105 generator
In the event of a generator malfunction, the vehicle's electrical system provides a breakdown indication. When the generator is faulty, the battery lamp icon lights up. But you need to take into account that the cause of the breakdown may be a banal failure of the fuse in the circuit , therefore, after checking the fuse, you must further continue troubleshooting by checking the brushes, rectifier, and voltage regulator.
To check the voltage regulator, you need to connect a voltmeter to the brushes. We connect the “plus” from the 12V battery to the regulator terminal, and connect the “minus” to the “ground” terminal. If there is no voltage, then the regulator is defective and requires replacement.
Sometimes a malfunction or imminent failure of the brushes is indicated by a disruption in the current supply to the car's power supply : the light of lighting fixtures and headlights disappears or dims, the cigarette lighter or radio stops working, the stove stops heating, or the battery discharges too quickly.
Generator brushes - why are they needed?
Quite often (especially in older models) there are cases when, with a sharp increase in driving speed, various seemingly inexplicable things happen: the light of the dashboard or headlights dims, the cigarette lighter and (or) radio work intermittently. Drivers who have not been hardened by many years of experience in the cold lake may mistakenly think about burnt fuses, wiring, or shorted devices. It can take a whole day or more to work through all these versions. But what will be the driver’s surprise when the true cause of the malfunction becomes clear, that the whole essence of the problem is due to some small pieces of black metal called generator brushes.
Based on 9th or 8th grade physics lessons, everyone knows that any generator must include two main parts, one of which is movable (rotor), and the second, correspondingly, stationary (stator). Each part has a copper (in most cases) winding. Under the influence of magnetic force, the rotor begins to rotate, powered by electricity through the armature and two other metal parts. And they are called generator brushes. Due to the constant impact of friction, all parts gradually wear out due to the constant rotation of the rotor. This happens in any case, regardless of the quality of the material of the parts (and it is really strong).
How to determine the malfunction?
If, while warming up the car, you begin to notice strange actions on the dashboard (the voltmeter readings change greatly with minimal engine load or the battery charging light comes on), then this can only mean one thing - the alternator brushes are worn out and need to be replaced.
In some cases, a good warm-up of the engine allows you to “extinguish” the indicator. At the same time, the car drives on the autobahn quite calmly and normally, without any signs of malfunction. But you shouldn’t be such an optimist, because your car may break down at the most inopportune time. Don't forget to check the condition of the alternator winding and belt, although the absence of sparks and smoke suggests that the brushes are the cause of the breakdown.
When is it time to change generator brushes?
The main signs of brush failure on a generator:
- spontaneous shutdown of electrical appliances while the engine is running;
- decrease in brightness or blinking of control lamps and standard lighting equipment;
- voltage drop in the on-board network during operation of the power unit;
- the appearance of extraneous sounds (rustling or squeaking) when the generator is operating;
- turning on the control indicator for lack of charging (the lamp is located in the instrument cluster);
- rapid battery discharge when the car is moving.
Methods for replacing brushes
Unit repair is carried out using 2 methods:
- with equipment removal;
- without dismantling.
The method for restoring the unit depends on the layout of the units in the engine compartment and the condition of the threaded connections. If there is a coating of rust and oxides on the steel elements, it is recommended to remove the electrical machine.
The parts are treated with a special liquid, otherwise the edges of the nuts will be licked off or the body of the bolt will break.
Before replacing the brushes on the generator, you need to prepare:
- wrenches or sockets (size and type depend on the car model);
- screwdrivers with flat and Phillips blades;
- a set of new parts (selected from the catalog depending on the modification of the electric machine);
- a bottle of WD-40 liquid, which allows you to unscrew dirty or rusted threaded connections.
This is interesting: When and how to adjust valves on Renault Logan
On a removed generator
Algorithm for servicing a unit using the example of a VAZ-2113 car with an 8-valve power unit:
- Stop the engine, engage 1st gear and tighten the parking brake lever.
- Open the hood and disconnect the negative cable from the battery housing (it goes to the car body).
- Loosen the bolt in the lower support.
- Disconnect the patch cables.
- Unscrew the drive belt tension adjuster nut, and then use a mounting spudger to carefully move the generator towards the engine block.
- Remove the drive belt, unscrew the bolt securing the tension bracket to the cylinder block.
- Unscrew the bottom bolt holding the electrical machine to the motor.
- Place the equipment on the workbench and remove the plastic cover, which is held in place by latches.
- Remove the voltage regulator housing, which is secured with Phillips head screws. The unit is attached to the windings using a quick-release block.
- Remove the brushes; parts must be replaced if the remaining length of the graphite elements is less than 5 mm.
- Install new parts and reassemble in reverse order. Adjust the belt tension, and then start the power unit and check the operation of electrical devices. If an on-board computer is installed on the car, the device shows the voltage in the on-board network.
Removing the alternator on other vehicles may require removing the air filter housing or air ducts.
On some foreign-made machines, automatic tensioning devices are used; the body of the electrical device is rigidly bolted to the cylinder block. The owner needs to loosen the belt tension and then remove it from the pulley. On Toyota vehicles, the electrical components are covered by a metal casing secured with nuts.
Under the cover there is a brush block, a diode bridge and a charging control unit (equipped with an aluminum radiator). After removing the brushes, the collector rings are inspected; if there is wear on the parts, you will need to remove the rotor to correct the defect. After assembly and installation, the voltage in the on-board network is checked with the engine turned off and running.
Tips for replacing generator brushes VAZ 2107/VAZ 2105
If you are sure that it is necessary to replace the brushes, then you can change them yourself and without removing the generator. To do this, turn off the power to the battery, unscrew the two screws of the brush assembly holder and change the assembly. In another case, when it is not possible to unscrew the bolts or you need advanced diagnostics of the serviceability of generator parts, it is necessary to remove the generator.
It is forbidden to start a car generator with a disconnected battery. This will lead to a short-term increase in voltage at terminal “30”, as a result of which the parts of the rectifier and the vehicle’s electrical network will become unusable.
To replace the brushes you will need the following tools:
- ring wrenches for “8”, “13”;
- ratchet;
- a set of nozzles “for 13”, “for 10”, “for 17”; "at 19";
- flat and Phillips screwdriver;
- penetrating fluid WD 40;
- vice (if needed);
- new brushes for the VAZ 2107 generator.
The price of brushes VAZ 21013701470 is 34 rubles. Their analogue from UTM with article number HE0703A is 120 rubles.
The price is valid for Moscow and the region for summer 2021.
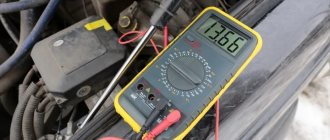
A problem in the power supply system is indicated by the battery charging arrow. This indicates that when the engine is running, the battery is not charging well.
The voltmeter showed a voltage of 11.2 volts. Ultimately, suspicion falls on the generator.
Let's start the renovation. First, remove the terminals and remove the battery.
Using a 17mm wrench, unscrew the nut and remove the adjusting bar.
We move the insulating cover, use a “10” wrench to unscrew the nut securing the wires at terminal “30” of the generator and disconnect the wires.
Disconnect the wire block from terminal “61” of the generator.
Using the socket “19” we unscrew the nut of the lower mounting of the generator.
Remove the drive belt from the generator pulley.
We knock out the bolt and remove the bushing. Please note that in this case the generator will be supported on a bracket.
We remove the generator from the car by lowering it down between the bracket and the front axle beam.
And here is the culprit of the “long journey”: a screw with torn edges.
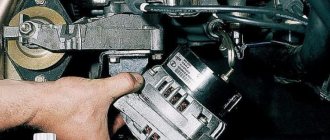
We install the generator in a vice and use a screwdriver to unscrew the two brush holder bolts.
Product replacement
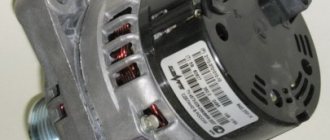
Replacing the voltage regulator on a VAZ 2107 is very simple. To do this, you need to unscrew two bolts using a screwdriver or a wrench, which depends on the generator model, then disconnect the terminal, and then remove the part itself, which looks like the one shown in the photo below.
Replacing the voltage regulator is quite easy, and there is no need to even remove the generator. Before carrying out work, be sure to disconnect the negative terminal from the battery to avoid a short circuit.
You can replace the product with a similar one, but it is recommended to use a three-level regulator. It allows for more reliable stabilization, and three adjustable output voltage levels.
This is interesting: How to disassemble the headlight on a Passat B5 with your own hands?
The brush mechanism is installed in place of the standard relay, and the box with the board and three-position switch is fixed anywhere in the engine compartment, but always with a mass on the coupling bolt. After replacement, the switch should be set to the appropriate position, depending on the temperature conditions.
Removing and installing the voltage regulator
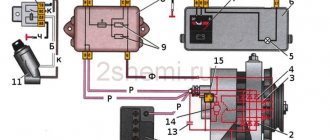
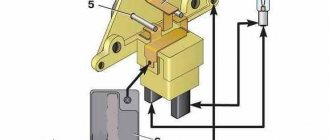
Replacing the external voltage regulator VAZ 2107
1) Using the “8” socket, unscrew the two nuts and remove the regulator.
2) Disconnect the two wires.
3) Attach the new regulator to the mudguard and connect the wires: orange to terminal “15”, and gray to terminal “67”.
Voltage regulator relay connection diagram
ATTENTION! Before starting the engine, make sure that the contact between the voltage regulator housing and the vehicle ground is reliable, and that the wires to terminals “15” and “67” are connected correctly.
Voltage regulator VAZ 2107 - purpose and first signs of malfunction
The voltage regulator is designed to automatically maintain the current strength so that the voltage generated by the generator is within specified limits, regardless of the rotation speed of the generator shaft (from the engine speed) and the current consumption of the car's electrical network. In VAZ 2107 cars, as a rule, an electronic voltage regulator is installed on the generator.
It is extremely rare that some models may come across an old-style device - a relay regulator. They were installed on generators 37.3701, produced before 1996, and on G-222. First, the device is tested on a running car. To do this, you need a voltmeter with the ability to measure DC voltage. The device must be equipped with a scale for values up to 15–30 V and have an accuracy class of at least 1.0. After starting the VAZ 2107 engine, it is allowed to run with the headlights on for 15 minutes at medium speed.
Then the voltage at the generator output is measured. To do this, the positive probe of the device touches terminal “30” on the generator, and the negative probe touches the ground (generator or car - it doesn’t matter, it’s the same thing). The voltmeter should show a voltage in the range of 13.6–14.6 V. If the measurement result is higher or lower than specified, and the vehicle is experiencing systematic overcharging or undercharging of the battery, then most likely the regulator is faulty and needs to be replaced.
Operating principle of the voltage regulator (VR)
RN is structurally an electromagnetic relay and a series-connected transistor circuit with resistances, which themselves are connected in series to the excitation winding on the generator stator. The physical meaning of the activity of an electronic launch vehicle is as follows.
The generator voltage is unstable and changes abruptly. As it increases, the electric relay turns on additional resistance, which limits the excitation current and the voltage decreases. If, on the contrary, the voltage drops below the permissible value, the relay turns off the resistance and the magnetic flux in the field winding increases, and the generator voltage increases. Since this is all a high-frequency process, the voltage in the automotive electrical network remains within an acceptable stable value.
If we consider the launch vehicle in a practical sense, then this device solves the following problems:
- this device activates the electric generator;
- it exercises autonomous control over the output of alternating current;
- maintains a constant set voltage value, regardless of the amplitude of oscillations generated by the primary windings of the generator.
For the generator model 9402.3701, which is mounted on a VAZ 2114, a voltage regulator 611.3702-14 is installed. This electrical appliance is mounted complete with a brush assembly. Technical characteristics of the launch vehicle:
- rated voltage supported by the regulator is 14.5 V;
- rated current - 5 A;
- maximum weight - 60 g;
- size - 66x55x32.
Checking the removed voltage regulator
To clarify the condition of the regulator, it must be removed. It is better to test the device complete with brushes and brush holder. This will allow you to immediately detect:
- poor contact between the terminals of the brush holder and the voltage regulator;
- breaks in the output conductors of the brushes.
Electronic devices are produced already assembled with a brush holder and one-piece brushes. The relay regulator will need to be connected to the removed brushes.
A voltmeter or a 12 V lamp with a power of 1–3 W is connected to the brushes of the device removed from the generator 37.3701. For the regulator from the G-222 generator, the connection is made to terminals “B” and “W”. The “plus” of the power supply is connected to the terminals “B”, “C” (when they exist), and the “minus” to ground. First, a voltage of 12–14 V is applied, and after that – 16–22 V. A sign of the device’s serviceability will be the lamp lighting up (deviation of the voltmeter needle) in the first case and going out (zeroing the voltmeter) in the second.
When the lamp lights up in both cases, this means that there is a breakdown in the device. If in both cases the lamp does not light, then there is no contact between the regulator terminals and the brushes, or there is a break in the device. Another cause of improper voltage regulation can be worn or stuck brushes. They must protrude from the housing of the electronic device or the brush assembly of relay regulators by no less than 5 mm.
Checking with a tester
The easiest way to check the generator voltage regulator with a multimeter on the Priora is to measure the voltage on the battery.
To do this, you need to perform the following sequence of actions:
- set the multimeter to measure DC voltage with a limit of at least 20 V;
- start the engine;
- at idle speed (1000-1500 rpm) the tester should show 13.2-14 V;
- when the number of revolutions increases to 2000-2500, the voltage should increase to 14.2 V;
- at maximum speed the tester should show no more than 14.5 V.
If the voltage differs greatly from the specified one, drops below 13.5 V or rises above 14.5 V, we can conclude that the unit is faulty.
A more accurate check of the voltage regulator of the Priora generator is carried out after its dismantling. You will need a multimeter, an adjustable power supply (you can use a charger), and a 12V light bulb.
We assemble a simple circuit: connect the light bulb to the brushes, the negative terminal of the power source to the ground terminal, the positive terminal to terminal “B” of the regulator. When 12.7 V is supplied, the light should light. When raised to 14-14.5 V, the control should go out. If the light goes out earlier or does not go out at all, the control device is faulty.
Replacing the voltage regulator VAZ 2107
If the regulator is faulty, the brushes are worn out or stick, then the device must be replaced. It cannot be repaired. For a relay-regulator in case of brush failure, it is sufficient to replace only one brush assembly. Usually they change it to a new electronic one, but you can install a three-level one, like 67.3702-02. They provide better voltage stabilization than standard regulators, taking into account the ambient temperature and vehicle operating conditions.
They are called three-level because they contain 3 voltage regulation modes. Their selection is carried out manually with a switch on the regulator, which is installed separately from the generator itself in a convenient protected place. The device is connected to the generator by wires through a brush assembly, which is supplied complete with the regulator.
Replacing generator brushes for Lada Granta (VAZ Granta)
You will need: a flat blade screwdriver, 8”, 12” wrenches, “7”, “8”, “24” socket wrenches, hammer, soldering iron, DC voltmeter, megger.
The operation of the voltage regulator is to continuously automatically change the generator excitation current so that the generator voltage is maintained within specified limits when the rotation speed and load current change. If necessary, you can check and replace the voltage regulator without removing the generator from the Lada Granta.