LED strip angel eyes
Of course, the main disadvantage of the previous option is the large discreteness, which means the low brightness of the angel eyes. Of course, the number of diodes can be increased, but it should be taken into account that then the resistors will be located too close to each other and the LEDs, which increases the risk of overheating.
You can get rid of this drawback by using LED strip with a high density of LD elements. In addition to the tape, which can be purchased at lighting stores, we will need:
- sheet material 5-8 mm thick;
- blade used in hacksaws;
- opaque white film used as a diffuser;
- the so-called ballerina - a device for making large diameter holes;
- transparent adhesive composition;
- soldering equipment;
- special heat-resistant tape (polyamide or aluminum foil);
- heat-shrink tubing;
- a bundle of wires, preferably with terminals.
To begin, we mark the sheet of plexiglass, determining the outer and inner diameter of the ring placed on the headlight. We start cutting out from the outer contour, using a ballerina. In our case, an electric jigsaw cannot be used, since it leaves the edges of the cut melted, and we are not happy with this.
We cut out the inner contour of the circle in exactly the same way; it is not necessary to grind the outer end. Cover the top of the ring with light-scattering film. The same effect can be achieved by walking over the surface with medium-grade sandpaper - this will make it matte.
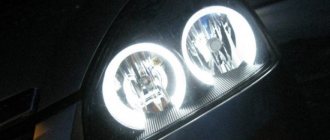
Now you can attach the LED strip to the glass base by first soldering the wires and insulating the soldering area with silicone sealant. You can cover the end of the circle with heat-resistant tape and check the operation of the circle by connecting the terminals to a 12 V power source. Angel eyes made from LED rings are ready!
Switching on through dimensions or low beam
The second version of the DRL connection diagram involves using the power circuit of the side light bulb. To do this, the positive wire from the running lights is directly connected to the “+” from the battery. In turn, the negative wire is connected to the “+” of the side light, which is currently electrically neutral. As a result, the following current flow path is formed: from the “+” of the battery through the LEDs to the size, and then through the light bulb to the body, which serves as the minus of the entire circuit. Due to the low current consumption (tens of mA), the LEDs begin to glow, and the lamp spiral remains extinguished.
This circuit solution has several disadvantages:
- running lights remain on when the engine is turned off, which is contrary to current regulations;
- the circuit will not work if LEDs are also installed in the dimensions;
- the circuit will not work correctly if the DRLs contain powerful SMD LEDs, the rated current of which is comparable to the current of a light bulb;
- For safety reasons, an additional fuse must be installed.
This connection method can be improved by connecting the positive wire of the LED module not to the “+” of the battery, but to the “+” of the ignition switch, thereby eliminating the first drawback.
main technical characteristics of the cars in question:
Currently, many drivers, in particular owners of VAZ-2109 cars; ..08, they are wondering whether it is necessary for them to install special daytime running lights on the car, or simply, as prescribed by the traffic rules, it is enough to turn on the low beam when driving in the daytime.It’s worth considering that not everything in the rules is thought out correctly; there are probably many unaccounted for points. For example, the fact that with the main low beam constantly on, we will always have a slightly uncharged battery means its early disposal and an unjustified, but regular way of profiting battery manufacturing companies. Plus the load on the generator, and therefore on the engine, means increased fuel consumption, increased wear and tear on engine parts, generators and their drives. Again, no benefit to us.
Here we begin to understand that installing daytime running lights on a car can serve as a way out of the situation, and we will look at what these are next.
Daytime running lights are lighting devices on a car that must be visible to pedestrians during the daytime, and ideally, which of course would be desirable, they consume a minimum of energy and are not expensive. Currently, there are a large number of devices of various types on sale, but almost all of them are based on a very bright LED light source, which uses a very small amount of energy. For example, a pair of such powerful devices with twelve LEDs each consumes no more than 5 Watts of energy, which of course has no worse effect on the performance of the car.
There are some effective tips for purchasing daytime running lights. There is no need to take large-sized or high-power running lights; you need to understand that these devices are designed only to be visible to pedestrians during the day; they are not suitable for night time. It doesn’t hurt, of course, to understand that the lights should fit harmoniously into the “entourage” of the car, decorate it, and not spoil it in any way. In general, it turns out that they are needed more to comply with traffic rules, and when ensuring road safety, their influence is very small. Which again brings to mind all our unnecessary expenses, and it is not difficult to calculate the quantitative income in the amount of even one individual country for the manufacturers of these devices.
The principle of operation of such a device is very simple. Since it must only work when the ignition is on, the positive wire must be attached to the most convenient place for this in the engine - this is the ignition coil, the negative wire must be simply attached to the housing. There is a special switch with an indicator in the cabin. It is needed to turn off the running lights when the main lighting is on, as well as when starting the engine in frosty winter weather, if there is a need to turn off unnecessary energy-consuming devices. There is also a need to turn off the daytime lights to start when the battery charge is low. And, in general, all these techniques are indicated in detail directly on the device’s packaging box and in the included internal documentation.
How to connect a voltage stabilizer (optional)
In the electrical on-board network of the car, the voltage “walks” from 12 to 16 volts. And LEDs do not tolerate such changes well. We soldered a resistor to each LED to regulate the voltage. But for more reliable protection you need a special stabilizer. It’s easier to buy a ready-made version and arrange it into a connection between the “angel eyes” and the on-board network of the car.
Factory version of the voltage stabilizer
If you are an “advanced” electrician, you can solder a simple stabilizer yourself. The L7812CV chip is used as a basis. See the photo below for the connection procedure.
The connection diagram is quite simple
According to this scheme, you need to connect the negative contact of the LED to the ground of the car, and the positive contact to the output of the stabilizer.
Video: connecting a voltage stabilizer for LEDs
The procedure for making and installing “angel eyes” is not easy. Before starting work, evaluate your abilities and capabilities to avoid possible additional costs. Consider whether your actions are legal and what consequences they may lead to. Neatness and cleanliness are required for successful completion of optics tuning. But everyone will notice your efforts.
Hello, dear friends! At one time, angel eyes on BMW cars made a splash on the market. It was optics of amazing beauty, especially in the dark. But even now fashion has not disappeared, and many people want to make angel eyes with their own hands.
In practice, there is nothing particularly complicated here. You will have to tinker, but the result will certainly please you. You can start from different instructions and manufacturing options. Some people use sites with videos that can be watched in parallel with taking notes in a notebook. Also on the Drive2 resource, motorists share their own experience of making peepholes, like those on a BMW.
I suggest you consider 3 interesting options. 2 of them are homemade and one more can be purchased online. The kit usually includes an ignition unit or a stabilizer, depending on the light source used.
How to connect correctly
Important! Only a correctly made connection will ensure the most positive effect from using DRLs.
To connect additionally installed DRLs, you can use several connection schemes:
- By installing an additional control button located inside the car and connecting it to the battery.
- Using an additional 4-pin relay.
- Through a standard lighting control relay with 5 contacts.
In addition to the above schemes, you can use others posted in the technical literature and on the Internet, or develop your own that meets the requirements for using DRLs and personal preferences.
Which angel eyes are better?
The question is ambiguous and difficult to answer. If you do not take into account manual assembly, then it is better to trust professionals who have already assembled similar headlights more than once. You can find a person who can make angel eyes to order very efficiently and quickly on any automotive forum or in social network groups dedicated to this topic.
It is recommended to contact people who have installed such lights themselves. They know how to select the right tubes, LEDs and take into account other nuances in order to achieve the maximum glow effect at minimal cost. In addition, they can show by their own example what the purchased angel eyes will look like.
Prefer to make your own headlights? Make sure to select a heat-resistant tube and LEDs with the appropriate light output. Angel eyes with a weak luminous flux will be practically invisible against the background of the main headlights. Very bright LEDs, on the contrary, will only blind oncoming vehicles and make it difficult for them to move on the road.
Angel eyes based on plexiglass rings
In order to make luminous rings for headlights or foglights using the first method, we will need:
Transparent rod can be purchased at a construction supermarket - these are used in blinds. Any can that matches the diameter of the reflector will be suitable as a cylinder. If the headlights are not round, then the process of bending the rod will be more difficult - you will have to make a template of a complex shape yourself from scrap material.
First, measure the circumference of the future ring. Then a piece of the rod of the required size is cut off, and holes for the LEDs are drilled in its ends. Now the rod can be bent.
To make the plexiglass soft, it is heated with a hair dryer. To make a ring, a softened rod is wrapped around a template and waited until it becomes hard again.
Now you can install the LEDs in the pre-drilled recesses at the ends. You can attach it using transparent glue. It is dripped into the recess and an LED is inserted.
For better dispersion on the resulting product, you need to make notches 0.5 mm deep at equal distances (the easiest way is to use a hacksaw blade or a needle file). In order not to suffer from painstaking work, you can cut a thread on a still straight rod using a die of suitable diameter.
Connection via a 4-pin relay from a generator or oil sensor
The following two methods have a common basis and imply the operation of daytime running lights only after the engine is started. The circuit for switching on DRL from the generator is based on switching a four-contact relay and a reed switch.
The DRL relay contacts are connected as follows:
- 30 – to the positive terminals of LED modules;
- 85 – to the positive wire to the dimensions;
- 86 – to any reed switch output;
- 87 and the second terminal of the reed switch - to the “+” of the battery.
After checking the reliability of all contacts, proceed to setup. To do this, start the engine and, by moving the reed switch near the generator, achieve its activation and a stable glow of the DRL. Then the reed switch is hidden in a thermal tube and fixed in the found place using nylon ties.
At the moment of starting the engine, and then the generator, the contacts of the reed switch and relay close, supplying power to the LED running lights. In this case, the side lamps remain turned off, since the current through the relay coil is small to light them.
In the absence of a reed switch, you can power the DRL from the oil pressure sensor. In this case, pin 86 is connected to the oil pressure lamp. The rest of the circuitry is duplicated.
Both schemes have a common drawback. They cannot be used if LEDs are installed in the dimensions.
Product advantages
Among the main advantages of DRLs with indicators, experts and car enthusiasts note:
- high energy efficiency;
- good lighting brightness (450 Lumens and above);
- the ability for flexible running lights to take absolutely any shape at the owner’s request;
- improving the appearance of your car;
- presence of 2 modes;
- the ability to install LED lamps not only inside the headlights, but also on other parts of the car;
- the ability to shorten LED products to the required length without losing their functionality;
- resistance to high and low temperatures, moisture, dust, vibration;
- use in a set as a repeater or separately from turn signals;
- long service life (up to 80 thousand hours).
Flexible daytime running lights Optima Flex DRL-9-60
This will allow you to catch the admiring glances of pedestrians and other motorists. The brightness of LEDs on the market can differ by two times, and their price also differs. You can install these products yourself, strictly following the instructions.
There are many options for installing DRLs on the front of the car. From my own experience, I can say that if you decide to really be more noticeable on the road, then you need to set it higher. If for you DRL is just an excuse for Mr. Traffic Policeman, then it doesn’t matter where you attach it.
Installing running lights at a car dealership when purchasing a new car is very expensive. They offered to install the Duster for 15 thousand rubles, the price of the Philips kit in the store is 3 thousand rubles. If the DRL is well equipped, installation and connection will take 15-20 minutes.
Abroad they are designated as DRL - an abbreviation for “Daytime Running Lights.”
- 1. Types of daytime running lights
- 2. Rules for installing navigation lights
- 3. Eye of the eagle
- 4. Modular models
- 5. DRL from fog lights
- 6. Some varieties for PTF
- 7. LED strip
- 8. LED neon tube
- 9. Video analysis of the headlight
- 10. DRL monoblock, classic
Legal norms in Russia and Ukraine
In principle, building daytime running lights with your own hands is not a particularly difficult task. To do this, you only need steady hands and minimal knowledge in the field of electronics. However, before you make running lights for your car, you need to know exactly what the letter of the law says on this matter. Otherwise, you may encounter problems with improper installation, which will lead to fines and regular stops by police officers.
According to the laws of the Russian Federation, running lights on a car must be turned on in any case, regardless of the time of year or day. This rule was introduced back in 2011. The DRLs themselves can be used in conjunction with low beam headlights, as well as fog optics. But if it is not possible to connect them to the existing optics, then they can be installed separately from the headlights. The main thing is that the installation is carried out taking into account all requirements and standards.
Standards for installing running lights
As for Ukrainian legislation, the traffic rules indicate that DRLs in headlights are lighting devices.
But unlike Russian legislation, in Ukraine the need to turn on daytime running lights arises in several cases:
- during the period from October 1 to May 1 at any time of the day;
- when driving in low visibility conditions;
- when driving outside populated areas.
How to make angel eyes like a BMW
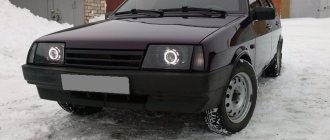
“Angel Eyes” is a unique horse from a German manufacturer, loved by so many motorists. However, if you like this mesmerizing glow, you don’t have to buy an expensive foreign car. This can be done on almost any car.
It is important that it has round front optics. For example, domestic VAZ 21213 or VAZ 2106 have it.
But, of course, the design will be even better suited to foreign cars, including the same old BMW models that so lack the shine of their successors
In any case, the beauty and effectiveness of the new headlight bezel may attract the attention of traffic police officers. But if they stop you on the road, it will be purely out of interest - the driver will not face a fine for this
Getting ready for work
Plastic sticks
In order to decorate your vase (models from 2101 to 2115 and 21099), you will need to prepare a certain set of materials and tools.
To make “angel eyes” for a vase, you will need the following materials:
several plastic sticks. They must be equal in length to the dimensions of the optics on the machine. Therefore, to create tuning we will need four plastic sticks with a length of approximately 40-45 cm;
- heat-resistant sealant suitable for working with optics;
- four LED bulbs or strip. If using tape, give preference to the SMD 5050 model with 60 diodes per meter. The choice of LED glow color is determined only by your imagination. The best solution would be to match the color of the car with the color of the LEDs;
- four spare glasses for headlights. You need to buy them just in case, since it’s unlikely that you can remove the old ones intact and without chips;
- cable;
- resistors;
- 9 volt battery;
- a can or any round object that has the same diameter as the headlights;
- plexiglass with a sheet thickness of 10 mm.
The tools you will need are a glue gun, a hair dryer and pliers. You also need a drill with a set of drills and disk attachments.
"Angel eyes" and their color
Colors of “angel eyes”, and in what cases they can be installed on a car:
- yellow, red, green, orange, purple - allowed to be used as tuning on show cars;
- white, blue - can be used in everyday use, as lighting and dimensions.
In other words, the operation of “angel eyes”, other than white ones, does not comply with the rules governing the use of lighting devices. Their presence gives the traffic police the right to issue a fine, officially warn the driver, and be sure to confiscate non-standard lighting equipment. This ban also applies to multi-colored “angel eyes,” that is, to those whose color can change.
A little about connection
In general, installation and connection largely depend on the specific vehicle and its design features. But some general and very important points are worth highlighting.
To begin with, elements such as angel eyes act as an additional lighting device as part of the vehicle. Therefore, their presence falls under the requirement for DRLs. As you understand, these are daytime running lights.
And according to the rules, they should be turned on simultaneously with starting the engine, and turned off when stopping. Plus, the DRLs are required to turn off when the headlights turn on. This tells us that the connection of the eyes should be carried out according to the connection diagram for daytime lights.
One of the options involves using 4 female terminals and one five-pin relay. The minus from the eyes goes to the body, and the plus goes to the relay.
Hi all. As promised, today I’ll tell you how to make “angel eyes”
at home, using available tools and materials. The article will be useful to those who love to make things with their own hands. Go!?
We all know what angel eyes are, and who owns (the chip belongs to BMW) this invention that is so popular with millions of motorists around the world. But, unfortunately, not everyone has the opportunity to buy a BMW, but they want to have beautiful tuned optics. What to do in this case? Everything is very simple, you need to “flex your brains” and make angel eyes with your own hands
To work you need to prepare:
- "Straight arms" :-). I’m joking, of course, but without the slightest experience in handmade crafts, you most likely won’t succeed... Therefore, before taking on this work, you need to realistically assess your own abilities.
- Plexiglas tubes (transparent PVC tubes). You can buy these online, at a hardware store, or at a decor store. Some craftsmen get creative and use strips of plexiglass or PVC as a plexiglass tube, which they cut into square strips, after which they are sanded into a round shape with sandpaper of different grain sizes. As an option, some use LED strip, but that’s a completely different story... I think someday I’ll tell you about this option for creating angel eyes.
- Soldering iron, four 12V resistors, bright LEDs rated at 3.5 volts. The color of the LEDs is at your discretion.
- A template or layout according to which the tube will be bent. The diameter of the template should match the diameter of the place where you are going to install the angel eyes. Here you can use anything: from a coffee can to a drainpipe of the required diameter...
- Electrical tape, heat shrink, soft copper wire. The length of the wire will be different for everyone, it all depends on the method of wiring and the location of the connection.
- Pliers, a household hair dryer, a metal blade or a special miniature cutting wheel for a screwdriver or drill.
- Sandpaper of different grains, file or needle file.
How to choose flexible daytime running lights
Regardless of whether you are interested in installing lights with or without a turn signal function, it is important to give preference to quality models. They must be powerful and bright enough, well sealed, and have an effective cooling system.
In addition, car owners who are interested in how to choose flexible daytime running lights should take into account that they come standard and universal. Lighting devices of the first type are designed for installation on certain vehicle models. And universal DRLs equipped with a turn signal function have a wider scope of application.
Depending on the features of the device, you can choose modular cluster daytime running lights and strips enclosed in silicone tubes. In any case, the design will include two types of LEDs - white (working as DRLs) and yellow (playing the role of turn signals). This makes the models under consideration as universal as possible. Moreover, you can buy flexible DRLs with a turn signal function, in which white and yellow LEDs work alternately or simultaneously. In the first case, the daytime running lights will turn off when the car's course changes, so that the turn signals come on instead. In the second, during rotation, both types of LEDs will function simultaneously. You can choose any option - products in each category are easy to install and easy to use.
In the selection process, also pay attention to the number of LEDs used in the design, the size and shape of the blocks, color temperature, and radiation strength. However, it is equally important to evaluate the reputation of the manufacturer’s company - this will help you avoid the risk of purchasing low-quality models.