Causes and symptoms of malfunctions
There are several reasons why the VAZ-2114 steering rack needs to be replaced:
- Natural wear and tear of components;
- Wear due to foreign particles (sand, dirt) getting inside the mechanism;
- Damage to the rack or pinion teeth.
Natural wear and tear is understandable. If a car has driven more than 100 thousand km (and on our roads maybe less), then play in the steering is a common occurrence. But other causes of malfunctions are influenced by the features of operation and maintenance.
Damaged boots and oil seals, careless operation of the car, ignoring adjustment work - all this significantly reduces the life of the steering mechanism and leads to damage that makes further use of the unit impossible.
A worn or faulty VAZ-2114 steering rack will definitely manifest itself, and the symptoms can be different:
- Increased free play in the steering;
- Knocks from the steering rack when driving over uneven surfaces;
- Strong vibrations in the steering wheel;
- The car pulls in different directions;
- Crunching in the area of the steering mechanism when turning;
- Wedging;
- "Weighting" of the steering wheel.
Since many symptoms are also inherent in problems with other components of the VAZ-2114 steering, before making a replacement, you should first make a diagnosis.
It comes down to checking the camber/toe angles, the condition of the rod ends and silent blocks, as well as the column shaft and its components.
The steering rack of the VAZ 2114 dangles and knocks, causes and solutions
Well, let me start with the fact that after winter, on our spring roads, it would be necessary to eliminate extraneous knocking in the suspension... Namely, what was bothering me was that when the wheel is turned out, when driving at low speed on an uneven road, an unpleasant knock appears in the steering wheel...
I changed the steering joints and ball joints, but the knocking noise remained. When parking the car on a flat surface, I moved the steering wheel left and right and there it was, the same sound as when driving.
We performed the operation together with an assistant, he dangles the steering wheel, I hold the inner steering tip, and the knocking comes from there at the point of attachment to the rack. If you pull the tip, it seems to be wobbling, but if you hold it, press it, like, as if at a break, and the assistant wiggles the steering wheel, then there is no knock.
Question! What could it be? Are the internal lugs broken where they are attached to the rack, or is something in the rack itself broken, or is it possible that the bolts securing the lugs to the rack need to be tightened? Where to start first, what to sin on? I really hope for advice from knowledgeable people, but if the weather gets better, I’ll follow your advice to eliminate the unpleasant, annoying knocking... Thanks in advance!
Possible reasons
- Of course, first of all, check the fastening of the steering rods to the rack. The second question is about the rack - they are weak on your cars and you often have to change the bushings - they play.
- Replace the bushings and the problem will most likely go away.
- There is an adjusting nut at the bottom of the rack; an elastic band is inserted into it; you need to tighten it a little with a special wrench so as not to bother calling in for service; this adjustment costs a penny, but you can see for yourself which key and where to tighten it in the future.
- Bolts have nothing to do with it. This is increased play in the rack mechanism. The rack needs to be adjusted. Only there is a trick there. The rack shaft is commercially called a “stick”. So, over time, wear appears on the stick, and it is not uniform. It's stronger in the middle and fades away at the ends. If you adjust the play with the wheels in a straight position, then when the steering wheel is turned, the rack may jam. And the nut must first be turned to loosen, and then slowly tightened. You need to pull the steering rod with your left hand, and use your right hand to turn the adjusting nut until the play disappears. And when tightened, the steering wheel becomes “heavy”.
When is replacement carried out?
If the condition of the listed elements does not cause any complaints, and adjustment work cannot be performed due to backlash, the fault lies in the steering mechanism itself.
Increased free play and knocking can still be eliminated by adjustment. While under the car on the mechanism body, you can find an adjusting screw for a special key, which can be replaced with a 17mm hexagon.
Using a wrench, tighten the screw until it stops, and then unscrew it by ? revolutions, and check the “heaviness” of the steering wheel. It should rotate easily, then you can check the behavior of the steering on the road.
If the adjustment does not help, the play and knocking remain, the VAZ-2114 steering rack needs to be repaired or replaced.
Read on the topic: The play in the steering, what it should be, is normal.
But if there is a crunch in the rack, you can immediately start replacing it, since adjustment with such symptoms obviously will not help.
Replacing the VAZ-2114 rack can be entrusted to service station specialists, but you will have to pay. The cost of replacement services at service centers varies from $20 to $45. And if we add the price of the rail itself, then the amount comes out to be considerable.
You can replace everything yourself, saving on this, especially since performing the operation on a VAZ-2114 is not difficult and even a novice car enthusiast can do it.
Also read about the causes of knocking when turning the steering wheel.
Preparatory work
If you want to repair the steering rack yourself, then you should purchase the following spare parts:
- Tubes for rack.
- 2 tips - they already come with nuts.
- Repair kit.
- 2 silent blocks.
- Cover for the rack.
Repair requires replacement of the above parts even if only the tubes are damaged. The wear of elements must occur simultaneously, so it is not recommended to skimp on parts. You will also need bearing grease, clamps, White Spirit, and a can of WD-40. It is worth preparing rags in advance, as you will need a lot of them. As for tools, repairs require sets of wrenches, screwdrivers, socket heads, and wrench extensions. Special tools include special wrenches for the adjusting nut, as well as a puller for tips.
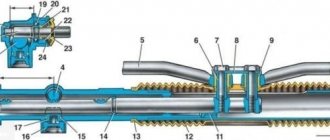
Rack in disassembled condition
Advice! When the defects in the operation of the steering rack are minor (for example, knocking), then it is better to start with adjustment. If the adjustment does not help, then you should move on to diagnostics and repair.
Before starting repairs, it is recommended to carefully study the structure of the steering rack, which is described in detail in the VAZ 2114 operation and maintenance manual. You should first apply WD-40 to the four nuts that secure the steering rack to the car body. You also need to shed the only tightening nut and the threads of all the tips. After 3-4 hours the work must be repeated. Repairs can only begin the next day.
Changing the rack yourself
There are two ways to replace the rack. The method is selected based on why exactly the mechanism is being removed - for replacement or repair.
In the case of installing a new rail, you should first determine its completeness.
They go on sale both assembled with steering rods and without them.
The first replacement option involves pressing out the tips from the steering knuckles, so the work will require a special puller.
Tools and accessories
To carry out the replacement you will need:
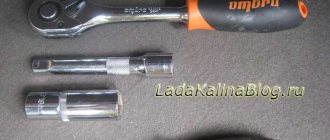
- Socket or open-end wrenches for 10, 13, 17, 22 (but better - heads with a knob equipped with a ratchet mechanism);
- Jacks and supports;
- WD-40 product;
- Flat screwdriver;
- Hammer;
- Rags;
- Tip remover (if the rods are also dismantled).
Work technology
Let's look at how to replace the VAZ-2114 steering rack without changing the rods. The technology for carrying out the work is as follows:
- We put the car on a flat area or hole, immobilize it (tighten the handbrake, put wheel chocks under the rear wheels);
- Loosen the wheel bolts;
- Using jacks, we hang up the front of the car, then secure it with props. If you have one jack, first lift one side, put a support, remove the lifting mechanism and go to the other side;
- Remove the front wheels;
- In the arch on the left side, in the direction of travel of the car, there is a technological hole that can be covered with a lid (not always). We dismantle this cover;
- If there is an absorber, loosen the clamp securing it, pull out the element and move it to the side;
- Using a hammer and a screwdriver, we bend the antennae of the plate, which prevent the bolts securing the rods to the rack from loosening (for ease of work, you can turn the steering wheel to position the rack in a place that is easy to access);
- We unscrew the fastening bolts and pull them out together with the fixing plate;
- We move the rods to the side;
- In the cabin, in front of the front shield, at the bottom we find the junction of the column shaft with the gear shaft of the mechanism. Unscrew the fixing bolt. By moving the steering wheel towards you, we move the connection;
- Using a 13mm socket, unscrew the nuts securing the brackets that secure the mechanism. They should be treated with WD-40 first, as they often rust. Attempts to unscrew without pre-treatment may lead to breakage of the pin;
- Remove the staples;
- We move the mechanism towards the engine so that the gear shaft completely comes out of the hole in the shield;
- We pull out the assembly through the technological hole;
- We push the new mechanism through the hole, correctly place it, fix it and connect it to the column.
Reassembling the steering control is done in the reverse order of removal.
How to disassemble the steering rack of a VAZ 2114 and replace worn parts
In addition to a helper and new slats, you will also need a set of tools and materials. Be sure to include in this list:
- Set of wrenches;
- Jack;
- 17mm hex wrench;
- Balloon wrench;
- Bricks or similar materials (to support the front of the car without wheels);
- Puller for steering rods (not necessarily needed, you can do without it);
- Dry rags;
- Litol type lubricant;
- The almighty WD40.
Now you can proceed directly to replacing the steering racks. We strongly recommend that you follow the established procedure for conducting operations.
- Place the car on a level surface. No, a simple floor in your garage is enough, it is not necessary to level it with cement.
- Apply the parking brake to keep the car from moving.
- Raise the car on a jack, place logs or bricks under the front, and then remove the wheels.
- Remove the negative cable from your battery for safety reasons. Nobody needs electric shocks today.
- On the driver's side inside the passenger compartment, near the pedal block, unscrew the locking fastening bolt of the cardan of your steering shaft.
- Remove the adsorber directly from the engine compartment. You can put it aside for now.
- Remove the cotter pins, which will allow you to then remove the mounting nuts from the tie rod ends.
- Using a rod puller, the ends are removed from the racks. If for some reason the puller is missing, it can be replaced by gentle, successive blows to the tips. Don't damage their threads just by doing this. They usually lend themselves, so many people do without pullers.
- Treat the rack clamp fixing nuts with an anti-rust agent. Now we are talking about the almighty WD40. Wait a while for the composition to be absorbed.
- Using a wrench, unscrew the fastening nuts. Processing with a Vedash should greatly simplify this task for you. There are four nuts in total.
- Remove the rack by pushing it through the passenger side, that is, the right side of your VAZ 2114.
- We recommend replacing the boot at the same time as replacing the racks. Over time and during the period of operation, the steering boots seriously wear out, so it is hardly worth trusting old boots to work with new racks.
- The tips are removed from the slats. At the same time, try to count the number of turns with which the nuts were tightened. This will allow you to fasten them back as close to precision as possible at the reassembly stage and, with peace of mind, go to the service station, where they will adjust the wheel alignment.
- Take your new rail, remove the plugs from it.
- Next, take Litol or a similar lubricating liquid into your hands and fill the body with this composition as much as possible.
- The ends are mounted back onto the rods. Try not to mix up the places of the nodes, although they are different from each other. However, as practice shows, this does not prevent many do-it-yourself repairmen from confusing them.
- The new rail is placed in its rightful place. To do this, the nuts are attached to the studs of the clamps.
- Now you will need your friend, comrade, assistant. Ask him to help guide the shaft drive gear to the seat located directly on the rack housing. The splines must line up exactly. Be sure to check this moment.
- A locking bolt is fixed on the cardan.
You can safely perform all other work in the reverse order of the dismantling described above. In this case, each thread must be treated with Litol. This event will allow you to more easily deal with disassembling the elements during subsequent repairs. Or it will be a pleasant surprise for the new owner of your VAZ 2114.
The nuances of replacing the assembly assembly
In the case of replacing the VAZ-2114 rack assembly with rods, we proceed somewhat differently.
There is no need to unscrew the rods from the rack during the work. But you will have to disconnect the tips from the stand. This operation will not be difficult if you have a puller.
If it is not available, you can use the folk method;
- Unbend and remove the stopper;
- Unscrew the tip nut;
- We take the pry bar and place it between the rod and the protrusion of the stand, to which the tip is attached;
- We use a pry bar to create a pressing force and at the same time apply sharp blows with a hammer to the protrusion (usually 2-3 blows are enough for the tip to “pop out”).
Next, we do everything identical to what was described: unscrew the fastening nuts and the fixing bolt on the column shaft. Afterwards all that remains is to remove the mechanism and replace it with a new one.
After replacement, it will be necessary to adjust the camber/toe angles of the VAZ-2114 steering, even if the rods were not removed. This operation will definitely not be superfluous.
What could be causing the problem?
Let's look at each of the signs and what can cause them to appear. It should be noted that some problems, for example knocking, may not be related to the mechanism itself.
1. So, the free play on the steering wheel has increased, that is, it dangles more; the increased travel can additionally manifest itself in the appearance of a beating in the steering wheel when braking.
This problem may be associated with loosening of the ball pins to the stabilizer strut, increased clearance in the ball joints, or increased clearance between the rack and pinion.
- If play is detected in the steering wheel, first of all you should inspect the steering ball joints. It rarely happens, but it is possible that the nuts securing the tips have become loose and the pin has begun to come out of the seat, causing a significant gap to form at the mounting point. Fixing such a malfunction is simple, just tighten the nuts.
- Ball end wear is much more common, resulting in a gap between the pin and the body. This problem can be eliminated by changing the tips.
- Play in the steering wheel can be formed due to an increase in the gap between the rack and pinion. During the operation of this mechanism, these elements gradually wear out, and the gap between them increases. Repairing this problem comes down to an adjustment that just requires tightening the adjusting stop nut correctly.
2. A knock in this mechanism can be caused by play in the tips, an increased gap between the rack and gear, as well as loosening of the mechanism itself.
- As for the tips and rack clearance, the repair of the mechanism is indicated above, that is, just tighten the thrust nut and that’s it.
- Regarding the loosening of the fastening, it is enough just to tighten the nuts securing the clamps that hold the mechanism, and the problem will be solved.
3. Stiff rotation of the steering wheel can be due to damage to the support bearing of the shock absorber strut (the case when a problem with the suspension affects the steering mechanism), damage to the rack bushing, wedging of the steering tips, wedging of the steering gear bearings.
- In the case of a worn support bearing, the repair boils down to removing the support and replacing the bearing.
- If the reason for the tight rotation is the support bushing, then you need to put a new one in place of the damaged one, and lubricate the mechanism itself.
- If there are problems with the tips, they should be checked and replaced if necessary. The same applies to drive bearings.
Adjusting the wheel alignment with a caliper
It should be noted that after repairing many faults, adjustment of the wheel position (wheel alignment angles) will be required.
Diagnostics and restoration of slats
Instead of purchasing a new rack, you can try to repair the one installed on the car. But first you need to make a diagnosis.
To do this, we completely disassemble the assembly into its component parts and carry out troubleshooting. This will allow you to determine which elements are extremely worn or damaged.
Repair kits for restoring the steering mechanism are sold on the market. Moreover, their completeness is very different.
Some include only rubber and plastic elements (oil seals, boots, bushings).
Others come with a new rack, gear, connecting elements, bearings (in general, almost all components).
With the help of repair kits, you can restore the functionality of the “native” unit, but only on the condition that the body is intact and does not have significant wear.
The use of repair kits can significantly reduce the cost of repair work. But they do not always allow you to restore functionality and problems with the steering remain even after repairs.
In this case, there is only one way out - replacing the steering rack with a new one.
How to tighten the steering rack on a VAZ-2114 yourself
No one will deny that a working steering wheel is one of the factors influencing the guarantee of the safety of the driver and passengers. Regardless of the type of steering gear, they all need to be serviced periodically. All second-generation cars, including the VAZ-2114, have a reliable and easy-to-repair and adjust steering mechanism. It is not equipped with a hydraulic power steering, which allows you to tighten and service the steering rack without any problems.
Before tightening the steering rack on a VAZ-2114, you need to consider the prerequisites indicating the need for its tightening or repair.
AvtoVAZ provides a ten-year warranty. This is a fairly long service life of the steering mechanism. But do not forget that the guarantee is given for ideal conditions of use of the mechanism. The basis for calculating the service life is normal roads and constant high-quality lubrication located in the rack housing and a moderate driving style.
In real life, a ten-year service life is practically unattainable. Bad roads, questionable quality of spare parts and hard driving of the car end up with the mechanism making itself felt ahead of time.
Selecting a replacement unit
The choice of a new unit for the VAZ-2114 should be approached seriously. The main problem is that very often there are defective products on the market that are already faulty or will fail in a very short time.
The best option is to purchase an original unit. The VAZ-2114 uses the same mechanism as the cars of the Samara 1 family (2108, 2109, 21099). Therefore, its catalog number is 2108-3400012, that is, when searching, you can safely ask for a rack for the “Eight” and not worry that it will not fit. The average cost is $100.
You can also buy analogue racks produced by auto parts manufacturers. But here you should pay attention to the manufacturer (it must be well-known), as well as the availability of quality certificates.
Among analog products, we recommend paying attention to steering mechanisms from the following manufacturers:
- Weber CG 2108-0012 (its price starts at $80);
- Pilenga SR-P 1141 (costs $100);
- Trialli CR 108 and CR S 708 (the first comes without rods and lugs and costs about $100, the second has an assembled mechanism, which is why it costs twice as much).
For those who want to slightly modify the steering, you can look for tuning racks. The main difference between them is the lower number of revolutions. They are also positioned by manufacturers as reinforced.
Regarding manufacturers, it is worth looking for products from the Italian company Brembo, the Polish company ATF, or the Russian company SS20.
As for the latter manufacturer, it only produces steering racks for the 10th VAZ family, so after acquisition the mechanism will have to be slightly altered.
But we note that tuning slats will cost much more than the original or conventional analogues. So, for a Brembo unit you will have to pay about $250, for ATF - about $200, and SS20 - approximately $210-220.
New or refurbished?
Among car enthusiasts, the question often arises regarding the steering rack - should I purchase a new one for replacement or restore the “original” one? It is impossible to answer unequivocally here.
If the repair was carried out independently and using a high-quality repair kit, then after restoration the rack can serve for quite a long time.
But if you purchase a restored rack or if it is repaired at a service station, there is a high probability that problems will soon arise. After all, it is unknown who, how and with what help carried out the restoration.
As for new units, there are a lot of defective racks on the market.
In general, it is still better to try to repair the rack first, since it is much cheaper. It is worth purchasing a new mechanism only after you have already become convinced that the restoration did not help.