How to change the license plate light bulb on Kalina
What tools will you need:
- flat screwdriver,
- a piece of rag
- new lamps.
The left side of the lampshade is made in such a way that you can place a thin object (in our case, a screwdriver) under it and pry it, releasing the first latch. This requires a little effort. If you are afraid of scratching the plastic, place a prepared rag under the tip of the screwdriver.
Once the left side of the latch has come out, move the lamp itself a little to the left and remove the right side. Pull the lantern out. Now you can either disconnect the wire, or simply turn the lamp a little and remove it from the housing.
The light bulbs in the license plate illumination are the most common ones - W5W. The same ones are in the front side lights. We take out the old incandescent lamps and insert new ones - LED ones. It’s better to immediately check whether you placed them on the wrong side; LED lamps have polarity! Well, now, with a clear conscience, everything can be put back together. The license plate light bulbs on Kalina have been replaced.
What advantages will we get after replacing the standard license plate light bulbs with LED ones?
- Firstly, they shine much brighter. This is noticeable even to the naked eye. And at the same time they consume much less energy, which leads to at least insignificant savings.
- Second, they don't get so hot. Having removed the old lamps, you may have noticed some melted plastic near their seats. It is not good. This definitely shouldn’t happen with diode lamps.
- And last but not least, it looks beautiful. Agree, the bright, white backlight of the license plate looks much better than the standard one.
How to change license plate lights
Wiring diagrams for Lada Kalina 2 hatchback (luxury).
electric Lada Kalina Lada Kalina Hatchback UltraViolet Logbook -062- How to drain antifreeze
Replacing the license plate light bulbs on the Lada Kalina is a simple task, so you can easily handle it yourself. By changing the lights yourself, you will not only save money on the services of workshop specialists, but you will also be confident in the excellent quality of the work.
Open the trunk of the car and pry the lamp on the left side with a flat-blade screwdriver. This will free him from the latch;
Step #1
Push the light on the right side and move it to the left. After some pressing, it should come out easily;
Step #2
Pull out the lamp along with the power wires. This will make it easier to replace the license plate lamps of the Lada Kalina;
Slightly lift the plastic clip up and remove the power plug;
Step #3
Carefully turn the white housing of the Lada Kalina license plate light bulb counterclockwise and completely pull out the base;
Step #4
Pull out the lamp itself. To do this, simply pull it to the side. After this, remove the lampshade from the base.
Step #5
Install a new lampshade in place of the burnt out bulb. The job is done in the same way as removing a light bulb, but in reverse order. Make sure the new light is lit.
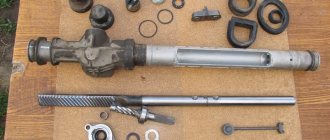
Engine Cooling Water Pump
Personal experience of Renault Megane III
Here it is, a mine - a water pump. Refers to the cooling system, but is driven by a timing belt. If the pump wedges due to the death of the bearing, it will cut off the teeth on the belt, and then there will be destruction in the motor. And they “forgot” to mention this detail in the routine maintenance section of all service books. What to do with it? The consumer can only guess. Should we wait for death from natural wear and tear on a plug-in motor? Stupidity. And if changed, then when? It seems that the mine is not even the water pump itself, but the complete disregard for it in all the official VAZ “literature” for the consumer.
New VAZ engines are now equipped with high-quality timing belts from well-known brands. I believe that if no oil gets on it, it will cost 180 thousand. But is the difference in components really so great that on the 8-valve VAZ-11186 for Granta the belt must be changed at the 75th thousand, and on its closest relative VAZ-11189 at the 180th?
Let's continue the research. The pulleys are not demolished at all. Pressure roller bearing up to 180 thousand? Let's admit it, although it's hard to believe. But why change all this equipment at the 180th thousand, if the estimated life of the engine is 220 thousand km? Refresh before demise or major overhaul? If you don’t believe me, look at the photo taken in the workshops where VAZ engines are produced.
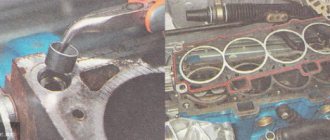
Engine valves VAZ-21116
After meeting the pistons, the valves were noticeably deformed (VAZ-21116 engine).
After meeting the pistons, the valves were noticeably deformed (VAZ-21116 engine).
The average consumer has access to only those that come with the car from official documents. What follows from them? Open the Grants service book. Replacing the timing belt - at 75 thousand kilometers for an 8-valve engine, not a word about the 16-valve belt! The same situation is with Kalina - I came across a book where there is nothing to say about one engine, but on the other we only check the condition of the belt, but there is no talk of a planned replacement. It’s even more fun with the Priora - there are service books where there is not a word at all about the gas distribution mechanism, but the air conditioning compressor belt is mentioned in almost every maintenance coupon.
With Vesta and Xray, progress is obvious - at 45, 75, 105, 135 and 165 thousand we adjust the gaps in the gas distribution mechanism. And for the first time we plan to remember the timing belt along with the rollers for 180 thousand kilometers! This is for 16-valve engines VAZ-21129, 21179 and 8-valve Vesta VAZ-11189. I can’t do without the quote: “2.11. Replace the timing belt along with the rollers. 2.12. Replace the crankshaft and camshaft sprockets. Replace the toothed belt, tensioner and support roller (for the VAZ-11189 8-cl. engine, only the tensioner) of the engine gas distribution mechanism drive. Adjust the tension of the toothed belt." Not only is the oil oil (we change the same belt twice), but of all the parts, they didn’t remember the most vulnerable one - the pump!
Replacing the pump on Lada Kalina 8 valves
Lada Kalina hatchback ultraviolet logbook -062- how to drain antifreeze
Personal experience Lada Priora hatchback On an 8-valve Kalina, you can change the water pump yourself. However, if the car owner does not have minimal experience in car maintenance, many questions may arise. For example, which pump to buy, how to choose the right tool, and is it worth draining the antifreeze from the system completely?
Which pump to choose
When the time comes to change the water pump, car owners begin to look at car dealerships for a worthy replacement. But which pump to choose so that it lasts as long as possible and does not cause problems for the owner?
In contrast, it will not last long - after 10 thousand kilometers the pump will need to be changed again.
At AVTOVAZ, designers install a TZA water pump on the Kalina. It has a long service life; drivers often change the pump only after 100 thousand kilometers. As an alternative, you can install more expensive German-made Bosch pumps - they are also famous for their quality and durability.
Where is the water pump located on Kalina?
Due to the fact that the pump is driven by the timing belt, it is part of the gas distribution mechanism. That is, you need to look for the water pump on the Lada Kalina from the side of the engine itself. Visually, before removing the belt, you can only see the pump pulley, which is involved in the gas distribution system.
The pump on the VAZ is located in the timing device
Preparing tools
It is recommended to prepare a standard set of tools for removing bolts and unscrewing nuts. You will also need a 6-point hex key. To drain the antifreeze without contamination and inconvenience, it is better to immediately find a container for draining and a rag to blot up any drops that have fallen on the engine elements. To ensure reliable installation of the pump, you can use a sealant with good thermal conductivity properties.
How much coolant to drain/fill when replacing the pump
In any case, before dismantling the old pump, you will need to drain the antifreeze from the system. This is necessary in order to reduce the pressure in the hoses and not be injured during sudden releases of liquid.
If the water pump has not been changed for a long time, then it is advisable to immediately drain the entire volume of antifreeze from the system and replace it with a new one. If the car owner has recently filled in new coolant, then there is no point in completely draining it: just disconnect the hoses from the expansion tank and wait until the antifreeze comes out.
To make it easier to fill a large volume of coolant, drivers usually use funnels
Operating procedure
First of all, you will need to install the machine on a flat surface. You can drive the Kalina into the inspection hole, you can simply lift the front right part on a jack. It is recommended to make sure that the car is securely secured; it is better to place additional supports under the body beam.
When dismantling the pump, you will need to remove the timing belts.
The work of replacing the pump on the Lada Kalina is carried out according to the following instructions:
- Remove the engine splash guard.
- Disconnect the negative terminal from the battery.
- Unscrew the cap from the expansion tank and immediately remove the plug located on the cylinder block. Wait until the coolant drains out.
- If all the antifreeze is drained, then unscrew the cap from the radiator and place a container under the drainage area.
- After the antifreeze has been drained, screw all the plugs back on.
- Remove the protective cover from the timing belt.
- Loosen the belt by slightly tightening the timing pulley.
- Remove the drive belt.
- Remove the four bolts that secure the pump pulley to the cylinder block.
- After removing the pulley, unscrew the last screws securing the pump.
- Pull the water pump out of its socket along with the gasket.
- Clean the planting site from adhering dirt and antifreeze drips.
- Apply heat-resistant sealant to the edges of the hole and install a new gasket on it.
- Place a new pump on the gasket and then proceed in the reverse order of removal.
Preparing to replace the pump on a Kalina car
Before directly replacing the pump on your Lada Kalina, you will need to purchase a new one, having decided which pump is better. And also perform partial drainage of the liquid from the cooling circuit. This involves removing antifreeze only from the cavities of the engine block, while the liquid in the radiator assembly remains in place.
Trunk mat for Lada Granta sedan
We carry out the procedure according to the algorithm below.
- Remove the protective shield of the pallet. It is secured with bolts that can be unscrewed with a “10” key.
- Disconnect the positive terminal from the corresponding battery terminal. We also disconnect the high-voltage wires connected to the ignition coil. We remove the coil itself using a hex wrench set to “5” and put it aside in order to free access to the drain plug.
- Now we move on to the LADA Kalina engine block, draining the liquid from it into a suitable container. The drain plug is unscrewed with a key set to “13”. To equalize the pressure, open the cap on the neck of the expansion tank.
- If for certain purposes (replacing pipes, etc.) it is necessary to drain the liquid from the radiator assembly, then we place the same container under its drain hole, having first unscrewed the plug.
Replacing a pump on a LADA Kalina car does not require special pullers. To work, you will need ordinary keys, thin pliers and a small screwdriver. An inspection hole is also not necessary, because the entire set of measures is carried out on a level area where the car is secured from rolling.
Work plan for replacing the Lada Kalina pump
Remove the timing belt protection cover. It is secured with 3 bolts - one on the left center, two on the back side.
Now we need to remove the camshaft gear, since it will prevent the removal of the iron protection that presses the pump itself. This is the peculiarity of the 8-valve Kalin engines.
Unscrew the nut securing the tension roller and loosen the belt as much as possible. Let's move on to the gear. When removing, do not lose the key; try to do everything so that the belt does not jump a couple of teeth from both the crankshaft gear and the timing gear. Otherwise, you will have to install both gears according to the marks, and this is problematic.
Having removed the timing gear, unscrew the bolts securing the protection - two in the middle and three at the bottom. The bottom 3 also hold the pump itself.
We take out the protection. Having picked up the pump a little with a screwdriver, we pull it out too. We clean the place where the pump is mounted on the engine from the remains of the old gasket and dirt.
We install the new pump in the reverse order. If desired, the gasket can be coated with sealant for greater reliability.
Engine VAZ-21116
Consequences of a broken timing belt on an eight-valve VAZ-21116 engine.
The pistons show clearly visible marks from the impact of the valves. Consequences of a broken timing belt on an eight-valve VAZ-21116 engine. The pistons show clearly visible marks from the impact of the valves.
And it’s a no-brainer: if you change the belt, tension rollers and pump in time, then the risk of destruction, and even if it is not reduced to zero (adjustment for low-quality components), will become significantly less.
How to determine the performance of the pump?
To come to the conclusion that the pump needs to be replaced, you can conduct an inspection. It is very difficult to identify the presence of a malfunction in the pump without removing the belt. However, in practice there are some signs that make it possible to sufficiently identify the occurrence of deviations in the operation of the pump with the Lada Kalina engine running or turned off.
What does engine diagnostics include?
Among these symptoms are the following.
- The appearance of noise produced by the exhausted bearing of the Lada Kalina pump. Not every mechanic can identify this factor, not to mention an inexperienced car enthusiast. If you are “lucky enough” to detect noise, then there is a reason to inspect the gas distribution mechanism, located under the protective plastic cover. In this case, the pump needs to be replaced.
- The appearance of traces of antifreeze leakage. This may be indicated by a wet surface of the belt drive or pockets of moisture accumulating on the end surface of the motor unit. If the leak is quite intense, then over a short period of time a wet spot accumulates under a stationary car, and the level of antifreeze in the expansion tank gradually decreases. This phenomenon can occur due to wear of the oil seal present on the pump shaft.
- The belt is not located evenly on the camshaft drive gear, but rather offset from the center of its longitudinal axis. Its slippage can be caused by the appearance of play in the pump bearing.
Below are a few recommendations that will allow the owner of a Lada Kalina to facilitate the process of identifying pump faults. If one of the above factors is detected, then you should not be lazy and remove the belt from the camshaft gear. To do this, you will need to first loosen the tension on the belt drive by unscrewing the eccentric roller fasteners. Now it is enough to apply a manual rocking force to the pump shaft, which will reveal the play. When such a situation occurs, the water pump is immediately replaced. Even if there are no antifreeze leaks, further operation of the pump is prohibited, since a jammed bearing will cause the belt to break. Here we will not remind you about the risk of engine failure, because everyone already knows this.
A failed water pump on a Lada Kalina car can cause engine overheating, which in turn can cause irreparable damage to the cylinder-piston group. Some “advanced” owners resort to installing an additional pump, which is a very effective action in preventing the risk of airing the cooling circuit. As an additional pump, a part from the Gazelle is often used, the rotation of which is carried out by an independent electric motor. The component is cut into a pipe designed for the return flow of coolant, that is, into a small circulation circle. Power to the electric motor of this component is supplied through an additional relay, which is activated by a button located inside the cabin. This allows you to increase the mobility of the pump and turn it on at the right time.
Lada 2112 › Logbook › Preparing for winter Part 3. Installing an additional gazelle pump
Since the arrangement of the stove pipes according to the alternative scheme was not impressive, it became clear that there was no way without an additional pump. The last argument was the barely warm air from the stove at XX. And it’s already down to -15 outside...
When buying a cheap pump for 700 rubles, the first thing you need to do is unscrew 4 long screws and coat the rubber gasket with sealant. When I installed it for the first time without sealant, the pump leaked immediately. I needed a piece of hose 5 - 7 cm, an angled hose with a shoulder of about 10 cm, clamps and a wire of the required length.
There were big problems with choosing the installation location. Since I have a 4th generation gas pump installed and all the listed places for the pump were occupied either by the brains or by the gearbox. Even when connecting the heater alternatively, I hung the pump on the gearbox cushion, but it seems to me that due to the large difference, the heater didn’t work very well at XX either. And when returning to the stock circuit with a 6-hole thermostat, I took a closer look at the steering rack thermal screen. This turned out to be the only place where you can properly install the pump. The installation is simple, an angled pipe connects the outlet from the stove to the pump, and a small piece connects the outlet from the pump to the flute. The pump mount rotates in a circle as it should and rests on the screen, also secured with a clamp. Of course, such proximity to a spider will not add health to the pump, but we’ll see how long it lasts) I’ll connect the power to a button, but for now, if necessary, I’ll just throw wires on the battery. The result is good! Warm air begins to flow much earlier than before. As soon as it warms up in the XX, the air is hot, and in general Tashkent is moving) We look at the photos carefully and if you have questions, we ask. Hot stoves to everyone in winter!
source
Possibility of installing an additional water pump on the Lada Priora
One of the disadvantages of the heater on the Lada Priora car is its low efficiency when the engine operates at low speeds in the cold season, due to insufficient coolant circulation. Therefore, the car interior warms up slowly and insufficiently, which causes some discomfort for the driver and passengers.
There are some requirements that must be met to obtain a high-quality result after installing an additional electric pump.
These include the following points:
- the installed product should not create excess pressure in the heater radiator during operation in order to avoid damage to the pipes or the formation of cracks;
- It makes sense to replace the thermostat and install this component with an increased opening temperature (90–95 degrees Celsius) due to the fact that as the speed in the coolant circulation increases, the engine parts will warm up more slowly, increasing wear on the power unit.
To solve this problem, you can install an additional water pump in the cooling system of the power unit, which will qualitatively improve the heating of the car interior even when the engine is idling. This technology is not new. Engineers have been using it for a long time. Examples include German cars BMW or Mercedes Benz.
Device selection
As a rule, devices from various manufacturers are suitable as an additional water pump for the Lada-Priora car.
These, for example, could be brands from:
- Bosch company;
- ;
- .
Video: positive effect of installing an additional electric pump on the Lada Priora
However, most often the Lada Priora is equipped with an electric water pump, which is installed on Gazelle cars. This may be an old or new design, but the principle of operation is the same for both: due to the vacuum at the inlet during operation of the product, a pumping force arises, which drives the coolant through the system. In fact, the pump from the Gazelle car is a classic centrifugal pump.
The design of the new pump version is much more successful and causes fewer complaints from car enthusiasts. And it is also less noisy during operation. The main problem that motorists encounter when using such an electric pump is its leakage.
Installation and connection of an additional electric pump
To equip a car with an additional electric water pump, you will also need a regular relay that has normally open contacts (this can be an ignition or starter relay from a VAZ 2105, VAZ 2108). It is necessary to close contacts No. o86 and No. o30. And you will also need a reinforced hose and clamps for clamping the pipes.
An additional pump can be installed in any of the gaps in the supply or outlet pipes of the car’s heating stove.
Installation of an additional electric pump is quite simple, and the efficiency of the heater increases significantly
The pump is fixed in the Lada Priora in the following places:
- stud for fastening the washer reservoir;
- studs located next to the battery;
- on the engine shield.
The device can be connected to a wide variety of systems.
It could be:
- recirculation button;
- SAUO stove block;
- heated mirrors;
- other convenient places.
Functions and purpose of a pump in a car
Lada kalina sedan russian mercedes logbook replacing the gearbox lever ball race with bearing
Normal engine operation is impossible without a cooling system that circulates coolant through the pipeline (system components, pipes and hoses). The purpose of the pump (water pump) is to ensure constant movement of antifreeze throughout the entire system while the engine is running. If at some point the pump stops functioning, this will immediately disrupt the thermal conditions of the engine. In this case, the coolant will boil, which can lead to serious engine damage.
Structurally, the pump is a fairly simple structure, consisting of a metal body and a pulley and impeller located on the shaft. The pulley is driven by a belt from the engine crankshaft. An impeller is located on a shaft inside the housing, which moves the coolant with blades from one part of the cooling system to another. This is how the motor is cooled.
Read also: Dummy car keys
2. Installing a pump on the Lada Kalina engine
By visiting the plastic expansion tank, you can visually control the amount of antifreeze and antifreeze. There are special marks for the highest and lowest levels of liquids in the tank. Outside the tank, there is a pipe at the top for connecting to the heat exchanger sleeve, and at the bottom - with a filling tube.
Expansion cap with breathers. Device means inlet and outlet breathers. They are capable of providing systemic impermeability. Inlet valve
maintains elevated pressure in a hot engine. As the temperature increases, steam leakage decreases. The reduced pressure facilitates the opening of the released breather as the car engine cools evenly. The pump pumping antifreeze is a quick discharge blade. The crankshaft wheel drives the pump by means of a toothed belt on the camshaft rod. Its body consists of aluminum. The rotation of the shaft occurs in a double-row ball bearing, in which there is enough fuel oil for the period of warranty operation. The outer ring is tightened with a screw. A gear is pressed in front, an impeller, a retaining ring, and an oil seal are in the back. Antifreeze or antifreeze leakage is monitored through a hole in the pump shell. This method will help identify unit malfunctions. If the pump cannot be repaired, it is replaced with a similar assembly device. The redistribution of antifreeze is corrected by the coolant. Systemic cooling of paired cycles occurs as follows: in a larger circulation circle, the antifreeze seeps through the motor shell to the radiator battery; when moving in a small circle, antifreeze or antifreeze passes only through the cooling shell, without getting into the heat sink.
The cooling system consists of a radiator battery and a throttle heating unit. The circulation of antifreeze or antifreeze here occurs continuously, regardless of the location of the coolant valve.
Thermostat. The thermal unit and two breathers are components. There is a redistribution of the flow of antifreeze, also called antifreeze. When the engine is cool, the node valve redistributes the direction of water movement. It circulates along the smallest radius without entering the radiator. High temperatures of 85°C allow the valves to open and allow fluid to flow into the radiator. At temperatures above 100° C, the main valve is completely open, the spare valve is closed. Water circulation occurs over a larger radius. Antifreeze or antifreeze temperature meter. This device is screwed into the cylinder head for automatic antifreeze control. The sensor is connected to the temperature indicator on the machine's device panel. This information is sent to the controller. Heating heat sink. Built into the engine cooling system, it heats the car interior by circulating hot antifreeze. The radiator is a 3.2 plastic tank in a vertical position. Some of them have a partition. There are also 4 rows of round aluminum tubes, aligned horizontally, which are passed through cooling plates. The pipes are connected to the tanks through a rubber key. Antifreeze enters through the upper pipe and comes out through the lower pipe. The inlet pipe is located next to the narrow steam exhaust hose. The radiator has a casing with an electric motor. Drain plug at the bottom. The fan maintains the temperature inside the car. When the controller receives a signal, the fan is turned on by means of a relay.
Additional pump for Lada-Kalina
Some “Kalinovodov” are not satisfied with the standard heating of the cabin in winter. In order to somehow correct the situation and ensure the flow of hot air at idle, they resort to installing an additional pump. The part also provides better cooling in hot weather, especially when idling in traffic jams.
An additional pump avoids the formation of air in the system. As a rule, a pump from a Gazelle, which is structurally equipped with an electric motor, is used as such a device. Install it in the gap in the small circle of the cooling system on the return pipe of the stove.
An additional pump is installed in the gap in the return pipe of the stove to increase the efficiency of heating the interior in winter.
How to install an additional pump
For installation (in addition to the pump itself), you will need an additional relay and a button with which to control the device, hoses of different lengths, fasteners and sealant. You can choose any suitable place to secure the part. Quite often, car enthusiasts install a pump under the battery or under the transmission bolts. In the first case, the device is installed horizontally, in the second - vertically. Before installing the hoses, you must complete the following steps:
- Cut the hoses to the required length depending on the installation location and degrease them.
- Before installation, treat the mounting areas of the pipes with sealant.
- Secure the clamps evenly, slightly moving away from the edge of the hose.
- Drain the antifreeze.
- In the lower part of the engine compartment, find two pipes: one supplies coolant to the heater, the other takes it away. Remove the outlet hose and replace it with the pipe from the additional pump.
- Attach the pump to the gearbox housing. Mounting options may vary depending on available mounting hardware. These can be clamps or brackets.
Video: installation of an additional pump
When the additional pump is secured, you need to connect the switching wire. To avoid damage, it is placed in a plastic corrugation. To control the device, a button, a relay and a fuse are installed in the cabin in place of one of the plugs. When the button is turned on, the relay will be supplied with +12V from the battery. Then, by installing an additional pump, you can significantly increase the efficiency of the cooling system and achieve quick heating of the interior even in the most severe frosts.
An additional cooling pump is installed under the battery or under the transmission bolts
Replacing the pump on a Lada Kalina yourself does not cause any particular difficulties. Using a standard set of tools, you can repair your car yourself, avoiding trips to a car service center. For long-term operation of the pump, buy a product from trusted manufacturers, which will save not only your energy, but also money.
It is best to replace the pump on Kalina at the same time as replacing the timing belt, without waiting for it to leak and cause trouble. According to the manufacturer's recommendation, the belt is changed every 60 thousand km. This is a fairly long interval, during which time a new water pump will definitely pay for itself.
And the replacement procedure is quite within the capabilities of the average owner of a Lada Kalina car.
When to change your pump
It is interesting that in the documentation of many cars, including imported ones, there is no direct indication at what mileage to install a new cooling system pump. Therefore, you can act in two ways. The first is to carry out a scheduled replacement along with the timing belt, the second is to change the pump when it partially fails. However, the first option is more suitable, since it will keep the engine in working condition.
The service life of a car pump depends on the operating conditions of the car. In particular, the factors that lead to a reduction in this period are:
- engine operation in conditions of extreme temperatures (heat and excessive frost), as well as a sharp change in this temperature;
- poor-quality installation of the water pump itself;
- lack or, conversely, excess of lubricant in the pump bearings;
- use of low-quality antifreeze or antifreeze, corrosion of pump elements by coolants.
Accordingly, to extend the service life of this unit, it is necessary to monitor its condition and the condition of the engine cooling system.
Replacement frequency
As for the planned replacement of a car pump, the frequency of its replacement for many cars is simply not indicated in the technical documentation. Therefore, most car enthusiasts carry out a planned replacement every 60...90 thousand kilometers, which corresponds to a planned replacement of the timing belt. Accordingly, you can change them in pairs.
In the second case, if a higher quality pump and a lower quality belt are used, then the replacement can be carried out as follows - one pump replacement for two timing belt replacements (after approximately 120...180 thousand kilometers). However, it is necessary to carefully study the state of one and the other node. Along with replacing the strap and pump, it also makes sense to replace the guide rollers (if you buy them as a set, it will be cheaper).
How to choose a pump for a VAZ
There are several signs that determine the correct choice of pump for a car. Moreover, each parameter is taken into account individually - there is no universal method.
The pump impeller can be:
- plastic;
- metal.
The first option has the advantage of having no inertial load, which makes it easier to unwind when the motor starts. The downside is the short service life and changes in the geometry of the wings under the influence of high temperatures - this reduces the efficiency of the pump. New foreign cars are equipped with impellers made of expensive materials that can withstand overheating and cavitation abrasion.
The second type is made of metal. Such impellers are heavier, take a long time to spin, but do not change geometry when heated. On the other hand, steel parts quickly become corroded when the wrong antifreeze or water is used in the cooling system, which critically reduces their performance.
According to the design, you should choose impellers with a minimum gap between the housing and the blades. This combination minimizes idle rotation of the mechanism and increases the efficiency of the unit.
The manufacturer recommends using parts of the same brand. If such pumps are not available, you should study reviews of the available company in advance and choose the best one at your own discretion.
What to look for when purchasing
The pump in a car is a very important element; its malfunction can lead to the engine boiling. To avoid this, you should take a responsible approach to choosing the unit. Below is a brief summary of the main selection criteria:
Impeller material
Refers to actuators, pumps antifreeze through the cooling system. An important point is the material from which it is made.
- Impeller made of plastic. Let us remind you that most modern cars are equipped with pumps with a plastic impeller. This design is lightweight, with low inertia, and the thin blades do their job perfectly. Their disadvantage is the fragility of the material, and they can also deform under the influence of high temperatures.
- Iron impeller. They have a huge resource and are very durable, but they have great inertia. In addition, if you use low-quality antifreeze or ordinary water in the cooling system, it can rust.
- Cast iron impeller. Such pumps are inexpensive; their production does not require the use of special technologies. Corrosion resistant. But due to the heterogeneity of the surface, the efficiency of the entire system decreases. In addition, thick blades increase the weight of the unit, which leads to even greater inertia of the pump.
- Aluminum impeller. An excellent option – the blades are thin and uniform. The unit has low weight and low inertia. The downside is their cost.
- Made from sheet steel. Such pumps have the thinnest blades, high-quality material is resistant to corrosion. But they have a flat shape, which reduces efficiency.
Impeller parameters
A very important parameter is the height of the impeller blades. Low ones have low productivity, high ones may not be suitable for design.
Another criterion is the reach of the impeller; the proximity of the blade to the response part of the pump increases the efficiency of coolant pumping. When choosing, you should pay attention to the quality of its pressing onto the shaft. If there is an imbalance, play will quickly appear, which will shorten the service life and also lead to a strong hum.
It is better to immediately refuse to purchase the cheapest pumps, since it will not be possible to control all these points on them.
Oil seals
The tightness of the pump depends on the seals. To increase the sealing properties, coolant with added lubricant is used. Most modern pumps have ceramic seals; they consist of two elements similar to a flat spool.
Bearing
The most common designs are double-row closed ball bearings or roller bearings. Must be lubricated with high temperature grease.
Pulley
The diameter of the pulley determines how fast the pump shaft will rotate. Manufacturers select optimal sizes for specific models.
In total, three types of pulleys are used on pumps:
- toothed - it is driven by a timing belt;
- belt - rotates with a regular belt;
- electromagnetic - a clutch that regulates the speed of rotation of the pump using a magnet.
The latter does not need to be sealed with oil seals; it never leaks. The pulley is rigidly fixed to the axle with bolts or a corkscrew connection.
Pump body
Passenger cars are often made of aluminum. It is easy to process, so you can make any, even the most complex, shape from it. Thanks to aluminum casting, precise dimensions can be achieved.
For trucks, cast iron ones are more common. They have more strength and are designed for fewer revolutions. Have longer service life.
How to determine if the pump is faulty on Kalina
The first sign that the water pump on a car has started to work incorrectly can be considered extraneous noise in the engine compartment while driving.
However, in some cases, the pump may fail earlier than stated. You can check the functionality of the water pump in the simplest way:
Warm up the engine to the optimal temperature. After warming up, use a gloved hand to pinch the upper pipe that comes from the radiator.
If the pump is working properly, you will immediately feel the fluid pressure in the nozzle. Accordingly, the pump works as coolant circulates through the system.
If pressure is felt, but weak, or not at all, it will be necessary to proceed to a detailed inspection of the pump.
You will have to remove the timing case and visually assess the external condition of the pump.
If there is a leak of antifreeze at the landing site, it means that the oil seal (seal) has failed.
If a roar is heard while driving, we can conclude that the pump shaft bearing has worn out. You can pump the drive part of the pump gear by hand. If there is play, the pump will not work correctly.
Loss of pump tightness leads to disruption of fluid circulation in the system
Thus, it is possible to identify pump malfunctions without removing it from the car. The procedure is quite simple and accessible even to a novice driver.
Pump Lubrication Procedure
When drivers talk about lubricating the pump, they mean lubricating the water pump bearings. There are two bearings installed on the shaft, which require a small amount of lubricant to operate correctly. Experienced drivers lubricate the pump without removing it from the car:
Remove the gas distribution casing.
Clean the pump mounting area and the pump housing itself from deposits, dust and dirt.
Apply Litol-24 or VNIINP-207 with your finger to the joints of the housing.
A better lubrication procedure will be carried out during pump repairs, when faulty parts are replaced. However, this procedure can also ensure a normal amount of lubricant in the bearings:
A N
https://www.lkforum.ru/showthread.php?t=49205
Signs of a pump malfunction
If the pump does not work, what signs indicate this? Let's list them in order:
- frequent engine overheating, especially in warm seasons;
- the pump’s seal is broken; coolant leaks will be visible from under its body (this is especially clearly visible when antifreeze with a fluorescent element is used);
- the smell of grease coming from under the water pump bearing;
- a sharp sound that comes from the pump bearing impeller;
- The heater in the cabin stopped working, provided that the engine was warmed up.
The listed signs indicate that the pump needs to be changed unscheduled, and the sooner the better, because if it jams, then the timing belt will also have to be changed. or even engine repair may be needed. In parallel with this, additional diagnostics must be performed in order to check the condition of other elements of the engine cooling system.
Device feature, failure symptoms
This is what the pump for Kalina looks like
The pump works in conjunction with the engine. It ensures uninterrupted operation of the fuel supply and cooling systems. The first one transfers fuel from the tank to the engine. The next reason is the forced pumping of antifreeze, or antifreeze.
The water pump-impeller, located on the shaft, is covered by a housing. The shaft has ball bearings at both ends and rotates due to a rotating moment by means of a belt attached to the engine.
Symptoms of a water pump failure:
the reddish section of the tachometer indicates the overheating temperature of the car engine, this is confirmed by the readings of the device; in the cabin of the Kalina car there is a persistent smell from the evaporation of antifreeze; a sound similar to a whistle can be heard quite clearly - repair or replacement of the pump is needed; there is an option to find drops of water under the car (to identify the problem, leave a sheet of snow-white paper under the car while you sleep).
Restoring the pump to function requires experience and special tools. It is better to entrust the work to 100% specialists, and at the same time replace the pump with the newest one.
Step-by-step work on replacing the timing belt
Before you begin replacing the timing belt, you need to prepare your work area and all the necessary tools. For work we will need:
- New timing belt.
- The key is "10", "17", "19".
- Flathead screwdriver.
- Tensioner pulley key.
Execution order
- Open the hood and remove the plastic engine cover.
- We dismantle the belt protection by unscrewing three bolts to “10”.
- Remove the right wheel and protection.
- This is what the timing belt diagram looks like, according to it we set the marks. The location of all marks is shown schematically.
- We turn the crankshaft clockwise by the bolt until the marks on the pulley and the tendril on the timing cover align. Marks "C and D".
- Make sure that the marks on the camshaft and the protective cover also match. Labels "A and B".
- We remove the plug on the upper part of the clutch housing using a screwdriver and make sure that the marks meet there too. The marks are marked with arrows.
- We fix the “crankshaft” from turning, insert a flat-head screwdriver into the hole between the flywheel teeth. We fix the screwdriver where the arrow points.
- We unscrew the generator pulley bolt while holding the screwdriver, then remove the pulley from its place. Using a “17” wrench, unscrew the fixing bolt.
- The next step will be to loosen the idler pulley nut.
- Loosen the nut so that the belt is as free as possible.
- Remove the belt from its seat. We dismantle the weakened belt.
- If you need to remove the tension roller, unscrew the fastening bolt and remove it from its seat.
Installing a new belt
- We put the belt on the crankshaft pulley.
- We begin to tension the two branches of the belt, first fix it on the pump pulley, then wind it by the tension roller.
- Then it drives it onto the camshaft.
- We tighten the belt using a tension roller, while simultaneously fixing the latter using a special key. (Rotate the roller counterclockwise).
- We make sure that all the teeth lie flat on the gears.
- Tighten the generator pulley mounting bolt and turn the crankshaft clockwise by giving one revolution.
- We make sure that all the marks match and remain in place.