Solving problems with a faulty VAZ-2110 heater speed switch
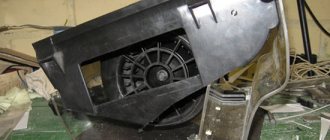
The heating device, which is installed in the domestic VAZ-2110, is a separate system consisting of several devices. The main element of the design is the unit, the functioning of which determines the preparation of the air flow entering the vehicle interior. The stove block is located under the hood of the car, with its help the speed at which the air flows, as well as its temperature, is adjusted. In addition to the central unit, the system includes an air distributor. It is worth noting that all the air ducts that are on the VAZ-2110 are located inside the car on the instrument panel. The Volga "ten" is equipped with a special stove "2110-01", which differs from other models in the presence of an evaporator in the standard climate control device. In the article we will look at the reasons why the VAZ-2110 stove mode switch does not work, and we will also provide instructions for troubleshooting problems that have arisen in each of the units.
Heater regulator repair
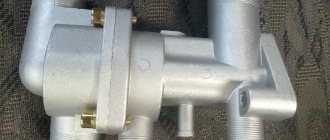
The stove of domestic cars of the tenth family has several features; the fact is that the tap, through which access to antifreeze or antifreeze is provided, is missing in the radiator. In turn, the air damper controls the temperature of the air flow. In other words, antifreeze is constantly supplied to the heater radiator.
In order to establish the true cause of the malfunction due to which the temperature regulator of the VAZ-2110 stove does not work, first of all you should remove the central nozzles and place the air flow direction handle in the extreme left position. After such a manipulation, you should monitor the behavior of the damper. To do this, you need to activate the ignition, change the position of the temperature sensor from the weakest to the most powerful (from the blue dot to the red). If the damper is frozen in a stationary position and does not even want to budge, with a high degree of probability the motorist is dealing with a jammed small gearmotor of the heater damper. If the gearbox has nothing to do with it, then the device socket may be broken. This problem often plagues units equipped with plastic dampers.
During investigative activities that help to understand why the VAZ-2110 stove regulator has stopped functioning properly, you should not pay attention to the readings of the air temperature sensor. The fact is that the temperature knob set to minimum or maximum (in extreme positions) is not connected with the data of this sensor.
When the ceiling sensor, which records the interior temperature readings, is turned off, the automatic heater control system unit will necessarily go into emergency mode, and at the same time the automatic adjustment will be turned off. Because of this, the temperature knob will directly begin to transmit all information to the damper. In this situation, if the damper can normally be moved to the maximum value without effort, while cold or slightly warm air continues to flow from the stove, the fault should be looked for in the radiator (an air lock may appear).
It cannot be ruled out that the breakdown may be caused by clogged tubes, which are often clogged with sealant and various deposits. The motorist should check the coolant level in the expansion tank; a low level of antifreeze or antifreeze may indicate that the volume of the substance is not enough to reach the heater. If the damper does not move, the gearbox should be activated by activating the ignition and changing the position of the temperature knob from one extreme value to the second. In this case, you must try to manually “stir” the stuck damper.
It is worth noting that once the regulator of the VAZ-2110 stove failed, which “delighted” the motorist with its wedges, it will soon make itself felt again if you do not devote enough free time to this issue. However, otherwise, an operating damper may indicate that you can look for the cause of the malfunction in the direction of the gearbox. The fact is that a thorough check of the self-propelled control system unit is required.
To check the presence of voltage on the gear motor, you need to connect the tester to the terminals and activate the ignition. The automatic control system will only work if the ignition is turned on. If the temperature knob is moved to the extreme position, the motorist will be able to notice a short-term control voltage (10 V).
At the same time, the polarity of the control voltage will be changed. Lack of voltage indicates a faulty ACS controller. If the car owner is going to independently adjust the device, he should remember that he must not close the contacts and apply voltage to them. If you do otherwise, the operational amplifier of the automatic control system will most likely fail, which can only operate at a current of 1 A, which is why, in addition to the existing malfunction, you will need to repair or replace the unit itself. The old-style blocks depend on each other, which makes them very different from the new-style block, which does not have the letter A, but has five speed positions.
Repair of the VAZ-2110 stove regulator may be necessary if the stove is capable of functioning exclusively in extreme positions. A problem of this kind most often occurs when the gearbox is operating in normal mode and the shaft is turning. The motorist will have to thoroughly examine the sensor responsible for the location of the damper. By changing the position of the temperature knob, the car owner should notice a change in the resistance between the contacts. The obtained values will directly depend on the type of automatic control unit installed in the vehicle.
Absent resistance and a rotating gearbox shaft indicate a malfunction of the damper location sensor. In this situation, the broken device should be immediately replaced by installing a new gearbox. If all the above actions are performed correctly and the control unit controller begins to function normally, then the gearmotor will be able to receive its control voltage. However, this does not guarantee that the damper will begin to change position on its own.
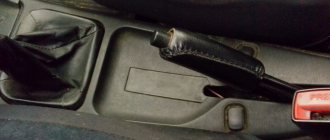
If the owner of a domestic Volga car is interested in how to remove the heater regulator on a VAZ-2110, then he must first dismantle the old wipers, get rid of all the screws, several nuts located on the sides, and then proceed to remove the fragile hook located in the hole in the body. All these manipulations will allow you to easily and quickly remove the frill. To subsequently facilitate the process of dismantling this element, it is necessary to cut the tube through which the washer passes and insert a small plastic part into the hole (a piece of tube removed from a cylinder with polyurethane foam will do). Then you should proceed to the gearbox, which is located on the stove body, on the left side of the vacuum chamber. To dismantle it, there is no need to remove the entire heating device. To remove the gearbox, which is held on by only three screws, you should unscrew the fasteners with the shortest or longest screwdriver.
The fact is that using a long screwdriver will help place it above the vacuum chamber, while a short screwdriver, after unscrewing the screws, will allow the gearbox shaft to come out of the socket, at which time the damper will take the lower extreme position (cold).
To carry out a similar repair of the VAZ-2110 heater, you will have to disassemble the gearbox. A thin screwdriver can be used to free the hooks, while a thicker tool will help split the closed halves. The power supply wires coming from the control unit should be placed in the power unit connector. Then you need to check the device for perfect revolutions. Regardless of the result, you will have to disassemble the small micromotor by first bending the molded side. When repairing the VAZ-2110 stove regulator, it is necessary to monitor the polarity of the device being disassembled and note the position of the cap relative to its body. A failed unit most likely needs to be found, while a functional one needs lubrication.
The shafts and gears must be treated with lubricant. To do this, you can use silicone grease, which is not able to interact with plastic products and can cover a huge range of temperatures. After this, you need to start assembling and testing the motor, taking into account the notes made.
If everything is done correctly, then, after connecting the connectors to the gearbox and installing the devices in their place, the shaft should begin to rotate. Before installing the gearbox, it is extremely important to position the shaft in the damper seat, since without this structural element it falls; actions should be performed in the “cold” position.
Adjusting the temperature of the VAZ-2110 stove often causes owners of domestic cars a lot of problems, this is due to the fact that in extreme positions the damper is too close to the edges, which provokes the rotation of the shaft on the removed unit by a slightly larger degree. In other words, before installing the gearbox in its original place, the shaft should be positioned closer to the “warm” position. To carry out this procedure, it is necessary to place the regulator in the “hot” position when the ignition is inactive, then momentarily activate the ignition. Having climbed deeper, under the frill, you need to make sure that the shaft fits and that it is possible to create fastenings for the gearbox. If there is a need, you can turn the shaft several times by instantly turning on the ignition.
If the motorist has overdone it, he will have to position the shaft in the “cold” setting and repeat all the above-described ignition manipulations. The frill should be installed only when everything is working properly.
Stories from our readers
“Fucking basin. "
Hi all! My name is Mikhail, now I’ll tell you a story about how I managed to exchange my two-wheeler for a 2010 Camry. It all started with the fact that I began to be wildly irritated by the breakdowns of the two-wheeler, it seemed like nothing serious was broken, but damn it, there were so many little things that really started to irritate me. This is where the idea arose that it was time to change the car to a foreign car. The choice fell on the melting Camry of the tenth years.
Yes, I had matured morally, but financially I just couldn’t handle it. I’ll say right away that I am against loans and taking a car, especially not a new one, on credit is unreasonable. My salary is 24k a month, so collecting 600-700 thousand is almost impossible for me. I started looking for different ways to make money on the Internet. You can’t imagine how many scams there are, what I haven’t tried: sports betting, network marketing, and even the volcano casino, where I successfully lost about 10 thousand ((The only direction in which it seemed to me that I could make money was currency trading on the stock exchange, they call it Forex. But when I started delving into it, I realized that it was very difficult for me. I continued to dig further and came across binary options. The essence is the same as in Forex, but it’s much easier to understand. I started reading forums, studying trading strategies. I tried it on a demo account, then opened a real account. To be honest, I didn’t manage to start earning money right away, until I understood all the mechanics of options, I lost about 3,000 rubles, but as it turned out, it was a precious experience. Now I earn 5-7 thousand rubles a day. I managed to get the car buy after half a year, but in my opinion this is a good result, and it’s not about the car, my life has changed, I naturally quit my job, I have more free time for myself and my family. You’ll laugh, but I work directly on the phone)) If If you want to change your life like me, then here’s what I advise you to do right now: 1. Register on the site 2. Practice on a Demo account (it’s free). 3. As soon as you get something on the Demo account, top up your REAL ACCOUNT and go to REAL MONEY! I also advise you to download the application to your phone, it’s much more convenient to work from your phone. Download here.
SAUO pinout:
The SAUO receives information from:
- – cabin air temperature sensor (No. 6), which has a built-in small-sized fan.
- – MMR (micromotor reducer) (No. 9), information about the position of the heater damper.
Damper control : Based on the received information and the set air temperature, the controller controls the position of the heater damper, sending appropriate signals to the damper drive micromotor.
The main malfunctions of the VAZ-2110 climate control
Since a full-fledged climate control system contains many additional components and parts, it is not surprising that the reliability of such a complex system by default should be no more than that of the heater or air conditioner itself. In other words, to the problems with the functioning of the heating and air conditioning system are added those malfunctions that are characteristic of the operation of the climate system controller itself. The climate control scheme of the VAZ-2110 provides for the presence of an electronic control unit and a damper drive that regulates the mixing of warm and cold air flows to ensure the optimal temperature of the air flow entering the air ducts.
If the air conditioning system does not reach the required temperature, you need to start troubleshooting. The first thing to do is check the functionality of the temperature sensor. This is done by measuring the resistance of the sensor, which must satisfy the following conditions:
- at a temperature of 16º C be equal to 2950 Ohm;
- at a temperature of 22º C be equal to 2800 Ohm;
- at a temperature of 30º C be equal to 2600 Ohm.
If the values on the multimeter differ by more than 25 ohms, the sensor is faulty and must be replaced.
A malfunction of the micro-reducer drive shaft position sensor (which controls the operation of the air conditioner damper) can also be judged by the resistance's compliance with standard values. The test is carried out as follows: with a temperature sensor connected to the system, use the handle to set the minimum temperature value, disconnect the control controller from connector X1, start the power unit and measure the resistance between the input contacts of the gearmotor drive shaft position sensor with a multimeter. The multimeter should show 0.85 - 1.25 KOhm.
The same check should be carried out in the maximum temperature position - in this case, for the first group of controllers, the resistance should be in the range of 3.30 - 5.00 KOhm. If the resistance is zero or the same in both modes, the problem is in a faulty micromotor gearbox, which cannot be repaired. However, the reason may also be the incorrect operation of the controller itself - in this case, the supply voltage will not be supplied to the gearbox drive.
The problem with insufficient heating during the cold season may be due to a jammed heater damper. To make sure of this, you need to start the power unit and set the furnace fan speed to maximum. After this, the temperature regulator must be sequentially set to MIN and then MAX mode.
There is feedback between the control unit and the micromotor due to the presence of a furnace damper position sensor built into the gearbox. The control unit interprets the information coming from this sensor, and if the heater damper has reached the required position, it turns off the motor.
The climate control control unit on the VAZ-2110 has an adjusting screw that allows you to manually configure more precise temperature control. To make such an adjustment, it is necessary to close all doors and raise the window glass, place an external control thermometer near the temperature sensor, turn the furnace fan control knob to position “A” and set the air temperature to a temperature higher than the temperature measured by the thermometer. After about 15 minutes, the readings on the display and thermometer should be equal. If not, you need to remove the controller to gain access to the adjustment screw and turn it clockwise (when you need to increase the temperature) or counterclockwise if the display value is higher than the value measured by the thermometer. The procedure is repeated until the mismatch becomes zero.
Why a heater is needed on a VAZ 2110 is clear without further ado. Try driving without it, not just in thirty-degree frost, but even when the temperature is close to zero. The windows fog up, become covered with a crust of ice, and in order to see the road, you need to make a thawed hole in the windshield, plus keep it in “working” condition.
It’s clear that if the stove breaks down during a trip, then, like it or not, you’ll have to somehow get either to the nearest service station or home, where it will be possible to replace the stove with a new one or tune up the old one.
The VAZ 2110 stove does not work: diagnostics and repair
Having decided on the main reasons, it is necessary to begin diagnostics. First of all, problems with temperature regulation may be associated with a breakdown of the control unit or damper.
- First, you should check the temperature sensor on the ceiling, which is located near the interior lamp. Simply put, malfunctions in its operation lead to the fact that the required command does not reach the damper and the stove does not heat.
Checking the sensor is easy. To do this, you need to move the control knob first to one extreme position, and then to the other. At the same time, you should check whether there is a change in the temperature of the incoming air.
The temperature may not change completely, or the air becomes warmer only when the handle is in the extreme maximum position. If the temperature does not change, then the problem is not in the sensor. In the second case, the culprit may well be the controller, which is replaced with a working device.
- A breakdown of the gear motor often results in the heater blowing cold air into the cabin after turning on the heating. This is a common problem. As a rule, replacing the heater gear motor allows you to normalize the operation of the system.
To change this element, you need to remove the windshield wipers, dismantle the frill by unscrewing the screws. Then you need to disconnect the wiring from the gearmotor, remove the faulty device and install a working one.
- If there is a suspicion that the heater of the VAZ 2110 stove has failed, you will need to remove the main deflector for inspection. To do this, you need to straighten the fasteners and move the damper. By the way, you can get to the damper from the engine compartment.
The inspection allows you to determine whether there is a need to replace the radiator. If this is the case, you need to disassemble the stove. You can read below about how to remove the radiator of a VAZ 2110 stove with your own hands.
- If the air is warm, but not warmed up enough or supplied poorly, it is recommended to change the damper. Instead of a standard plastic solution, it is better to buy an aluminum heater damper from a VAZ.
This eliminates possible deformation of the damper during switching, as well as improves heat retention. As a result, the heating system works more efficiently, the air is supplied hotter, which allows you to warm up the interior more efficiently and quickly.
How to remake the stove on a VAZ-2110?
If you are fundamentally dissatisfied with the operation of the heater on your car, then you can modify it to suit your needs without any problems. If you are faced with the problem of insufficient airflow or fogging of windows in rainy weather, then you need to take action. Firstly, you should make sure that the heater is in good working order and is working normally; if not, then it needs to be repaired and only then proceed with active actions. The main reason why little air flows to the side windows is that most of the flow is lost in the gap. Accordingly, you need to disassemble the entire panel into parts and use foam to prevent air leakage. This is quite easy to do. Sometimes it makes sense to lay corrugation, but in practice this does not always work. At best, you can only warm the feet of the front passengers there.
Please also note that the airflow for the rear passengers’ feet also needs to be improved. But before you remake the stove on the VAZ-2110, you need to take care of the driver’s seat. Here you will be dealing with the so-called “herringbone”. It is in this case that it is advisable to use corrugation. Firstly, it will give the desired effect, and secondly, it takes up much less space of that very “Christmas tree”. It is desirable that the tube be no more than 40 millimeters in diameter, and if it is long, smooth inside. Otherwise, as air passes through it, it may whistle, which is not very pleasant.
Modification of damper and airflow
Many drivers may have encountered the problem that in very cold weather there is no way to regulate the uniform supply of warm air in all directions. So it turns out that either the side windows are covered with ice, or the legs freeze. For example, if the VAZ-21103 stove does not heat well, then the problem is obviously in the dampers. So, on vehicles that were produced after 2003, there is no such problem, but on those that came off the assembly line before, you will have to work with this. There is nothing complicated here; you will need to cut out the edges of the damper with a regular metal file (you don’t need to touch the windshield damper). You can also saw off a little bit from the flap that supplies air to the side windows. As a result, if you put the damper on the legs, then approximately 50% will go to the side windows, 25% to the legs, and another 25% to the windshield. If you install it on the windshield, it will blow only on it.
Another reason why the VAZ-21103 stove does not heat well is that the airflow is insufficient. Let's finalize it. For this you will need anthers, as well as a grille. Using an elastic band, we attach the grille to the boot, for which we use any suitable glue. We secure the boot on the reverse side with a clamp or tie and enjoy the result. This solution is not suitable for the driver’s seat, as it will heat up the right leg, but it’s perfect for passengers. Well, now let's move on, because we still have a lot to consider.
Causes of malfunctions
Depending on the design of the stove, the damper may cause a disruption in the efficient operation of the heater for the following reasons:
- deformation;
- wear of seals;
- deterioration or damage to control levers and rods;
- skew.
Deformation is a problem with old-style heaters. The first dampers of the VAZ-2110 stove were equipped with plastic elements that bent under the influence of temperature. Because of this, even when completely closed, cold air from outside leaks in and mixes with the heated air, and the efficiency of the stove decreases. Subsequently, the designers replaced the plastic flaps with aluminum ones and the problem with deformation disappeared.
To ensure tightness, the dampers have seals that reduce air leakage. Initially, foam rubber seals were used, which quickly wore out and became damaged. Later, foam rubber was replaced with rubber, but this only extended the service life of the seal; over time, the rubber ages, cracks and collapses.
The most common malfunctions of automatic control systems during operation
VAZ 2110 stove controller
A very common problem on the VAZ 10 series is when any of the stove speeds do not work. In this case, there is only one way out - carrying out a full repair of the hardware control system of the VAZ heater. Before this system begins to fully function, it must receive certain information from specialized devices, which are:
- micromotor reducer transmits information about the current position of the heating damper to the central control unit;
- The interior temperature sensor has very small and compact dimensions and, in turn, is built into the fan.
Note. From time to time it is necessary to carry out objective measurements of the functioning of the above information devices, which over time become more and more subjective and, as a result, the central control unit receives false information. This in turn, as a rule, leads to overload of the self-propelled gun system.
What to do if the stove does not turn on in any speed mode
If the VAZ 2110 stove unit does not work, the problem lies in the operation of the electrical network, since its electric motor is quite reliable and rarely fails. Before work you need to prepare a set of tools:
- Tweezers for removing fuses.
- Screwdriver Set.
- Chain tester.
- Jumper with contacts.
- 12 V indicator lamp (control).
- Wooden stand.
When working with wires, you may need pliers, wire cutters and other standard tools from an auto electrician's kit.
Checking the fuse
If a malfunction is detected in the VAZ 2110-12 heater and it does not turn on at any speed, the first thing to check is the fuse responsible for its operation. This fuse is located in the block located in the passenger compartment to the left of the steering column, has the number F18 and is rated at 25 A.
Having opened the block, remove it carefully using tweezers and check it with a device, since a visual inspection can only reveal obvious signs of burnout. To do this, a device is connected to both contacts of the fuse, and if the circuit is restored and the fuse is intact, it will give a signal. When using a multimeter, you need to remember to set the appropriate 25 A settings. If the problem is in the fuse, it must be replaced.
The control checks the voltage on the fuse installed in the block; for this, when the ignition is turned on, one contact closes to ground, the second to the fuse; if everything is normal, the light on the device will light up. The ignition must be turned on. If there is no voltage, you need to check the supply wiring.
Heater unit connector
To get to the connector, you need to remove the heater unit and disconnect it. After this, you need to use a tester to check whether voltage is supplied to the control unit through the contact block to which it was connected. The plus is supplied through the blue wire, but there may be another connector, so they need to be checked methodically. Contact with the heater is established via the red wire.
To check the engine, place a jumper in the contact where the positive was detected, and a second jumper in the contact with the red wire. If the engine does not start, the failure of the stove does not depend on the control unit. Otherwise, you need to disassemble the block or simply replace it with a new one.
Checking the electric motor
You can check the operation of the electric motor only from the engine compartment. It is located under the windshield and is covered with a plastic cover that needs to be pushed aside by hand. With the jumper left in the connector and the ignition on, you need to install a wooden pad (a hammer handle will do) and hit the engine several times. Sometimes it happens that the brushes get stuck in it and after several blows they fall into place, the electric motor starts working.
The procedure for repairing a stove fan
- Disassemble the heater motor. First remove the impeller, then the spring clips.
- Deprive him of support.
- Remove the brush assembly by unscrewing the screws first.
- Carefully knock out the rotor.
- Remove dust and dirt from all elements of the heater motor.
- Release the bearing by bending the edges of the plate on the inside of the stator.
- Remove the old bearing #609 and install the new one.
- Fold back the edges of the plate.
- Assess the condition of the plate after this procedure and sand the edges if necessary.
- Remove the old brushes along with the wires. In their place, solder the wires from the new brushes.
- Bend the brush spring stops to easily return the brush assembly to its place. Set it aside.
- Replace the heater motor rotor.
- Reinstall the brush assembly, making sure that the brushes are in their rightful places.
- Fill the gaps with springs and return the stops to their original position.
- Reinstall the impeller.
- Reconnect the electric motor to the stove network.
Checking the resistance resistor
The stove resistor has two spirals with different resistances, the first has 0.24 Ohms, the second has 0.81 Ohms.
If these two spirals are activated simultaneously, then the electric motor of the stove operates in the first temperature mode, and if only on the first spiral, the second speed operates. If the electric motor is turned on without the help of a resistor, then the fan rotor operates in the third position - the most powerful.
Trouble-shooting
Eliminating the inability to regulate temperature
There may be several reasons for this malfunction:
- malfunction of the control unit,
- damper malfunction.
Any of these breakdowns leads to incorrect operation of the heating device.
If the heater controller fails, the command to extend the damper may not be given. Therefore, you should immediately check the temperature sensor located next to the ceiling lamp. To check, you need to turn the temperature control lever several times from left to right. The temperature of the air flow can be controlled tactilely. This test is based on identifying the operating condition of the temperature sensor in the extreme position of the handle. If the flow temperature changes only when the sensor is in the extreme position, then it must be replaced. If it does not change significantly, you should look for the cause of the breakdown elsewhere.
Troubleshooting the heater
To check the functionality of the heater, you need to remove the central deflectors. To do this, you need to bend the special antennae and move the flap by hand. You can get to the latter through the engine compartment. When choosing this spare part, it is better to give preference to the aluminum rather than the plastic version. The radiator of the VAZ-2110 heater requires the largest amount of work when replacing it, because for this you have to remove the entire heater. If you do the work yourself, you can save a lot of money. Read more about how to change a radiator here.
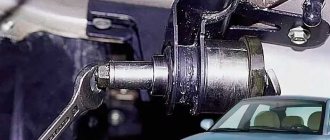
Troubleshooting gearmotor
When the heater fan begins to “drive” only cold air, then we can assume that the heater has failed. In modern models, dampers and regulators rarely fail, due to the fact that aluminum is used for their manufacture at the factory. The gear motor is to blame for 90% of stove failures. This part definitely needs to be replaced.
In this case, car repairs are carried out in the following order:
- We dismantle the wipers, remove the frill,
- move the frill to the side, use a short Phillips screwdriver to unscrew the three fastening screws,
- unfasten the wires,
- connect a new gear motor,
- install it back.
It is better to perform this type of repair with an assistant. It will switch the air supply from hot to cold mode and back. After installation, the removed parts are reassembled in reverse order.
Elimination of poor flow of hot air into the area of the feet and side windows
This problem is very common in domestic cars. For this reason, in winter your feet get cold and your windows fog up. Driving a car in such conditions is very difficult. The only way out is to modernize the air flow channels.
Fuse problems
There are several main reasons for the malfunction of the stove fan located on the opposite side of the radiator. One of them is the failure of the fuse. This part is easy to replace. To prevent the breakdown from happening again, it is necessary to find a problem in the power supply circuit of several vehicle systems. The element itself is located in the installation box of the engine compartment of the VAZ-2110. Before replacing it, you need to check it with a multimeter: connect the probes of the device to the fuse contacts and carry out the test in test mode. If the multitester shows “0”, you need to replace the element - it has failed.
The fuse, located in the VAZ-2110 in place of the F-7, has a current strength of 30 A. It is responsible for the operation of several components:
- heated rear windows and mirrors;
- stove fan;
- lighting of the glove box in the cabin;
- headlight washer;
- cigarette lighter
To find the cause of the fuse failure, you need to look at the power supply to all these nodes. The conductors must not be damaged and the terminal blocks must be free of oxide. If you see a green coating on the contacts, then you need to clean them with sandpaper. Check all the pads and the strength of the wire connections in them. There is a simple way to test wiring for the presence of oxide - move the wires. If after this the fan or any other component starts to work, then you need to clean the contacts.
Sometimes the fuse is good, but the fan still sends a weak air flow into the cabin or turns on completely every once in a while. In this case, you need to look at the quality of its installation. It is possible that the elements through which the device supplies power have become loose, so the contact periodically disappears.
More rare faults
The cause of the breakdown may be the failure of other components of the car. Let's figure out what elements you will have to check and replace if necessary:
- Filling the ignition relay. With this malfunction, a previously broken fan may start working after 20-25 minutes of engine operation. This behavior of the unit is a sure sign that it does not work due to moisture getting inside the relay. Fixing this problem is simple - just replace the faulty unit. After this, the fan start will not be delayed.
- Blowing the interior with warm air only works at speed 3. In this case, it is necessary to check the condition of the additional resistor. If voltage is not supplied to the fan at speed 1 or 2, then this is most likely the problem. The resistor is located to the right of the stove behind the vacuum booster. To replace it you need:
- remove the negative terminal from the battery;
- in the cabin, remove the upholstery and windshield trim;
- remove the sound insulation from the right side of the car panel;
- remove the vacuum booster;
- disconnect the wire block from the converter;
- remember or mark how it was connected so that you can return it to its place correctly later;
- Check the resistor with an ohmmeter, if it is faulty, replace it and reassemble it.
- Broken heater switch. Sometimes the signal to turn on the stove simply does not reach the fan. In this case, you need to check this module:
- take a 12 V light bulb equipped with wires and disassemble the central console of the stove in the cabin;
- Connect the negative wire from this lamp to the body, and check all three contacts leading from the additional resistor to the switch with the connecting ones.
- if the light is on, then the switch is working properly, otherwise you need to replace the fuse in the mounting compartment and check the integrity of the wiring.
Tips and tricks
VAZ 2110 owners often note that even when the stove is working properly, the air flow on the side windows and legs is insufficient. In such conditions, your feet get cold and your windows fog up. In this case, many people modify the air ducts in the car interior itself. To upgrade the heating system, you need to remove all the panels and disassemble them, seal the gaps, cracks, etc. Sealing is very important; all fastening points are also “packed” separately.
The damper and standard seal are also removed. Next, the valve is glued, and the cracks on the driver and passenger sides are processed. Often, during modification, the standard air distributor is removed, after which corrugated tubes with a diameter of at least 4 cm are installed.
Let’s also add that in order to increase the efficiency of the VAZ 2110 stove, you need to pay attention to how the floor mats are laid in the cabin. Sometimes the outlet of hot air into the feet is blocked by the carpets in the car. If necessary, the nozzles can be raised a little higher.
Finally, we note that it is optimal to turn on the heater in the “windshield/legs” position. This will prevent the front windows from fogging up; also, heating the feet makes it possible to warm up the interior more effectively than blowing air only from the central and side deflectors.
Speed control
In order to be able to control the speed, there is an additional resistor located behind the vacuum booster, on the side of the heater. It is equipped with 2 spirals: the 1st has a resistance of 0.23 Ohm and provides the lowest, 1st fan rotation speed. The 2nd, at 0.82 Ohm, makes it possible to turn on the 2nd speed. If this part is working properly, the driver has the ability to control the temperature in the cabin, lowering it or raising it. If it fails, then there is only one speed left for the heater - the highest. It is the additional VAZ resistor that ensures their switching, not counting the last one. Therefore, in fact, the highest one works if it breaks.
The stove fan does not work in positions 1,2,3 | VAZ-2110 11, 12, 13 Priora, Repair for pennies
heater fan did not work
at positions 1,2,3, the prerequisite is overheating of the thermoelement on the rheostat.
Replacing self-propelled guns
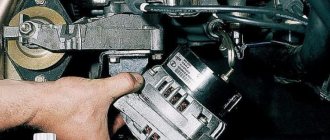
Control units cannot be repaired - they are simply replaced with new ones. But first you need to make sure that this mechanism is the reason. Instead of a broken one, install a working control unit. Its price is about 1500 rubles. The element is very easy to dismantle: just remove the buttons installed nearby. And then you can remove the device. The handles are set to zero positions and then removed.
Then the glass and front cover snap off. Before removing the heater control unit on a VAZ-2110, unscrew two screws in the front and one in the back. The board can then be pulled out of the case and carefully inspected to ensure its integrity. If there is damage to the board tracks, they must be repaired. Subsequent assembly is performed in reverse order. If the temperature on the control unit is not regulated, then the entire board should be inspected. There will definitely be defects. But before you pull out the heater control unit on the VAZ-2110, you need to check the fuse box. Perhaps there is a bad connection there.
Adjusting the automatic control system
Place a regular mercury thermometer near the temperature sensor on the ceiling. Turn on the heater controller and set the fan control knob to position “A”, and set the temperature dial to 2C higher than the air temperature in the cabin. If, with the doors and windows closed, after 15 minutes the temperature in the cabin does not correspond to the set temperature, then the heater control unit should be adjusted.
To adjust, pull out the SAUO block from the socket and rotate the regulator on the left side of the controller:
- turn clockwise to increase temperature.
- turn counterclockwise to decrease.
Check the operation of the heating system again by repeating the above steps.
How to check the serviceability of the SAUO controller
To check the automatic control system, you will need a multimeter to measure the voltage on the pink and brown wires (turn on the ignition and turn the temperature knob). Depending on which controller is installed on the car, the voltage changes differently. On cars before 2001, a heater control controller 1303.3854 was installed; its voltage in the “min” position decreases after 13 ± 5 seconds, and is constantly supplied to o. Thus, when the output voltage of the ACS unit does not change, it is not working. On cars after 2003, block 1323.3854 and stove 2111-8101012 were installed.
When the controller malfunctions, the dampers may not work , but in order to diagnose other causes of malfunction of the VAZ 2110-12 heater, you will have to disassemble the heater.
Checking the automatic control system
Diagram of the automatic heater control system : 1 – fan electric motor; 2 – additional resistor; 3 – controller; 4 – mounting block; 5 – ignition switch; 6 – cabin air temperature sensor; 7 – recirculation switch; 8 – recirculation valve; 9 – micromotor gearbox for heater damper drive; A – to the instrument lighting switch; B – to power supplies