Door locks for VAZ classics are distinguished by their simple design and quick repair. The components can be modified and reinstalled yourself. If the lock of the rear door of a VAZ 2106 does not lock, then the reason may be wear of the locking mechanism, breakage of the cylinder, violation of the geometry of the body, when the door is skewed and the hinges are sagging.
Preparatory stage
To repair the door lock of a Zhiguli 2106, preliminary work is needed. They begin with checking the position of the hinges; if there is a slight distortion, there are uneven gaps, then it is recommended to adjust the position of the locking latch. This is the easiest way for the knot to begin closing quickly and correctly. Work order step by step:
- Outline the position of the latch with a pencil.
- Loosen the three screws, do not remove them.
- Move the pawl lock and check how the locking mechanism closes.
- Tighten the screws in the new position.
On a VAZ 2106, the retainer is attached to the side of the pillar with hex screws; for the work you will need an open-end wrench or an 8-size wrench.
If, after reinstalling the latch, the locking element of the door does not lock, it is necessary to repair or change the internal part of the mechanism; to do this, dismantle the door trim, the outer and inner handle, and check the rods.
How to open the trunk lock of a VAZ 2106
There may be a situation when the trunk lock is jammed or broken, and you really need to get into the trunk. To understand how to open it, you need to understand the lock itself.
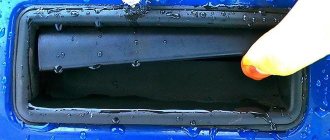
The fact is that between the trunk and the trunk lid there is a small gap through which you can get to the lock mechanism. It’s impossible to do this with your fingers, but with a plastic card it’s easy.
You need:
- Insert a plastic card into the gap between the trunk and the trunk lid in the area of the lock itself.
- Next, we rest the card against the movable element of the lock, so that it moves away from the engagement.
- At the same time, press a little on the trunk lid and voila. The trunk is open.
How to open the trunk of a VAZ 2106 without a key. Video
Sequencing
Door locks are controlled by an inside and outside handle. The opening mechanism is directly connected to the locking part by a steel drive. The outer handle has a lock insert. When you turn the key, the safety lock is activated, and pressing the handle again opens the door. On the interior side, the inner handle is connected to the locking part through a flexible cable.
For the rear doors there is a child safety lock in the design. The latch prevents the rear door from opening from the inside. To repair, you need to completely disassemble the door panel: dismantle the trim, pull out the part, make adjustments, repairs or replace the cylinder. The following tools will be required for the work:
- ratchet wrench;
- head at 8;
- Phillips and flat screwdriver;
- wooden, plastic wedge.
Dismantling the casing
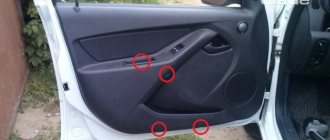
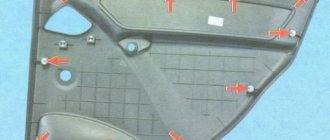
The VAZ skin is a plywood or plastic card with stretched facing material. Before starting repairs, the glass must be raised all the way up. Dismantling the casing step by step:
- Using a flat screwdriver, pry off the decorative plug on the armrest mounting screw.
- Unscrew the three bolts securing the armrest and remove the part.
- Press the base of the window lift handle away from the trim, slide the socket and remove the flat trim.
- Pull out the handle and remove the socket.
- Using a screwdriver, use a screwdriver to pry the cover on the drive handle of the locking part, move it around under the cover, and remove the handle.
- Remove the door card with a screwdriver or a wooden wedge, unfastening the seven holders around the perimeter, and remove the trim.
The internal door blocks on the VAZ 2106 are covered with protective film or sound insulation; the door leaf must be disconnected from below and lifted upward. This will open up access to the door cavity.
Step-by-step instructions - how to install locks from a VAZ 2114 to a VAZ 2106
3. Using a drill with a drill bit, you need to drill out the bottom left one on the door. Attach the lock from the inside, marking the place for the hole in which the upper bushing of the lock will fit, then use a round file to bring the door to shape.
4. Now you can install the mechanism in place.
6. Take a round file and adjust the lower right hole to approximately the same condition as mine, see photo. After this modification, the lock should close and work well. Don't forget to also check the operation of the door locking mechanism.
8. After this, grind off the corner of the lock, as in the photo.
9. Next, you need to grind off the heads of the screws that will tighten the lock. They need to be flush. Upon completion, assemble the castle. Looks like you sorted out the door!? Now you need to connect the rods to the handles.
11. The most important thing here is to guess the location of the screw; personally, I decided to go the old fashioned way. I took the chalk and snapped the chocolate bar into place two clicks, and inserted the chalk into the location of the screw, having previously aligned it in length and width. Alternatively, you can use a piece of pencil or something else that can leave an imprint. The principle is as follows - close the door, pressing it against the seal, as a result, a trace of chalk or whatever you used instead remains on the counter
Attention! Be careful and don’t rush, you need to double-check everything and estimate it several times and only then start drilling a hole for the screw. Check it a hundred times before you decide on a place for the hole, it’s better than later the whole rack will be full of holes.
12. Use an 8.5 drill to drill the front wall of the rack, then use a tap to cut the thread to “10” (step “1”). In this case, the screw that is screwed in will interfere with the closing of the door, everything is solved as follows - use a socket and a hammer to deepen the hole.
13. Next, you need to drill a hole in the front wall of the rack with a diameter of 10.5-11, and in the second wall with a diameter of 8.5-9, then cut the thread and screw the screw into the rack.
15. Now let's start installing the lock drives and connecting the handles.
16. I made the plate, assembled the handle and put it in place.
18. If you had an alarm activator installed on your old lock, connect that too. Remove the rubber bushing from the old lock (in which the nail rod stood, the one that sticks out from the trim inside the door right next to the glass). This rubber bushing will come in handy; it needs to be placed in the new lock, and the activator rod will be installed into it, this can be clearly seen in the photo. In this case, the nail itself will no longer be needed, so I took it out. If this scheme doesn’t work for you, come up with something of your own, in any case, I think you can “cheat up” something.
19. Now all that remains is to connect the internal handle; for this purpose we have a cable with clamps. There are two implementation options:
Now you can safely say DONE! To be honest, I didn’t even think that it would turn out so well, the silent locks of my VAZ 2106 began to close like in an expensive foreign car, everything is very easy and quiet.
The door opening mechanism on the VAZ 2106 is quite durable from the outside, but some owners still manage to break them off, or particularly aggressive passengers. Replacing the handle is not so easy, because you have to remove the casing. So, to perform this repair you will need a tool such as:
- crosshead screwdriver
- Head for 8
- Extension
- Driver or ratchet (most convenient)
How to get to the mechanism
For VAZ classics, the design of the locks and mechanisms of the front and rear doors is almost the same. The only difference is that the drive of the locking part for the rear door has additional elements, the correction of which takes longer than when adjusting the front doors.
To dismantle it from the rear door of the VAZ, you will need a Phillips and flat-head screwdriver and a key size 8. The glass must be raised. Removal procedure step by step after removing the door card:
- Unscrew the lock button.
- Unscrew the locking rod bracket fastening nut and remove the washer.
- Unscrew the three fastening screws and remove the bracket.
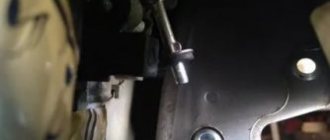
- The bracket is removed from the door cavity along with the rods. For convenience, it is necessary to slightly bend the metal casing of the front linkage; do not bend the drive at a right angle.
- Remove the locking element from its place, unfasten the inner handle rod holder, remove the handle and drive.
- Using a screwdriver, remove the longitudinal drive hinge from the locking mechanism.
- Remove the retaining ring and disconnect the longitudinal drive from the locking rod bracket.
Installing the lock is carried out in the reverse order.
It is more convenient to adjust the correct position of the mechanisms when the bolts are not fully tightened.
Original patented locks on Zhiguli cannot be lubricated with oil, silicone lubricants, etc. Dirt from the mechanism is removed with technical gasoline. The unit is disassembled, the parts are rinsed and dried. When assembling the mechanism, the cams are lubricated with compounds containing flake graphite.
How to adjust the doors on a VAZ 2101-VAZ 2107?
Note! If you suddenly cannot unscrew the bolts that the hinges are secured with an impact rotary screwdriver, then in this case, resort to drilling them, to do this, take a 6 mm drill and a good drill, and those bolts that cannot be unscrewed, first drill out their heads to a depth of about 6 mm carefully, then with an 8 mm drill, to a depth of approximately 4.5 mm, and when the heads are cut, remove the door, and unscrew the studs using pliers and, if necessary, spray them with WD-40!
1. There are several ways to consider them all, the first is to unscrew the bolts that secure the door hinges to the body (They are indicated by a red arrow, not all bolts are visible in the photo, in fact there are many more of them and there is also a lower hinge), after them when turning, you will need to put thick washers under them, like those shown in the small photo, thereby selecting the thickness and number of washers, you can align the door as you need, if you don’t want to constantly unscrew the bolts and want to finish the job as soon as possible, then cut all the washers in such a way that they fit under the loosened bolts and after which they can be clamped with the same bolts, thanks to this, you won’t have to constantly unscrew the bolts, but just loosen them a little, insert the cut washer and tighten it again, and so on until until the door is level.
2. The next method is to place a thick metal plate under the hinge; in general, a plate is taken; again, the thickness is selected individually; if the door hangs too low, then a thick plate will be needed; if it sags a little, then a thin one will suffice, well, so, what to make such a plate from, you ask, we answer: From any metal that most likely lies in your garage and has a small thickness so that it can be cut, if there is no such thing, then the plate can be made from a metal can, for example, or from anything else be (It’s all up to your imagination), in addition, the plate needs to be cut in the center as you can see in the photo below, just so that the bolts can be screwed in and so that this plate is not visible, make it in size, slightly smaller than the hinge, but only Cut it exactly to size in length so that the loop fits around it from the very top to the very bottom.
Note! To put such a plate under a hinge, you need to do the same thing, loosen the fastening bolts of this hinge a little and then place a plate under it, we recommend starting with the bottom hinge, since if you put it under the top one, then there is a possibility that the door will turn downwards fall over, and not straighten up exactly as needed!
3. And the last method, we’ll immediately warn you that it’s complicated (for some, but we resort to it only when the hinges are already terribly worn out and they have a terrible backlash), but still doable and still more reliable, it’s done as follows, the door is completely removed from the car, after which the middle part is drilled or sawed off with a grinder, under which the pin itself is installed (the middle part is indicated by a red arrow, in no case do not touch those parts that are shown by a blue arrow and by the way, we indicated the pin with a green arrow , so that you understand what it is) and finally the pin is removed and the hinge is removed from the car door and a new one is put in its place (A slightly different method for replacing hinges, but there is no need to drill or cut anything, it is explained in the video clip in the end of the article, if you are interested, check it out).
Additional video: As you have already seen, there are a lot of ways to restore the level of door overhang, but these are not all the methods; in more detail with all of them and visually with those that were given in this article, you can find out in the video videos below:
Method one:
Method two:
Method three:
Note! In addition to these methods, there is one more and it is very good, because thanks to it, without changing the hinges, you can make sure that they do not dangle, but there is some nuance, namely there you will have to knock out the pin and put a washer under it, but not all in cars, this is feasible (Basically, to remove it, you have to cut off the central part of the hinge with a grinder, as we said above), and therefore if you cannot knock it out, then try (If possible) cut off the washer a little and insert it into the grooves where the washer is needed place the pin while knocking it out, see the video below for more details and clarity:
Front door lock device
Car locks are installed in the door cavity and fixed with two screws; the locking element is connected to the opening mechanism by rods. To reduce noise when opening and closing, high-density plastic coatings are installed on the ratchets, which reduces wear on the contact surface during operation. The design contains:
- retainer body;
- cracker spring, cracker;
- rotor;
- switch;
- traction: blocker, internal drive, switch;
- outside handle;
- levers: internal drive, blocker, external drive;
- lock button;
- ratchet;
- switch roller, central roller.
Cylinder locks or cylinders have become widespread. For the front doors, the locks can be combined with a common ignition key circuit.
Recommendations for selecting and replacing handles
The standard front and rear door handles on VAZs can be replaced with non-original components, which are called Euro handles. After the repair, the doors begin to lock without effort; there is no need to slam or press on the part for the fuses or the main lock to work.
At the same time, drivers reinstall the lock, choosing silent models. Plastic components are used in the design of silent locking devices along with metal parts. During operation, plastic prevents metal joining, ensures silent operation of the mechanism and prevents rapid wear.
Installation of Euro handles is carried out in standard places; no additional drilling of holes is required during installation. Replacement is carried out after dismantling the casing. The part is installed with three screws. The average price of a set of 4 parts is from 1000 rubles.
When installing the Euro handle, it is necessary to loosen the fastening of the locks and check the tightness of the plastic latches, adjust the position of the handle stop and the ratchet.
Replacing the front door lock
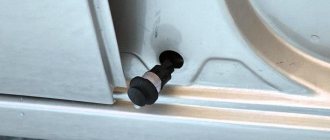
If it is necessary to change the lock on the front door, the trim must first be dismantled and the glass must be raised all the way. Procedure for reinstallation step by step:
- Unscrew the two screws securing the rear gutter from the end.
- Lower the gutter, remove the tongue from the groove, and move the part to the side.
- Using a slotted screwdriver, disconnect the shutdown button rod and unfasten the outer handle rod.
- Using a size 8 wrench, unscrew the nut securing the groove, move away the plastic cover, and remove the part from engagement with the frame post.
- Unscrew the two fastening screws and push the handle inward.
- Remove three self-tapping screws or fastening screws.
- Remove the locking mechanism from the door panel along with the rods and the inside handle.
Replacement of VAZ-2106 doors
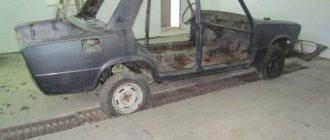
The biggest problem for a motorist is corrosion of the metal of car doors; replacement may be necessary for both the front door (and the driver's door is no exception) and the rear one. The price of door repairs in specialized auto repair shops can be unreasonably high, and the only option is to replace the door yourself.
To replace, you can purchase either a new door or a used one (previously used), already assembled with glass, door handles, and seal. At the same time, you should make sure that they are of good quality, especially the seal, card and door trim. The main thing is not to make a mistake and not to purchase “left doors”, which, although they will have the required markings and dimensions, will not fit your car. Either door moldings or various stickers are installed, which an unscrupulous seller can use to hide traces of corrosion.
The process itself will not take much time and a small set of tools:
- powerful Phillips screwdriver (power or impact) with a key for it
- hammer
- pliers.
Work order:
- first, open the door that needs to be replaced and use pliers to compress the limiter until the ends come out of the holes on the body;
We remove the limiter using a screwdriver and unscrew the bolts with which the door canopy is attached to the body (three bolts on top and two on bottom). If the force is not enough, you can use a hammer or a screwdriver;
Unscrew the bolts on the door
- Having unscrewed both canopies, remove the doors.
We install the door in the reverse order, but it may happen that it does not close. Then you will need to adjust the doors, or the door does not match your sample.
Below in the video you will clearly see how to remove the door of a VAZ:
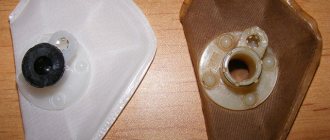
General practical information about the structure of the larva
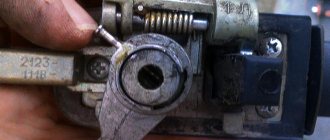
In cylindrical designs of the locking mechanism, the cylinder most often fails. The part cannot be repaired; the cylinders are replaced only in pairs, simultaneously for the left and right doors. For the work you will need a flat narrow screwdriver and metal wire. Scheme for replacing the VAZ 2106 door lock cylinder:
- With the lock removed, remove the spring that releases the key in the cylinder by prying it with a screwdriver.
- Use a thin wire to press out the fixing rod.
- Remove the top ring, the cylinder is removed from the back of the lock.
- Replace the part and configure it.
In addition to replacing the cylinders on the front doors, it is recommended to change the locking elements on all elements and in the trunk lock so that it can be opened with one key.
Door adjustment VAZ 2106
In order to adjust the door locks, you just need a key “10” and a marker. The rear and front locks have no fundamental difference in adjustment.
Adjustment process:
- Using a marker, draw an outline around the door lock latch.
- Next, loosen the bolts and adjust as needed.
- After which, safely tighten the bolts.
Where to move the lock:
How to adjust VAZ door locks. Video
That's all. We hope the material was useful for you!
Setting the front left and right door locks
The adjustment begins with checking and reinstalling the lock latches. In 70% of cases, the doors stop locking and close the first time.
In other cases, the position of the handle is adjusted if the door does not open from the outside. To do this, you need to loosen the fastening screws, move the handle and bracket towards the front pillar. After adjustment, the screws are tightened.
On classic VAZ models, jamming and locking of the lock is often associated with stretched rods. The drives are removed, the tips are checked, and the creases are straightened.
Adjusting door locks
I think every owner of a VAZ 2106 has encountered such a problem when the doors either begin to close poorly or there is too much of a gap between them and the body. In this case, it is necessary to adjust the door locks. This procedure is quite simple and to perform it you only need a head with a knob:
It is necessary to slightly loosen each of the bolts securing the lock to the body, and moving it in the desired direction, tighten the bolts:
Of course, it is unlikely that you will be able to find the optimal position of the lock the first time. In this case, the adjustment of the door locks is repeated again and again. That is, until you achieve the desired result.
For example, we can consider the following cases:
- The door closes with two clicks, as it should, but sticks out a little relative to the body. In this case, it is necessary to move the lock closer to the interior.
- The door rises slightly when closed. Therefore, the lock is raised too high. We'll lower it a little lower.
- The door cannot be closed at all, even with a strong bang. It is necessary to adjust the lock, that is, move it a little further from the car interior.
I think that the meaning of adjusting the door locks on a VAZ 2106 is quite clear and you can do it yourself within 5 minutes, even if you have to repeat this procedure several times.