The article was written by me personally. You have the right to copy it without restrictions.
To begin with, let’s understand that
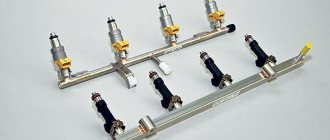
an injector
is not only a set of control units and sensor equipment, but it is also a very
high-tech fuel supply system
.
If we imagine fuel injection in a carburetor and an injector
, we
will see
some differences.
The carburetor does not have such injection
— fuel is supplied by gravity through the nozzle and it mixes with air on
its way into the engine
and enters the combustion chamber, where it burns safely.
The injector injects fuel
through a
high-pressure
to an open or closed intake
valve
. This is a classic injector and will not be confused with a direct injection injector, where the nozzle is not located on the intake manifold near the valve, but directly looks into the combustion chamber.
That's all the inherent differences between the fuel injector and the carburetor.
In 15.000 - 20.000
thousand kilometers (depending on the engine, driving style and technical fluids) from direct
contact of fuel
with the valve (after all, injection occurs on an open or closed valve),
coke
and deposits in the form of a sponge form.
Because of this, the mixing of the mixture deteriorates. Fuel simply falls
on this “sponge” and is absorbed and flows off the valve in drops.
And this has a very detrimental effect,
first of all,
on starting
a cold engine and on
smooth idling
.
Also, coke and deposits form inside the combustion chamber, increasing the compression ratio
, which leads to
detonation
and
loss of power
, as well as sticking of the piston rings.
Main signs of injector contamination:
- Difficulty starting the engine. — poor and jerky engine operation at idle and in transient modes. — failure when sharply pressing the gas pedal. - deterioration in engine acceleration dynamics and loss of power. - increased fuel consumption. - the appearance of detonation during acceleration - carbon deposits greatly affect the compression ratio. - occurrence of misfires.
The essence
cleaning the injector
consists
of
cleaning
the elements of the gas distribution mechanism - the intake valves, the space above the piston and, of course, the piston itself. We'll talk about cleaning the combustion chamber a little later.
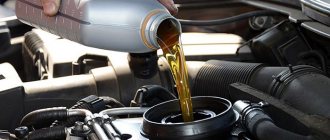
Cleaning the injector involves connecting a special unit to the injector ramp using adapters. The gas tank, gas line and fuel filter are disconnected. Using a special flushing mixture supplied from the installation under a pressure of 2-4 atmospheres, the engine runs for 60 minutes. This method does not require the labor-intensive operation of dismantling the ramp with nozzles, and therefore is relatively inexpensive.
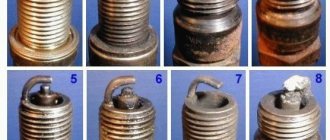
After flushing the injector, the spark plugs must be replaced. After cleaning, the candles look terrible.
Many people confuse cleaning the injector with cleaning the injectors.
This method hardly cleans the injectors.
Within the framework of the operation of the injectors
on the engine, this is simply
impossible
.
It is possible to clean the injectors if they are clogged with dirt or something else, that is, deposits that have not accumulated over many thousands of kilometers
. For example, after an unsuccessful refueling, the filter clogged, it burst and sand got into the injectors, in this case cleaning may help, but if the injectors are very clogged, then only remove and clean at the stand.
A very dangerous type of cleaning of removed injectors.
Do not confuse with the liquid method.
With this method, the injectors must be removed from the fuel rail and placed in a special tray
.
They are cleaned with ultrasound for 20-30 minutes. Injectors often leak after this method
. I don't recommend using it. In Our Workshop you will not find any reason to worry about the performance of the fuel injection system.
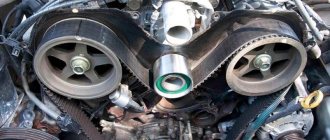
Decoking effect of oil scraper and compression rings.
When cleaning the injector, together with cleaning the valves, the combustion chamber is cleaned
.
If the rings are not too deep, the rings will decarbonize. Due to this, oil consumption will be reduced and compression will be restored
.
Clean the injector
The in-place method
is a preventative measure
, like replacing spark plugs or changing the oil. You just need to understand that everything gets dirty and everything interferes with something. For example, if you don’t change the spark plugs for a very long time, you will experience engine jerking and hesitation. If you don’t change the fuel filter, you’ll clog the entire fuel line and, God forbid, end up on the highway at -30. They changed everything and flew again. The same goes for cleaning the injector. Once you try it, you will feel the same effect as after replacing bad spark plugs or a clogged fuel filter.
Let me remind you of the main signs of injector contamination:
- Difficulty starting the engine. — poor and jerky engine operation at idle and in transient modes. — failure when sharply pressing the gas pedal. - deterioration in engine acceleration dynamics and loss of power. - increased fuel consumption. - the appearance of detonation during acceleration - carbon deposits greatly affect the compression ratio. - occurrence of misfires.
And now the advantages of cleaning the injector:
— improved starting in cold weather — improved engine smoothness — reduced engine noise at idle — confident traction from the bottom — reduced fuel consumption — complete absence of detonation at low speeds
Disadvantages of cleaning the injector:
— on engines with mechanical valve lifters, the clearance in the valve mechanism may disappear. But in any case, 90% of people neglect to set valve clearances. — the need to replace spark plugs, but if cleaning is done at the same time as a scheduled technical inspection, then the minus can be crossed out. — 1-2 hours of time spent
Price: 1,500 ₽ Mileage: 15,000 km
Signs of injector failure
The injector's job is to supply fuel to the combustion chamber. Therefore, the main malfunction that can occur with it is clogging or its complete failure. Signs of malfunctioning injectors include the following factors:
- unstable engine operation at idle;
- significant increase in fuel consumption;
- problems with starting the engine, especially when cold;
- in some cases, a significant amount of black smoke may appear from the exhaust pipe (if a lot of fuel enters the combustion chamber through a leaking nozzle), and sometimes it is also accompanied by periodic loud pops from the muffler;
- loss of the dynamic qualities of the car, expressed in the fact that the car accelerates poorly, it lacks power, jerking is felt while driving even on a flat surface, including when releasing the gas and when the load on the engine changes.
These signs, of course, may indicate other problems with the car’s power unit, but if they occur, we advise you to check the injectors and, if necessary, repair or replace them.
Malfunctions in the operation of injectors entail significant wear of the internal combustion engine, and the time for its major repairs is approaching.
How to identify a leaking nozzle?
Savings persuade many motorists to purchase a car with a diesel power unit. But new diesel power systems can spoil all the advantages due to their high cost, because new injectors cost a lot.
Manufacturers claim that the injector is designed to operate for 100-150 thousand kilometers. But in fact, they can work even more, but then you need to be vigilant so as not to miss the moment of nozzle failure.
Why do injectors break?
As soon as the engine begins to develop insufficient power, when the load on the engine increases, dips and jerks appear, and at low speeds the operation of the power unit becomes unstable, then you should immediately think about going to a service station for repairs or to an auto shop to buy new injectors.
Most often, injectors break due to various types of contamination. Since these parts are constantly exposed to high temperatures, the resins contained in the fuel become coked at the nozzle. These hard deposits can block the spray ports, causing the needle valve to become unsealed. This can lead to the fact that even high-quality Denso injectors begin to spray fuel poorly or even leak. A clogged fuel system can cause other injector components, such as the passages or filter, to become clogged. Most often, common rail injectors are repaired using ultrasonic cleaning.
The first signs of a leaking nozzle
A pouring nozzle is a nozzle that does not spray fuel well or simply drains it in a stream into the combustion chamber. What are the signs that the injector is not working properly? First of all, you can feel twitching at idle or during low load modes. When the engine warms up a little, the twitching will decrease, because in a warm engine the fuel evaporates much better, even if the atomization is disrupted.
If the car does not start on the first try, but only on the second or third, and before it always started normally even with a similar temperature outside, then this is also a sign of a leaking injector. The thing is that if the injector is flowing, it lets fuel through even when the engine is not running. Due to this, the pressure in the ramp drops very significantly. And due to the fact that the fuel pump only works for a few seconds during start-up and then turns off at the software level, this is not enough to ensure that there is the required pressure in the fuel rail. That is why the engine has to be started several times in order for the pressure to equalize to the required level.
In addition, if at least one of the injectors is leaking, the air-fuel mixture becomes very lean. It is known that such a mixture burns much worse and is more prone to detonation. This can be noticed by the knock sensor, but many car enthusiasts simply do not pay attention to it, mistakenly believing that it is the sensor itself that is broken.
Sometimes a flash occurs in the engine when the starter has not yet worked. This is also one of the signs that fuel is leaking from the injectors. This pop most often means that an idle spark from the ignition ignited the leaking fuel.
Why do injectors fail?
Contaminants can enter the fuel system along with gasoline. For cleaning, filters are installed that capture contaminants larger than 20 microns. Such filters are provided both on the fuel line and in the injector itself.
Gasoline contains heavy fractions. They settle on the injector seats, and over time turn into resinous growths. This leads to deterioration of the injectors or their complete failure.
How deposits appear
When the engine stops working, light fractions of the fuel evaporate on hot surfaces. Heavy fractions settle on parts, including nozzles. There is nothing to wash them off - fuel no longer flows.
Over time, the shut-off cone can no longer fit tightly into the seat - therefore, the tightness of the nozzle is broken. This leads to interruptions when starting the engine, as the pressure in the fuel line decreases. Resinous deposits clog the injector nozzle. As a result, the amount of fuel ejected by the nozzle in each operating act decreases.
The spray pattern of the injector also changes. The sprayer has its own standards and tolerances. Solid contaminants lead to the formation of an irregularly shaped torch, fuel atomization occurs smoothly, and fuel leaks appear. Often deposits form more intensively on individual injectors, while the load on the “cleaner” ones increases.
Filter contamination
Another main reason for injector failure is dirty filters. Filters are installed along the fuel path and the injector itself has a filter. Its size is small and it is designed only to filter out very small fuel contaminants. If during operation of the fuel system the main filter, which is supposed to catch increasingly larger particles, is clogged, the injector filter instantly becomes clogged. Therefore, timely replacement of fuel system filters is the key to injector performance.
How to troubleshoot injector problems?
To identify the causes of an injector malfunction, you need to go through half of the car. It takes a lot of time and effort. Special diagnostic equipment is required.
Advanced cases occur among drivers who do not monitor the condition of the car. Requires time and material costs to fix the problem.
Many drivers have an indecently dirty injection system. Lack of competent maintenance and low-quality fuel take their toll.
Computer diagnostics.
The beginning of any renovation. Clarifies the causes of malfunctions. Special equipment is used.
Fuel injection system.
Represented by nozzles prone to contamination. It has a complex design, which makes it difficult to perform maintenance on your own without outside help.
Failure to promptly replace the fuel filter results in small dirt particles entering the injector nozzles. Normal supply of gasoline is difficult. Ultrasound is used to remove dirt and the filter is replaced.
Fuel pump.
Located in the fuel tank. Serves to supply gasoline to the injectors. Long-term operation of the pump leads to wear of its working elements.
A typical malfunction is an insufficient amount of fuel supplied to the injectors. This leads to unstable operation of the injection system. The pump cannot be repaired and must be replaced together with the fuel tank.
The injector is a reliable fuel supply system. She lost the fight to new technologies. The new generation ICE (internal combustion engine) has low fuel consumption and lower emissions of harmful substances. The injector is prone to contamination and high fuel consumption.
Thank you for your attention, good luck on your journey. Read, comment and ask questions. Subscribe to fresh and interesting articles on the site.
Why do we need injectors at all?
The main function of this element is to supply fuel to the combustion chambers. Moreover, you need to supply a certain amount of gasoline mixed with air. This is the only way to form a flammable mixture that will ignite in the combustion chamber. Given this, it is logical to assume that the injectors may malfunction due to bad fuel. And this is true in 90% of cases. Car owners who pour bad gasoline into their car are forced to clean or change this engine element more often. But for this you need to know how to check the injectors correctly.
What functions does an injector perform in a car?
Absolutely all modern internal combustion engines, both diesel and gasoline, have a fuel injection mechanism. The nozzle in this system plays the role of a pump, supplying a very thin stream of fuel under high pressure and being one of the main elements of the injection system.
An engine injector is an electromagnetic valve that operates in accordance with a special program embedded in the engine control unit. This valve ensures a dosed supply of fuel to the cylinders. And today an injector means precisely an organized system of nozzles.
By purpose, these elements can be:
- for distributed injection;
- for central injection;
- for direct injection.
Fuel is supplied to each injector under a certain pressure due to the supply of electrical impulses from the control unit to the electromagnet. These pulses respectively open and close the needle valve at the right moments and thus regulate the flow of fuel through the nozzle channel into the cylinder. The longer the pulse lasts, the longer the valve will be open and the more fuel will flow into the injection element. The duration is regulated by the engine control unit. In addition to the duration of fuel supply, the nozzle mechanism allows you to create different shapes of the fuel torch and produce a jet at different angles. These variable parameters have a significant impact on the creation of the fuel mixture in the engine.
Not all car owners can immediately find an injection system in the engine. The location of the injectors depends on the type of injection used in a particular case:
- With a central injection scheme, 1-2 nozzles are located in the intake manifold near the throttle, completely replacing the carburetor.
- In a distributed scheme, each cylinder is equipped with a separate injector. In this case, the injector is located near the base of the intake manifold, where fuel is injected.
- In the direct scheme, the injector is placed on the cylinder walls in the upper part. Injection is carried out directly into the combustion chamber.
Thus, injection elements are an important component of a modern engine, the uninterrupted operation of which completely depends on these elements. Therefore, the injector needs periodic inspection and flushing.
Methods for cleaning and flushing the injector
The most widely used methods for flushing the injector are:
- Washing with special detergent additives for gasoline.
- Cleaning and washing the injector without removing the injectors from the engine.
- Washing injector nozzles in an ultrasonic cleaning stand.
Let's take a closer look at each of them.
Gasoline additives for injector flushing
Additives for flushing the injector are the cheapest and easiest way to clean it from contaminants. Such additives are available in the range of many auto chemical manufacturers. They are most effective when added regularly to the gas tank.
When the first signs of injector contamination appear, you can apply a shock dose of such additives, but provided that the gas tank and pipelines are relatively clean. Otherwise, all the dirt will end up in the electric fuel pump and fine fuel filter, which obviously will not add durability to these components.
Flushing the injector without removing the injectors from the engine
Cleaning and washing the injector without removing the injectors from the engine is carried out using a simple washing unit:
- to do this, the engine is disconnected from the standard power system;
- instead, a unit for washing the injector is connected;
- after which the motor is forced to run for 20-30 minutes using a special solvent.
The washing ability of this composition is very high and it easily washes away all deposits (for an example, see the video at the end of the article).
Washing and cleaning the injector with ultrasound
Ultrasonic injector cleaning is by far the most effective cleaning method. To do this, the injectors are removed from the engine and placed in an ultrasonic unit with a special solvent.
The operating principle of the installation is as follows:
- In order to help the solvent wash out toxins, it is forced to vibrate using ultrasound.
- Liquid vibrations have virtually no effect on the nozzle, but cause slags to resonate, which peel off from the metal and become easy prey for the solvent.
The time for such injector flushing usually ranges from half an hour to an hour. The advantages of this method include the uselessness of an expensive solvent, however, a fairly large amount of work is required to remove and reinstall the injectors on the engine.
Cleaning procedure
Cleaning injectors can provide the car owner with the following benefits:
restoring the original functionality of the device;
reduction of fuel consumption;
optimization of motor operation.
That is, in case of contamination (use of low-quality fuel), it is possible to flush and clean the valves in order to restore them to functionality.
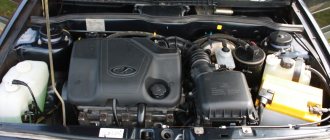
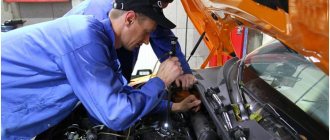
Open the hood and make sure all vehicle systems are working properly
Several cleaning methods
Experienced drivers know that there are several ways to clean injectors on a Lada Priora. Moreover, each of them has both its pros and cons.
The first option is to use a detergent additive - the liquid is added to gasoline and, after entering the gas tank, it enters the injectors. Usually one bottle of the additive (0.5 l) is enough for a whole tank of fuel. In this case, absolutely all parts of the fuel system are washed. However, the disadvantage of this method is the lack of drainage of dirt - it will remain in the system.
The second option involves using a solvent. It is considered the most effective, since flushing is carried out while the engine is running. However, it is necessary to replace the solvent immediately after using it, as they may stop functioning.
Ultrasonic cleaning of injectors can be considered the most modern method . However, the average car owner cannot always afford to buy this type of equipment.
The Lada Priora car owner can clean and replace faulty injectors on his own - the main thing is to carefully monitor the progress of the work. The solenoid valve on the Priora is considered a fairly reliable element of the fuel system, so you will rarely have to perform any type of work with it.
Carburetor cars are slowly but surely becoming a thing of history. Float chambers and diffusers have been replaced by injectors and distributed fuel injection, the quality of which is controlled by the car’s on-board computer. On the one hand, injectors have made life much easier for motorists. On the other hand, even these reliable devices periodically fail. Fortunately, the driver can replace them with his own hands. The main thing is to know how it's done.
Causes of malfunction of injection nozzles
Nozzle device
Modern fuel injectors in gasoline engines come in two types: electromagnetic and mechanical. The first is a solenoid valve that is controlled by the vehicle's ECU system. When the appropriate signals are given, the valve opens to a certain angle, regulating the amount of fuel supplied to the cylinder. The second only supplies fuel to the channel. Its design includes a needle with a step. When there is enough pressure, the fuel overcomes the resistance of the spring and the needle rises. Accordingly, the nozzle opens and fuel is supplied to the chamber. Currently, electromagnetic injectors have gained wide popularity as they are more technologically advanced. Therefore, we will further consider checking and cleaning using their example.
There can be only a few malfunctions of the electromagnetic injector:
- lack of signal from the ECU;
- malfunction or complete failure of the winding;
- nozzle outlet is clogged.
As practice shows, it is the latter option that is the most common cause of complete or partial failure of the nozzle.
Causes of pollution
Contaminants enter the fuel system of injection cars along with gasoline. Low-quality fuel can contain a huge amount of harmful impurities and particles. Fuel filters block the path of mechanical particles. Their timely replacement provides a guarantee against such particles larger than 10 microns. However, high-quality gasoline inevitably contributes to the contamination of the fuel system and, in particular, the injectors. It necessarily contains wax, as well as tars and olefins, which accumulate on the walls and clog the nozzles. Injector seats, as well as their locking elements, become covered with hard resinous deposits over time. These deposits can significantly degrade performance, and sometimes even lead to injector failure.
Manufacturers of fuel equipment are trying to look for new technologies, as well as improve the designs of existing injectors to prevent their rapid contamination. They are using more and more new materials in production, increasing the accuracy of technological processes, but they have still not been able to completely eliminate the possibility of clogging. Therefore, you should avoid little-known gas stations, where it is very easy to run into poor quality fuel. In addition, it is also undesirable to use fuel that has been stored in cans for a long time. Resins accumulate at the bottom, which can clog filters and settle on nozzles, thereby accelerating the appearance of deposits. For prevention, you can use cleaning additives that motorists add to the tank with their own fuel along with the fuel. Following these simple recommendations will help keep the fuel system clean throughout the life of the vehicle.
Signs of malfunctioning gasoline engine injectors
There are two common injector malfunctions - a violation of the quantitative composition of the mixture and a distortion of the spray pattern. The latter also reduces the quality of mixture formation.
Since high-quality compliance with the mixture composition when starting a cold engine is of particular importance, problems with injectors most clearly manifest themselves in this mode.
The injector may “overflow” when the valve is unable to maintain the gasoline pressure and the over-enriched mixture refuses to ignite, and the spark plugs will be bombarded with gasoline in the liquid phase. Such an engine cannot be started without purging with additional air.
The designers even provide a special mode for blowing the spark plugs, for which you need to completely press the accelerator pedal and crank the engine with the starter, while the fuel is completely shut off. But even this will not help when a closed nozzle does not hold pressure.
Related article: Why the starter turns, but the engine does not start
Poor atomization can lead to a lean mixture. Engine power will drop, acceleration dynamics will decrease, misfires in individual cylinders are possible, which will cause the lamp on the instrument panel to light up.
Any deviations in the composition of the mixture, including due to its insufficient homogenization, will lead to a significant increase in fuel consumption. This does not necessarily mean that the mixture is too rich, but a lean one will have the same effect as it will reduce the overall efficiency of the engine.
Detonation may occur, it will go out of thermal mode and the catalytic converter will be destroyed, popping sounds will appear in the intake manifold or muffler. The engine will require immediate diagnosis.
Why is it important to monitor the health of your injectors?
To understand this issue, you need to understand the essence and principle of operation of injection nozzles. Without going into technical details, fuel sprayers are a lot like regular garden watering systems.
When the injector is in good working order, it delivers fuel in the form of barely noticeable jets, which mixes with oxygen (air). Thus, a fuel-air mixture is supplied to the working cylinders, ensuring combustion and subsequent operation of the power unit.
But when the atomizer wears out and becomes dirty, the holes become clogged, the mixture is distributed unevenly, and the fuel system stops performing its tasks efficiently, which negatively affects engine performance. At the same time, fuel under high pressure still continues to flow to the injectors.
The presence of blockages does not allow fuel to flow freely through the injector openings. Therefore, the mixture is looking for other ways to exit. If in normal condition the air-fuel mixture resembles an aerosol, then in the event of a malfunction a full-fledged stream may emerge. There is nothing good about this, since the increased volume of fuel does not have time to burn in the chamber, which leads to the formation of soot and increased consumption.
The task of injection nozzles is to timely supply fuel liquid, which acquires a finely dispersed state due to the design of the atomizer. The supply goes directly into the cylinder or into the intake manifold, depending on the engine, for further mixing with air and combustion.
To ensure the formation of a high-quality mixture, gasoline must be supplied in a finely dispersed state, resembling an aerosol or mist. This is the only way combustion will be truly efficient. Adequate spraying is achieved through holes in the nozzles. But their cross-section is extremely small, which is why the likelihood of clogging is quite high.
Dirt penetrates the injectors along with the fuel, clogs these holes, resulting in a decrease in the efficiency and quality of atomization. As a result, gasoline is supplied not as a mist, but as a stream of liquid. Mixing with air turns out to be much worse; the fuel does not burn completely and often simply flies out through the exhaust system pipe. This entails a drop in power, increased performance and disturbances in engine operation.
How to check fuel injectors on a fuel injection engine
There are several methods for checking the performance of an injector. Let us list them in order with a detailed indication of the algorithm of actions.
Check using resistance measurement
You can check the injectors without removing them using a multimeter. First, check which injectors are installed on your car - high or low impedance (electrical resistance). This data will be necessary to perform an accurate diagnosis. In order to check the injectors with a tester without removing them from the engine, you must adhere to the following plan:
Measuring the resistance of the injector winding
- remove the high-voltage wires from the injectors;
- set the multimeter to the mode for measuring insulation resistance (ohmmeter) in the range from 0 to 200 Ohms (depending on the technical parameters of the device, the upper limit may differ, the main thing is that the ohmmeter can show a resistance value of several tens of Ohms);
- turn off the ignition and remove the negative terminal from the battery;
- disconnect the electrical connector on the injector being diagnosed (as a rule, to do this, unclip the fastening clip located on the block body);
- connect the tester's measuring probes to the injector terminals and take measurements.
High impedance injectors have insulation resistances ranging from 11...17 Ohms, and low impedance injectors - 2...5 Ohms.
If the measured insulation resistance value differs significantly from the specified value, this indicates that the injector is faulty. Accordingly, the injector must be dismantled and detailed diagnostics performed.
Remember that when checking injectors with a multimeter, you need to diagnose all devices one by one! This way you can check which injector is not working.
It is important to know that the voltage to the injectors from the ECU is supplied in pulsed and not constant form. Therefore, it is recommended not only to measure the resistance with an ohmmeter, but also to take an oscillogram of the pulsed voltage transmission using an oscilloscope, so you can see what peak voltage it receives. The tester will only show you average values.
How to check power to injectors
Checking the power supply to the fuel rail of VAZ 2110-2112
Let's look at checking the availability of power to the ramp using the example of VAZ 2110, 2111, 2112 cars, as some of the most popular. But first, let us recall that in the block with contacts, four of them supply power to the injectors, and one (pink wire with a black stripe) is the common ground. You need to act according to the following algorithm:
- disconnect the power plug;
- on the multimeter, set the upper limit of the measured resistance to around 200 Ohms (this value depends on the specific model of the tester);
- measure each of the four contacts from the injectors with a common connector in pairs.
The resistance value should be within 11.5...15.5 Ohms . Remember that this will only measure the resistance of each injector on the ramp.
You can check the injector simply for vibration. When the engine is running, a working injector should vibrate slightly . If there is no shaking, it means it is out of order.
Checking the power supply from the car's electrical circuit is quite simple, you just need:
- it is necessary to disconnect the supply wire block from each injector one by one;
- After this, use two pieces of wire to connect the injector directly to the battery;
- turn on the ignition.
If the injector starts spraying fuel, then the problem must be looked for in the wiring.
Be careful not to let fuel from the injector spill on you or other objects. Point its nozzle into a closed container.
How to check the starting injector
First, let's say a few words about the monoinjector. Today, such units are becoming less and less common, since the system is outdated. Its essence lies in installing only one injector - in front of the throttle valve. They can be found on old models of foreign cars from VW, Audi, Skoda, Seat and others.
Let us describe the algorithm for checking the resistance of an injector on a monoinjector:
- check the contacts from the injectors in pairs and compare them with the data from the manual (as a rule, these values should be within 1.2...1.6 Ohms);
- when checking pins 1 and 4, you need to make sure that the DATV (intake air temperature sensor) is working correctly; for this, also use the resistance data from the manual;
- if the resistance value is outside the acceptable limits, it is necessary to diagnose the injector in more detail.
Start injector
Often in old mono-injection engines, in addition to the valve injector, a so-called starting injector is also used, the task of which is to provide additional fuel when starting the engine, especially in cold weather and at high engine speeds, in order to facilitate its starting. Its operation time is determined automatically by the computer (in particular, a thermal relay), but as a rule, it lasts only a few seconds, after which it turns off as the engine starts and there is no need for its further use.
Its operation is completely similar to the operation of the nozzles in the injector. During operation, it may also partially or completely fail. A clear sign of such problems is the fact that a cold engine starts and immediately stalls. The starting injector is checked according to the following algorithm:
- pick up some small measuring container (like a glass);
- remove the injector from the engine and install it in the mentioned container;
- one contact of the injector is connected directly to the car’s battery, and the other to its “ground”;
- The fuel pump relay is also connected to the “plus” of the battery, thereby putting it into operation.
When operating and checking the pump, the injectors must be paid to the angle of fuel spray, as well as the amount of gasoline pumped. You will find reference data in the reference information for the injector that is installed in your car. As an indicative example, the data on the K-Jetronic system can be cited. In this case, the spray angle is 80°, and the volume is from 70 to 100 cubic centimeters of fuel per minute. Naturally, in other systems these indicators will be different.
After you have checked the operation of the mono nozzle, disconnect it and wipe it dry. In normal operating condition, its body is sealed. This means that fuel should not leak from it. Wait a while and make sure of this (1...2 minutes is enough for this).
Checking the injector by ear
Experienced motorists are able to check the condition and performance of injectors without removing them from the engine, in particular, by ear . To do this, use a regular rectangular board or, better yet, a stethoscope.
Place one edge of it tightly against the nozzle being tested, and the other edge to your ear. If the nozzle is in normal operating condition , then you will not hear any extraneous sounds or vibrations from it, only uniform clicks . But if it does not click or the sounds are not uniform, and other vibrations and knocks are also present, this means that the nozzle in question is clogged. And the stronger the knocks and noises, the greater the degree of blockage.
In general, you can listen to the injectors without the mentioned board. However, this requires relevant experience. The fact is that if the unit is faulty, a muffled high-frequency sound will be heard from the cylinder block, similar to a squeak or whistle. If you hear it while the engine is running, we recommend that you check the operation of the injector in more detail on a stand or ramp.
Checking the injector on the ramp
Fuel rail
Another method for checking injectors is with the fuel rail removed (it is removed together with the injectors, so this method can be classified as one that involves removing the injectors). To do this, the ramp is removed along with the injectors, and cups or other containers are installed under them to receive the fuel. In this case, it is advisable to remove the “negative” terminal from the battery and disconnect the supply wire harnesses. Before switching on, the circuit must be restored.
After this, connect the two fuel pipes and tighten the fittings holding them with a wrench. Next, you need to turn the starter for 10...15 seconds (but not longer, as this is harmful to it). It is important to note the shape of the “torch” under which the fuel is supplied, as well as the amount of gasoline in the glasses. If the injectors are working properly, the amount of gasoline in them should be the same . If this is not the case, then for further detailed diagnostics it must be removed and checked on a stand.
It will also be useful to notice whether gasoline is leaking from the injector when the engine is turned off. If this is the case, then it makes sense to check the integrity of the injector body, as well as the degree of its closure.
Checking the injector balance
Checking the injector balance
Let's look at checking the balance of injectors using the example of VAZ cars. Actions are performed in the following sequence:
- turn off the fuel pump and start the car in order to remove excess fuel pressure in the system (the car should run for a few seconds and stall);
- connect the pressure gauge to the fuel system;
- connect the fuel pump back into the system;
- connect a computer with the appropriate software and a cable for taking and diagnosing readings to the car’s computer.
Further actions are carried out in the software, with the help of which the fuel pump and injectors are turned on and off. The action algorithm for each of them is as follows:
- turn on the ignition;
- we check the readings on the pressure gauge (should be about 2.8...3 at);
- using the software, turn off the fuel pump relay;
- the pressure on the pressure gauge has dropped slightly (approximately 2.8 at);
- use the software to turn on the first injector;
- check the pressure on the pressure gauge (ideally, the pressure should not drop significantly);
- again, using the program, turn on the fuel pump relay in order to restore the pressure to the original 2.8...3 atm;
- then repeat the procedure with all the injectors, and then do not forget to restore the pressure in the system using the fuel pump.
Ideally, all injectors should show the same pressure release value. If in any of them the reset occurs with a very different value, this means that something is wrong with the injector, and additional diagnostics are needed.
After performing the described procedures, do not forget to completely relieve the pressure in the system. You need to connect the fuel pump and start the car, after which you can disconnect the pressure gauge.
Checking injectors on a bench
Injector testing stand
Mechanical characteristics affect the performance of injectors. And their verification is possible only at a special stand. You can read how to make it yourself in a separate article. In particular, at the stand they check:
- the amount of fuel passing through the injector;
- fuel pressure;
- the shape of the “torch” of the nozzle.
Checking a removed injector on a bench is the most accurate diagnostic method. With its help, you can determine the degree of damage to the injector and the feasibility of repair.
Fuel injector repair
The car owner can repair a gasoline or diesel fuel injector with his own hands. Especially if the device is of a mechanical type, the simplest tools will be sufficient for maintenance.
The design of injectors from different manufacturers differs significantly, therefore repair work has its own peculiarities.
It is easy to repair Bosch Common Rail injectors. Among the most common malfunctions of these mechanisms are damage to the atomizer and multiplier (valve). Moreover, the last detail fails most often. The manufacturer provides a replacement guarantee for nozzles for 100 thousand km. But in Russian realities (as well as in CIS countries), due to the low quality of fuel, the unit cannot withstand more than 20 thousand km, after which inspection and repair of diesel engine fuel injectors is required.
The same problems are typical for Delphi injectors. They also most often have nozzle and valve failures. Ultrasound is used to clean the atomizer; if the procedure does not help, the part is replaced.
The Japanese one guarantees that its injectors can withstand 150 thousand kilometers. Another advantage of such parts is that they are cheaper than European ones. But repairing these fuel injectors is impossible because Denso components are not sold. If a unit fails, it must be replaced.
To repair a gasoline or diesel fuel injector with your own hands, you need to prepare the following:
- clean, lint-free rags;
- a flat blade screwdriver;
- spanners;
- tweezers for removing petals;
- side cutter or pliers for removing the mesh;
- hex key.
The nozzle is disassembled in the following order:
- Clamp the part in a vice.
- Using a wrench, unscrew the valve to get to the adjusting washer, spring and rubber ring. You need to handle the ring especially carefully, because if it is damaged there is nothing to replace it with - such parts are not for sale.
- Remove the nozzle petals using tweezers.
- We take out the spring.
- Remove the large ring.
- Using a hex wrench, unscrew the nut with an M17 external thread.
- Removable nozzle. Gently tapping it, shake out the multiplier.
- Using a screwdriver, remove the nylon washer and copper ring from the inside.
There are repair kits on sale that include O-rings. These parts are needed to prevent outside air from entering the multiplier. As the rings are used, they wear out, their elasticity decreases, and cracks appear through which air leaks. As a result, the fuel injection process is disrupted, which causes unstable operation of the power unit.
To replace seals during repair of fuel injectors of gasoline (diesel) engines, proceed as follows:
- Remove the rings from the injector. If this is not easy to do because the rubber has become hard, you can use a sharp knife.
- Install new rings after lubricating them with engine oil.
If you have started repairs and diagnostics of fuel injectors show the presence of leaks, in some cases the problem can be solved by replacing worn out injector gaskets. The algorithm of actions here is as follows:
- Inspect the gaskets - an indicator of the need for replacement is their reddish, rusty color. The new mesh is white.
- Before installing new gaskets, the injectors should be flushed.
It is also easy to replace the copper washer under the nozzle. But sometimes the matter is complicated by the fact that the old washer burns out, the seat becomes uneven, then it will need to be processed with a milling cutter.
To do this, install the cutter in the seat and use a special key to screw it inward. You need to act carefully, do not put too much pressure on the key, otherwise it will leave nicks. Periodically you need to remove the cutter and inspect the seat. If not all irregularities are removed, the procedure is repeated. The cutter itself also needs to be cleaned every time.
Determining damage by hearing
Most experienced drivers can try to determine the operation of the injectors even by ear. Beginners are not recommended to use this method due to lack of experience.
To try to diagnose injectors by ear without removing them from the engine, you will ideally need a stethoscope or a small thin board. One side of the board must be pressed tightly against the TF being examined, and we place our ear on the other side.
When working properly, the nozzle does not emit any extraneous sounds, does not emit vibration, and generates rhythmic clicks extremely clearly. If uneven noises or knocking noises are heard, we can conclude that the nozzle is clogged. The degree of damage is determined by the volume and frequency of the unusual noise.
Motorists with extensive experience can do without a plate during analysis. If a malfunction exists, a muffled high-frequency sound will emanate from the engine area, very much like a squeak. If it is continuously heard while the engine is running, then the fuel injectors must be examined on a ramp or stand.
Cleaning Priora injectors
There are two options for washing injectors: with and without removing them from the car. The removed injectors are washed on special stands using ultrasound, under the influence of which even the oldest contaminants disappear. Ordinary drivers do not have such stands, so below we will consider a more popular option for washing injectors without removing them from the Priora. Here's what you'll need for this:
- liter of special flushing fluid;
- two automobile nipples;
- automobile fuel filter;
- a pair of metal clamps;
- a meter piece of rubber hose with a diameter of 12 mm;
- drill with 13 mm drill bit;
- electric pump;
- two liter plastic bottle.
Flushing sequence
- The bottom and cap are drilled into the plastic bottle. This is done with a “13” drill. Automotive nipples are inserted into the holes.
Ordinary car nipples are inserted into the holes of a plastic bottle
Priora injectors are washed using a filter and a plastic bottle
The green button is clearly visible on the Priora fuel hose
The main fuel hose of the Priora is connected to the fuel filter for flushing
The device for washing Priora injectors is assembled and ready for use
A car water pump plays an important role in the operation of a car engine. It is possible to recognize its malfunctions using the following article: https://vazweb.ru/desyatka/pitanie/zamena-forsunok-vaz-2114.html
Troubleshooting
To quickly check the injectors without removing them, you will need an indicator screwdriver. It consists of a metal rod and handle on which a switch and a contact are located to create a conductive circuit, clamped by one of the fingers. When moving the switch forward towards the rod, the device becomes less sensitive; when moving to the upper position, its sensitivity increases. In the first case, the red indicator lamp will light up or flicker, in the second case, the green lamp will light up.
Before carrying out the test, the screwdriver switch must be moved forward, towards the working part (rod) until it stops, and your finger must be pressed against the open contact located on the handle of the indicator screwdriver. The hand must remain in this position during the entire test, closing the electrical circuit, otherwise there will be no indication.
The working rod of the screwdriver must be positioned so that it touches the metal bracket on the block holding the nozzle. There is an opinion that it is enough to simply bring the rod to the block for an indication to occur, but this is not so. The metal clamp catches the electromagnetic pulse generated during the operation of the injectors; a potential difference and alternating currents arise in it, which the device records.
This test checks the injector while the engine is running, so it must be started and left at idle. When the rod of the indicator screwdriver comes into contact with the metal bracket on the screwdriver, the red indicator should light up. This checks performance on all cylinders. If the injector of one of the cylinders is not working, the indicator will not light or blink.
Using the indicator does not necessarily indicate that the injector is faulty, it signals that it is not working. The problem may be there, or in the voltage supply system, poor contact, failure in the electronic control unit, etc.
Some models do not have metal pad clamps in which currents are generated; in this case, is it possible to determine the faulty injector without removing it from the engine? Yes, this can be done using the same indicator screwdriver. To do this, you need to set the switch in the uppermost position (this is the highest level of sensitivity of the device) and perform additional manipulations.
After starting the engine, the screwdriver rod is brought to the injector block, and no indication will appear, even if it is working. Therefore, you need to attach a metal bracket to the screwdriver shaft, which will serve as an antenna where electromagnetic oscillations will occur. A paper clip carefully pressed around the rod with pliers is suitable for this.
During the fuel injector test, the switch remains in the highest sensitivity up position. With the engine running at idle speed, you need to bring the bracket as close to the block as possible, it should cover it. A blinking indication should appear on the device due to currents excited by the electromagnetic field that occurs during operation of the nozzle. If there is a non-working injector under the column, there will be no indication. This technique is also suitable for pads equipped with a metal bracket.
Conclusion
Testing with an indicator screwdriver will help you quickly find a problem when the engine is misfiring due to an injector, or other problems from the list above arise. If you have this tool, you can carry out diagnostics in your garage, and having identified a malfunction, fix it, if possible. The proposed test only reveals the fact that the injector is not working, and this can be done without disassembling the engine.
To identify the reasons why the fuel does not ignite in the cylinder, more detailed diagnostics and subsequent repairs will be required. However, it is not always necessary to replace the nozzle; there are other reasons why it does not function or is unstable. Sometimes you just need to seal the pad contact and the problem of stable engine operation is immediately solved; in more complex cases, for example, to clean the injectors, you will need to contact specialists.
INJECTORS
The injectors on the VAZ 2114 are an electromagnetic device in which, when there is a pulse in the electrical component, the valve opens and atomized fuel is injected under pressure into the internal combustion engine cylinder. Depending on the magnitude of the pulse, the valve opens to a greater or lesser extent, thereby dosing the flow.
Model 2114 can be equipped with fuel injectors from different manufacturers, and accordingly, the cost of the injectors may also differ. Manufacturers and cost (price range in the Russian Federation):
- GM (1300 – 1400 rub.),
- BOSCH (1000 – 1200 rub.),
- SIEMENS (800 – 1400 rubles).
Article on the topic: The stove on the VAZ 2114 does not heat well: we find out the reasons and fix the problem
The VAZ 2114 (2115) is equipped with engines of 1.5 and 1.6 liters (8 and 16 valves), therefore the performance of the injectors must be selected depending on the type of engine. If you make the wrong choice, fuel consumption may increase or the internal combustion engine may lose power. Which injectors are better to install on a VAZ 2114? Here you should focus on the part markings. For example, BOSCH 0 280 158 502 is only suitable for a 1.5 l 8-valve engine. It’s hard to say anything about the manufacturer; the quality of all products is approximately the same.
SIGNS OF PROBLEM
There are certain signs of clogged injector nozzles:
- Difficulties in engine operation, jerking;
- High gas consumption;
- Unstable engine operation at idle speed.
And, if the injectors are leaking, the internal combustion engine may not start at all. To improve engine operation, you should clean the injectors on the VAZ 2114.
REMOVAL
Let's look at how to remove injectors on a VAZ 2114 (of course, everything is done with the engine not running, and it won’t hurt to disconnect the battery terminals). To do this we need a set of combination wrenches, a hexagon, screwdrivers and pliers:
- Relieve the pressure in the system. On the rear of the ramp there is a valve under the cap. We unscrew the cap and press the valve with a thin screwdriver or rod.
- Remove the air filter pipe;
- Disconnect the fuel lines (supply and return);
- Disconnect the electrical connectors from the injectors. The connectors are snap-on and easy to remove;
- We unscrew the two ramp mounting bolts (or a 10mm wrench or a hexagon):
- We dismantle the fuel rail.
We move the latch and take out the nozzle. The injector is removed from the ramp very simply - you need to move the locking washer to the side and pull out the nozzle using a little force.
REPLACEMENT
Replacing injectors with the fuel rail removed is done simply - remove the old part, install the new one and secure it with a springy split washer. Then we install the fuel rail in place. Changing the nozzle is very simple.
EXAMINATION
Before cleaning, it won’t hurt to check the injectors on the VAZ 2114; it’s a good idea to first make sure they are not working. The check is carried out on a removed fuel rail; there is a special stand for this; many modern car repair shops are equipped with such stands.
Article on the topic: Hand (parking) brake system on the VAZ 2110
You can check each individually removed injector by applying power to it and connecting a fuel tank to the inlet. When voltage is applied, the valve should operate and gasoline should spray out of the nozzle. But the test here is conditional; performance is almost impossible to determine.
Even more dubious is the idea with measuring cups, which is often described on resources on the Internet. Let's say all glasses are filled with the same amount of gasoline. How then did you determine the performance when simply cranking with the starter? After all, the engine operates at different speeds, and a faulty injector usually overflows gasoline depending on the voltage supplied to it. What if the electrical part is faulty?
How to clean injectors
Most often, the problem with the operation of injectors is their banal contamination. Therefore, to restore their functionality and return the injector to its nominal performance, it is enough to clean it. This can be done in two ways - without removing it from the engine (by adding a special cleaner to the fuel) and in the removed state (passing the cleaner through a separate nozzle or using ultrasound). The following methods are used for cleaning:
- mechanical;
- ultrasonic;
- using chemical compounds.
In this article we will talk about only a few, since cleaning injectors often requires additional professional equipment. You will find detailed information about self-cleaning in another material. Here we will briefly touch on these methods.
Cleaning the nozzle at home
A separate nozzle can be cleaned using special chemical compounds. For example, the same additives that are added to fuel to clean the system or the so-called “Carburetor Cleaner”. In this case, it is necessary to act according to the following algorithm:
- prepare in advance “Carburetor Cleaner” (or its equivalent in the form of a spray can), a contact button without locking the closed position, a syringe with a volume of 5 ml or more, a tube to extend the neck of the syringe with a seal, an empty container, preferably of large volume (5-10 liters ), a mobile phone charger with a cut plug, contact wires with terminals;
- Next, you need to insert the test nozzle into the back of the syringe (as tightly as possible, with or without a rubber band);
- after that, connect the terminals through the button to the charger and plug it into the outlet;
- insert the tube into the cleaning agent sprayer, and unfold the back of the nozzle into the prepared empty container;
- after that, press the sprayer so that a certain amount of the substance enters the nozzle;
- press the contact button to activate the nozzle.
If the nozzle is working properly, detergent should come out from its reverse side under pressure. The purging procedure must be repeated several times to achieve the required degree of cleanliness.
If your car has low-resistance injectors, then you need to press the injector open button for a split second. If you have high-resistance injectors, then you can hold the button for 2-3 seconds.
In addition to the check methods listed above, you can also mention checking the toxicity of gases and smoke - a low level of CO during gas release is a sign of poor injector performance. This method is practiced at some service stations as a way to monitor engine operation. Since both certain knowledge and equipment are needed, we will not consider it as one of the options for self-diagnosis.
You also cannot ignore and not pay attention to checking the injectors for fuel supply correction and lambda, but here the situation is the same as with toxicity, you will need not only diagnostic equipment, but also be able to understand all the numbers that the diagnostics will show you.
Injectors installed on Priora
The Lada Priora car is equipped with imported injectors manufactured by the German company BOSCH. These devices are highly reliable. Their service life can reach 160 thousand kilometers. However, car service specialists strongly recommend changing injectors every 120 thousand km.
Almost all Prioras are equipped with German injectors from BOSCH
Injectors for 8 and 16 valve engines
You should know that the injectors of the 8-valve Priora engine are no different in appearance from the injectors of the 16-valve engine. These are all the same devices from BOSCH, consisting of a housing, a coil, a diffuser and a fuel grid. When choosing injectors for a Priora, you need to think not about the number of valves in the engine, but about its volume. Because the markings of injectors for 1.5 liter engines are different from the markings of injectors for 1.6 liter engines. In the first case, the BOSCH injector should be marked 0-280-158-110, in the second - 0-280-158-502. You can clarify the markings in the car’s operating instructions, at the end of which there is a summary table with digital designations of all BOSCH injectors depending on engine size.
The following material is devoted to the repair and replacement of injectors in VAZ 2110-2112 cars: https://vazweb.ru/desyatka/pitanie/zamena-forsunok-vaz-2110-8-klapanov.html
Table of applicability of injectors for VAZ cars
Comprehensive diagnostics of the operation of injectors on the ramp
For such a check, the fuel rail will need to be removed from the engine along with the injectors attached to it. After this, you need to connect all electrical contacts to the ramp and injectors if they were disconnected before removal. It is also necessary to return the negative terminal of the battery to its place.
- The ramp must be placed in the engine compartment so that a measuring container with a scale can be placed under each of the injectors.
- It is necessary to connect the fuel supply pipes to the ramp and additionally check the reliability of their fastening.
- The next step is to turn on the ignition, after which you need to crank the engine a little with the starter. This operation is best performed with an assistant.
- While an assistant rotates the engine, check the efficiency of all injectors. The fuel supply must be the same on all injectors.
- The final step will be to turn off the ignition and check the fuel level in the containers. The specified level must be equal in each container.
More or less fuel in the measuring containers will indicate a faulty injector or the need to clean one or more injectors. If the nozzle shows underfilling, then the element needs to be cleaned or replaced. Fuel leakage after turning off the ignition will indicate that the injector is “flowing” and has lost its seal.
In addition to self-checking, you can use the injector diagnostic service at a car service center. This operation is performed on a special testing stand. Testing an injector on a bench allows you to accurately determine not only the efficiency of fuel supply, but also the shape of the torch during fuel spraying.
How is diagnostics carried out?
You should know that car injectors are classified into several types. Today, two of them are in use: conventional and electric injection elements (magnetic).
Electric or, more correctly, electromagnetic injectors (EMF) are equipped with a special valve that supplies fuel. It, the valve, is controlled by the power unit ECU using sent pulses.
As for mechanical injectors, they open as the gasoline pressure in the injector increases, i.e., automatically.
On modern cars, the first variants of injectors are often installed - EMF.
Checking the injector itself without removing it
Injector testing can be done in several ways. However, the simplest of them is in use, and this is not surprising. It makes it possible to quickly test the injectors without even removing them from the car. The fundamental factor in such diagnostics is the analysis of the noise emitted by the motor during operation.
Checking the injector
If a muffled high-frequency noise is heard from under the hood, this indicates the importance of cleaning the injectors or a problem with one of them.
Checking power supply
It is recommended to check how the power is going. This test option is carried out only when the injectors themselves are functioning flawlessly, but difficulties are observed with starting.
Here's how this kind of diagnosis is carried out:
According to the result, the following conclusions are drawn:
Another test option involves using an ohmmeter. This method allows you to measure the resistance on the injectors, and draw conclusions accordingly.
This is done as follows.
In this way, you can measure the compliance of the resistance indicator with the required one. If deviations from the norms are noticeable, the faulty injector is removed from the vehicle and replaced with a known good one. After this, you can check the resistance again, and be sure to evaluate the operation of the motor. If everything was done correctly, the engine characteristics should change.
Analysis of the operation of injectors on the ramp
This method already involves dismantling the fuel rail.
The injectors, of course, are removed along with the ramp. Then reconnect all electrical contacts to the ramp (after all, they are thrown off during dismantling). The negative terminal of the battery, which was removed earlier, also returns to its place. Anyone can check the injector nozzle with their own hands. It is not necessary to go straight to a car service center if you encounter another problem. An experienced motorist should be able to do some repairs himself.
Hearing test
This is the simplest and most accessible way. However, it requires a lot of experience, because you need to know how the working nozzle “sounds”. To listen, use a rectangular board or a stethoscope. One edge of the “device” must be applied to the nozzle being tested, the other to the ear.
If you hear only uniform clicks, the injector is working properly. If there are knocks, pops, or vibrations of varying intensity, you can definitely say that the nozzle is clogged.
Signs of a blockage
The injector nozzle is designed in such a way that the injector does not need to be cleaned at all if the car consumes fuel of European standards. Car manufacturers recommend changing devices every 120-140 thousand km. mileage, regardless of the technical condition of the device. But the fuel used in the post-Soviet space clogs the nozzles so much that it is better to clean them after 20-30 thousand km.
It is usually not immediately clear that the devices are clogged. It is easier to find out about clogged devices in the cold season, when the volatility of gasoline decreases. Engine malfunctions appear:
- When starting, it does not start the first time, it runs unevenly.
- Fuel consumption increases.
- The gas pedal falls off.
- There are dips at idle or when driving, acceleration dynamics deteriorate, jerking during acceleration.
- Engine power decreases.
- The service life of the catalyst and lambda probe is reduced.
- The performance of the injectors is reduced.
- The direction and shape of the fuel spray plume changes, until its supply stops.
- The amount of exhaust and its smokiness increases.
How to check injector nozzles
Troubleshooting and checking injectors when diagnosing an injector are not very different from similar operations with a carburetor engine.
- To check the injector for functionality, it is necessary, as when searching for a “dead” spark plug (ignition system malfunction), to turn off the power to each injector one by one. At what stage the shutdown will not cause changes in the operation of the motor - this means that the problem is in this element.
- Next, you should check the presence of voltage at the non-working injector with a voltmeter with a measuring range ranging from 0 to 2.5-3 V.
- After this, you should check the solenoid valve for operation: momentarily apply current from the battery to the injector terminal - if characteristic clicks are heard, then the valve is working.
If checking the injectors shows their performance, then all problems associated with their unstable engine operation should disappear immediately after flushing the injector.
Checking Lada Priora injectors
As mentioned above, both the fuel system ECU and the injector itself can fail. To carry out a complete diagnosis of the ECU, special software is required, which the average motorist simply does not have. Therefore, the only option is to diagnose the machine at a service center. The program, connected to special equipment, will quickly detect ECU errors and correct them.
A full check of Priora injectors is possible only on a special stand
And if problems arise in the mechanical part of the injector, then the diagnostic program will be useless. The maximum that it can do is indicate which cylinder is not working correctly. After this, the car owner can only replace the failed injector on the specified cylinder, since these devices cannot be repaired.
Checking the injector balance
To balance the fuel pump, you must first turn off the fuel pump and start the car. After a few seconds of operation, the engine should stall - this is necessary to eliminate excess pressure of the mixture. Then the pressure gauge is connected, and only after that the fuel pump returns to its place. Next, a computer with the necessary software is connected and diagnostics are carried out.
Subsequent actions are performed exclusively using specialized programs. You may notice that the fuel pump will gradually turn on and off, as will the injectors. In general, the following algorithm can be distinguished:
- Turning on the ignition;
- Pressure gauge readings are in the range of 2.8–3 atm;
- The fuel pump turns off;
- Pressure drop to 2.5–2.8 atm;
- Checking one TF;
- Analysis of pressure gauge data – significant dynamics should not be observed;
- The pressure is restored to its original value by turning on the fuel pump;
- The procedure is repeated one by one with all nozzles.
When working correctly, each element will give approximately the same performance. If the reset is different in a certain place, then we can talk about a malfunction of the injector or its further diagnostics. After completing the manipulations, the pressure gauge must be turned off only after first releasing the pressure in the system.
Replacing injectors on a 16-valve Lada Priora engine
As mentioned above, symptoms of injector malfunction include unstable engine operation, starting problems and increased gas mileage. To change the nozzle to a new element, you will have to spend a lot of time, since the replacement procedure is quite complicated.
As a working tool, it is recommended to immediately prepare:
set of open-end wrenches;
Phillips-blade screwdriver.
After the car has stood for some time and cooled down, you can start working:
The plastic retainer of the harness must be pressed to the side with your finger to pull the bundle of wires out of the injector.
After which you will need to relieve the pressure in the car’s fuel system. The average pressure is approximately 380 kPa, that is, if work is carried out without bleeding, you can get injured due to sudden fuel emissions. To do this, you will need to open the car and remove the seat from the back row.
There is a carpet under the seat, and under it there is a hatch to the gas tank.
Using a Phillips screwdriver, unscrew the two screws that secure the hatch cover to the panel and remove the cover.
From the fuel pump, which is located in the gas tank, you need to disconnect the power wire - the connector can be pulled out without difficulty.
After this, you need to start the car and wait until the engine stalls due to lack of gasoline.
Next, you need to run the starter for at least three seconds so that the pressure in the system equalizes.
Disconnect the cable from the negative terminal on the battery.
Injector diagnostic stand
Modern service stations are always equipped with stands for diagnosing and cleaning injectors. This method involves removing the fuel rail and injectors from the vehicle. At such stands, complete diagnostics are carried out: checking the power supply, measuring electrical resistance, and checking the performance of the diagnosed injectors. Some people construct similar stands on their own.
Monitor the condition of the injectors, change fuel filters on time, refuel with high-quality fuel at trusted gas stations, undergo maintenance on time and you will not have problems with the fuel system.
Injector prevention
You can get rid of the need to wash the injectors yourself by regularly carrying out preventive procedures to ensure pre-cleaning of the injectors. For example, liquid cleaning of injectors is a good idea for preventive purposes. Note that it is not necessary to contact a car service for preventive purposes (although it certainly won’t get any worse), it is enough to do an “enema” and carry out the procedure at home.
In addition, there is an old “grandfather’s” method that many still use today. It involves regularly accelerating a car to a speed of more than 120 km/h, and covering approximately 10-15 kilometers in this mode. High pressure inside the system provokes self-cleaning of the nozzle. The same method also involves accelerating at idle speed to 4000-5000 rpm for three minutes. Although it is less effective than the first.
Cleaning injectors on a stand
One of the most popular methods is to clean the injectors on a stand; this method can be implemented independently, or you can contact a car service center. The difficulty lies not only in securing the injectors to the stand, but also in implementing a pulse controller that will supply current to the injectors intermittently. The principle of operation of the stand is simple, nozzles are installed in it, washing liquid is also poured in and the injector is cleaned, during which you can control the spray quality of each nozzle and its performance. The operation is carried out until the nozzles produce the same torch and spray the same amount of liquid over a certain period of time.
A washing stand will allow you to assess the condition of the injectors; you can do it yourself or contact a specialized service.
How to clean injectors
It has been proven that regular use of high-quality chemicals every 5,000 kilometers, which is poured into the fuel tank to flush the fuel system and remove carbon deposits, ensures long-term uninterrupted operation of the injectors and the fuel system as a whole, but this is only true for new cars and with regular use, and when signs of malfunction are already appearing, then it’s a direct road to a car service center.
Today, auto repair shops widely use inexpensive single-circuit units, which are containers containing a solvent, located on a mobile stand next to the engine or under the hood of the car. The working principle of this single-circuit installation is as follows.
A pressure hose is connected to the fuel rail at the inlet. The solvent, which serves as both a cleaning agent and a fuel, is drawn from the container by increasing the pressure created by an air compressor attached to the solvent container. disadvantage is that the cleaning liquid bypasses the pressure regulator , thereby not cleaning its shut-off valve and very superficially flushing the fuel rail. Moreover, there is no way to check the result of washing using diagnostics; it is completely absent on installations of this class. It is also not uncommon to use solvents of dubious origin with very low cleaning abilities. This is done in order to minimize costs and maximize profits. An example can be given of a case where workers at a well-known service station washed injectors using the most ordinary gasoline, passing it off as a special high-quality cleaning liquid. Naturally, no benefit was observed from this cleaning.
It is optimal to use a dual-circuit cleaning system , which, unlike a primitive tank with a special cleaning liquid, is highly professional equipment. The practical use of this dual-circuit stand guarantees high-quality cleaning of any engine.
This stand has its own pump that supplies a special liquid (solvent) under pressure directly into the fuel rail, and its excess passes through pressure regulators on the way back to the installation tank. This scheme promotes the most effective cleaning of all engine parts , i.e. not only the injectors, but also the pressure regulator and the fuel rail. Moreover, the metering distributor is cleaned in the electromechanical injection system. Using a solvent, carbon deposits and dirt from the intake valves in the engine, which impede the movement of the fuel mixture, as well as deposits and carbon deposits on the pistons and combustion chamber are effectively removed On engines using diesel, the injection pump (high pressure fuel pump) is effectively flushed, due to the fact that the cleaning liquid goes directly to the injection pump input.
%rtb-4%
Liquid injector cleaning
- We take out the fuse with the engine running. The fuse is responsible for the operation of the electric fuel pump. This is done in order to relieve pressure in the fuel line.
- We disconnect the terminals from the injectors, the injection and reversing hoses of the fuel line.
- Carefully unscrew the tablet with nozzles.
- Carefully remove the sealing rings from the injectors.
When the solenoid valve is closed, the nozzle should not allow liquid to pass through and vice versa.
You will need liquid for flushing carburetors and a device for blowing liquid through the nozzle. Any device (for example, a plastic bottle) can be used that is connected to the inlet of the nozzle and a container with injected carburetor fluid. You will also need two wires from the battery to the sprayer terminals (preferably with a pressure switch without a latch connected in series).
By opening and closing the circuit , closing and opening the valve, we pass the cleaning liquid under pressure through the sprayer. Car enthusiasts say that if after two to six times of cleaning the required spray of the torch is not present, it must be replaced. Cleaning the injector is carried out in the following order: we pass the liquid through, leave it for a while to soften the hardness, and rinse it again. The target is the six nozzle holes and the valve seat. Having completed the procedure, carefully reassemble everything in the reverse order.
Delaying cleaning may result in excessive contamination of the injector, resulting in the need to replace the injectors. Clean these devices in a timely manner, and then you will be able to avoid many problems.