Website about joints
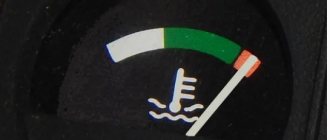
Recently, the engine has stopped reaching normal temperature, the maximum limit is 78 - 80 degrees (although according to the passport it should be 85 degrees) Since the thermostat on my car has already been changed once under warranty, I decided not to buy the same one...
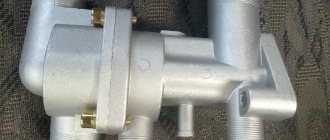
The topic is not new, you can take it apart thermostat and install a thermocouple from AUDI into it. Wahler 3091.92D (92 degrees) is ideal for our “thermos”
and
Wahler 3017.87D (87 degrees)
.
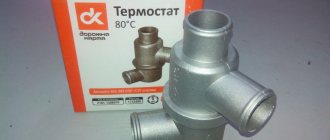
I ordered a thermostat on the Exist Wahler 3017.87D. Basically everyone sets it to 92 degrees, but I think in the summer there will be problems...
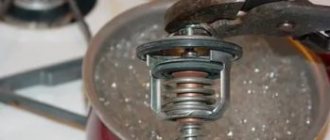
I received this box. All you need from the thermostat itself is a thermocouple and a spring...
code Luzar LT 0192
OEM number: 2190-1306010-92 2190-1306010 21200-5PA0A 2190-1306100
Opening temperature, ?С: 92
Where can I buy
Applicability for vehicles
Brand name – LT – LuzarThermostat
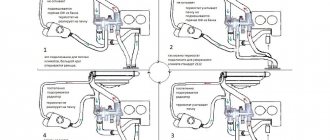
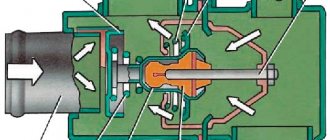
Thermostats are necessary to direct the flow of coolant in the cooling system of automobile engines, thereby regulating the temperature of the coolant.
- when the temperature rises (usually at ≈80ºC), the main thermostat valve opens while the bypass valve closes;
- the radiator is included in the cooling circuit;
- the coolant temperature drops;
- When the temperature decreases, the reverse process occurs.
If necessary. more details
Brand name – LT – LuzarThermostat
Thermostats are necessary to direct the flow of coolant in the cooling system of automobile engines, thereby regulating the temperature of the coolant.
- when the temperature rises (usually at ≈80ºC), the main thermostat valve opens while the bypass valve closes;
- the radiator is included in the cooling circuit;
- the coolant temperature drops;
- When the temperature decreases, the reverse process occurs.
If you need to purchase a thermostat for a car, you need to know a few simple rules.
The operation of a car thermostat is characterized by two parameters:
The service life of a car thermostat depends on the degree of professionalism of the manufacturer and depends on the following points:
- thermostat designs
- pairing parts
- production technologies
- technical production capabilities
- raw materials used
- level of control of finished products
In turn, the accuracy of the auto thermostat is “revealed” by several indicators:
- opening temperature
- opening speed
- valve lift
- pressure at which the valve seals when closed
Step-by-step instructions for replacing the thermostat on a Lada Granta
Before starting work, you need to prepare a tool: a TORX T30 wrench, a 13mm socket and a Phillips screwdriver. After this, proceed as follows.
- The car is placed on a level area with the engine cooled down. Raise the hood cover.
- Remove the plug from the expansion tank.
- Remove the plug from the bottom of the radiator and drain the coolant into a clean container. The plug is screwed back in.
- Disconnect the connector with wires from the coolant temperature sensor.
- Use a Phillips screwdriver to loosen the hose clamps.
- The hoses are removed from the thermostat pipes.
- Unscrew the nut securing the wire shorted to ground on the upper stud of the vehicle body.
- Remove the nuts and washers from the remaining two studs.
- The thermostat is pulled off the studs.
- Remove the old gasket from the engine seat and install a new gasket.
- To ensure a good fit, the gasket can be lubricated with engine oil or a thin layer of sealant applied to it on both sides.
- The new thermostat is installed in the seat by threading the pins through the holes in the beads of the vehicle body.
- Put on the washers and the tip of the ground wire.
- The nuts are tightened with a wrench on studs.
- The vehicle pipes are lubricated with engine oil.
- Put on the hoses and secure them with clamps.
- Having unscrewed the top radiator cap, fill in coolant until the level in the expansion tank is between o and “max”. The plug is screwed back in.
- Start the engine and check that there are no coolant leaks in all connections of the cooling system.
- Once the operating temperature is reached, screw in the expansion tank cap. Previously, this is not done so that air pockets leave the system.
Design of LUZAR thermostats
The terms should be distinguished:
- thermostat in a broad sense (car part, thermostat in a housing, thermostat as a “function”)
- thermostat in the “commodity” sense (a replaceable part of the thermostat, can be either a thermostat in the housing or a thermoelement; what is sold as a thermostat for a given machine)
- thermoelement (“working” part of the thermostat, in some cases may coincide with the name of the thermostat in the “commodity” sense)
- temperature sensor (the executive part of the thermostat is part of the thermoelement; it is a brass cylinder with a filler that expands when heated)
An automobile thermostat consists of a temperature sensor, which is a brass cylinder with a filler (technical paraffin or thermal wax), which expands when heated, with a rod on which spring-loaded plates of the main and bypass valves are placed; the temperature sensor is rigidly fixed to the frame, through which the thermoelement can be installed in the thermostat housing. The valve discs have rubber seals.
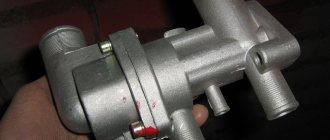
Automotive thermostats can be cased or uncased, depending on the design laid down by the designer of the engine.
Design image
- modern automotive industry, with the increasing complexity of automobile engines, is switching to the use of electronic thermostats, where temperature control is carried out by sensors, and the thermostat valves are controlled by micromotors (LUZAR does not produce electronic thermostats)
- Many modern engines have not one, but two or more thermostats - for non-uniform temperature control in different parts of the engine.
Common faults
Despite the relative simplicity of the device, troubles sometimes occur with it. A malfunctioning thermostat will most likely render the vehicle unable to be driven. More often, its incorrect operation is provoked by the following reasons:
- unstable functioning of the motor (when tripling, the valve is often damaged);
- antifreeze getting inside the device;
- wax flows out;
- mechanical damage to the valve;
- deterioration of the rubber gasket;
However, there is usually one main reason - corrosion.
If for some reason the valve does not open at all, the coolant does not circulate and the power plant overheats. Moreover, the problem will arise regardless of how cold it is outside and how quickly the car accelerates.
Incomplete opening of the valve also causes overheating. True, in this case it will not be critical if external factors do not contribute to this. A delay in closing leads to a prolonged warm-up of the engine, and in winter it most likely will not be able to reach operating temperature.
You should know that normally, at zero degrees outside, the power plant warms up in a maximum of 10 minutes. If something prevents the thermostat from opening normally, then even in summer its temperature will not rise above 70 degrees Celsius.
Malfunctions of this kind require replacing the device with a functional one.
Advantages of LUZAR thermostats
- Computer dosage of thermal wax LUZAR thermostats have thermal sensors filled using special equipment, which guarantees high accuracy of operation.
- Patented thermal sensor design To eliminate the possibility of a “breakthrough” of thermal wax from the thermal sensor body (which, according to statistics, is the most common cause of thermostat failure), LUZAR changed the configuration of the sealing gasket in the rod-thermal wax-cylinder interface. With increasing pressure, which expands when heated, the thermal wax gasket design - thanks to its specific geometry - forms an increased volume of rubber precisely in places where the thermal wax “breakthrough” may occur. This also required changing the geometry of the temperature sensor housing (“cylinder”).
- Rubberized valves We have eliminated the cause of insufficient tightness of the thermoelement - the metal-to-metal interface between the metal frame of the thermoelement and the metal valve plate - by using a rubber sealing gasket on the valve plate. Thus, LUZAR thermostats provide faster engine warm-up in winter (which is so important in Russian conditions climate).
- 100% control of thermoelements Each thermoelement is tested for temperature, height and response speed - carried out in special baths with cells.
- Warranty 2 years or 125,000 km. Mandatory certification In the event of a breakdown, you can easily replace the purchased thermostat through a retail store - just return it with a warranty card and a description of the defect. All products are certified according to the international quality management system ISO 9001 TUV and have GOST-R certificates of conformity.
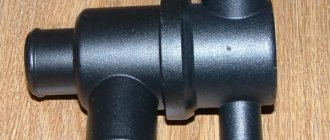
Correct installation of the “hot thermostat” Vernet-TH4898.92J
Greetings dear comrades! Since the cold weather is coming, many of you will now be faced with the problem of not warming up the engine and low air temperature inside the car. In general, with a thermostat malfunction! Many of you will want to set the thermostat hotter to 92* (Vernet-TH4898.92J), which is what we will talk about….
Before the onset of cold weather, I decided to change the thermostat to a winter one, or as it is also called “hot” Vernet-TH4898.92J. The first time I installed it was before the start of last winter. I rode the season in a warm (hot) car.))))) And the engine temperature did not drop below 87-88* even at minus 32*. So I was very pleased with this thermostat. I recommend to all. You may ask, why the name - Correct installation of the thermostat? -Now you’ll find out! Before replacing, I read a lot of forums, learned a lot of useful tips, etc. I realized that many people break the eyelet from the body when tightening. The best thing is to cut out a paronite gasket in place of the rubber ring (which is pressed by the body to the internal combustion engine) (by the way, a very convenient and useful thing). That the case breaks for those who use a square gasket (2 gaskets are included in the package with the element). Another reason for the case to break was the bolts. The bolts that come with a plastic (stock) thermostat for a new aluminum one are not suitable for us! They have non-removable wide washers (which rest against the edge of the ear and break it off), someone ground them, someone ordered new ones (which is what I did General Motors - 94500294 - Fastening bolt = 32 rubles for 2 pieces). In general, there is a lot of debate and discussion on this topic... But the most interesting thing is that people, even after all the accounting and modifications, still managed to break the thermostat body! And there were cases that twice in a row! They scolded themselves, and their hands growing from the “right” places, and the manufacturers of these cases, and the whole wide world))))) So, when I changed the thermostat for the first time, I was also a little confused, to be honest, but everything went fine, I and I thought, maybe people really have something wrong with their hands?! Or indeed, there was a marriage. Anything can happen)))) ... In general, I’m changing it this time. By the way, I was once again convinced of the usefulness of paronite gaskets. the second half of the body remains glued to the internal combustion engine. (then it will be very convenient to change the thermostat) I remove the outer part of the case, pull out the thermostat to 87* and begin to compare it with the hot one. I look, and it turns out to be a little bigger. see photo. I also thought, but by chance it doesn’t run into anything. I started inserting and discovered that if the element itself is placed in the 12 o’clock position, then the antennae from the thermostat. rest against the aluminum side. Oppa! that's it! That's what breaks it. Now I understand why people's cases broke. There, even without tightening, you can see that it is already resting. (when the gasket is new, there is a gap of half a millimeter, but if you press a little....) And if you apply a little more pressure with the bolt, then of course, the ear instantly breaks off. This is the conclusion: It is necessary to either grind down this very edge, or, like me, set it to the 2 o’clock position. I twisted it in every way, this position in my opinion is the best, nothing rests against anything and does not interfere with the exit for the small circuit. This means that when I placed it for the first time, it turned out to be just luck that I placed it correctly, and it did not resist. Otherwise, I, too, would have been one of the lucky ones with a broken ear because... I didn’t pay attention to this at all, I put all the emphasis on tightening... So guys, be more careful! I hope my experience will save many cases)))) Good luck