#1 Mikhail
- Moderators
- 3,256 messages
A friend of mine has been using the Lada Granta for more than six months.
Occasionally the check engine light would come on, but I told her not to bother, especially in the off-season. Moreover, the swearing itself goes out after a while.
The other day, after refueling (Lukoil, AI-95), not only did the icon light up, but the car began to noticeably kick and shake. Taking into account the automatic transmission, it’s completely unpleasant.
I went to the service.
The diagnosis was made: bad fuel, injectors need to be replaced. Moreover, the case is not guaranteed, pay half your salary to the cashier and then sue Lukoil, fortunately you have the check in your hands.
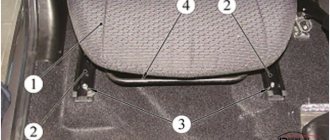
My friend was smart enough to refuse.
Then two options were proposed: ultrasonic cleaning or special washing. The second is cheaper and faster - so she chose flushing. We also changed the spark plugs.
Result: the check went out, the car drove well, my wallet was lighter by 3,000 rubles.
Now the question that has been tormenting me for three days: isn’t this a scam?
A full tank of fuel (allegedly the culprit) - no one drained it or even offered it.
I looked at the removed spark plugs - they are normal, well, maybe you can use a brush a little.
I myself was a bit of a mess back in the last century, so my knowledge is of little use.
Do you think the servicemen mocked the blonde, or does washing the injectors (without draining the fuel) on Grant make sense?
Source forum.zr.ru
Checking and replacing injectors on a Lada Granta car
Tools (for 8 valve engines):
Tools (for 16 valve engines):
- Tester
- Medium Phillips screwdriver
- Medium flat screwdriver
- Open-end wrench 10 mm
- Open-end wrench 17 mm - 2 pcs.
- Ratchet wrench
- Extension
- 13 mm head
- 5 mm hex key
Parts and consumables:
- Injectors
- Injector O-rings
- Carburetor Cleaner
- Engine oil
- Rags
If the injectors on a car fail, the following signs of injector malfunction are possible: - difficult starting of the engine; — unstable engine operation; — the engine stalls at idle; — increased crankshaft rotation speed at idle; — the engine does not develop full power, insufficient engine response; — jerks and dips in engine operation when the car is moving; — increased fuel consumption; — increased content of CO and CH in the exhaust gases; — glow ignition due to leaking injectors.
In points where there are two photos, the first shows the process on an 8-valve engine, and the second on a 16-valve engine.
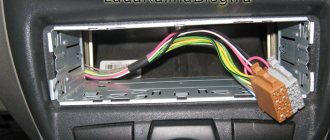
1. Disconnect the injector wire and engine harness connectors as described here (for 8-valve engines) or here (for 16-valve engines.
2. Perform an initial check of the injector windings. To do this, connect the tester to the connector contacts one by one.
The connector has five contacts: four for supplying a control signal to the injectors and one for common ground (a crimson wire with a black stripe is connected to it).
3. In turn, connect each of the four control contacts to the common contact and measure the resistance in each case.
It should be equal to 11-15 Ohms. If one or more measurements show resistance different from the specified value, some injectors are faulty.
4. To more accurately check the injectors, remove the fuel rail from the vehicle as described here (for 8-valve engines) or here (for 16-valve engines.
5. Remove the injectors from the fuel rail as described here (for 8-valve engines) or here (for 16-valve engines.
6. To identify a faulty injector, connect a tester to the injector contacts in ohmmeter mode.
It should show a resistance of 11-15 ohms. If the winding resistance is not normal, replace the injector, as it cannot be repaired.
In case of replacement, buy new injectors with exactly the same markings.
7. Check the injector for the shape of the fuel spray and for leaks at a specialized service station, since such a test directly on the car is very fire hazardous.
8. Whenever you remove injectors, be sure to replace the O-rings on all injectors on the fuel rail side and on the sprayer side.
9. If you are installing old injectors, carefully wash their nozzles with solvent or carburetor cleaner.
It is not allowed to wash the injectors by immersing them in a detergent composition to avoid damaging their electrical parts.
10. Install the injectors on the fuel rail in the reverse order of removal.
Before installing the injectors, lubricate the O-rings with engine oil.
11. Having installed the fuel rail on the intake pipe and connecting the pipeline to the fuel rail, start the engine and check the tightness of the connection of the pipeline and the injector seals.
The article is missing:
Checking and replacing VAZ 2190 Granta injectors
Removal of fuel injectors on a VAZ 2190 Granta car is carried out to check them and subsequently replace faulty ones. To carry out repair work, you will need a five-point hex wrench, a screwdriver, a seventeen-point wrench and a tester to check the resistance of the windings. Checks for spray pattern shape and tightness should be carried out at technical inspection stations.
If you have everything you need, do the following:
We disconnect the connector with the power wires of the injectors and carry out their initial check. The block with wires has four connectors supplying impulses to the injectors and one common ground wire. We alternately connect one terminal of the tester to ground and the second to the terminals and check the resistance of the windings, which should be in the range of 0.011-0.015 kOhm. If there are deviations from the recommended values, then one of the injectors is faulty.
Now that the initial check has been completed, you can begin to remove them and determine the faulty one and replace it. To do this you need:
- We press the lock and disconnect the connector with wires from the injector.
- Next, use a flat screwdriver to pry up the spring retainer of its fastening and remove it.
- We remove the injector from the fuel rail and do the same with the others. We connect a tester to its terminals and again measure the winding resistance, which should also be in the range of 0.011-0.015 kOhm. If the resistance is not normal, change it.
- Each time you remove the injectors, replace the O-rings on the rail side and the intake manifold side.
- Reassemble and install in the reverse order. Upon completion of work, start the engine and check the tightness of the pipeline connections and injector seals.
At this point, the repair work to check and replace injectors on the VAZ 2190 Granta car with VAZ 11183, 21116 and 11186 engines has been completed.
Dismantling VAZ 2110 injectors 8 valves
In order to remove fuel injectors from a VAZ 2110 8 valve
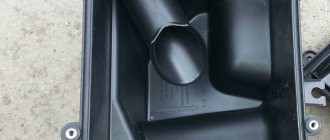
It is necessary to remove the air intake system, namely the air filter with pipe, throttle valve and intake manifold. After which you will have access to the fuel injectors themselves so that you can replace or wash them, depending on the task at hand.
Step 1 Cleaning the injectors. Removing the air filter.
How to remove injectors from a VAZ 2110. Removing the air filter.
To clean the injectors
first you need to get to them, first of all you need to dismantle the air filter and its pipes. To do this, we do it according to the following scheme. As you can see in the photo above, all manipulations must be performed by disconnecting the battery and disconnecting the terminal, in order to avoid a possible short circuit.
- We unhook the rubber clips that hold the VAZ 2110 air filter
- Unhook the wires going to the air intake sensor.
- Loosen the pipe clamps
- We remove this node so that it does not interfere with us.
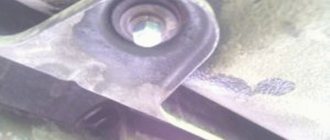
Step 2 Cleaning the injectors. Removing the throttle valve assembly
Dismantling units for access to injectors
The second step is to remove even more parts and we are at the goal of repairing the injectors with their dismantling or simply cleaning the injectors. You need to do the following:
- Unscrew the clamps holding the coolant hoses
- Disconnect the wires going to the TPS and IAC sensors
- Unscrew the fastening of the throttle opening cable
- Unscrew the fastening bolts.
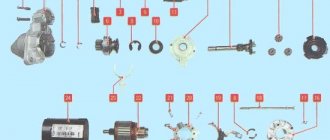
Step 3 Cleaning the injectors. Removing injectors.
Dismantling injectors on a VAZ 2110
Finally we got to the injectors themselves on a VAZ 2110 8 valve
and we begin the most important thing - dismantling them. You may have significant difficulties if no one has pulled them out for a long time. The injectors can easily stick, or rather the sealing rings, and the injector itself can easily rotate. Next we do it according to the following scheme.
- Unscrew the bolts securing the melted ramp and injectors. Hex bolts.
- Disconnect the wires going to 4 injectors
- We remove the injectors along with the fuel rail.
Here are our 4 injectors without the ramp
Injectors on a VAZ 2110 car 8 valves
Removing the fuel rail and injectors of VAZ 11183, VAZ 21116 and VAZ 11186 Lada Granta engines
- Medium Phillips screwdriver
- Medium flat screwdriver
- 5 mm hex key
- Open-end wrench 17 mm - 2 pcs.
Parts and consumables:
- Injector O-rings
- Fuel injectors (if required)
- Engine oil
Remove the fuel rail to check the injectors and replace them, as well as when removing the intake pipe.
1. Relieve pressure in the engine supply system as described here.
2. Remove the air supply hose with the throttle assembly as described here and here.
3. Using a flat-head screwdriver, press the retainer of the engine management system wiring harness block and disconnect it from the injector wiring harness block.
4. Using a 17 mm wrench, unscrew the fitting of the fuel rail tube, holding the tip of the fuel supply hose to the rail with a wrench of the same size, and remove the tip of the fuel supply hose from the ramp tube.
The connection is sealed with a rubber ring.
5. Using a 5 mm hex key, unscrew one screw each securing the ramp to the inlet pipe on the left and right sides.
6. By pulling the ramp along the axes of the injectors and overcoming the resistance of the rubber sealing rings of the injectors, remove all four injectors from the holes in the intake pipe. Place the fuel rail assembly with injectors to the left side of the car and remove it from the engine compartment.
7. Squeezing the spring clamp of the wiring harness block, disconnect the block from the injector connector.
8. Similarly, disconnect the wiring harness connectors from the connectors of the other injectors.
9. Use a screwdriver to pry the bracket that secures the injector onto the ramp and remove the bracket.
10. Overcoming the resistance of the rubber sealing ring, remove the nozzle from the ramp pipe.
11. Remove the other injectors in the same way.
12. Using the blade of a flat-head screwdriver, remove the rubber o-rings of the injector.
13. Replace the injector sealing rings with new ones.
14. Before installing the injectors, apply a thin layer of engine oil to the O-rings.
15. Assemble and install the fuel rail in the reverse order.
The article is missing:
- Photo of the instrument
- Photos of parts and consumables
Do-it-yourself injector cleaning VAZ
- Carburetor cleaning fluid
- 5 cc syringe
- 2 wires
- Set of tools
The first thing to do is remove the injectors from the engine. All 4 injectors are mounted on the fuel rail, which in turn is attached to the engine with two bolts.
To make work easier, you can remove the intake manifold and clean the throttle valve at the same time. The intake manifold is mounted on 5 studs.
Before removing the fuel rail, it is necessary to relieve the pressure. For this purpose, there is a special spool on the left side of the ramp.
Remove the chips from each injector, having first disconnected the terminal from the battery. Unscrew the fuel supply hose from the ramp (key 17). Unscrew the 2 bolts securing the ramp to the engine block (hexagon). Now you can remove the injectors from the engine and take the entire structure out.
Remove each injector from the rail. It is secured with one small clip. Now you can start cleaning.
To clean the injectors yourself, you need to assemble the following structure:
Remove the two o-rings from the removed injector. We connect the wires to the 2nd terminals (if +/- are not marked, then + should be on the left). From the side where the injector is attached to the fuel rail, we tighten the syringe (it fits quite tightly). To the syringe, instead of a needle, we attach a bottle of liquid for cleaning the carburetor. Now this entire structure is ready for use.
We put a little liquid into the syringe and briefly supply power to the injector terminals by connecting the wires to the battery terminals (try not to supply power for more than 1-2 seconds, this may damage the injector).
Follow the steps described in the previous paragraph until the nozzle begins to spray liquid normally (there should be no separate jets, dripping, etc.).
After you have cleaned all the injectors with your own hands, you can put everything back in place. When you start the engine, you will be pleasantly surprised, and the dirtier the injectors were, the greater the surprise.