How the front suspension of the VAZ-2109 works
It is very important to do timely maintenance of the vehicle’s chassis, since the main load during operation falls on it.
Moreover, the load also occurs at rest. The chassis includes the following elements: frame, wheels, rear and front suspension. Early diagnosis will help avoid many problems.
What is the front suspension? This element of the car is independent, which allows the car to be more maneuverable, since the front wheels work independently of each other. If one of them hits a pothole, the other avoids this impulse. Such design features allow you to adjust the wheel alignment of the car; you can also correct the “behavior” of the car on the road using a small negative value for the rolling radius.
The main part of the front suspension is the shock absorber struts, the springs are attached to them. There are 3 bolts and a bearing attached to the top of the rack. All this as a whole provides the ability to rotate the stand with the wheels of the machine.
The next main part is the rotary cam. Its lower part is attached to the ball joint, and its upper part is connected to the bottom of the rack. The connection is provided by bolts. The upper one adjusts the camber. The lateral stability of the car is ensured by a rod, which is secured by silent blocks to the base of the car using brackets.
Thus, we see that the front suspension includes a lot of parts, but the most basic of them are:
- spring;
- lever arm;
- shock absorber;
- ball joints;
- tension joint;
- brackets.
Front axle
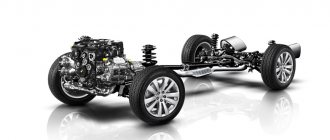
The front axle has an independent telescopic suspension, which uses both hydraulic shock absorbers and coil springs. The wishbone is the lower one with braces. The chassis is equipped with a stabilizer bar. The suspension device of the VAZ 2109 is almost identical to that of the VAZ models 2108, 21099.
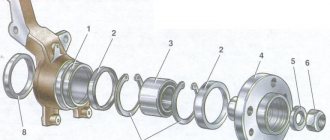
Components and parts of the front axle chassis
The front axle of the VAZ 2109 is perhaps the most complex element of the chassis, this is due to the fact that the car’s transmission is front-wheel drive, but the number of main components in its structure is not so large. This:
- Rack with shock absorbers;
- Rounded fist;
- Cross arm;
- Stretch marks;
- Mounting units for the chassis to the body and transmission;
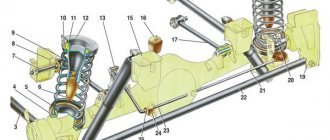
Description of the front suspension design
The chassis of the front axle of the VAZ 2109 contains quite a lot of elements, but everything is typical for cars of this class and its design has something in common with many cars of the same type. The main part is a telescopic stand with a hydraulic shock absorber. A coil spring with a stroke buffer is installed on top of the hydraulic cylinder. The upper support is also made of polyurethane and ensures the rack swings and vibration damping. The device for fastening the rack to the body (with three bolts) allows you to dampen vibrations. There is also a ball bearing inside the support, which ensures that the stand rotates together with the wheel. At the bottom of the steering knuckle there is a ball joint for connection with the lower suspension arm.
To compensate for the forces, there are stretchers with rubber-metal hinges. To install the wheel hub, a double-row thrust bearing is mounted in the steering knuckle. The hub is secured with one bolt. The suspension device also includes a stabilizer; it is connected to the lower suspension arms through struts with rubber hinges.
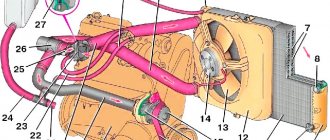
How to change a diode bridge in a generator
To perform the work you need to acquire:
- a set of heads;
- flat screwdriver;
- curly screwdriver;
- new diode bridge.
Note! Basically, the generator stops charging the battery due to a faulty voltage regulator or breakdown of the diode bridge. For more detailed diagnostics, it is recommended to remove the device from the engine compartment and install it on a plumbing installation.
Replacement of the bridge must be carried out in a certain sequence:
After removing the diode bridge, check the current flow in the circuit. This can be done using an ohmmeter or a special tester. If the semiconductors fail, the bridge will need to be replaced completely.
Note! It is difficult to replace individual parts of the bridge yourself; this requires certain skills.
- To reach the diode mounts, you need to remove the brush block from the generator. The bolts that hold the back and front covers are unscrewed. One part of the device is removed from the stator.
- Half of the generator is set aside. Using a socket wrench, unscrew the nuts securing the stator winding leads to the rectifier unit. The middle area of the device will be disconnected only after the negative wire is detached from ground. Also, the bolts with the corresponding insulators and the diode bridge itself are removed from the back cover.
- The new diode bridge is installed in its place. Now bolts with insulators are placed in the cover, the winding terminals are put on them and tightened with nuts.
- The rotor and front cover are installed into the rear through the stator. The generator housing is tightened using bolts. At the last stage of work, brushes are installed.
As you can see, the process of changing the diode bridge is not complicated; it is recommended to watch videos and photos to do the work yourself. In addition, the novice car mechanic is provided with additional instructions with a detailed description of the processes. Since the price of service stations is not acceptable for everyone, many try to repair their car themselves.
Source
https://masteravaza.ru/generator/remont-generatora-generator/vaz-2109-zamena-diodnogo-mosta-v-generatore-690
Independent front suspension - very comfortable
The front wheels in the Lada 2109 are not rigidly connected to each other. The VAZ 2109 front suspension design is designed in such a way that each wheel has its own connection with the car frame. This principle is called independent suspension. This structure has long been successfully used in the automotive industry because of its main advantage: in the event of an external negative impact on the front wheel (impact, diving into a hole, damage), the second wheel does not receive a similar impulse.
The independent suspension on the VAZ 2109 includes the following main elements (using the example of one wheel).
- The elastic element is a spring.
- The damping element is a shock absorber.
- The guide element is the front suspension arm of the VAZ 2109.
- Anti-roll bar.
- Rounded fist.
- Ball joints.
- Swivel joints.
- Mounting brackets.
In total, we can identify about fifty elements that make up the front suspension of the VAZ 2109. The main parts that are directly involved in softening the vibrations of the car are indicated. The spring is designed to soften sharp vertical impacts at speed. There are 2 classes of springs in terms of stiffness: A and B. Products of both classes can be installed on the VAZ 2109. The main condition: identical springs on one axle.
Under the influence of elastic force, after the spring has softened the blow, it will continue to move for a long time. It will take several minutes for the oscillation amplitude to return to 0. In order to instantly dampen vibrations, the VAZ 2109 suspension is equipped with a hydraulic shock absorber.
Inside it there is a cylinder in which a rod with a piston is installed. When you hit a bump, the piston moves down and squeezes out the oil. When the spring intends to oscillate further, the piston meets the resistance of the valves, and the oil is viscous and slowly drains down. At the same time, the oscillations also die out.
VAZ levers are articulated with the wheel and transmit the external mechanical force further to the spring and shock absorber. They are connected to the wheel via a rotary cam. In turn, the fist is fixed to the levers using a ball joint, which makes it possible to change the angle of the lever, but leave the distance to the wheel the same. The anti-roll bar prevents the wheels from heeling (deviating from the installation axis). When turning, when one wheel tends to tilt to the side, the stabilizer is activated by twisting and does not allow the wheel to roll.
Problems with the front end
You need to regularly monitor the condition of your suspension parts.
| Malfunctions | What is the reason and what to do |
| The cause of minor deviations in operation may be loose fasteners or failure of some small part. | The fixing bolts of the stabilizer bar or the nuts securing the upper support (under the hood) may become loose. Then repairing the suspension yourself comes down to tightening the fasteners with a wrench. Also, worn out cushions, rubber components of the upper support, and silent blocks may require replacement. |
| More serious malfunctions are excessive wear of the ball joint, spring, and compression buffer. | The service life of the ball when handled with care is designed for the entire service life of the vehicle. In this case, it is necessary to replace the broken part with a new one as quickly as possible. If you ignore this problem, other suspension components may suffer. |
| If your VAZ 2109 does not vibrate for a long time after driving through a hole, it means there is a malfunction inside the shock absorber. | Most likely, the tightness of the valves, which are responsible for the resistance during the upward stroke of the piston, is broken. |
A clear sign of worn valves is the presence of fluid leaks on the strut body. In this case, it is necessary not only to replace the valve. It is necessary to replenish the oil supply in the cylinder.
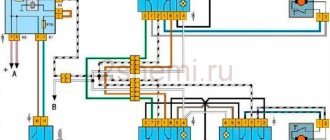
Rear suspension on the VAZ 2109: diagram with symbols, device features
Rear suspension diagram for VAZ 2109
Device Features
Having understood the diagram, you should separately talk about what the design of the rear suspension of the domestically produced VAZ 2109 is. Knowing all the features and nuances of the suspension elements used, you will know how to carry out further repairs, preventive maintenance, and what parts to buy for replacement old.
- The VAZ 2109 uses a torsion-link rear suspension design. The guiding device here is a pair of longitudinal arms, which are connected to each other using an elastic connector. Since the connector is shifted forward relative to the wheel axis, the kinematic properties of the rear suspension of the nine correspond to the features of an independent suspension on trailing arms.
- The independent movement of each wheel is ensured by twisting the amplifier with a U-shaped cross-section. This section is characterized by low torsional rigidity and high bending rigidity. This makes the structure quite reliable and durable.
- The trailing arms are made of pipes. They are welded to the connector through the rear suspension arm reinforcements, which makes it possible to create a single beam. It is hingedly suspended through a bracket on the car body.
- Each of the rear suspension arms in front is equipped with a bushing into which rubber-metal joints are pressed. They consist of a pair of bushings - rubber and metal.
- Through the spacer sleeve there is a bolt that connects the suspension arm and the stamped bracket, which is mounted to the body bracket using bolts, nuts and washers. A self-locking nut is screwed onto the mounting bolt.
- Brackets with lugs are welded to the back of the levers, which are used for mounting shock absorbers, and flanges are necessary for attaching the rear wheel hub and brake shield using bolts.
- The elastic components of the rear suspension include springs and a compression stroke buffer.
- The spring is made of spring steel with a round cross-section. It is installed on the shock absorber and rested with its lower part on the cup. The upper part rests on a support, which is welded to the inner arch of the car body. The lower spring support cup is welded to the shock absorber. A rubber insulation gasket is installed between the upper support and the spring.
- Rear suspension springs are divided into two classes, depending on the control load along the length - A and B. Class A is marked in yellow, applied to the outer side of the middle coils. Class B has a green designation.
- The compression stroke buffer is made of polyurethane. It is mounted on the shock absorber rod inside the spring. From above, the buffer rests against the cover of the protection casing, but when it is put into operation, it rests on a support.
- The buffer support is pressed onto the top of the shock absorber reservoir.
- The buffer has annular grooves on the outer surface that determine the location of deformation.
- The protection casing provides protection from mechanical damage and contamination of the rod and compression stroke buffer. The casing is made of corrugated rubber, which allows you to change the length when the suspension is operating. There is a ring groove at the top inside the casing. They serve to enter the spent part of the steel cover. At the bottom, the casing is quite elastic, which allows it to be pressed against the spring support cup.
- The rear wheel axle is mounted to the lever flange using 4 mounting bolts. The same bolts are used to secure the brake shield.
- The hub rotates on an axis on a double-row ball bearing. The hub is mounted to the axle using a nut and thrust washer. The nut is installed on the axle by crimping its collar into the groove of the axle.
- The bearing is mounted in the hub using a retaining ring. The bearing is closed and contains almost permanent lubrication.
- The inside of the hub is sealed with a pair of dirt-reflecting rings. One of the rings is welded to the hub, and the second to the axle flange. A labyrinthine seal is formed between them.
- The outer cavity of the hub is closed by a cap. There is an O-ring between the cap and the hub.
- During operation of the VAZ 2109, the hub bearing is not adjustable and is not lubricated. The wheel disc is mounted to the hub using 4 mounting bolts.
- The shock absorbers on the rear suspension of the nine are hydraulic telescopic double-acting.
- The lower eye shock absorber is installed on the lower arm bracket using a bolt and a self-locking nut.
- The upper fastener of the shock absorber is pin-type - the rod is mounted to the upper spring support through a pair of rubber pads and a support washer. There is a spacer between the protection casing cover and the washer.
Read also: Suzuki Grand Vitara characteristics
The design of the rear suspension cannot be called simple, since there are many elements that interact with each other. If this effective interaction is lost, the car begins to behave unstable and requires repair or replacement of certain components.
It is not difficult to understand the diagram and structure of the rear suspension of the VAZ 2109 car. This will allow you to significantly save on repairs, avoiding visits to service stations, and also develop your own skills in independently repairing your own car.
Symptoms of a problem
There are several main signs of failure of the rear beam silent blocks, including:
- Unstable behavior of the car on the roads;
- Tires wear unevenly, which is not difficult to notice from the tread pattern;
- When driving on a bad road (that is, 95% of all our roads), unpleasant squeaks and impacts on the car body are observed.
These signs are indirect, since they may be associated with other failures of the vehicle’s chassis. For example, dull knocks are also a sign of a faulty rear pillar. Therefore, in order to make sure that there is a particular problem, you will need to fully diagnose the chassis.
Malfunctions
Often, replacing the rear beam bushings is due to the fact that defects arise in the design of the element. They are like this:
- The elasticity of the rubber element deteriorates;
- The rubber breaks;
- The central bushing is displaced;
- Rotations occur in the seat.
If problems are detected with the silent block of the rear beam, you will need to drive the car into the garage in the near future and replace the damaged components. Unlike foreign cars, changing the silent seal on a VAZ 2109 is quite simple and without outside help. Plus it costs almost pennies.
Before you start replacing the silent blocks of the rear beam, you need to decide what exactly you will replace the old, worn bushings with.
We figured out the markings and realized that for the VAZ 2109 you need to take only those that are suitable in size and diameter for the rear beam of the nine.
Today, for the VAZ 2109 they offer two types of silents, differing in the material of manufacture.
The choice should be made based on the available budget. Rubber elements cost several hundred rubles cheaper
As for manufacturers, we recommend paying attention to the companies SEVI, BelMag, Boge and SS20
To replace you will need:
- New rear silent blocks;
- A small wooden beam;
- A device for pressing in a silent block (you can do the job without it);
- Open-end wrenches;
- Socket wrenches;
- Spanners;
- Hammer.
When everything is ready, you can start working.
- Place the car on a level surface in the garage above a pit or overpass. Be sure to place wheel chocks and shoes under the wheels. All for your safety.
- It is better to remove the rear wheel to make it easier to work.
- But it is not at all necessary to remove the rear beam. Just complicate your work with unnecessary dismantling processes.
- On the left side of the driver is the pressure regulator rod for the rear brakes. It will disturb you while you work, so we advise you to remove it. This is done by removing the locking bracket of the rod and the handbrake cable. You will remove the latter from the right side from the mount.
- Unscrew the nut from the bolt with a 12mm wrench that holds the rear beam to the bracket. This may cause problems. Place a socket wrench on the driver to increase leverage on the fastener. Remove the bolt, lift the car with a jack and move the beam down. It will come out of the eyelet this way. Do not overdo it to avoid damaging the nearby brake hose. If you press too hard on the pry bar while moving the eye, you risk breaking the hose.
- Take a pre-prepared wooden block and insert it between the body and the beam. This must be done so that the beam is below the eye.
- Using a hammer and a drift (regular metal tubing will do), knock out the old worn bushings. By the way, if you come across such a concept as “fungi”, don’t worry. This is what car enthusiasts often call these bushings because of their external similarity.
- Clean the seat from accumulated dirt and rust. Be sure to lubricate the areas with soapy water. Without it, it will be difficult to press in new silent blocks. Or use a simple dish detergent. Under no circumstances should you lubricate the seats with grease or oil, as these substances will soon begin to corrode the element.
- Now it presses in new elements. Ideally, you should have a special pressing tool. If you don't have one, use a regular hammer.
- Take out a wooden block.
- Armed with a second jack, lift the beam and insert the mounting bolt into place and tighten it with a nut.
- Reinstall the rear wheel and lower the car to the ground.
Only upon completion of all these stages can the bolts of the new silent blocks be tightened until they stop.
Such an operation should not cause any special problems, so it is not at all necessary to go to a service station and spend extra money.
Replacement of rear struts on VAZ 2108, 2109, 21099 cars
The need to replace the rear struts on VAZ 2108, 2109, 21099 vehicles arises when the following malfunctions occur: the strut shock absorber has leaked and/or started knocking, the strut spring has broken or sagged.
Necessary tools and accessories - Open-end wrench "6"
— Curved socket wrench “17”
Or a special device for unscrewing the rear suspension shock absorbers of VAZ 2108, 2109, 21099 cars.
— Two spanners on “19”
— Assistant (preferably, but not required)
The work of replacing the rear struts can be carried out both in a pit and on a flat area. It is advisable to replace shock absorbers and strut springs in pairs rather than individually.
— We hang and remove the rear wheels of the car
To do this, loosen the wheel bolts, jack up the car on both sides, place stands under the sills, and remove the wheels.
— We clean the lower fastenings of the struts to the rear beam from dirt
You can treat it with WD-40 and tap the fastening bolts.
The procedure for replacing rear struts on VAZ 2108, 2109, 21099 vehicles and their modifications
— Unscrew the shock absorber rod nut
We remove the rubber plug of the support cup in the trunk of the car and unscrew the nut with a curved spanner set to “17”, holding the rod from turning with an open-end wrench set to “8”.
Remove the nut, under it the spring and support washers, and the upper rubber cushion.
To unscrew the nut, instead of keys, you can use a special device.
— Unscrew the bolt securing the shock absorber to the beam
Using a wrench or socket set to “19”, unscrew the bolt and hold the nut with another wrench set to “19”. Remove the bolt from the mount.
Problems may arise with unscrewing and removing the bolt, since it is constantly exposed to an aggressive environment and very often becomes very sour. If you managed to unscrew its nut, you can try to knock it out using a mandrel and a hammer. In some cases, heating the bolt with a blowtorch or gas torch helps. In especially severe cases, cut off the bolt with a grinder or a hacksaw blade.
— We remove the rack
Make sure that the upper rubber gasket of the strut spring is removed. If it is not there, then remove it from the support cup from below.
That's it, the rear pillar has been removed.
We repeat the removal procedure for the second rack.
Features of installing a rear pillar on a VAZ 2108, 2109, 21099 car
— We attach the upper rubber gasket to the spring with electrical tape or tape, for ease and accuracy of installation, install the spring on the stand
— Pull out the shock absorber rod until it stops; a spacer sleeve and a lower rubber cushion should be put on the rod
— Insert the shock absorber rod into the hole in the body cup
An assistant puts on the upper rubber cushion, support and spring washers and tightens the nut.
If there is no assistant, then first we attach the shock absorber to the beam, then, placing a stop on the beam, we slowly lower the car body with a jack, periodically checking that its rod fits into the hole. You can pre-tie a wire to the rod and thread it through the hole in the cup. By pulling it out you can direct the movement of the rod.
When installing the shock absorber, it is necessary to rotate it so that the rising part of the spring cup is directed towards the wheel.
— We secure the lower part of the shock absorber, do not tighten the nut completely
— Install the rear wheels and lower the car to the ground
— Press the rear of the car several times to self-install the suspension elements
— Tighten the rod fastening nut and the lower mounting bolt of the strut shock absorber
Notes and additions
— The rear struts of VAZ 21088, 2109, 21099 cars fail less often than the front struts. Therefore, the need to replace them arises no earlier than 100 - 120 thousand kilometers.
About malfunctions 2109.
Visual factors that indicate the need to repair the VAZ chassis are stains on the shock absorbers. In this case, it is necessary to replace the shock absorbers with new ones. The malfunction of the constituent elements (discs, valves, bushings and springs) will be confirmed by low return during compression.
Seals.
It is necessary to replace the rubber elements of the system if an unpleasant creaking or periodic knocking occurs in the chassis. It is better to change elements in pairs. After all, when one element fails, more pressure is placed on the other, which contributes to its faster wear. The 2109 ball joint is one of the weakest points of the suspension. In order to identify the causes of the malfunction of this part, it is necessary to remove the wheel, as well as the plugs. Depth measurements should provide indicators of eleven point eight millimeters. Otherwise, it is necessary to replace the supporting part. This will help prevent the ball from flying out completely if there is a strong blow to the upper part of the body.
Here, it is especially important to pay attention to the end of the lever and the middle of the supporting part, they are especially weak
Bearings.
A wheel wedge indicates “dead” bearings or a damaged VAZ hub. These elements must be replaced every 130 thousand km. You should not wait until these elements are completely worn out to extend the life of your chassis. The main symptoms of this malfunction are; additional noise when cornering and braking.
Replacement is also carried out in pairs - on the front and rear wheels, to reduce the frequency of replacing elements. For cars with rear-wheel drive, it is necessary to lubricate and change the rubber hub holders, with the replacement of brake discs - every 40 thousand km
For this type of car, if fluid gets on the brake discs, you need to pay attention to the hubs. Cars with front-wheel drive do not require periodic lubrication of bearings
Replace bearings in a specially prepared and clean place using a clean tool. Even a small amount of dirt and sand can cause the element to break down and cause premature damage.
To increase the service life of bearings, it is important to prevent dust from entering it. We use the lubricant recommended by the manufacturer
It is better not to save money to maintain long-term functioning. It is important not to overdo it with efforts on the surface (no hammer blows, etc.). If the hub assembly moves, it will be necessary to change the bearing again.
The sealing surface also requires careful attention. Sharp tools can break the seal of the element. Corrosion and moisture entering the element contribute to its failure. Depending on the make and model of the car, brake repairs vary. For general instructions on this type of work, you must refer to the instructions (for a specific model).
Suspension and clutch.
The front suspension is always the main control element of the car. She primarily reacts to the condition of the road. Elements of the front chassis periodically fail. If the upper arm is faulty, then the entire axle must be replaced (upper and lower arms). If the suspension knocks, it means that the structure of the seals has been damaged. The issue can only be resolved by completely replacing the rubber components. The clutch is checked with the engine off. It is necessary to press the pedal several times to detect extraneous sounds. If the data is available, then this is a direct signal about the need for repairs. The pedal travel (from the floor to the state, without pressure) should be one hundred forty-six millimeters. The smoothness of the pedal stroke is also a significant indicator of the proper operation of the clutch. If increased pressure on the pedal is required, repair is required. If, when you engage gear R, an unpleasant sound occurs, the clutch discs are faulty.
https://youtube.com/watch?v=_goCAPndjGA
Carry out timely diagnostics of your car to prevent serious damage to the chassis. Timely maintenance will ensure the safety of you and your passengers.
Front suspension VAZ 21099
For the VAZ 21099, the front suspension is the most complex element in the car, since the car is front-wheel drive. But the number of main nodes is small.
During each preventive self-examination, you need to pay attention to:
- the presence of operational defects on the balls;
- traces of deformation of the suspension by the body or external objects;
- any cracks or irregularities on the suspension;
- defects in the elements of any joints in the components of the front part of the machine, ranging from braces to levers and stabilizer, including hoses and struts;
- wheel angle, because any deformation makes work on their correct camber and toe useless;
- integrity and wear of silent blocks;
- absence of cracks and defects on the rubber bands of the stabilizer cushion;
- subsidence of telescopic suspension struts.
No parts should have cracks, bruises, traces of oil, torn fragments, or bulging rubber bands on one side.
To check the performance of the ball, measure the distance from the support disk to the lever in front. When, during the swing of the chassis, the distance varies by plus or minus 0.8 mm or more, it is necessary to change the ball joint.
When rocking, the hub should not knock - the sound means the bearing needs to be replaced.
When, when starting to move, the car begins to make a hum/vibration/unintelligible knocking sound or the vehicle pulls in a certain direction, this indicates a malfunction in the front suspension system.
How to remove the front suspension arm
Before inspecting the lever, the front part of the machine is fixed on a support (or on a pair of raised jacks), the parking (hand) brake is depressed, and the rear wheels are secured in a stationary position with “shoes”.
Using the 17th key, unscrew the four bolts and the wheel is removed. By unscrewing the ball joint nut, you can release the pin. The stabilizer bar is disconnected from the front suspension arm.
To remove it, you need to unscrew the nut, then remove the bolt connecting the structure to the body bracket.
The part must be replaced if the geometry of the lever is changed or the rubber components show signs of defects.
How to replace shock absorbers on a VAZ 21099
Quite often, restoring the front suspension involves replacing shock absorbers. If you hear knocks when driving, this most likely confirms the need for replacement. The cause of the problem lies in the deformation/breakage of the spring. Replacing coil springs (or already assembled shock absorbers) is done in pairs, using the front or rear axle.
Replacing the front shock absorber begins with disassembling the front strut. It is better not to remove it entirely, since after reinstallation the wheel alignment will be extremely difficult.
How to disassemble the front pillar on a VAZ 21099
Work begins with removing the crankcase protection. When working, have a 13-1 wrench and a 19th ring wrench available.
- The “protection” of the cap is removed from the upper mount of the rack.
- Use a specialized wrench to loosen the nut on the shock-absorbing rod (rod). It is recommended to carry out work on loosening or tightening bolts strictly on the ground/floor (not in a pit). Tightening is carried out in the range from 65 to 95 Nm.
- When putting the handbrake on and after installing the “shoes” under the rear wheels, the front of the car is raised on a jack, after which it is installed on supports. The wheels are removed from the front axle.
- The metal nut fastening (cotter pin) connecting the ball joint from the steering rod to the steering lever is removed.
- The fastener turns away. The hinge “finger” is pressed out.
- The rubber band for sealing and the hose going to the brake system are removed from the bracket.
- The location of the eccentric washer is marked in relation to the rack bracket.
- Two nuts are unscrewed, a pair of bolts are removed from the rack mounting.
- The eye of the rotary cam is brought out of the bracket.
- Three nuts are removed from the upper rack mounting.
- The work is almost complete. All that remains is to reach the front pillar through the lower part of the wheel well.
- The front strut is installed in the reverse order after removal. The eccentric is wrapped according to the marks applied with paint or marker.
- Wheel alignment and alignment are best done at a car repair shop or tire shop with special equipment.
Diagnostics
It would be wisest if you do not wait for a breakdown and diagnose the chassis. There is no consensus on its timing - each specialist has his own opinion on this matter. The mileage recommended for vehicle maintenance varies from ten to thirty thousand kilometers. First of all, you need to focus on operating conditions - if you drive on broken country roads, this figure will be minimal. So:
- The diagnostic procedure includes checking the degree of wear of the shock absorbers. In car services, it is done with a special device that checks the elasticity of the spring. It is impossible to determine the degree of wear visually. Springs that have lost their elasticity may break.
- Be sure to inspect the spring cups, which may also have defects and damage. They check the play in the VAZ CV joint - a torn boot can create problems. Inspection of ball joints and tie rod ends is also necessary.
- Silent blocks are connecting elements between the frame and suspension; due to this worn-out part, the smoothness of the car is lost. Both brake pads and wheel bearings are subject to inspection, and the tightness of the hoses is checked.
- Computer diagnostics makes it possible to identify and promptly eliminate even minor faults, which will protect parts from more significant damage.
- When you fall into a hole or hit a curb, the rims are the first to suffer. The rim of the disc may bend, which will certainly be felt when moving. An iron or cast disk can be rolled, but a forged one cannot be repaired. It will simply burst upon impact.
- The wheels of any car need periodic balancing and checking tire pressure. It should be as prescribed by the operating instructions. When changing wheels seasonally, you need to alternate their installation from the front to the rear axle, which will balance out the abrasion of the tires.
Wheel balancing
If these simple rules are not followed, not only the tires will wear out, but also the steering, braking system and transmission elements. Timely maintenance of the chassis is the key to your safety on the road.
Rear suspension
Attention: It is necessary to loosen and tighten the bolts and nuts of all suspension components (including wheel bolts) only with the vehicle standing on the ground.
Removing and installing the rear suspension beam
Note: A lift is best for removing the rear axle.
If it is not possible to use a lift, the rear of the car must be carefully lifted with a jack, placing it under the beam, and then install support posts under the jack sockets
1. Engage first gear and install wheel chocks (or suitable size blocks) under the front wheels.
2. Loosen the wheel bolts, and then, with the rear of the car hanging, unscrew the bolts completely and remove the wheels.
2. Disconnect the ends of the parking brake drive cables from the balancer and remove the cables from the holders on the bottom.
3. Unscrew the fastening nut and remove the parking brake drive cable guide on the rear suspension beam.
4. Disconnect the brake hoses from the brake lines on both sides of the vehicle and plug the holes to prevent moisture from entering the brake system.
5. Disconnect the brake pressure regulator lever shackle from the bracket on the beam.
6. Unscrew the nuts and remove the bolts securing the lower part of the struts on both sides of the car. Disconnect the posts from the beam brackets.
Note
: The beam must be held by two assistants.
7. Unscrew the bolts securing the suspension beam to the body brackets on both sides of the car, then lower the beam and remove it from under the car.
Start disassembling the front suspension
All work must be done on an overpass or pit. When replacing the VAZ-2114 suspension, try to use special tools - this will make the work much easier. The sequence is something like this:
- You definitely need to press the handbrake.
- Secure the rear wheels using wheel chocks.
- If decorative caps are installed on the rims, they must be removed.
- If the wheel bearing is being replaced, you will need to unlock and slightly unscrew the nut in advance.
- The wheel bolts also need to be loosened.
- Having lifted my side of the car that is being repaired, it is necessary to completely unscrew the wheel mounting bolts and completely remove it.
You will need to remove the braces from the stabilizer link. After this, using a puller, the ball joint is disconnected from the steering knuckle. It is screwed from below with two bolts; they must be removed using a “17” key. Without this, it will not be possible to dismantle the VAZ-2114 suspension arm.
Signs of wear or damage to the undercarriage
Leaks under the car in the area where suspension parts are located. Vehicles of the VAZ 2109 model, as a rule, already have a long service life (and the design of the hydraulic cylinders is designed for a certain resource, which they may have exhausted long ago)
There is a high probability that the oil seal or shock absorber rod mirror may wear out, so pay attention to possible leakage of hydraulic fluid (in principle, you need to be careful about any leaks from the car); Knock when driving. Yawing along the road is the most common sign of trouble.
As a rule, this indicates wear or loosening of the components; carefully inspect the suspension, or best of all, contact a workshop; When acting on the suspension (try pressing on the hood or, conversely, lifting your car, experienced auto mechanics, when first getting acquainted with passenger cars, not only the VAZ 2109, roughly assess the condition of the chassis), the suspension does not provide sufficient resistance - the first sign of malfunction hydraulic cylinders. There can be many reasons - insufficient amount of fluid, leakage due to wear of the seals, fluoroplastic bushing, wear of the rod, malfunction of the valve mechanism. It is necessary to replace worn parts, replenish the oil in the cylinders, or eliminate the malfunction of the valve mechanism; When driving (especially on uneven roads), hard shocks with a characteristic sound occasionally appear, which can even be felt on the steering (the so-called “breakdown” of the suspension). The appearance of this symptom indicates that the springs (most often the rear chassis) have lost their properties due to metal fatigue; hydraulic shock absorbers may also not work properly. In any case, it is necessary to inspect the structure of your suspension and make repairs.
We have not yet mentioned the uneven wear of tires - if your wheels are adjusted for wheel alignment and balanced, and the CV joints (since the VAZ 2109 is assembled according to the front-wheel drive scheme) work correctly, then the reason is the chassis, there is a breakdown somewhere, unnecessary backlash or wear.
In conclusion, it should be noted that although the chassis of the VAZ 2109 is not subject to such overloads as a similar truck unit, its design is still quite complex and requires constant attention; fortunately, the suspension design allows for maintenance and repair without large material costs.
Rate the usefulness of the article!
- Why do brake pads squeak when braking and what to do about it
- Replacing engine mounts on VAZ and other cars
- Car rental: what you need to know when choosing
- What does the braking distance depend on and what formula can it be calculated by?
- How well do you understand car emblems?
- How to remove the outer CV joint and replace a torn boot
- How to independently replace the internal grenade on VAZ cars
- Wheels for rotating the car in place 360 degrees
- In 3 years, diesel engines will become a luxury
- Review of the most expensive Hyundai Solaris ever
- Test drive Lamborghini Huracan from Mikhail Petrovsky
REPAIR RECOMMENDATIONS
When disassembling in the field, drivers often encounter problems.
For example, VAZ 2108 rear wheel bearings from SKF, made in Sweden, are popular among motorists. However, sometimes they may resist removal. An original device made from a towing strap and a jack can help you with this procedure outside of the service center.
In addition, during repairs, it is also important to pay attention to the wear of the drum brake pads and conduct a thorough diagnosis of the suspension. Sometimes it happens that beating or knocking occurs due to “tired” silent blocks. When tightening the wheel fastenings, the torque wrench should be set to 186-225 nm or 19-23 kgf.
Didn't find the information you are looking for? on our forum.
Didn't find the information you are looking for? on our forum.
We recommend reading:
Clutch cable for VAZ 2112
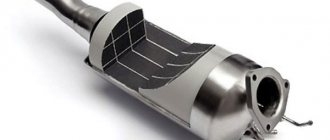
How to remove the catalyst on a VAZ 2114, as well as on a “classic”, “Kalina”, “Prior”, “Niva”
Turning relay for VAZ 2107 diagram
Why does the engine not stall after turning off the ignition of the VAZ 2109
Fastening the beam to a VAZ 2107
ZDT for VAZ 2114 installation
VAZ 2108 rear suspension device
How to check the oil pressure in a VAZ 2112 16 valve engine
Disassembling and replacing the front suspension: instructions
- The VAZ 2114 is installed on a viewing hole or raised on a lift. The car must be set to the parking brake. It is necessary to remove the wheel caps, loosen the mounting bolts and unscrew the hub nut. Having secured the front of the car, you can remove the front wheels.
- Next, you need to remove the ball joint pin, which is located in the swing arm of the front strut. The next step is to remove the front stabilizer link (number “24”) from the front suspension arm (number “22”). Next, the stretch marks from the body (30) are removed. Next, you need to completely disconnect the ball joint that is attached to the steering knuckle.
- Now you can remove the front suspension arm. To do this, you need to disconnect it from the body bracket (28). Afterwards the lever is removed along with the bracket and the extension (29, 30). It is also necessary to remove the bolts that secure the pads to the steering knuckle.
- In front of the driver there will be a caliper assembly. To avoid problems with it, you do not need to completely remove it; you need to hang the caliper on a hook in such a way that there is no load on the main hose. The next step is to press the spline shank out of the front wheel hub.
- From the side of the engine compartment, you need to remove the protective fist (“41”).
To do this, unscrew the telescopic strut nuts and then remove the solid front suspension strut. It should be together with the wheel hub and steering knuckle. The other front suspension strut is removed in the same way. Next, the racks are removed from the rod. Removing springs using zip ties
When removing the bolts that secure the ball joint to the steering knuckle, you must use a socket wrench. Otherwise, the protective cover of the hinge may be seriously damaged, resulting in additional costs.
In the case of the front suspension, its assembly proceeds in the reverse order, with the exception of a few features. When installing the mounting bracket to the VAZ 2114 body, you need to make sure that the threads of the bushings are not damaged. To do this, you must perform operations carefully. Also, longitudinal displacement of the cushions on the bar must not be allowed. This can happen during installation of the anti-roll bar.