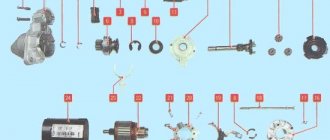
Removing the Lada Granta radiator
Tools (for 8 valve engines):
- Medium Phillips screwdriver
- Ratchet wrench
- Extension
- 5 mm hex bit
- 8 mm head
- 10 mm head
- 13 mm head
- Narrow nose pliers
- Funnel
- Compressor
Tools (for 16 valve engines):
- Medium Phillips screwdriver
- Ratchet wrench
- Extension
- 8 mm head
- 10 mm head
- Open-end wrench 10 mm
- 13 mm straight box spanner
- Narrow nose pliers
- Funnel
Parts and consumables:
- Technical capacity
- Coolant 8 l
- Radiator (if necessary)
- Radiator cushions (if necessary)
- Rubber radiator bushings (if necessary)
- Rags
Notes:
Remove the radiator to check it for leaks (if a leak is suspected) or replace it if damaged. Be sure to remove the radiator from the vehicle only when the engine is cold.
1. Remove the air filter housing and air intake as described here.
2. Drain the cooling system as described here (for 8-valve engines) or here (for 16-valve engines).
3. Unscrew and move the ignition coil aside as described here.
Note:
This item is only for 8 valve engines.
4. Remove the radiator fan by disconnecting its power plugs and mounting bolts as described here.
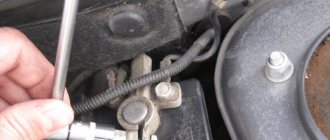
5. Loosen the clamp screw securing the lower pipe clamp, as shown in the photo below.
6. Disconnect the pipe and drain any remaining coolant if it remains in the system.
7. Similarly, remove the hose from the upper radiator pipe.
8. Using narrow-nose pliers, loosen the clamp securing the hose from the expansion tank to the radiator.
9. Unscrew the two nuts securing the radiator to the upper cross member of the radiator frame.
10. Tilt the radiator slightly forward towards the engine, thereby disengaging it from above.
11. Remove the radiator from the engine compartment.
12. Remove the two lower mounting pads from the radiator if they are still on the radiator mounting pins, or remove them from the holes in the lower radiator frame cross member if they are still on the body.
Note:
Replace torn or loose radiator cushions.
13. Remove the rubber-to-metal bushings from the radiator brackets.
Note:
Replace torn or loose rubber bushings.
14. Rinse the outside of the radiator with running water and dry.
Note:
If cracks appear on the plastic radiator tanks, replace the radiator on the car.
15. Check the tightness of the radiator by plugging its pipes and lowering it into a container of water, supplying air to it under a pressure of 0.1 MPa (1 kgf/cm2). No air bubbles should appear from the radiator for at least 30 seconds.
Note:
If the radiator does not fit completely into the container, check it sequentially from all sides.
16. Install the radiator on the car in the reverse order of removal, first placing the lower mounting pads on the radiator pins and inserting the upper mounting bushings into the brackets.
17. Install the electric fan and all removed parts on the Lada Granta car in the reverse order of removal.
18. Add coolant as described here (for 8-valve engines) or here (for 16-valve engines).
Replacing the cooling radiator on Grant
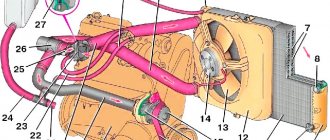
An engine radiator is a special design that is part of the cooling system of a vehicle engine. Its main function is to reduce the temperature of the coolant, which circulates through many cells located in this very radiator. During operation of the engine radiator, the liquid in it is under pressure and in cases where depressurization of this element occurs, a leak forms, and the above pressure decreases significantly. In most cases, the engine radiator cannot be restored, so it is simply replaced.
Replacing the cooling radiator on a Grant with your own hands
Below you can find instructions for changing the radiator of the vehicle engine cooling system:
1. First of all, you should drain the coolant that is in the engine.
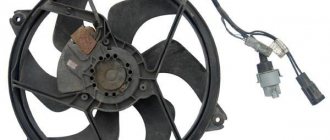
2. Next, you need to dismantle the electric fan that belongs to the radiator.
3. Now you need to squeeze the antennae of the hose clamp that is connected to the expansion tank and disconnect it.
4. The next manipulation should be to remove the hose from the fitting located on the radiator.
5. Absolutely identical manipulation must be performed on the hose responsible for supplying coolant.
6. Now, for the third time, you need to manipulate the tendrils of the clamp fastening, this time the actions should concern the hose, which is responsible for draining the coolant.
7. Next, you need to unscrew the two fastening nuts, which are located on the top of the radiator. Along with the nuts, you also need to remove the washers that are located under them.
8. It's time to dismantle the radiator itself. To do this, this element of the cooling system must be tilted towards the engine and removed from the engine compartment.
9. Now you need to remove from the vehicle body two rubber cushions that protected the radiator of the cooling system from unnecessary shocks.
10. Next, you should carry out a visual inspection of the rubber cushions, and if they are damaged, replace them.
11. The next step is to dismantle the rubber-metal bushings.
12. Next, install a new radiator and reassemble the structure in the reverse order.
Let us recall that in the previous article we looked at how to replace the timing belt on a grant with your own hands. This repair can be performed in a garage, provided you have all the necessary tools.
What to do if you doubt that the radiator of the Lada Granta engine cooling system is faulty?
Sometimes, the radiator may seem to be fully functional upon external inspection. To make sure there is a leak in it, you must close all the holes into which the pipes are supplied, and connect a hose to one of them, through which compressed air with a pressure of 0.1 MPa will be supplied. Next, place the radiator in a tank of water for thirty seconds. If bubbles appear, then you can be sure that this radiator is leaking.
Review of Manufacturer Prices
Technical parameters of the main radiator: length 560 x width 306 mm x height 20 mm.
| Name | Price, rub.) |
| Original 21901-1300008-11 | From 5500 |
| 21903-1300008-14 | From 4500 – 4800 |
| 21903-1301010-14 | —/— |
| 150925A2020 | —/— |
| 21900-1301010-14 | —/— |
| 21900130001004 | —/— |
| Lada Granta LUZAR 2190-1301012-01 | From 4600 |
| VAZ-2190 AvtoVAZ OJSC 546532532 | —/— |
| AvtoVAZ 21900-1301012-82 | —/— |
| RSO VAZ-2190 Lada Granta SB with electric fans and AvtoVAZ pipes | From 10100 |
| VAZ-2190,91,92,94 LUZAR universal 25643542 | From 6200 |
| VAZ-2190, 91, 92, 94 LUZAR 48454234 | From 4900 |
*prices are current as of November 19, 2018.
Recommendations for the selection of parts and components
The range is represented by domestic manufacturers, originals and high-quality analogues. The final choice is up to the owner of the technical device.
Service center technicians strongly recommend purchasing original parts. The service life and manufacturing quality of factory components are an order of magnitude higher than their analogues.
Before purchasing, carefully check the spare part catalog numbers with the actual data in the instruction manual. If necessary, get free consultations from service station specialists.
Lately it has become popular to order parts for subsequent installation directly in workshops. There are many advantages of this choice: prompt delivery, professional installation, quality guarantee.
Reviews
| № | Positive |
| 1. | Mikhail: I have run over 80,000 km on my car, there are no complaints, the cooling system is working as normal. I follow the manufacturer's instructions - replace antifreeze every 75,000 km. |
| 2. | Vladimir: in two years of active driving, I replaced the thermostat once. I don’t consider this a significant breakdown, since this is a normal occurrence for domestic cars. |
| 3. | Kirill: The car is a year and a half old, I bought it at a dealership. There are no complaints, all mechanisms work as usual. Breakdowns happen, but they are not so significant and can be easily fixed on your own. |
| 4. | Gennady: after buying the car from the dealership, I immediately replaced the antifreeze with a new, imported one. Domestic is of low quality and quickly loses its properties. |
| 5. | Vasily: I am satisfied with the quality of assembly and manufacturing of the Lada Granta (16 valves). As for a domestic manufacturer, this is very good, it cannot be compared with Kalina, Priora. I fix minor damage myself. |
| 6. | Konstantin: within a year and a half of using the car, I replaced two clamps on the cooling system pipe. I don’t consider this a defect; it’s normal for Lada. |
| 7. | Victor: I’ve heard negative reviews about Granta, I think they are unfounded. You should always follow the instructions in the instruction manual, then everything will be fine. |
| Negative | |
| 1. | Alexander: the radiator leaked at 39,000, corrosion formed, luckily I replaced it with a new one under warranty. After 15,000 km. The thermostat has failed. Lots of trouble with the Grant, it’s better to pay a few tens of thousands extra and buy a Renault Logan. |
| 2. | Vladislav: Two years have passed since I bought the car, and I have already had unscheduled repairs at a service station several times. The build quality is crude, many defects are not eliminated from generation to generation. |
| 3. | Igor: many components and assemblies do not maintain their service life and wear out prematurely. |
Conclusion The average service life of the cooling system radiator on a Lada Grant is over 100,000 km. Provided you follow the manufacturer's recommendations and replace the antifreeze, no problems arise after 75,000 km.
A number of owners save on maintenance, buy cheap analogues, lubricants, liquids, as a result of which irreversible processes begin. The mechanisms fail and work unstably.
Replacement procedure
- After the engine has cooled, unscrew the coolant expansion tank cap. The lid must be opened to equalize the pressure in the system.
Loosen the coolant drain plug on the engine block. The plug is located under the ignition unit.
Place a container to collect the liquid and unscrew the cap completely. Head plug for thirteen.
Press the lock and remove the power connector from the electronic gas pedal.
- Unscrew the three nuts securing the gas pedal and remove it. Ten head nuts.
- Press the latch and disconnect the power connector for the brake light button.
Disconnect the brake pedal from the brake booster. To do this, remove the locking ring using pliers and remove the pin that fits through the hole in the pedal and the VUT bracket.Unscrew the two screws securing the plastic cover that makes access to the radiator difficult. Phillips head screws.
Unscrew the three nuts securing the gas pedal bracket and remove it. Ten head nuts.
- In the engine compartment, disconnect the power connector to the mass air flow sensor.
- Loosen the clamp on the pipe going to the intake manifold. Next, disconnect the plastic pipe for the air intake and remove the air filter housing assembly. Clamp for a slotted screwdriver or 8mm head.
Loosen the clamp and remove the pipe coming to the thermostat. Also remove the pipe connected to the pump. Head clamps for thirteen.Remove the insulation from the engine shield so that it can be reused.
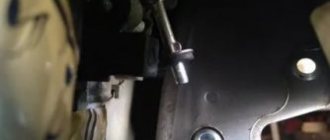
Cut or saw through the two aluminum tubes that go to the radiator. Cut off the tube that is closest as short as possible.
Remove the radiator from its seat. When dismantling, it is best to place the brake pedal between the radiator tubes.
Glue the seal onto the new radiator, just like it was on the old one. Most often, the seal comes with the radiator.
Cut the pipes on the new radiator as shown in the photo below.
Clean the seat and install the radiator.
Place two clamps on the radiator tubes and lubricate the pipes with a sealing compound. Insert the pipes from the side of the engine compartment. Direct the heads of the clamps towards the radiator so that there are no problems with the plastic cover during installation.
- Glue the insulation near the pipes.
- Mount the gas pedal bracket and secure with three nuts.
- Install the plastic cover for the radiator pipes and secure with two screws.
- Connect the brake pedal to the vacuum booster.
- Connect the brake light button power connector.
- Install the gas pedal and secure with three screws. Also don't forget to connect the power connector.
- Cut the pipes to size. Trim the pipes so that they are not strained and there are no kinks.
- Fill the radiator with coolant.
Lubricate the pipes with a sealing compound and secure them to the thermostat and pump. - Install the air filter housing and connect the mass air flow sensor.
- Pass coolant through a sieve and pour into the system.
- Start the engine and check connections for leaks.
How to replace a radiator on a grant with air conditioning
Removing the air conditioner radiator on a Lada Granta car is carried out to replace it with a new one or repair it, in most cases to restore the tightness of the system. To carry out repair work, you will need a Phillips screwdriver, eight-size wrenches and a ten-socket socket.
It is most convenient to carry out repairs on a vehicle mounted on an inspection pit or lifts. Do the following sequence of actions:
- Replace it, then install it in the reverse order, removing the pipeline plugs directly when connecting the pipes. Be sure to replace the O-rings with new ones and lubricate them with oil used for the air conditioning system.
Tools (for 8 valve engines):
- Medium Phillips screwdriver
- Ratchet wrench
- Extension
- 5 mm hex bit
- 8 mm head
- 10 mm head
- 13 mm head
- Narrow nose pliers
- Funnel
- Compressor
Tools (for 16 valve engines):
- Medium Phillips screwdriver
- Ratchet wrench
- Extension
- 8 mm head
- 10 mm head
- Open-end wrench 10 mm
- 13 mm straight box spanner
- Narrow nose pliers
- Funnel
Parts and consumables:
- Technical capacity
- Coolant 8 l
- Radiator (if necessary)
- Radiator cushions (if necessary)
- Rubber radiator bushings (if necessary)
- Rags
Notes:
Let's sum it up
Replacing the cooling radiator in the LADA Kalina cooling system is not considered difficult. If all the necessary conditions and means are available, the work is carried out manually. What you won’t be able to do yourself is soldering the aluminum honeycombs of the radiator assembly. Not every specialist will take on such a painstaking task as replacing a cooling radiator.
Tools (for 8 valve engines):
- Medium Phillips screwdriver
- Ratchet wrench
- Extension
- 5 mm hex bit
- 8 mm head
- 10 mm head
- 13 mm head
- Narrow nose pliers
- Funnel
- Compressor
Tools (for 16 valve engines):
- Medium Phillips screwdriver
- Ratchet wrench
- Extension
- 8 mm head
- 10 mm head
- Open-end wrench 10 mm
- 13 mm straight box spanner
- Narrow nose pliers
- Funnel
Parts and consumables:
- Technical capacity
- Coolant 8 l
- Radiator (if necessary)
- Radiator cushions (if necessary)
- Rubber radiator bushings (if necessary)
- Rags
Notes:
Remove the radiator to check it for leaks (if a leak is suspected) or replace it if damaged. Be sure to remove the radiator from the vehicle only when the engine is cold.
1. Remove the air filter housing and air intake as described here.
2. Drain the cooling system as described here (for 8-valve engines) or here (for 16-valve engines).
3. Unscrew and move the ignition coil aside as described here.
Note:
This item is only for 8 valve engines.
4. Remove the radiator fan by disconnecting its power plugs and mounting bolts as described here.
5. Loosen the clamp screw securing the lower pipe clamp, as shown in the photo below.
6. Disconnect the pipe and drain any remaining coolant if it remains in the system.
7. Similarly, remove the hose from the upper radiator pipe.
8. Using narrow-nose pliers, loosen the clamp securing the hose from the expansion tank to the radiator.
9. Unscrew the two nuts securing the radiator to the upper cross member of the radiator frame.
10. Tilt the radiator slightly forward towards the engine, thereby disengaging it from above.
11. Remove the radiator from the engine compartment.
12. Remove the two lower mounting pads from the radiator if they are still on the radiator mounting pins, or remove them from the holes in the lower radiator frame cross member if they are still on the body.
Note:
Replace torn or loose radiator cushions.
13. Remove the rubber-to-metal bushings from the radiator brackets.
Note:
Replace torn or loose rubber bushings.
14. Rinse the outside of the radiator with running water and dry.
Note:
If cracks appear on the plastic radiator tanks, replace the radiator on the car.
15. Check the tightness of the radiator by plugging its pipes and lowering it into a container of water, supplying air to it under a pressure of 0.1 MPa (1 kgf/cm2). No air bubbles should appear from the radiator for at least 30 seconds.
Note:
If the radiator does not fit completely into the container, check it sequentially from all sides.
16. Install the radiator on the car in the reverse order of removal, first placing the lower mounting pads on the radiator pins and inserting the upper mounting bushings into the brackets.
17. Install the electric fan and all removed parts on the Lada Granta car in the reverse order of removal.
18. Add coolant as described here (for 8-valve engines) or here (for 16-valve engines).
Preparatory stage before replacing the radiator
Any repair of the power plant cooling system requires draining the coolant. If you need to replace the cooling radiator, you will need to drain the liquid in full.
How to remove the radiator, how to change it? We act like this.
- We place the Lada Kalina in the middle of a flat area.
- Taking a “10” size key as our “helpers,” we dismantle the metal protection sheet located under the engine sump. This is necessary so that the process of draining the antifreeze is carried out directly into the container, and not along the surface of the crankcase protection.
- Draining the liquid should begin after the Lada Kalina engine has cooled. This will eliminate the risk of hand burns.
- We continue the process by dismantling the air filter housing.
- To gain access to the drain plug on the engine block, it is necessary to remove the ignition coil. To do this, you will need to de-energize the network by removing the terminals from the battery. It is also necessary to remove the high-voltage wires. The coil fastener is unscrewed using a hex key of size “5”.
- The plug on the block is unscrewed if you use the key at “13”.
- Don’t forget to first place a container of the appropriate size under the drain hole.
- After waiting for the antifreeze to completely drain, we move the container to the radiator.
- Disconnect the lower hose and continue collecting the refrigerant in the same container. The liquid will come out of the system more readily if you open the cap on the expansion tank.
- Having completed the “draining event”, we return the cylinder block plug to its original place, tightening it to the required torque.
- Now, using a suitable screwdriver, remove and tighten the clamp securing the system pipe to the fitting of the throttle assembly heating unit. This is necessary to bleed air from the circuit while charging refrigerant.
The replacement of the cooling radiator is complete.
Radiator replacement and stove repair Lada Granta
The engineering staff of AvtoVAZ worked very hard on the heating of the Lada Grant. The interior warms up very quickly and the temperature reaches the desired level. But, despite the high-quality performance of the stove itself, breakdowns sometimes cannot be avoided. For example, the radiator may leak or become clogged. For this reason, you need to understand the causes of the breakdown by dismantling the stove.
This type of repair eliminates the need for a jack, a lift, or even an inspection hole.
All the main work is done in the upper level of the engine compartment or inside the car; the only inconvenience is the difficulty of accessing the engine.
- We begin the repair by unscrewing the two clamps that secure the stove pipes to the heater radiator. We remove the pipes completely.
- We find a container for draining the coolant in advance and drain it.
- At the end of the work in the engine compartment, we move the pipes to the side.
- Inside the car, unscrew the self-tapping screw that secures the tunnel near the handbrake, and the other that serves as a clamp for the parking brake housing. We find and unscrew two more screws on the driver and passenger sides.
- Using a screwdriver, you very carefully remove the cover of the gear shift knob. And at the same time the tunnel rises slightly, moving it to the left.
- Unscrew the nuts securing the gas pedal and the stand under it.
- A few more screws securing the casing are unscrewed, and the cover is removed.
- Next we do the cutting. And only now the radiator is removed, the brake pedals, which interfere with this process, are clamped.
I would like to remind you that all these manipulations must be performed after first de-energizing the car, that is, you need to remove the terminals from the battery. Otherwise, you can get a short circuit that will damage all elements of the Lada Granta electrical network.
You can replace the radiator of the Lada Granta stove without removing the panel. To do this, it is necessary to cut off the pipes flush, extending beyond the body and interfering with the installation of the radiator. Remove the key from the pedal so that the pedal goes deep and does not interfere with the process. A long pipe with an internal diameter of 16 and an outer diameter of 24 is purchased and installed. Connects to pump and thermostat.
Radiator dismantling in Kalina
To remove the designated assembly and related components, you will need to use the following tools:
- wrench "10" (socket type);
- pliers with thinned grips;
- Phillips screwdriver;
- If the Lada Kalina is equipped with an air conditioning system, then we additionally stock up on a set of Torx (star profile).
- Disconnect the power connector from the system fan.
- Let's dismantle this unit. It is held on the radiator with 4 bolts. To unscrew them, you will need to use a “10” key. Extraction is carried out in the upward direction.
- Next, we move on to removing the pipes from the radiator fittings. We loosen the clamps using pliers or a screwdriver. We use the same wrench to unscrew the two nuts that hold the radiator assembly in the seat.
- Now we tilt the product slightly towards the engine and lift it up.
When dismantling the unit on a Lada Kalina equipped with air conditioning, you will need to resort to removing additional components that are directly attached to the radiator. To carry out this activity, you should stock up on a key with an asterisk profile.
You need to unscrew 4 screws. During dismantling, look towards the lower radiator cushions. They can either be removed along with the product or left in the landing niches. Experts recommend removing these support elements to assess their condition. It would also be useful to remove the rubber-metal bushings present on the body of the LADA Kalina radiator unit. It is better to replace them with new analogues.
Method No. 1: replacing the Lada Granta heater radiator with removing the panel
- We remove the terminals from the battery to avoid a short circuit in the circuit.
Removing the terminal from the battery
- We unscrew the drain plug in the radiator, cylinder block, and grind the antifreeze into a plastic container.
- We unscrew the four screws, remove the heating system filter and casing.
Location of screws
- We release the clamps, remove the two rubber pipes “supply” and “return” from the radiator fittings.
Supply and return pipes
- Inside the car, pry up and remove the cover of the fuse box.
Removing the fuse box cover
- We remove the plastic lining of the tunnel and the steering column frame.
Steering column frame
- Remove the dashboard in the central part.
Central part of the dashboard
- We dismantle the rubber seals on the doorways.
Rubber seals on doorways
- We pry up and remove the side (left) plastic trim of the instrument panel.
Plastic instrument panel trim
- By analogy, remove the trim on the right side.
- We dismantle the upholstery of the front left and right pillars.
Front pillar trim
- We dismantle the lighting beam control knob.
Dimmer knob
- Unscrew the nut and pull the regulator out towards you.
- Using a screwdriver, pry it up and remove the glove box cover from its regular place.
Glove compartment lid
- We remove the glove box.
Glove box
- On the left side, under the casing, we find the mass fastening, unscrew the nut (key set to “10”).
Ground attachment
- Using a “10” head, unscrew the left and right console mounting bracket.
Console mounting bracket Unscrew the bolts
- We press the side clamps, disconnect the block with wires from the brake light switch.
- By analogy, disconnect the accelerator pedal.
Accelerator pedal
- Disengage the clutch pedal.
Clutch pedal
- On the right side, press the latch and disconnect the wire block from the controller.
- Using a “13” socket, unscrew the bolts securing the instrument panel to the body element.
- We remove the instrument panel from the car interior and carefully place it on the surface of the workbench for work.
Replacing the radiator of the Lada Granta stove with your own hands is completed.
Some motorists practice not removing the entire dashboard, but only the plastic lining. The process is similar to the one described above. In fact, the dashboard frame remains in place, and all plastic linings and inserts are removed.
Each owner decides which method to use individually.
Eliminating air jams
The design of the cooling system in the VAZ-1118 has one unpleasant drawback - the tendency for the circuit to become airy. This can lead to overheating and engine damage. Here we recommend resorting to minor system upgrades. You need to act when the liquid is drained.
- First we replace the thermostat. Instead of a standard product with five holes, we install a component with six such holes.
- We add a refrigerant filter to the circuit.
- We install a shut-off valve on the pipe leading to the stove.
These actions are not capable of radically transforming the system. Experienced owners of LADA Kalina have moved further in this matter. They add steam exhaust pipes, install a forced fan activation button, etc. To install the designated outlet, the diagram looks like this: we cut a tee into the pipe leading to the expansion tank. It is connected through a separate hose to the pipe of the throttle body heating unit. We place the second tee in the return from the radiator of the heating system and connect it with an expansion tank. Now you know how to remove, as well as how to change the radiator, and fix other problems yourself.
Replacing the stove radiator on a Lada Granta with your own hands + video
Lada Granta has become a really popular car. And, in many ways, this happened thanks to the affordable price and good components. For example, the stove installed on the Lada Granta is quite good, as it warms up the interior to the required level very quickly. AvtoVAZ engineers did a very good job on this issue, since for our harsh winters the issue of high-quality heating of the interior is very relevant.
Installation of a new Lada Granta radiator
When buying a new radiator, you need to understand that it must be either original or very close to the original in its characteristics.
Car enthusiasts have to console themselves mainly with a radiator heater for the Lada Granta Luzar. In general, he performed well. Especially with the use of special additives that seal the liquid supply channels. The new generation of radiators has features in the fastenings; they consist of two parts and are assembled together with three self-tapping screws.
The new radiator will fall into place correctly if, after purchase, you carefully cover it with foam rubber around the perimeter, after which a small window of the required format is cut, somewhere at the bottom of the stove body. Thanks to these manipulations, the new radiator should fit perfectly into place. Next, the entire assembly proceeds in reverse order.
We dismantle the radiator of the Lada Granta stove
This radiator eventually leaked into the car interior. And antifreeze vapors are harmful!
Despite the fact that there are usually no complaints about the quality of the stove, breakdowns can still occur. If you focus on the radiator, it may clog or leak. In any case, you need to immediately begin dismantling the stove, after which it will be possible to inspect it in detail and understand the causes of the breakdown.
Most of the work will have to be done on the top of the engine compartment, as well as from inside the car. In fact, in this case we will not need a pit, a jack, or a lift. Just keep in mind that access to the engine compartment will be extremely difficult.
- To begin, unscrew a couple of clamps that secure the heater pipes to the heater radiator. This frees them up so we can remove the pipes completely.
- Now we will have access to draining the coolant from the radiator. Naturally, you will have to take care in advance of the container where this liquid will be drained.
- If possible, we move the pipes to the side. In principle, most of the work in the engine compartment is completed here.
- Next comes work from inside the car. Near the handbrake you can find one self-tapping screw that secures the tunnel, as well as another self-tapping screw for fixing the parking brake housing. Unscrew them completely. In addition, on the driver's side and on the passenger's side there will be two more screws that secure the tunnel on both sides.
One self-tapping screw under the handbrake tunnel
Unscrew the two screws. One is visible in the photo, the second is to the right, closer to the gearshift knob
Three pedal mounting bolts
Gained access to the heater radiator pipes
We saw off the radiator tubes to remove it
Installation of a new Lada Granta radiator
The new radiator must be original or at least compatible with it in size and technical parameters.
We carefully cover its perimeter with foam rubber, after which we begin to work with the window in the stove body.
Carefully cut a small window of a suitable size, closer to the bottom of the stove body.
After this, the new radiator will fit into place very well. All other parts are assembled in reverse order.
Selecting a new heater radiator (verified articles)
A model specifically for the Lada Granta Luzar under the symbol LRh 0190b would be a good fit for the role of a standard heater radiator.
It is completely made of aluminum alloy, and the price of this radiator is about one and a half thousand rubles. In addition to the Lada Grant, it is also suitable for installation in the second version of the Lada Kalina.
In general, so far, alternatives are rarely found on the domestic market. So car enthusiasts have to be content with this radiator. However, it performs quite well, especially if you do not use special additives to “repair” it, which seal the liquid supply channels.
Radiators of the so-called new type are characterized by mounting features. In addition, such radiators are not solid, but consist of two parts. They are assembled together using three self-tapping screws.
As for the “old” radiator model, it has a completely solid structure. However, most of the fastening elements are the same as the new type, so installing any of them should not lead to any difficulties.
Features of the Lada Granta stove
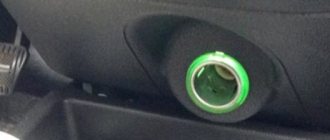
The dashboard controls that control the operation of the stove include switches marked with what power should be applied to the stove, as well as what kind of air it should blow - cold or hot. Near this switch there is another regulator that allows you to set priority air flow directions. This could be the windshield, interior, legs, or interior and glass at the same time.
Below these switches there is another handle with a horizontal range of motion. They can determine where the air will come from - from the cabin or from the street.
The “interior” option will be relevant if there are unpleasant odors outside or if you are faced with the task of warming up the car faster.
In recirculation mode, the car windows may fog up, so if you have air conditioning, we recommend turning it on. On many foreign cars, the air conditioner automatically turns on when the air recirculation mode is activated.
The rear windows can be heated with a special button located slightly below the handle.
The radiator must be replaced if a coolant leak is detected. In a workshop with special equipment, the radiator can be checked and repaired. You can also learn about the possibility of repairing the Lada Granta radiator yourself from the article “Radiator Repair”. Remove the radiator only when the engine is cold to avoid burns from hot coolant.
You will need: a 10" wrench (a socket head is more convenient), a screwdriver with a Phillips blade, and pliers with long thin jaws.
Adviсe
Antifreeze leaked into the cabin
To prevent problems with the heater core, you need to carefully monitor it. For example, from the first days of buying a car, periodically look under the car to see if there are dark spots there. And in the engine compartment it would be a good idea to observe the condition of the cooling system hoses. If you notice traces of antifreeze in any of these places, you need to immediately seek help, or carry out repairs yourself.
If possible, the hoses for connecting the heater radiator should be replaced with new ones, having coated the connection points with sealant. But some do not agree with this opinion. After all, sealant from the hose can get inside the cooling system and cause damage to the pump. As a result, the timing belt will break and the valves will meet the pistons.