Where is the diagnostic connector for VAZ 2114?
VAZ diagnostic connectors
There are several types of connectors for diagnosing VAZ cars, including EURO 3 (4). To connect a car to a computer or laptop, you need to purchase or manufacture a communication interface between the COM port and the K-LINE diagnostic connector. It looks something like the picture below.
VAZ diagnostic connector for models after 2002 with an OBD-II connector
B L-line diagnostics
D CO potentiometer (not always diluted)
H Power supply +12V (not always wired)
G Fuel pump control (not always connected
M K-line engine diagnostics
Diagnostic connector for VAZ cars
H - 12V. Constant with battery via fuse A - GND B - L-Line M - K-Line G - Fuel pump control.
Diagnostic connector EURO 3
2 - J1850 Bus+ 4 - Chassis Ground 5 - Signal Ground 6 - CAN High (J-2284) 7 - ISO 9141-2 K Line 14 - CAN Low (J-2284) 15 - ISO 9141-2 L Line 16 - Battery Power
Location of diagnostic pads
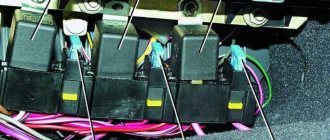
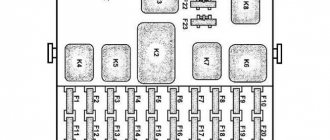
VOLGA - under the hood, on the wall of the engine compartment, on the passenger side VAZ 2110 - to the right of the driver, next to the steering column of the VAZ 2109 Low panel - on the shelf under the glove compartment, next to the VAZ 2109 ECU High panel - behind the center console. VAZ 2108-2115 “Europanel” - on the dashboard, closed with a hatch. Chevrolet Niva - OBD-II, near the ignition switch. partially covered by the steering cover. VAZ 11183 “Kalina” - Under the niche for small items next to the gearshift knob. VAZ 21126 Priora - behind the glove compartment.
OBD2 pinout - 16 PIN
Where is the diagnostic connector located on the Lada Priora?
The OBD2 connector is trapezoidal and consists of 16 pins.
Brands and years:
Gasoline passenger cars and light commercial vehicles manufactured or imported into the United States since 1996 (US CARB and EPA legislation) and in Europe (EOBD) since 2000-2001 (European Union Directive 98/69EG) and Asia (mainly since 1998). ).
Diagnostic connector pins for used protocols
Pins 4, 5, 7, 15, 16 - ISO 9141-2.
Pins 2, 4, 5, 10, 16 - J1850 PWM.
Pins 2, 4, 5, 16 (without 10) - J1850 VPW.
The ISO 9141-2 protocol is identified by the presence of pin 7 and the absence of pins 2 and/or 10 on the diagnostic connector.
If pin 7 is missing, the system uses the SAE J1850 VPW (Variable Pulse Width Modulation) or SAE J1850 PWM (Pulse Width Modulation) protocol.
All three data exchange protocols operate via a standard OBD-II J1962 connector cable.
Pinout and where is the diagnostic connector for VAZ-2112
Diagnostics of modern car models is carried out using a special diagnostic connector. It connects to a computer, which analyzes the current state of the vehicle, determines the malfunction and indicates it. If you have the appropriate equipment, you can look for breakdowns even at home. However, not all VAZ-2112 owners can find the diagnostic connector right away. Today we’ll talk about its location on the classic panel and on the Europanel. In which part of the car should I look for the required socket?
What is a diagnostic connector according to the OBD2 standard?
A little history
Where is the diagnostic connector on the VAZ-2112?
Manufacturers first started thinking seriously about automating vehicle diagnostics in the 70s. It was then that electronic engine control units appeared. They began to be equipped with self-diagnosis systems and diagnostic connectors. By closing the connector contacts, you can diagnose faulty engine control units using blink codes. As personal computer technology was introduced, diagnostic devices were developed to interface connectors with computers.
The emergence of new manufacturers on the car market and expanding competition predetermined the need to unify diagnostic devices. The first manufacturer to seriously approach this problem was General Motors, which introduced a universal information exchange protocol via the ALDL Assembly Line Diagnostic Link interface in 1980.
In 1986, the protocol was slightly improved, increasing the volume and speed of information transfer. Already in 1991, the American state of California introduced a regulation according to which all cars sold here followed the OBD1 protocol. It was an abbreviation for On-Board Diagnostic, that is, on-board diagnostics. It has greatly simplified life for companies servicing vehicles. This protocol has not yet regulated the type of connector, its location, or error protocols.
In 1996, the updated OBD2 protocol had already spread throughout America. Therefore, manufacturers wishing to develop the American market were simply forced to comply with it.
Seeing the clear benefit of unifying auto repair and maintenance, the OBD2 standard has been extended to all gasoline-powered vehicles sold in Europe since 2000. In 2004, the mandatory OBD2 standard was extended to diesel cars. At the same time, it was supplemented with Controller Area Network standards for data exchange buses.
Interface
It is wrong to believe that the OBD2 interface and connector are one and the same. The interface concept includes:
- the connector itself, including all electrical connections;
- a system of commands and protocols for information exchange between control units and software and diagnostic systems;
- standards for the execution and location of connectors.
The OBD2 connector does not necessarily have to be a 16-pin trapezoidal design. On many trucks and commercial vehicles they have a different design, but the main transmission tires in them are also unified.
In passenger cars produced before 2000, the manufacturer could independently determine the shape of the OBD connector. For example, on some MAZDA vehicles, a non-standardized connector was used until the 2003 model year.
This is often a challenge for inexperienced auto electricians. The most common connector locations are:
- near the driver's left knee under the dashboard;
- under the ashtray;
- under one of the plugs on the console or under the dashboard (in some VW models);
- under the handbrake lever (often in early OPEL);
- in the armrest (occurs in Renault).
The exact location of the diagnostic connector for your car can be found in reference books or just Google it.
In the practice of an auto electrician, there are cases when the connector was simply cut off or moved to another location during repairs after accidents or modifications to the body or interior. In this case, its restoration is required, guided by the electrical diagram.
Where to look for the connector
It is important to know that on different cars the required socket is located in different parts of the car. Moreover, on some AvtoVAZ models it may be in a completely different place compared to another car. Let's look at several VAZ cars as an example:
- on the VAZ-2112, as well as on the 2110, as well as 2111, the socket is located to the right of the driver’s seat, immediately under the column;
- on models 2108, 2109 and 21099, the socket you need is located under the glove compartment, on a special shelf;
- on cars with a europanel it can be found in the center of the console, near the cigarette lighter. A special decorative cover is used to disguise it;
- on Lada Kalina cars, the connector can be found near the gear shift lever. As is the case with cars with a Europanel, it is hidden under a special cover;
- on a Priora you need to look for it right behind the glove compartment, on the wall.
Thus, on the VAZ-2112 the diagnostic connector is located on the right side of the driver’s seat. It is located immediately under the steering column and, in principle, is not so difficult to find. Inspect the bottom of the panel.
Pinout
Knowledge of pinouts may be required if a car enthusiast wants to make an adapter for computer diagnostics with his own hands, or if you need to connect without one. Experts recommend buying ready-made devices without the need to make a plug yourself. However, if you do not have such an opportunity, and diagnostics need to be carried out urgently, we will consider two main pinout options used on VAZ cars of various years of manufacture. Until 2002, AvtoVAZ products used the following pinout option:
- The 4th and 5th pins are GND outputs.
- Pin 16 – +12 V (power line).
- The 7th contact is the diagnostic line itself.
Since 2002, the pinout scheme has changed significantly. Now it looks like this:
- Pin H – +12 V (power line).
- Contact G – +12 V for the fuel pump.
- Pin A – GND output.
- Contact M – diagnostic line.
There is one important note to note regarding this diagram.
If you connect the connector without a block, but directly, it is recommended to use the charge from the cigarette lighter as a source of electricity. The peculiarity of this pinout is that contact H is not always routed in the car. The use of G is also not recommended because high frequency current is supplied. This can have a negative impact on the adapter, even to the point of burning it out. However, cases of burning out the fuel pump connector are quite rare. Therefore, if you wish, you can also use this option. As you can see, the pinout on VAZ cars of different ages is sometimes very different. Therefore, we advise you to look at the registration certificate of your car and find out what year it is made. On older vehicles you will not find the new pinout design as it did not exist yet and on newer vehicles the old design was no longer used.
- Other
- Engine
- Steering
- Electrical equipment
- Transmission
- Brake system
- Suspension
- Tuning
- VAZ 2110 Other
- Engine
- Steering
- Electrical equipment
- Transmission
- Brake system
- Suspension
- Tuning
- Electrical equipment
- Steering
- Video publications
- VAZ tuning photo stream
- Operation and repair manuals
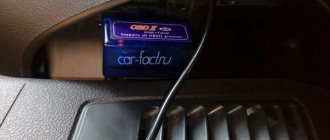
ELM327
Separately, we will introduce you to the ELM327 adapter, with the help of which many VAZ 2110 owners perform full diagnostics on their own.
https://youtube.com/watch?v=kfkZlvjIz4Y
ELM327 is one of the latest OBD developments. This scanner is used to check cars using a computer. The key advantage is that the device supports all known OBD protocols and interacts with many diagnostic programs. A USB cable is used to connect the device to a computer.
ELM327
The software for the ELM327 is mostly free, although some software is available only for a fee.
The adapter can work on computers with different OS. Namely:
- DOS;
- Windows;
- MacOS;
- Linux;
- PalmOS;
The full capabilities of the scanner can only be fully realized through properly selected software. For self-diagnosis, software for scanning the transmission and engine is available free of charge. Commercial versions of the programs allow you to additionally check other components of the car.
Key Features
Let's take a look at the capabilities that the ELM327 chip provides:
- Reads error codes and vehicle malfunctions;
- Displays codes and their descriptions;
- Exports data for printing, if necessary;
- Removes error codes;
- Displays data in metric and US measurement systems;
- Records, saves data, builds graphs;
- It has an acceleration counter from 0 to 100 km/h, which allows diagnostics on the go.
Many vehicle operating parameters must be checked while driving.
Not all adapters are suitable for this, so it is important to choose equipment that meets your requirements
Self-diagnosis of VAZ 2110: pinout, connector location, features
Inside every modern car there is a lot of electronic stuffing. This also applies to the new generation of VAZ, which includes the Lada 2110. If there is electronics, then it can be tested. Today, this task is performed by computer diagnostics, which quickly and effectively finds all problems with the car. Testing can be done by yourself, but this requires an adapter.
Diagnosis requires experience in working with computers.
Computer diagnostics are divided into 2 types:
- Suspension testing. Performed when knocking or uneven tire wear is detected. Testing is also carried out if drift of the front or rear axle occurs during sharp turns.
- Diagnostics of the power plant. Performed when problems are detected in the engine: increased fuel consumption, the engine is difficult to start, low or high idle speed, the presence of black or white smoke, etc.
Recovery
Is it possible to restore a broken sensor? This can be done only in one case - if the cause of the malfunction is poor contact and the sensor itself is working normally. You can also try removing the carbon deposits inside. But to do this, you need to take the sensor out and lower it into an aggressive environment (white spirit or gasoline)
Please note: do not use sandpaper, needle files or other rough objects for cleaning. To avoid damaging the tip, use a soft cloth soaked in solvent.
By treating the sensitive element with white spirit, you can restore the functionality of the sensor. But it is not a fact that after cleaning it will take accurate measurements. Ideally, this element should be changed entirely. Fortunately, the operation is simple, you can do it yourself. We’ll tell you exactly how below.
Connector location
So, we plan to check our car and we even have the necessary equipment. Now you need to find the connector - it is located at the bottom of the steering column, to the right of the driver. This connector is also called OBD. Knowing this name, it will be easier to find a suitable adapter.
If you believe the reviews, the K-Line connection device is considered the most successful adapter for VAZ cars. It has a lot of free space, so you can connect almost any testing equipment to it.
As for the main diagnostic device, it will be a computer. Of course, it is easiest to work with a laptop, since the process can be performed right behind the wheel of a car. But if there is only a stationary option, then you should take care of a long cord connecting the computer to the adapter.
Programs for diagnosing VAZ cars
Due to the fact that there are many of them, let’s name a few of the most common and advanced:
- KWR_D is one of the most reliable. Its advantage is that there are many useful adjustments. We list the main functions: - control of mechanisms (nozzles, coils, fans, etc.), - monitoring of vehicle parameters.
- ICD 1.2.0.1 is the same (the program is free).
- Diagnostic Tool vl.31.2 - control functions, there are adjustments.
- AVTOVAZ NEW is the most modern option. The advantages are immobilizer control and adjustments.
- Sens Diag - comprehensive diagnostics.
- Motor tester is the same.
- My Tester VAZ is the same with direct adaptation to VAZ models.
All of these programs work with Bosch blocks.
How to diagnose a VAZ car using a laptop:
- Complete diagnostic equipment (laptop, connection cable, adapter),
- Install the appropriate program and drivers on the laptop,
- Using a cable, create a logistics chain “laptop - adapter - ECU - car computer”,
- Setting up a connection between a laptop and a car computer,
- Turning on the engine
- Diagnostics.
Performing diagnostics yourself
Adapter for connecting a computer to the electronics of a VAZ 2110 car.
Many motorists believe that having a computer and an adapter is quite enough to perform a high-quality test of their VAZ 2110. But the main “component” for a successful and extensive test is the presence of a competent specialist. Of course, you can complete the task yourself, but to do this you need to install special software, which is publicly available on the Internet. A good option is Motor-Scan.
Also, the presence of the Internet is necessary in order to decipher the received error codes and abbreviations. The work is performed in the following sequence:
- The adapter is inserted into the OBD connector (located where the steering block is), and the computer must be turned on.
- When the block has received the adapter, the ignition is turned on, since without power the program will not be able to read anything.
- Now the testing program starts on the laptop.
- If the block and other elements are in working order, then the electronics of the VAZ 2110 will be displayed on the monitor. Now you can start checking.
Basic blocking methods
Today, blocking the diagnostic connector is one of the main options for protecting your vehicle from theft. Thanks to the blocking, the car owner will be able to prevent illegal connection to various car systems and avoid possible bypass of the anti-theft system using software. If the engine is blocked, the criminal will not be able to check the blocked motor elements.
There can be several options for blocking a device:
- The first of them is the transfer of the AR itself to another place. So an attacker who tries to steal a car will be faced with the problem of finding an AR that can be installed anywhere. The car owner can move the device to the engine compartment or hide it somewhere in the cabin.
- Re-pinning the DR contacts and making a special adapter for its use. In this case, you only need to reassign a few wires on the device. But in order to use such an DR, you will need a special adapter, where the contacts will also be re-pinned. Otherwise, diagnosing the vehicle will be impossible.
- Complete removal of the AR and installation of a non-standard device in its place. In the future, to carry out diagnostics, you will need a counterpart from such an DR with a block of wires, that is, essentially the same adapter.
- Another method that has recently become widespread is the use of the so-called secret. The secret is a device designed to enhance the functions of the installed immobilizer. As a rule, most modern manufacturers manufacture secret components in such a way that the design of the DR remains the same, and no adapters are needed for its operation. In the event of an attempted theft, the wiring that comes from the DR in the passenger compartment and in the engine compartment is blocked, and a control circuit is placed in the resulting gap. As for control, it all depends on the device manufacturer. For example, an additional DR can be installed, which will be displayed in another location, and sometimes control can be carried out via SMS commands.
Loading …
Pinout
The remaining contacts are empty, but their number differs depending on the year of manufacture.
If you plan to diagnose it yourself, then you need to know what the block includes. Pinout is the purpose of all the contacts that are in any connector. We are interested in the OBD pinout.
We will analyze the notation using a diagram. The pinout is as follows:
- Contact “A” is responsible for connecting the ground;
- Contact “B” is needed to connect the L-Line (some cars do not have this contact);
- "M" is needed for K-Line;
- “G” is responsible for controlling the fuel pump;
- “H” is +12V power supply.
OBD 2 pinout
The 12-pin OBD1 in the Chevrolet Niva has been replaced by OBD2. This is due to the introduction of new standards in Europe since 2001. This solution has significantly expanded the possibilities of car diagnostics.
The first copies of the equipment showed general error information. Using OBD2, the car owner can independently obtain complete information on the state of the ECU by using a scanning device or adapter. 16-pin connector. Its shape has changed: now it is a trapezoid with a narrowing downwards.
The plug contacts are responsible for the following diagnostic elements:
- pin 2 - bus+ (via J1850);
- 4 — body grounding;
- 5 - signal grounding;
- 6 - CAN-High line (via J-2284 protocol);
- 7 - K-Line;
- 10 — bus- (via J1850);
- 14 - CAN-Low line (via J-2284 protocol);
- 15 — L-line;
- 16 - battery powered.
Car brands and years of manufacture
OBDII has been used in cars since 1996 in the USA. In Europe, standards changed in 2001. In the Chevrolet Niva, new diagnostic connectors first appeared in the 2002-2019 models. These cars work with control systems BOSCH MP7.0 Euro-3, BOSCH M7.9.7, January-7.2, January-7.3.
Self-diagnosis of VAZ 2114 and 2115: golden rules
On any vehicle, various problems are possible during operation. Owners of cars with injection engines have the opportunity to carry out diagnostics themselves. For this purpose, a diagnostic connector is installed on vehicles from the factory. The article describes where the diagnostic connector of the VAZ 2114 and VAZ 2115 is installed, when diagnostics are carried out, instructions are given for its implementation.
Connector location and features
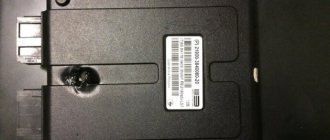
On VAZ 2114 and 2115 cars, where a Europanel is installed, the diagnostic connector (DR) is located on the central control panel under the cigarette lighter. It is closed by a decorative plug. To access the connector, just pry off the plug and it can be easily removed.
Location on VAZ 2114
VAZs can be equipped with a 12-pin rectangular connector of the old style OBD 1 (GM-12) or a 16-pin OBD-II connector in the form of a trapezoid USB-KKL. If the adapter is intended for OBD-II AR, you can buy an adapter.
Location of the diagnostic connector
obd2 diagnostic connector
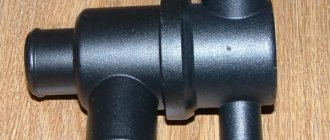
Opel Corsa D "CAN"
The corresponding connector for Opel Corsa D and C is located in the car's interior. It is not difficult to detect by removing the decorative plug at the bottom of the center console of the instrument panel. Yes, yes, exactly under the control unit for the heating and ventilation system. This is not to say that connecting is easy and convenient, but it can be worse. You should know that although on both models the connector is made in OBD-II format, the data exchange protocols are different:
Be sure to check out:
- K-line – for Opel Corsa C.
- CAN – for Opel Corsa D.
The protocol is selected in the settings of diagnostic equipment and software.
When is diagnosis necessary?
Many car enthusiasts are frightened by the “Check Engine” signal appearing on the panel, which reports malfunctions in the operation of the vehicle systems. The easiest way out in this case is to visit a service station. But this is associated with both financial costs and loss of time. Thanks to the DR that has appeared on modern cars, computer diagnostics of the VAZ 2114 and VAZ 2115 has become possible, which you can do yourself. To do this, you need to purchase a diagnostic adapter and have a device to which it can be connected: a computer, laptop or other device.
The ability to independently diagnose a car will allow you to:
- quickly identify vehicle malfunctions;
- obtain the necessary information from sensors;
- change settings;
- save on visiting a service station.
The need for diagnostics arises primarily when the “Check Engine” sign is displayed, but it is not a bad idea to carry out regular diagnostics for prevention.
"Check Engine" sign
You can carry out additional diagnostics using a compression meter and a multimeter. During an additional check, you should check the level of fluids in the car systems, do a visual inspection of the car body and components for mechanical damage. Next, you need to check the compression in the cylinders, the battery charge, the condition of the valves, high voltages and spark plugs. Having made a preliminary diagnosis, you can begin computer diagnostics.
Errors on-board computer VAZ 2114
To check the computer, you need to reset the mileage for the day on the dashboard and turn on the ignition at the same time. Then, by pressing the button on the windshield wiper lever, you will see on the display the computer firmware version with error codes, if any.
Main error codes:
- 2 - The machine's mains voltage is too high.
- 3-fuel level sensor.
- 4-fluid cooling temperature sensor.
- 5-malfunction of the overboard temperature sensor.
- 6-motor overheating.
- 7 - critically low oil pressure.
- 8-disadvantages in the braking system.
- 9-battery is low.
The most common on-board system errors are:
- Code 4 mainly appears when the engine is not warmed up enough, or when the sensor indicating the amount of fuel is turned on.
- Code 6 indicates an overheated engine.
- Code 8, when there is a shortage of brake fluid in the system.
Having identified existing errors, you can reset them; just press and hold the car’s daily mileage button for a while.
Before making a transaction to purchase a car, be sure to check the on-board system. Make sure there are no system errors. Or you will discover interesting facts about the condition of the car. For example: engine heating, oil pressure, etc.
Instructions for performing diagnostics via a laptop with your own hands
For diagnostics you will need a laptop and a diagnostic adapter. The laptop can be of any power, it does not matter for diagnosis. The adapter is universal and suitable for all VAZ models (the author of the video is KV Avtoservis).
There may be a mismatch between the diagnostic pads. In this case, you can buy an adapter. A diagnostic program is supplied with the adapter, but the software can be downloaded from the Internet on specialized sites. They have the same set of functions, but may differ in unique features.
When connecting a laptop, the ignition must be turned off.
One end of the adapter is inserted into the DR, and the other directly into the USB port of the laptop. After connecting the adapter, turn on the ignition. At the next stage, we launch the program and begin diagnostic work. When the program starts, the computer connects to the electronic control unit.
How to diagnose a car
- Connect contact “B”, which has the diagnostic block and “ground”;
- Turn the ignition key to the third position, do not start the car;
- First, the “CHECK ENGINE” lamp displays code 12 with 3 flashes. It shows that the diagnostic programs are working. On the VAZ 2110 this happens in this order: the lamp blinks briefly 1 time (which should be considered the designation of number 1). After a pause lasting at least 2 seconds, it flashes 2 times in a row (two). So we got the number two. And this is repeated 3 times so that the driver understands these signs;
- After the diagnostic program has declared its serviceability, it will begin to display error codes, if there are any, of course. In the same way - flashes and pauses.
Where is the diagnostic connector on the VAZ-2114
Any machine will sooner or later experience all sorts of problems during operation.
Car owners of an iron horse with an injection engine have the opportunity to carry out diagnostics on their own. For convenience, cars, and the VAZ-2114 is no exception, have a diagnostic connector. We will describe where this connector is located, how to perform diagnostics and talk about the intricacies of the 2114 model. The location of the diagnostic connector may differ depending on the model or make of the vehicle. Basically, in modern iron horses, the diagnostic connector is located in the area of the steering column, often to the left and below it.
Where is the diagnostic connector for Ford Focus 2?
please tell me where the """" diagnostic connector"""" FF2 2008 is located
under the steering wheel on the left where the feeders are
Vadim, thanks, I'll look for it tomorrow
Have you heard about an application on Android, if you connect the phone to this connector, then the phone becomes a kind of on-board computer, where there is speed, engine speed, etc.
I haven't heard this, but anything is possible
There is something like this, on the iPhone for sure, but for this you naturally need a cable
Where can I get the cable and what is the name of the application?)
Sanya, I’ll log in via computer in the evening and give you a link to this application...
You need a controller like Elm to begin with, and then an application.
An ELM327 controller is needed with bluetooth and an application for Android torque.
Has anyone used this application?
It turns out that you buy Elm with bluetooth and plug it into the connector and connect via bluetooth and that’s it?
well yes) everything is simple)
Yes, you're welcome) I just advise you to find the torque pro version (more features).
Andrey, where is the best place to buy this elm and how much does it cost?
on the Internet) price 2-3 tr. on average) I can sell mine at a pinch) I have 3 of them (I am a diagnostician and they are there just in case). I would give that ruble for 1.5) tested but new)))
Andrey, it’s a little expensive for me, with delivery it will cost about 2000 rubles ((
which one should I take?
ELM327 OBDII V1.5
ELM327 OBDII V1.4
1.5 does not officially exist. This is a Chinese fantasy. 1.4 latest version. take the bluetooth one with the blue and orange label
Watch an interesting video on this topic
eurasia-avto.ru
installator.ru
Placement of the diagnostic connector: features
In the 2114th model, which has a Europanel, the connector is located on the main control panel, under the cigarette lighter. The latter is closed with a decorative plug. To get to the connector, you just need to carefully pry off the plug, after which it is simply removed.
In general, VAZ cars are equipped with a 12-pin rectangular connector of the old OBD-1 type or a 16-pin OBD-2 connector, presented as a USB-KKL trapezoid. In the case where the adapter is provided for the OBD-2 DR, it makes sense to purchase an adapter.
How to diagnose a car
- Connect contact “B”, which has the diagnostic block and “ground”;
- Turn the ignition key to the third position, do not start the car;
- First, the “CHECK ENGINE” lamp displays code 12 with 3 flashes. It shows that the diagnostic programs are working. On the VAZ 2110 this happens in this order: the lamp blinks briefly 1 time (which should be considered the designation of number 1). After a pause lasting at least 2 seconds, it flashes 2 times in a row (two). So we got the number two. And this is repeated 3 times so that the driver understands these signs;
- After the diagnostic program has declared its serviceability, it will begin to display error codes, if there are any, of course. In the same way - flashes and pauses.
When is diagnostics required?
Car owners often perceive with horror the Check Engine sign appearing on the dashboard. It indicates any flaws in the system of the 2114th model. The easiest way out in this situation is to visit a service station. However, this involves both financial and temporary expenses. Meanwhile, thanks to the diagnostic connector installed on current cars, it is quite possible to perform computer diagnostics on the VAZ-2114 and 2115 yourself. For this procedure, you will need to buy a diagnostic adapter and have a device that connects to a laptop, computer, tablet or phone.
Self-diagnosis of your vehicle allows you to:
- quickly detect faults in the car;
- acquire the necessary data from sensors;
- change settings;
- Save money by not visiting a service station.
So, initially diagnostics are required when the Check Engine combination lights up, but it would not be superfluous to perform regular diagnostics as a preventative measure. It’s a good idea to carry out additional diagnostics using a multimeter/compressometer. During the extraordinary inspection, your task is to examine the fluid levels in the system of the fourteenth model, conducting a visual body inspection of the car, as well as components for mechanical problems. Then you should check:
- compression in cylinders;
- what condition are the valves in?
- spark plug;
- high voltage wires;
- charging the battery.
Only when a preliminary diagnosis has been made should you proceed to a computer study.
How to diagnose a car
- Connect contact “B”, which has the diagnostic block and “ground”;
- Turn the ignition key to the third position, do not start the car;
- First, the “CHECK ENGINE” lamp displays code 12 with 3 flashes. It shows that the diagnostic programs are working. On the VAZ 2110 this happens in this order: the lamp blinks briefly 1 time (which should be considered the designation of number 1). After a pause lasting at least 2 seconds, it flashes 2 times in a row (two). So we got the number two. And this is repeated 3 times so that the driver understands these signs;
- After the diagnostic program has declared its serviceability, it will begin to display error codes, if there are any, of course. In the same way - flashes and pauses.
Diagnostics using a laptop: instructions
During diagnostics, you will need to use a diagnostic adapter and a laptop.
The latter is suitable for any power. The adapter, as a rule, is universal, so it is suitable for any VAZ model. Sometimes the diagnostic pads don't match. Then you will need to purchase an adapter. A diagnostic program is included with the adapter. However, it is quite possible to download software support on the Internet on thematic sites. They have an identical functional set, sometimes differing in features. When connecting the laptop, you must turn off the ignition. The end of the adapter should be inserted into the connector, the opposite end into the USB port of the computer. When the adapter itself is connected, you can turn on the ignition. The next step will be to launch the program, after which it is time to begin diagnostic work. When the program starts, the computer will connect to the ECU.
So, the interface depends directly on the program that is downloaded. This is a list with indicators or graphs with parameters. Based on these readings, it will be possible to draw initial conclusions regarding the operation of the engine and the main systems of the car.
As soon as the list of detected errors lights up, you can find their decryption in the test file (attached to the program). By the way, the file decrypts all types of errors that appear during problems.
So, the error codes found have been deciphered. Now it's time to eliminate them. Initially, you need to check the sensors, since the operation of the ECU and the correctness of the readings depend on their operation. Problems with the sensor can cause the error to light up. To make a more accurate diagnosis, you will need auxiliary monitoring of vehicle components. After troubleshooting, a check will certainly need to be made to make sure that the system is functioning without errors.
Diagnostic equipment
OBD-II module
When purchasing diagnostic equipment, you should decide in advance which models of equipment you will be working with. The choice of the most important component – the auto scanner – depends on this. Here, as they say, there may be options:
- If you intend to service cars of only one brand, it makes sense to purchase a dealer scanner. It costs more than analogues developed by third-party manufacturers, but, at least in theory, such a device provides the most complete and reliable information. In other cases, it makes sense to buy a universal scanner designed to work with various brands of equipment. They are produced by many companies and also do their job well.
- As an inexpensive means of rapid diagnostics, you can acquire a portable scanner. Such a device makes it possible to read error codes and erase them from the ECU memory, test some sensors and view on-board computer data. An important advantage of such equipment is its compactness. You can easily take a portable scanner with you on the road. But in order to reprogram the computer, so-called chip tuning, the capabilities of a portable scanner are not enough.
- Special programs installed on a computer allow you to more fully evaluate the operation of various vehicle systems and even make the necessary adjustments. You can use either a laptop or a stationary terminal, to which a scanner is connected via a USB connector. In this case, the degree of interaction with the vehicle's electronic equipment depends on the capabilities of the software developed by various companies. But for full-fledged chip tuning, this may not be enough. This requires the purchase of an additional electronic programmer designed for such work.