In the last article, I talked about choosing front suspension components for my Kalina. And here I will try to describe in more detail the entire procedure for replacing these parts, starting from struts and springs, and ending with supports and their bearings. All this can be done in three hours, if there are no special problems with rusted nuts. To perform this repair you will need the following tools:
- Balloon wrench
- Hammer and pry bar
- Jack
- Open-end wrench size 9 and socket wrench size 22 (for unscrewing the top nut of the strut and holding the rod)
- Socket wrenches 17, 19 or similar heads with a crank
- Pliers
- 13mm socket head with ratchet or wrench
- Penetrating lubricant
- Spring ties
Upper support of the front strut for viburnum - features of choice
As practice shows in most cases, the upper support assembly is replaced.
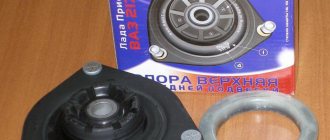
There are three models of “supports” on sale, which you should pay attention to when purchasing. The photo below shows original sets of supports from three companies: SEVI. SS20 (SS20), ASOMI (ASOMI). The cost of products varies from 2000 rubles. up to 4000 rub. depending on the configuration. Watch the spare parts review video:
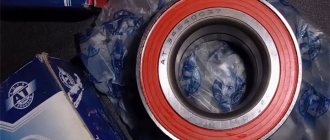
If you do change the support bearing individually by installing it in the old support, then you should buy from trusted manufacturers, a summary table of which and photographs are presented below. Catalog number (article) - 1118-2902840.
Choosing front strut support bearings, which ones are better. Article, catalog number, price
Both the upper “support” assembled with a ball bearing (set) and individual parts are available for sale. When replacing, you should know the condition of the upper “support” housing, the upper bowl and the lock nut; if there is no damage or wear, then you will need to replace the bearing separately, otherwise you will have to change all the components.
The table provides a list of the best and recommended manufacturers of support bearings for replacement on Renault Logan. Prices, catalog numbers, and completeness of products are indicated. A complete set of Renault Logan front shock absorber support is shown in the photo, where the components are also listed.
Original factory article:
- shock absorber supports – 6001547499;
- ball bearing - 600102585.
Note:
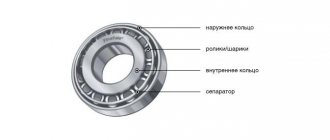
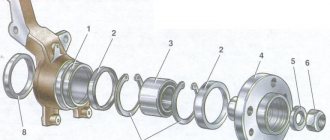
A support bearing is a thrust single-row ball bearing consisting of a steel housing, inside of which there are rings with raceways, a cage, and balls.
Table of the best recommended shock absorber mount companies
| No. | Firm | Catalog number (article) | Price 2021, rub. | Contents of the repair kit | |||
| Lock-nut | Bearing | Cup | Support | ||||
| 1 | SWAG Germany Analog | 60 92 7505 | 700 | — | + | — | + |
| 2 | SKF Sweden Analog | VKDA35633 | 1250 | + | + | + | + |
| 3 | Renault France Original | 46001547499 | 800 | — | + | — | + |
| 4 | NTN-SNR France Analog | KB65528 | 1200 | + | + | + | + |
Advice:
In terms of cost, it is more profitable to change the “support” using a repair kit, and this is also correct from the point of view of compatibility of parts.
Characteristics and dimensions of the front supports, support bearing
| Parameter | Shock absorber support | Support ball bearing |
| Installation side | Front axle, right/left side | |
| Required quantity per axle | 2 pcs | |
| Height, mm | 46 | 9 |
| Inner diameter, mm | 18 | 16(27) |
| Outer diameter, mm | 104 (75) | 56 |
| Material of execution | Synthetic rubber | Steel ШХ-15 |
| Product weight, g | 400 (from p-sh) | 70 |
Video 2
In order to replace at least one of the elements that is part of the Kalina front strut, you need to remove the entire assembly from its seat.
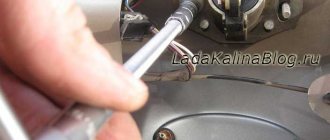
To do this, open the hood and use a 22 wrench to rip off the upper support nut, while holding the shock absorber rod with a 9 wrench. There is no need to unscrew the nut completely yet.
We also use a wheel wrench to remove the wheel nuts and only then lift the car with a jack. Immediately you need to place a stop for belaying.
Now you can safely unscrew the wheel nuts and remove the wheel. The brake hose is attached to the strut, so it needs to be released from the mount so that it does not interfere when we remove the strut. Now we will need WD-40; we need to treat all the bolts and nuts that will have to be unscrewed. The main thing is to spray on the lower nuts and bolts of the shock absorber that secure the assembly to the steering knuckle.
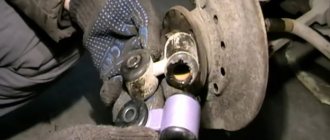
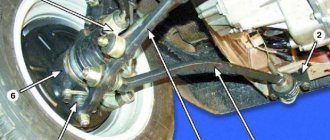
We remove the steering tip nut and hit the eyelet into which the ball pin of the tip is inserted with strong blows, while inserting a pry bar between the steering tip and its mount on the rack.
If you have a special puller, you can press out the finger using it. Unscrew the two self-locking nuts securing the shock absorber to the swing arm. To do this, we use keys 17 and 19.
It is better to use similar heads and knobs.
After removing the nuts, it happens that the bolts do not come out. They have to be knocked out. You must first knock them out through a wooden block so as not to spoil the thread, and then, using a punch with a smaller diameter, knock out the bolt when it is already sunk into the steering knuckle.
Design Features
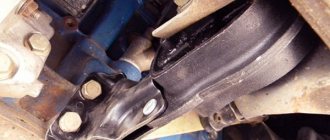
The support bearing is located between the upper shock absorber cup mount and the upper strut mount. The main purpose is to provide a movable connection between the upper support of the shock absorber strut and the car body.
The unit is a regular ball bearing. In some designs, the bearing may be attached to a plate that rests on the upper spring seat. This is exactly the design used on the Opel Astra F, but this does not make a fundamental difference in the replacement process.
Tool
- spanners, sockets and hexagons of the required size;
- slotted and Phillips screwdrivers;
- spring ties;
- a wire brush for cleaning bolts before unscrewing, penetrating lubricant (WD-40 or its equivalent).
The steering tip can be removed with a special puller or using a hammer. Also, a hammer and an adapter of the required diameter may be required if the outer CV joint is stuck on the splines to the hub (methods for replacing bearings without removing the axle shaft are mentioned in the video, but in most cases it is actually easier to unscrew the hub nut).
Keep in mind that small sets of universal sockets will likely not cover all your needs. For example, when unscrewing the top nut of the shock absorber rod, the rod itself must be held with a hexagon. To prevent the stabilizer link pin from turning, there may be, for example, a recess in it for a Torx, so you won’t be able to unscrew and tighten the stabilizer with a regular head - you need a spanner. Also, in some cars, the CV joint nut may not be the usual hexagon type, but a special multifaceted shape. Be sure to check these points before repair, so that during disassembly the tool is not found to be missing.
The dimensions of the fasteners, as well as the requirements for clamping forces, can be found in the repair and operation manual for your vehicle. If you do not have plumbing experience and a refined muscular sense of the degree of tightening of the nuts, we recommend that assembly be carried out only using a torque wrench. Of course, you won’t be able to undo the threads of the hub nut, but you can ruin the threads that secure the caliper guides.
Removing the shock absorber strut
On cars whose suspension parts have not been separated for a long time, we recommend that the day before repair, clean the fasteners from dirt and fill them with penetrating lubricant or brake fluid.
The described instructions and video will be devoted to replacing support bearings using the example of Skoda Fabia.
- Loosen the hub nut and wheel bolts. Since the clamping force is quite high, it will be extremely difficult to unscrew it alone after lifting the car. Unless you are changing the brake discs along with the support bearings, then you can afford to insert a screwdriver into the disc stiffeners, thereby fixing it in the caliper. The nut can be loosened by asking someone to press the brake pedal firmly. Of course, all these options require more labor than loosening the nut when the car is still on wheels and can be secured with wheel chocks and a hand brake.
- Raise the car and secure it on strong supports. Under no circumstances should the car be constantly hanging on a jack! Wheel chocks must be installed under the wheels.
- Remove the wheel.
- Unscrew the nut securing the stabilizer link to the telescopic strut. Be sure to thoroughly clean the recess under the Torx from dirt. Otherwise, if you mistakenly insert a smaller head due to deposits packed inside, you risk damaging the internal edges when unscrewing the nut.
- Unscrew the mounting bolt of the brake hose mounting bracket.
- Unscrew the steering tip nut. If you do not rotate the tip around its axis, you won’t have to do a wheel alignment after the repair. To remove the tip, use a puller or hit the post pivot arm several times with a hammer.
- Unscrew the hexagon socket bolts securing the caliper to the steering knuckle.
- Rotate the caliper slightly and pull it out of its seat along with the brake pads. Secure the caliper in a suspended position or place something under it. Under no circumstances should it hang on the brake hose!
- Remove the brake disc.
- Unscrew the hub nut.
- Unscrew the ball joint mounting bolts. If the ball is riveted to the lever, you need to unscrew the upper mounting bolt, after which it is best to remove it with a puller. If the distance from the end of the bolt to the CV joint does not allow the nut to be unscrewed, the rivets will have to be drilled out and then replaced with bolts with nuts and washers.
- Knock the drive shaft out of the splines in the hub. The video shows an effective removal method using a hammer drill in jackhammer mode.
- Unscrew the upper bolts securing the front strut support. It is better to do this with an assistant, since nothing holds the stand except these nuts.
Removing the slewing bearing
- Slightly tighten the spring with zip ties. Use only high-quality screeds! Since the compression force required is high, a flying spring can cause serious injury.
- While holding the rod with a hexagon, loosen the nut securing the upper strut support.
- Retract the spring until the support bearing is released.
Installation Features
All you have to do is install a new support bearing and reassemble the shock absorber strut in the reverse order of removal. Some nuances:
- the shock absorber rod nut can be tightened only until the rod begins to rotate, since after installing the strut in place, it will be much more convenient to completely tighten the nut, holding the rod with a hexagon;
- after unclamping, the spring should “sit” in special seats for the last turn;
- It is not recommended to tighten the shock absorber rod nut with a wrench;
- Before installing the caliper guides, be sure to lubricate them with special grease;
- do not forget to cotter the hub nut if manual cottering is necessary;
- Lubricate all threaded connections, conical seating points of steering tips, ball joints, and stabilizer bones with graphite grease. This will make the disassembly process much easier in the future.
Owners of cars with inclined strut supports should pay special attention. If installed incorrectly, the new support bearing will bite. For trouble-free installation, during the assembly process, paint or scratch marks on the strut support and on the body of the upper spring seat.
General recommendations
In the video, the master mentions the need for preventative replacement of strut cushions on some VAG-Group car models, which does not apply to support options without built-in threads.
As practice shows, the support bearings of the front struts have approximately the same service life. Therefore, if, when diagnosing the car suspension, you find a faulty support bearing, we recommend replacing both support bearings at once. After all, with a high degree of probability it is possible to predict the imminent failure of a still serviceable element. We recommend reading the article on diagnosing the chassis of a car, in which you will find guidance on checking support bearings, strut supports, shock absorbers, steering ends, ball joints, silent blocks, wheel bearings, etc.
Replacing the support bearing for a viburnum (VAZ 1118, 1119, 1117)
Replacing and installing support bearings on Kalina begins with checking the condition of the remaining elements of the module: lower cup, power buffer, bump stop, corrugation, shock absorber springs. They will need to be replaced if necessary. How to correctly install the support bearing on Kalina and change it is described in order below.
- Before assembling the front jay, make sure that the ends of the shock absorber spring rest against the special tabs at the lower and upper cups.
- We place a rubber gasket on the top cup, with a new “support” on top of it, and orient the product upwards with the markings.
- On top of the p/sh we install the upper part of the support (cover).
- Now we attach the shock absorber rod nut, which we tighten until it stops.
- Unclench the shock absorber spring ties. We tighten the rod nut with a torque wrench to the torque indicated in the table at the end of the article.
- We install the assembled module back, first attach it to the body glass. We carry out the assembly in the reverse order: we screw the steering tip to the lever, fasten the stand with two bolts to the steering knuckle, and mount the wheel at the end. This completes the replacement.
Replacing support bearings on a Lada Granta without removing struts - step-by-step instructions
- We hang the wheel, then remove it.
- We unscrew the bolt securing the stabilizer strut, and then remove it so that it does not limit the travel of the strut.
- Next, take the hexagon and, holding the strut rod with it, loosen the fastening nut.
- We install the jack under the ball pin, and jack the rack, thereby removing the load from the second jack. At the same time, the stand will begin to “play” a little.
- We take the spring ties and attach them to the coils. We tighten the spring quite a bit, and then lower the jack installed under the ball. After these manipulations, the stand should go down.
- Now you need to unscrew the support bearing and rod; to do this, lower the rod down and pull out the “support” through the resulting void.
- We clean the rubber band and support cup from dirt. If you are going to install SS-20 supports, then the lower cup will not be useful to you.
Further assembly is carried out in reverse order. I recommend lubricating the bolts and nuts with “graphite” or at least working off, and after completing all the work, do not forget to tighten everything properly. We put the wheel in place and do the same with the second “support”, after which you can safely check the work. As you can see, in order to replace the support bearing on a Lada Granta, it is not at all necessary to completely dismantle the shock absorber struts.
That’s all I have, I hope this “life hack” will be very useful to someone and will significantly “make life easier.”
How to change a support bearing without a camber on a Lada Kalina
Replacing the support bearing on Kalina without removing the strut is impossible, or will not be correct, but replacing the part without further camber is still possible. In this case, the technology for removing the rack will change:
- After removing the wheel, unscrew the hub lock nut.
- Disconnect the steering knuckle from the ball joint and steering rods.
- Then we remove the steering knuckle from the CV joint with the strut and shock absorber spring, this way you will not break the camber bolts.
Video “Replacing the support bearing”
The recording shows a quick way to replace a support bearing with your own hands.
A support bearing (in common parlance “opornik”) is a subspecies that belongs to rolling bearings. This type of bearing is widely used on modern cars due to its ease of installation, ability to withstand high loads, and excellent performance characteristics.
The “support” is located under the hood, at the top point of the “glass” of the body, in which the shock-absorbing strut is installed. The support bearing is designed to connect the body and shock absorbers; thanks to the “support”, the weight of the car is transferred to the wheels, which rotate. This element of the chassis is very important; without it, handling and a comfortable ride would be out of the question.
What distinguishes a journal bearing from a regular bearing is its thick outer ring (cage). This design feature is explained by the need to withstand severe loads and impacts that come from the wheels.
How to check a support bearing
The easiest way to check the performance of a support bearing is with the help of an assistant. You need to remove the plastic cover from the strut cup, there you will see the bearing mounting nut. You need to put your hand on the support and ask an assistant to rock the car. As soon as the car starts to rock, you will immediately feel the bearing working.
If you hear a knocking or squeaking sound in the support, it is most likely faulty and needs to be replaced.
New Lada: Repair of TsBKE 21900-3840080-10/20 from the LADA car. (1/1)
What is a support bearing and a front shock absorber strut support?
The basis of a MacPherson-type spark plug suspension combines a shock absorber and a spring, that is, one telescopic spark plug is capable of both acting as an elastic element and absorbing the vibration energy of the body relative to the road.
In other words, this assembly is called a "suspension strut" or "telescopic strut".
The strut is attached from below through a ball joint to the positioning lever, and a bearing support is installed on top, allowing the strut body with the spring to rotate about its own axis under the influence of the steering rod.
The upper support directly includes the rolling bearings, housing, damping rubber elements and mounting pins.
On the one hand, the body is rigidly connected to the body shell, and on the other, the shock absorber rod and spring support cup are attached to it. Rotation occurs between them.
Bearings according to their structural organization can be divided into:
- by the nature of the rolling body - ball and roller;
- bearings with removable outer or inner races;
- integrated angular contact bearings of non-separable type;
- bearings without cages, which are a powerful cage with built-in rolling elements; the support flanges act as tracks.
During assembly, a supply of lubricant is placed in the bearing, but its operating conditions are such that it is not enough for a long time.
How to remove the support bearing on a viburnum - step by step guide
Replacing the Kalina front strut supports begins preparing the car. Place the car on a flat surface, if there is a lift or pit available. Engage first gear and release the parking brake. Dismantling sequence in order:
- We unscrew the wheel bolts, then raise the car with a jack or a lift as in our case.
- We gain access to the brake disc, but you don’t need to remove it, nor do you need to unscrew the hub locknut.
- Let's move on to the swing arm and tie rod. First, remove the cotter pin from the fastener. Next, unscrew the nut itself.
- After this, use a tip remover to press it out of the hole in the lever or, as a last resort, use a hammer. We install the device, tighten the thread and remove the tip.
- Now disconnect the brake hose and speed sensor wire from the front strut.
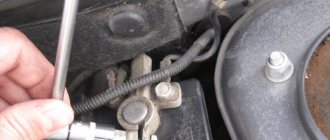
- Next, we find two bolts securing the strut to the steering knuckle and lubricate them with penetrating lubricant.
- To unscrew the nuts, we use a 17 socket wrench, as well as a head with a ratchet.
- The bolts will have to be knocked out; use a wooden guide to avoid damaging the threads.
- The lower part of the module is freed, let's move on to the upper part. Unscrew the three fastenings of the front pillar to the body glass.
- When unscrewing the last nut, hold the stand, or place a support under it, for example, a removed wheel. After this, remove the module with the support and shock absorber assembly.
- We install two ties on the springs of the removed suspension module. As shown in the photo, we compress the shock absorber spring evenly on both sides.
Note:
In garages and car repair shops, special machines are used to compress shock absorber springs; when using them, the replacement process is faster.
- We continue to compress the shock absorber until the upper support is freed from the spring tension, and only then unscrew the rod nut. We use the key at 19.
Attention:
The photo on the right shows the SS20 shock absorber mounts, the design is different from the standard mounts, as in the photo on the left. The essence of replacing and repairing the Kalina support bearing of different designs does not differ.
- Now we remove the upper part of the support (cup), under which the “support” is located. We remove the old part and proceed to replacement.
Signs of support bearing failure
Signs of worn bearings are two main factors - the presence of a knock when turning the steering wheel in the area of the front wheel arches (also in some cases felt on the steering wheel), as well as deterioration in vehicle controllability. However, in some cases the knock from the struts may not be felt. It depends on their design.
Worn support bearing
For example, on a VAZ-2110 car, the inner race of the support bearing acts as a bushing through which the shock absorber rod passes. When the bearing is worn enough, its housing allows play, which causes the shock absorber rod to deviate from the axis. Because of this, the alignment angles are violated. Malfunctions can be identified by rocking the machine. Detailed instructions for checking the support bearing can be found in the supplementary material.
The main sign of a malfunction is the need to constantly steer when driving on a straight road. Due to a violation of the camber angle, the wear of the shock absorber support increases by approximately 15...20%. Tire treads, connecting and steering rods, and their ends also wear out additionally.
If the tasks of the bearing include only rotation of the strut (that is, it does not interact with the shock absorber), then in this case, violation of the wheel alignment angles does not occur, since the shock absorber rod is held by a bushing that is pressed into the rubber damper of the structure (for example, on a Lada Priora”, “Kalina”, Nissan X-Trail). However, this still affects the car's handling, although to a lesser extent. Such a bearing will begin to knock when it fails. Moreover, knocks will often be felt even on the steering wheel. In this case, it will not be possible to diagnose a bearing failure by simply rocking the machine .
Signs of front strut malfunction
- The appearance of knocking noises when driving over uneven surfaces in the area of the pillar. This happens when the thrust bearing has become disintegrated and is not performing its function properly. This also happens if the coil spring bursts.
- When hitting an obstacle, the car sways for some time due to the fact that the shock absorber itself does not dampen the vibrations.
- During a visual inspection, if you see that the strut is wet on a dry road, this means that the front shock absorber has lost its tightness.
Oil leaks out of it.
New Lada: About stamped wheels on Lada Granta cars
Front shock absorber support bearing faults
Like any parts in a car, OPs wear out and break over time; these suspension elements have their own service life. For each car model, the shock absorber supports have their own service life; on average, parts can last from 50 to 100 thousand kilometers without replacement. But for various reasons, support bearings can fail prematurely; the main causes of failure are:
- driving a car on bad roads;
- poorly performed repairs (for example, during installation the nuts were not fully tightened);
- low quality of spare parts or defects, most often non-original parts are of poor quality;
- destruction of the OP as a result of an impact (when hitting an obstacle or due to an accident);
- ingress of dirt and moisture onto the parts of the “support”; on many car models these parts are not protected in any way.
To make sure that the upper support is faulty, it is necessary to carry out diagnostics; in general, checking the support bearing is not difficult, but it is better to diagnose the suspension together.
Table of bearing sizes 8112n and technical characteristics
Characteristics Unit of measurement Value according to GOST (TU)
| Inner diameter of the tight ring, d | mm | 60 |
| Outer diameter of the tight ring, d1 | mm | 85 |
| Free ring inner diameter, D1 | mm | 62 |
| External diameter of free ring, D | mm | 80 |
| Installation height | mm | 17 |
| Dynamic load capacity | kH | 41,5 |
| Static load capacity | kH | 95,0 |
| Nominal speed | rpm | 3600 |
| Axial clearance | mm | — |
| Steel type | — | SHH-15 |
| Hardness of steel and rollers | H.R.C. | 61-65 |
| Contact angle | hail | — |
| Torque | kN*M | 220 |
| Ring roughness | Ra | 0.32 |
| Number of balls | PC. | 24 |
| Ball diameter | mm | 8,731 |
| Mounting chamfer radius, r | mm | 1,5 |
| Weight | G. | 295 |
The important role of MacPherson struts
But MacPherson struts have another important function - they also serve as steering knuckles. That is, the stand with the wheel hub attached to it can rotate around an axis, which allows the drive wheels to be steered.
Naturally, where there is rotation, a bearing is used; in the case of this type of suspension, a support bearing.
To figure out where the support bearing is installed, let's briefly look at the car suspension structure.
Its main components are:
- Shock absorber.
- Frame.
- Spring.
- Support.
All these elements are assembled into a single whole, which provides the possibility of compressing and decompressing the spring and moving the shock absorber rod in the body (which is what the suspension is actually for, since vibrations are damped during these movements).
To ensure all this, the rack is assembled like this: a shock absorber is installed in the body and all this is installed in a spring.
To support the spring from below, a cup is used, attached to the body (welded to it).
To ensure that the spring is pressed, another cup is installed at the top, which rests against the support.
The spring extension limiter is the shock absorber rod, a limit switch that passes through the support and is secured with a nut.
Additionally, the support not only acts as a stop for the spring, it also provides the upper fastening of the strut to the body (it is attached to it with levers from below).
Table of recommended manufacturers
No. Manufacturer Manufacturer's article Price 2021, rubles Equipment Features Retaining rings Protective cap
| 1 | VBF Russia Analogue | 1118-2902840-01 | 700 | — Clip made of hardened steel; — Manufactured according to GOST; — Increased service life; — High-quality lubricant. | — | — |
| 2 | NPP "System Technologies" Russia Analogue | SS10113/11180-2902840-00 | 900 | — Silence; — Vibration damping; — Work at low temperatures; — Protection from dirt and dust. | — | — |
| 3 | AvtoVAZ Russia Original | 1118-2902840 | 750 | — Original product; — 1 year warranty; - Durability. | — | — |
Advice:
When installing ss20 support bearings on a viburnum, it is recommended to install new “Vibration and Noise Insulators” for springs made of synthetic rubber; they soften the load on the suspension and shock absorbers so that a crack does not appear on the Kalina strut support, and this also prevents other malfunctions.
It is important to know:
Inside the plastic housing of the support bearing from VBF there is a single-row thrust ball bearing, marked according to GOST - 8112Н, according to ISO (51112).
Do-it-yourself replacement of the front strut support bearing on a Priora
Even experienced motorists sometimes do not immediately determine the causes of knocking from the front pillars. The noise is heard under the hood while driving and when turning. There is also a knocking sound in the shock absorber springs. Car control deteriorates, and noticeable play appears at the steering wheel.
The reason for these problems is most likely that the support bearing of the Priora front strut is faulty . The part itself is installed between the support cups; inside there are also rubber gaskets - vibration and noise insulators, which also wear out. “Priorka” is an unpretentious car, but failure of the “support” still happens from time to time.
If the front support bearings of a Priora (Kalina, 2110, 2112, 2111) are knocking, it’s worth doing diagnostics and replacement.