Wheel bearing failure is a common problem for car owners. Let's look at how to replace the rear wheel bearing of a VAZ 2114 and what tools are required for this. We will also look at the symptoms of part failure and how to carry out diagnostics to detect the problem.
Video that clearly demonstrates the replacement process:
Useful: How to replace the front wheel bearing on a VAZ 2114?
How to check the rear wheel bearing?
Diagnostics is similar to checking the front wheel bearing. You can do it yourself without going to a car service. There are several points by which failure is determined:
- When driving at a speed of about 50-60 km/h, noise with vibration will be heard, transferring to the car body, while the road surface will be smooth.
- Having raised one side of the car with a jack, we begin to rotate the wheel. If rotation is accompanied by extraneous sounds, this will also indicate a malfunction.
- After driving the car, touch the wheel disk at the hub. If it has a high temperature, then the part is failing.
Of course, it will not be possible to find out the critical wear of a part, but it will be possible to detect a malfunction. When a breakdown is diagnosed, it is strictly not recommended to continue driving the car; this may pose a threat to other road users.
How and which bearing to choose?
Choosing a new part is often quite difficult, because there are many nuances that play a big role. When choosing a new bearing, you should always pay attention to the quality of the product, technical specifications, certificate and packaging confirming originality. But in addition to the original VAZ2114 rear wheel bearing, there are many replacements that are also available and recommended for purchase. We advise you to familiarize yourself with all existing options for replacing a faulty part.
Original part
2108-3104020 and 2108-3104020-02 are the original numbers of the rear wheel bearing for the VAZ2114. This car part with this number is made at AvtoVAZ factories. It fits the seat exactly and its approximate price is 2000 rubles.
Analogue parts options
In addition to the original bearing models, there are many other equally high-quality options that are also suitable for installation. And these are the options that most drivers of VAZ 2114 cars choose, since sometimes the quality and service life of these parts exceeds even the original bearings. But it is not recommended to buy bearings from an unknown manufacturer.
Some nuances and recommendations for selecting, purchasing and installing a rear wheel bearing:
- You should only buy bearings in original stores or order from factories!
- Change parts on both sides, because they have the same service life.
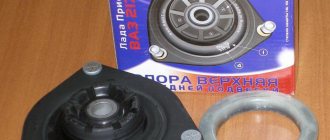
Necessary tool
Before starting work on replacing the rear wheel bearings on a VAZ 2114, we need to collect the necessary tools according to the list:
- Set of open-end wrenches;
- 30mm head and knob;
- Round nose pliers and pliers;
- Wheelbrace and jack;
- Hammer.
It is better to have a can of WD-40 or liquid wrench, as the parts are susceptible to corrosion and can be difficult to unscrew. If possible, you can purchase or find a special puller for the hub, which will make the work a little easier.
Helpful : How much do wheel bearings cost?
List of new parts and tools for replacing them
Replacing the front wheel bearing on a VAZ 2114 begins with the purchase by the car owner of the following spare parts:
- front wheel bearing (original art. 11180 – 3103020 – 04);
- front hub retaining rings (usually included in the repair kit under art. 11180 – 3101800 – 86);
- a new front hub (art. 11180 - 3103012 - 00), which will be needed if there is excessive wear of the bearing and rotation in the seat.
- tire remover;
- set of open-end spanners from 12 mm to 24 mm;
- socket heads from 12 to 19 mm and wrenches;
- specialized wheel bearing puller;
- specialized steering wheel end remover;
- duckbills for removing retaining rings;
- carriage;
- Screwdriver Set;
- regular pliers.
The cost of work to eliminate this malfunction from official dealers (at the end of autumn 2021) ranges from 4 to 6 thousand rubles. In small private service workshops they will ask for work from 2500 to 3000 rubles. After reading the instructions below, carrying out repairs yourself will not cause big problems for the owner of a VAZ model 2113, 2114 or 2115.
Symptoms of malfunction
The first symptom of a malfunction will be a noise heard from the rear of the car. This means that the mechanism runs out of lubricant and the metal parts begin to rub against each other. The next thing that will happen is that vibration will be added to the body, which will be caused by slight wear of the element. When a part is on the verge of failure, an unpleasant smell will be felt, as if the brake pads are stuck in the drum. It is better not to let this happen, as the wheel begins to jam and the bearing can fall apart at any moment.
The process of replacing bearings on a VAZ 2114
It is necessary to put the car in first gear, and then put “shoes” under the front wheels. Next, loosen the wheel bolts and jack up the car. After the manipulations have been completed, the wheel is removed and set aside.
How to replace the rear wheel hub bearing. How to remove the rear wheel hub with your own hands? bearing removal and installation
The process of replacing bearings on a VAZ 2114
The preparations are complete, now it’s time to unscrew the guide pins and remove the brake drum. It can be removed, but if that doesn’t work, you should knock it down with a hammer and a wooden handle.
Next you need to remove the hub. To do this, unscrew the nut and knock the part off the trunnion. If you don’t have a puller at hand, you can use the following method: screw the wheel to the hub and remove it with a sharp jerk. After such manipulations, the situation can develop in two directions:
- The part came off neatly and there were no elements of the inner bearing ring left on the journal. With this course of events, you can immediately begin further repair work. You can begin pressing out and pressing in the new bearing.
- The inner ring remains on the trunnion and prevents further repair work. There will be a lot of work here. First you need to remove the brake pad to avoid damage. After this, using a chisel, you should tear the remaining inner ring off the seat. Using a tension puller or two pry bars, you should pull the ring off the bearing, and only after this can you continue replacing the VAZ 2114 rear wheel bearing.
Using special pliers, remove the retaining ring and then knock off the boot. This is only necessary if the bearing will be pressed out in the future. If it gets knocked down, there is no need to remove the boot. Next, you need to knock out or press out and lubricate the place for fitting the new part on the hub. After preparation, the bearing is pressed into the required place using a vice and outer races that remain from the previous part.
The manufacturer recommends not hammering the bearing into place, as there is a possibility that it will be damaged and will last much less. The last step in installation is to replace the retaining ring and boot.
Replacement of the rear bearings of the VAZ 2114 is almost complete. All that remains is to stuff the hub onto the axle
It is important to act not on the outer part, but on the inner ring of the bearing to avoid damage. A nut is put on the finished part and tightened
If difficulties arise during work and you have to remove the pads, they should be assembled and then installed in place. Next, the drum and the wheel itself are put on. The repair process is completed, the rear wheel bearing of the VAZ 2114 is installed and ready for use.
Replacing the rear wheel bearing
When starting to replace the rear wheel bearing of a VAZ 2114, place the car on a level surface and place supports under the wheels for safety. Then you can begin the replacement process:
- Remove the plug from the wheel that covers the hub nut. We unpin it using a core and a hammer.
- We loosen it using a wrench and a 30mm socket. First, you can spray a special agent on the threads that will corrode the rust. Also, the handle of the wrench can be extended using a piece of pipe, which will increase the leverage and provide a smooth load on the nut.
- Raise the car with a jack and remove the wheel.
- Check that the car is not on the handbrake! Unscrew the drum mounts. The adjacent holes have threads. We screw the bolts in there, which will allow the part to be pressed out. You can also tap the drum in a circle using a hammer and a block if it is very difficult to remove.
- Unscrew the bearing nut completely.
- You can remove the hub using the drum and engine head bolts. We screw the drum on with the back side and pull it towards ourselves, so the hub will come out. You can try to knock it out with a hammer or squeeze it out using a pry bar.
- Now we need to pull out the wheel bearing itself. It is best to use a special puller for this. When you don’t have a puller, you can use a grinder to slightly saw down the old element and knock it down.
- Remove the retaining ring in the hub using pliers.
- Next we need to press out the old bearing; if there is no puller, we can try to knock it out. If you can’t remove it, then you can contact a service center that has a hydraulic press, and they will also install a new part for you.
- After installing the new bearing, do not forget to install the retaining ring. Now lubricate the installation site with oil and install the part in place.
Further assembly occurs in reverse order. Be sure to check the tightness of all bolts after installation. Also be sure to tighten the bearing nut.
Bearing replacement process
Now that we have sorted out the design features, we can move on to the actual replacement process. First you need to collect the tools. What you will need: a jack, a set of open-end and socket wrenches, a wheel wrench, rags, a 30mm socket wrench, round nose pliers for removing retaining rings, VD-40 (as needed), and a new bearing.
When everything is assembled, you can consider the step-by-step instructions for replacing the rear wheel bearing on a VAZ-2114 car:
- Place the car on a flat surface.
- We set first gear to the gearbox and place wheel chocks (shoes) under the front wheels.
- We dismantle the protective cap of the hub.
- Using a 30mm socket and an extension, we tear off the wheel bearing tightening nut.
- We tear off the wheel rim mounting bolts.
- We jack up the car.
- We dismantle the wheel.
- Unscrew the rear drum mounts.
- Remove the front brake drum cover.
- Remove the hub nut.
- We install the hub puller and begin dismantling the part.
- When the hub and bearing are removed, you can proceed directly to dismantling the internal element.
- Using pliers, remove the retaining rings.
- There are two ways to remove a bearing from a hub. The first is to knock the product out of its seat. The second, less barbaric, is to use a press to press out the bearings. As practice shows, all motorists use the first one, since the press is not stored in every garage.
- Now that the old product has been dismantled, you can proceed to installing the new part.
- Before pressing, it is necessary to lubricate the inner surface of the hub with oil. This is necessary so that the spare part fits better into the seat.
- Once the bearing is in place, the retaining rings can be installed.
- Now, with light blows of a hammer, install the hub in its place.
- The rest of the assembly process is carried out in reverse order.
Read more about replacing the front wheel bearing.
Part selection
Choosing a spare part is always not an easy task, since there are many factors that influence it. It is worth noting that you must choose a high-quality product and check for certificates, original packaging, and holograms. In addition to the main original product, there are a number of analogues that are recommended for installation. Let's consider all possible options for purchasing a spare part.
Original
2108-3104020 and 2108-3104020-02 - original catalog numbers of the VAZ-2114 rear wheel bearing. The spare part under this article is produced at the AvtoVAZ plant. It's ideal to sit in a seat. The average cost is 2000 rubles.
Analogs
In addition to the original, there are a number of substitutes recommended for installation. As practice shows, they are chosen by most motorists, since the quality of workmanship and service life are much higher.
So, let's look at all the options for purchasing a wheel bearing:
Price and article number of the rear wheel bearing for VAZ 2114
Many car enthusiasts, when choosing a new part, prefer original spare parts. They have a price above the market average, but differ in the quality of the product. In stores you should look for them exclusively by article numbers 2108-3104020 and 2108-3104020-02 .
It is under them that parts from the AvtoVAZ plant are produced. When the part numbers are not indicated or have a different meaning, it may be a Chinese counterfeit made to match the original packaging, also pay attention to this when purchasing!
The average cost of an original bearing is about 1,500 thousand rubles .
Wheel bearing replacement process
Now that all the elements have been studied, you can proceed directly to the replacement process itself. To carry out repair operations, it is necessary to prepare, namely, to collect the necessary tools. What will you need: a set of all kinds of wrenches and sockets (it’s best to have a set of tools in your arsenal that has everything), round nose pliers (the best option is for removing locking rings), a wheel wrench, a jack, a new part, rags, and a couple won’t hurt either gloves
When the motorist is fully armed, you can proceed directly to considering the sequence of actions aimed at replacing the bearing:
- We place the car on a pit or overpass.
- We dismantle the front wheel.
- Remove the wheel bearing protective cap.
- Unscrew the wheel bearing nut.
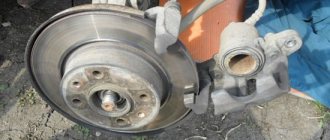
- We dismantle the brake drum and caliper assembly. The caliper, so as not to completely remove it, can be detached and moved to the side, or hung on a stand.
- After unscrewing the fasteners, remove the ball joint from the steering knuckle.
- We remove the CV joint from the hub seat.
- Now, you need to unscrew the lower fastenings of the telescopic stand.
- Next, the steering knuckle is freed from all fasteners, and it can be removed.
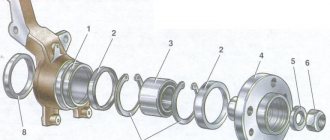
- Press the hub off the steering knuckle.
- The next step is to press out the bearing itself.
- First, we dismantle the retaining ring that limits the bearing.
- We install the hub in a vice so as not to damage it.
- Next, we put a drift and hit it with a hammer until the central part of the bearing falls out.
- On the other side of the hub, the second retaining ring must be removed.
- Now, using a frame, we press out what is left of the bearing.
- Lubricate the inner surface of the hub with engine oil. This is done to make pressing easier.
- We install a retaining ring on one side.
- Using a vice, we press in the new bearing.
- Place the retaining ring on the other side.
- Press the hub into the bearing.
- Further assembly must be carried out in reverse order.
Bearing selection
Almost all spare parts for Lada cars have both original and analogues. In this case, the front wheel bearing is no exception. Let's consider all options for purchasing this part.
Original
2108-3103020 — original catalog number of the factory front wheel bearing for the VAZ-2114. This spare part is produced by the AvtoVAZ plant.
The cost is 1500 rubles.
Good analogues
You can also opt for analogues that have excellent reviews from car enthusiasts:
- Part number R172.04. The average price on the market is about 1,500 rubles .
- GKN-Spidan. Catalog number 26727. The cost is also about 1500 rubles .
- Search number H10 1206. The average price on the market is about 1200 rubles .
The quality of these brands is not inferior to the original and in some cases they last even a little longer than the original. Of course, the service life depends on driving style, so there is no exact data on the mileage of the bearings. Replacing a wheel bearing with your own hands is not a labor-intensive process that can be done without going to a car service center. The average price for such a procedure starts from 1000 rubles, which means that by doing car repairs yourself, you can save a third of your budget. You can extend the life of the bearing by not using the car in difficult conditions and on poor roads unnecessarily. This will help reduce the load on the chassis, which in turn will reduce wear.
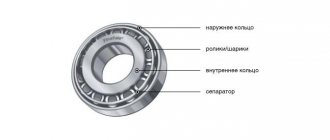
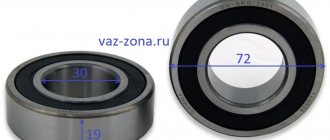
We independently select the rear wheel bearing for the VAZ 2114
The rear hub has an angular contact double-row ball bearing. Russian manufacturers of this product have proven themselves well, but foreign analogues are also considered when choosing. Marking according to GOST 6-256706 C17.
Table of recommended manufacturers
Before purchasing spare parts, check the technical specifications and dimensions of the VAZ 2114 wheel bearings. Beware of counterfeits, the product parameters are shown in the table. It is also not recommended to purchase spare parts from other, little-known brands.
Table of Bearing Sizes and Specifications
Also check out
- How to replace the support bearing of a VAZ 2110 without wheel alignment
- Replacing power steering fluid in a VAZ 2115 without going to a service station
- How to replace a VAZ 2110 timing belt and tension roller at home
- Remove the 2 bolts securing the ball joint to the lower control arm.
- Disconnect the lower suspension arm from the steering knuckle and move the lower cavity of the shock absorber strut to the side.
- Use a suitable extension to knock the hub out of the steering knuckle (it is better to use a special puller).
- Using special pliers, first remove the outer and then the inner retaining ring of the wheel bearing.
Do-it-yourself replacement of the VAZ 2115 wheel bearing
Do-it-yourself replacement of the VAZ 2115 wheel bearing
Recommendations:
Secure the steering knuckle to the lower control arm. So that it does not interfere, you need to connect it to the ball joint lever.
- Install the special key on the steering knuckle.
Do-it-yourself replacement of the VAZ 2115 wheel bearing
- Using pliers, install the outer retaining ring into the steering knuckle.
- We fix the puller with the new wheel bearing on the steering knuckle. To do this, you need to tighten the power nut of the puller, then press the bearing into the knuckle seat as far as possible.
- The hub is knocked out of the steering knuckle along with the inner bearing ring. That is why it is welcome to have a special puller with which you can remove the ring without much difficulty. If it is not there, you will have to use a grinder (this must be done especially carefully so as not to damage the hub).
Do-it-yourself replacement of the VAZ 2115 wheel bearing
- Place the hub on the puller and insert it into the steering knuckle. Place the puller against the inner wheel of the bearing, into which you want to press the hub.
You can also use a tool and a hammer instead of a puller.
- Using pliers, install the inner retaining ring.
Do-it-yourself replacement of the VAZ 2115 wheel bearing
Reassemble everything in reverse order. After replacing the VAZ 2115 wheel bearing, perform a wheel alignment.