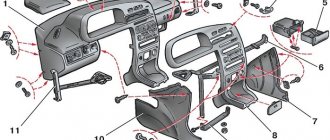
High instrument panel
According to the diagram presented below, the VAZ 2109 with a high panel has the following components.
High dashboard
| Item number | What is this |
| 1. | Ignition switch |
| 2. | Hazard switch |
| 3. | Windshield wiper and washer control lever |
| 4. | Radio socket |
| 5. | Central nozzles of the interior heating and ventilation system |
| 6. | On-board computer (not available on all trim levels) |
| 7. | Dashboard |
| 8. | Glove compartment lid (glove compartment) |
| 9. | Side nozzles of the interior heating and ventilation system |
| 10. | Speaker (loudspeaker) trim |
| 11. | Shelf |
| 12. | Power window switches (available on certain trim levels) |
| 13. | Cigarette lighter |
| 14. | Control panel for heating and interior ventilation system |
| 15. | Gearbox shift lever |
| 16. | Hand brake lever |
| 17. | Ashtray |
| 18. | Carburetor choke handle |
| 19. | Gas pedal |
| 20. | Brake pedal |
| 21. | Clutch |
| 22. | Horn switch (horn) |
| 23. | Instrument panel light switch |
| 24. | Headlight hydrocorrector |
| 25. | Front seat heating switch (available as standard) |
| 26. | Rear fog light switch |
| 27. | Front fog lamp switch (not available on all trim levels) |
| 28. | Rear defogger switch |
| 29. | Hood lock drive lever |
| 30. | Turn signal and light control lever |
| 31. | Outdoor optics switch |
| 32. | Instrument cluster |
In order to eliminate certain malfunctions, monitor the operating parameters of the engine and vehicle systems, it is necessary to learn how the instrument cluster with a high panel is designed when you first get acquainted with the VAZ 2109.
Operating procedure
Replacing the backlight on a VAZ 2114 begins with purchasing a set of LED lamps in the color you need. On the instrument panel, there are several sensors and indicators that require a certain number of diodes to ensure their normal visibility for the driver, especially at night. Therefore, before buying a set of lamps, calculate the required number of LEDs for each device. For example, a brake sensor requires 3 bulbs.
It is advisable to buy with a reserve, at least 5 - 10 lamps more. Since, during installation, you can damage one of the circuits and the LEDs will not work. This often happens to those who are doing this work for the first time.
You need to start work by removing the instrument panel, as well as turning off the resistance. Next, carefully remove the old backlight bulbs from the factory sockets. On the reverse side of the VAZ 2114 panel, there are special sockets designed for installing LED backlight bulbs.
After the old backlight is removed, carefully grind off the heads of the LED lamps to the required size. If this is the first time this work is being done, then you will most likely need spare diodes. Next, when the heads are prepared, they need to be installed on the instrument panel. Replacement of light bulbs must be carried out strictly according to the same polarity as in the standard version. After the diodes are in place, they need to be secured. Do not under any circumstances use screws for this. Scotch tape is also not suitable for this type of thing. When choosing a fastening element, you need to assume that it will heat up a little. Silicone glue is ideal for this. It will not damage the surface of the panel, thanks to its soft consistency, and will securely secure the light bulbs in the sockets.
Now, you need to check the quality of the work done. To do this, without putting the panel in place, turn on the ignition and look at the result. If everything works as it should, then the replacement was made correctly. If there are any inconsistencies, then you most likely have violated the polarity of connecting the backlight bulbs on the VAZ 2114. To fix the problem, you will need to find the connection diagram and double-check whether all the bulbs are in their places. If, after turning on the ignition, the backlight does not light up at all, then you need to check the integrity of the wires. The wires installed on diode lamps are quite thin and can easily break under the insulation or even break completely. So, be careful when handling them.
Instrument cluster
Below we present a diagram and also introduce you to the components of this unit.
Instrument cluster
| Item number | What is this |
| 1. | Speedometer |
| 2. | Daily mileage reset knob |
| 3. | Daily odometer |
| 4. | Vehicle mileage meter |
| 5. | Fuel level indicator in the tank |
| 6. | On-board control system light panel |
| 7. | TEST |
| 8. | STOP |
| 9. | Indicator lamp for breakage of brake light and dimensions |
| 10. | Indicator lamp for low brake fluid level |
| 11. | Indicator lamp for low coolant level |
| 12. | Front brake pad wear warning lamp |
| 13. | Indicator lamp for low liquid level in the washer tank |
| 14. | Indicator lamp for low oil level in the crankcase |
| 15. | Coolant temperature gauge |
| 16. | Tachometer |
| 17. | Parking brake activation warning lamp |
| 18. | Indicator lamp Check engine (Check Engine) fuel injection system |
| 19. | Indicator lamp for closing the engine air damper (carburetor) |
| 20. | Fuel reserve indicator lamp |
| 21. | Oil pressure warning lamp |
| 22. | Right turn signal lamp |
| 23. | Battery discharge warning lamp |
| 24. | Left turn signal indicator |
| 25. | Warning lamp when seat belts are not fastened |
| 26. | Indicator lamp when doors are not closed |
| 27. | Indicator lamp for activation of side optics |
| 28. | Indicator lamp when turning on the high beam |
| 29. | Warning light Check engine emissions system |
Removal
Having familiarized themselves with the diagram of the high instrument panel of the VAZ 2109, many will probably think about the issue of removing it.
There are more than enough reasons to dismantle the panel:
- Repair, modernization of the heating system;
- Body repair;
- Replacing the old panel with a new one;
- Car painting;
- Body sound insulation, etc.
Dismantling process
This is not to say that removing the panel is a difficult process. The main problem is the time that needs to be spent on the work. The task requires concentration and increased attention in order to dismantle all elements, devices, and linings.
The process looks like this.
- Remove the steering wheel itself, otherwise it will seriously interfere with you when dismantling the panel.
- Pull the carburetor choke towards you. Injection engines do not have such an element. Then remove the plastic handle from the drive rod.
- Next, the decorative trim of the console is removed. To do this, simply unscrew the two mounting screws on the sides.
- Dismantle the ashtray and remove the cigarette lighter from its seat.
- Remove the handle that controls the speed of the fan motor.
- Using a screwdriver, pry the levers of the interior heater drive, which will allow you to remove these decorative elements.
- Disconnect the block with wires from the heater fan mode switch.
- Remove the two power wires for the backlight of the stove control panel from the contacts.
- Now you will need to get rid of several decorative control knobs - headlight hydraulic adjustment, instrument lighting control.
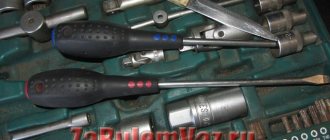
- The next step is to dismantle the hydraulic corrector itself and the lighting regulator. You will need a socket wrench that matches the diameter of the mounting nuts you are using. After unscrewing, push them inside. A little later you will be able to take them out.
- The air deflectors for heating the side windows are removed on the left and right.
- Here, using a Phillips screwdriver, you need to unscrew one mounting screw on each side that holds the upper panel covers.
- Remove the exterior light switch from the dashboard. To do this, you need to carefully pry the switch with a flat screwdriver and pull it out. Do not pull too hard as the switch is limited by the length of the wires used. Disconnect the power supply with the wires from the switch and set it aside. The block can still be pushed inside the panel.
- If you have an audio system, remove the radio. Now remove the standard socket from the radio. Of course, if you still have it.
- Unscrew the central fastener from the panel trim.
- Let's start by removing the dashboard trim. Before doing this, be sure to unlatch the latches located under the dashboard. This is done with a pair of flathead screwdrivers. Insert the tools along the edges and press down. By performing upward movements, the panel rises and then is completely removed.
- The cover has been removed, but that's only half the battle. Next, you can easily disconnect the power supply from the cigarette lighter and the cigarette lighter lamp.
- Also, without much difficulty, the wires from the alarm signal and the hazard warning lights are disconnected.
- Be sure to remember to remove the decorative trim from the front speaker and the heated glass switch, plus the rear fog light switch trim. If you also have a speaker, you will need to remove it.
- Reach through the hole under the speaker to disconnect the wiring harness from the fog light and rear window defroster switch.
- The instrument cluster is held on the panel by two mounting screws, which must be unscrewed. Pull it towards you, unscrew the nut and remove the flexible drive cable from the speedometer.
- That's it, the block with wiring from the instrument cluster can be disconnected and put aside for now.
- Do the same with the ignition switch - disconnect the block with wires, remove the ignition relay ground wire from the connector.
- Here, in close proximity, you will see a wire from the air damper warning lamp. But only for the carburetor VAZ 2109. Injection versions are not equipped with this wire.
- On each side of the panel, unscrew one bottom mounting screw.
- Disconnect the power supply wiring for the glove compartment lighting.
- Unscrew the heater panel fasteners and move it down. This way the panel will not disturb you.
- Remove the fasteners for the interior heater guide rod.
- Unscrew all the remaining side top and center fasteners, after which the panel can finally be completely removed.
One of many screws
Your further actions directly depend on the reasons why you decided to go through this difficult path of dismantling the dashboard.
Do-it-yourself tuning of the VAZ 2108 interior, tips for modernizing and modifying the interior, internal tuning of the VAZ 21099, VAZ 2108, VAZ 2109. Tuning means modifying the car to suit individual needs. You have decided to modernize your VAZ car on your own. You love an individual appearance and a sporty interior, then do-it-yourself VAZ tuning is for you. VAZ 2109 cars have huge potential for tuning. But still haven’t decided where to start? Our sections will help you make your choice; you can make your VAZ 2108 faster, more powerful and more beautiful. On our website you can find photos of external tuning of vases with various body kits and bumpers. As well as advice on tuning the VAZ 21099 and modernizing the main components of the car. You will be able to do engine tuning, brake system tuning, gearbox and transmission tuning, suspension tuning, interior and body tuning, and also get acquainted with interesting materials on modifying the VAZ 21099, tuning VAZ cars.
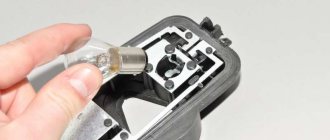
The modernization of the button illumination (or the introduction of backlighting in the case of the 2108 buttons) will certainly appeal to those who are seriously thinking about lightly restyling the boring interior of the car. The procedure is as follows: 1. remove the console assembly with buttons and take it home. 2. Remove the buttons from the console. 3. Use a flat-head screwdriver to pry up the button cover (photo 1) and pull it out.
We immediately find out how the lid is attached (we see 2 latches) 4. If the button is 2108, then there is no light bulb in it, if it is 21083, then we take out the light bulb. 5. We look at the inside of the lid. If it is like in photo 2, skip the next point.
6. If we see a green light filter there, we tear it out from there using improvised means (I scratched it out in the corners with an awl, then with a heated soldering iron I made a tubercle, by which I pulled out the light filter with duckbills). 7. Solder a resistor with a nominal value of 610...1500 Ohms to any of the LED terminals (their appearance is in photo 3), leaving the 2nd terminal of the LED and the 2nd terminal of the resistor long. If the button is 21083, we insulate the resistor up to the LED head using heat shrink, bend the long leads so that the height of the entire LED-resistor structure is about 15 mm. We bend the leads so that with a little effort they fit into the contacts, from where the light bulb is pulled out.
If the button is 2108, there are no pins for backlighting. 3 options: we buy button 21083 in the store and see above, we make the contacts ourselves, or we bring the long leads of the resistor and LED to the places of contacts 6 and 7, bend them so that we can fit the block with connectors. We first insulate the resistor with heat shrink up to the LED head. 9. We check the functionality by supplying 12 V from the computer power supply to the backlight terminals. Does not burn? We change the polarity. We mark the pin where the “+” is applied when the LED is lit. 10. Assemble the button by replacing the lid. Make sure that the lid is not turned 180 degrees. 11. We repeat the procedures with each button and external lighting switch. 12. We insert the LED into the handle for turning on the heater fan of the VAZ 2109, into the upper part of the ashtray, etc., strictly as written here 13. We carry the console with the installed buttons into the car. 14. Having pulled out the external lighting switch from it, we put a block on it and turn on the “dimensions”. We check the polarity on the two lowest contacts of the block with a tester. 15. We stretch a wire from the “Positive” contact of the external lighting switch, connecting in parallel each of the marked terminals on the buttons (they were marked as “positive” in paragraph 9). We also pull the “minus” sign. I think the most elegant thing is to install the same pads on the buttons as on the emergency lights. And we crimp the wires into the same contacts that are used in button blocks. 16. That's it.
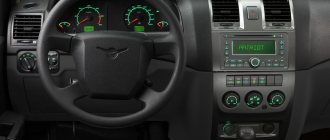
Features of the Europanel
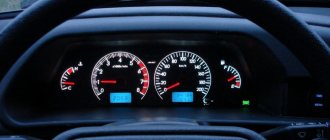
Since 1996, Europanels began to be installed on the VAZ 2109. They have a trapezoid shape with strongly rounded corners, are ergonomic and, as a result, attractive. As in the “high” panel, most of the dashboard is occupied by the tachometer and speedometer, all other instruments - warning lights, indicators - are located around them. Trip counters have been replaced with electronic indicators.
Europanel
Tidy 21099 injector: icon designations
There are more lights and indicators here than on the carburetor. Additional light bulbs available:
Tidy 21099 carburetor: designations
The decoding described at the beginning of the article can be fully used as an example for this point.
Stop light on the dash 2109
The lamp signals the driver about the presence of unexpected problems in the on-board circuits. When such an inscription is activated on the device, it is recommended to immediately go to a service station and look for the cause.
Possible dashboard problems and how to fix them
With prolonged use of vehicles, parts included in various systems gradually wear out, which can lead to serious problems. A car enthusiast can find and eliminate the cause of a malfunction independently if he has certain knowledge and skills. Let's consider the problems associated with the instrument panel of the VAZ 2109.
| Malfunction | Cause | Remedy |
| The coolant temperature and fuel level sensors do not work. | Fuel level and temperature sensors are damaged. Wire tips are oxidized or damaged. | Replace sensors. Check the condition of the wires. |
| When the tank is full, the fuel level sensor needle returns to zero. | The float stop is not installed correctly. | Adjust the limiter. |
| The fuel level sensor needle jumps | Insufficient contact of the sensor resistor with the current collector. Break or damage to the sensor (resistor) winding. | Bend the resistor leads. Replace the sensor. |
| The fuel reserve warning light is constantly on. | The wires are shorted to ground. The flexible sensor bus touches the fuel pipe. | Eliminate the short circuit. Bend the tire. |
| The control lamp does not light up. | The light bulb is out of order. The contacts of the lamp socket are not pressed against the board enough. The contacts have oxidized. The sensor has failed. Wires are oxidized or damaged. | Replace the light bulb. Bend the socket contacts or replace it. Clean contacts. Replace the sensor, ring it and check for functionality. Repair damage or clean wires. |
| The speedometer does not work. | The speedometer drive fastening nuts are not tightened. The drive shaft is broken. The speedometer mechanism is faulty. | Tighten the nuts. Replace the shaft. Replace the speedometer or instrument panel. |
| The flexible speedometer drive shaft is noisy. | The shaft shell is deformed. | Replace shaft. |
Warning icons on the panel
The steering wheel icon can light up in two colors. If the yellow steering wheel is on, then adaptation is required, and when a red image of the steering wheel with an exclamation mark appears, you should already be concerned about the failure of the power steering or power steering system. When the red steering wheel lights up, your steering wheel will probably become very difficult to turn.
The immobilizer icon usually blinks if the car is locked; in this case, the indicator of a red car with a white key signals the operation of the anti-theft system. But there are 3 main reasons if the immo light is constantly on: the immobilizer is not activated, if the tag on the key is not read or the anti-theft system is faulty.
The handbrake icon lights up not only when the handbrake lever is activated (raised), but also in cases where the brake pads are worn out or the brake fluid needs to be topped up/replaced. On a car with an electronic handbrake, the parking brake light may come on due to a glitch in the limit switch or sensor.
The coolant icon has several options and depending on which one is lit, draw conclusions about the problem accordingly. One red lamp with a thermometer scale indicates an increased temperature in the engine cooling system, but a yellow expansion tank with waves indicates a low coolant level in the system. But it is worth considering that the coolant lamp does not always light up at a low level; perhaps there is simply a glitch in the sensor or float in the expansion tank.
The washer icon indicates a low fluid level in the windshield washer reservoir. Such an indicator lights up not only when the level actually decreases, but also if the level sensor is clogged (the sensor contacts become coated due to poor-quality liquid), giving a false signal. On some vehicles, the level sensor is triggered when the washer fluid does not meet specifications.
The ASR icon is an Anti-Spin Regulation indicator. The electronic unit of this system works in tandem with ABS sensors. When such a light is constantly on, it means the ASR is not working. On different cars, such an icon may look different, but often in the form of an exclamation mark in a triangle with an arrow around it or the inscription itself, or in the form of a car on a slippery road.
Catalyst icon
It often lights up when the catalytic element overheats and is quite often accompanied by a sharp drop in engine power. Such overheating can occur not only due to poor cell throughput, but also if problems arise in the ignition system. When the catalyst fails, high fuel consumption will be added to the burning light.
The exhaust gases icon , according to information from the manual, indicates a malfunction in the exhaust gas purification system, but, as a rule, such a light starts to light after poor refueling or the presence of an error in the lambda probe sensor. The system registers misfires of the mixture, as a result of which the content of harmful substances in the exhaust gases increases and, as a result, the “exhaust gases” light comes on on the dashboard. The problem is not critical, but diagnostics are worth doing to find out the cause.
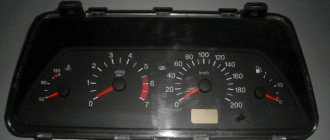
Dashboard VAZ 2109 low panel
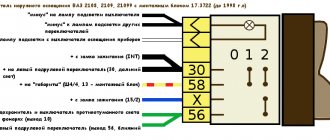
Instrument panel pinout 2109. Low panel
I am going to change the instrument panel, but for a long time I could not do it because I could not find the pinout of the instrument panel pads 2109 low panel. Well, for those who also have problems with these wires, look, read, take note.
WHITE 1 —————- 2 Temperature (white-green) 3 Handbrake (blue-brown) 4 Instrument lighting (double white) 5 WEIGHT (black) 6 —————— 7 fuel lamp (blue-red) 8 WEIGHT (double black) 9 to voltmeter (orange-blue) 10 ————— 11 ————— 12 plus from lock (double orange) 13 fuel level (pink-red)
red 1 High beam (green-black) 2 Heated rear window (green-red) 3 —————— 4 Turn signal (double blue-red) 5 ———— 6 Handbrake plus stop (pink-blue) 7 ——— ——- 8 Rear fogs (orange-black) 9 Dimensions (brown) 10 Minus (double black) 11 Emergency light (blue-white) 12 Choke (gray-red) 13 Battery (white-brown)
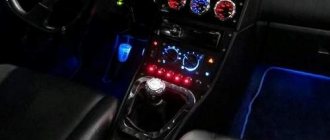
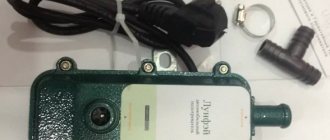
Backlight Land Rover Range Rover Vogue | Car repair - ordering spare parts
I drive with the low beams on all the time. There was a glitch when I bought the car. In my opinion, he wrote about.
Special offer for relighting the interior of a Range Rover from the RPM service
But perhaps we can repeat it again. I turn on the dimensions, and the instrument lighting should turn on along with them. But it doesn't turn on.
Turned it off, turned it on - doesn't work. I called the seller to find out what it is. Here begins the story about LR and RR sores, which most often happens in winter, but if you first turn on the dimensions and then start the car, everything burns.
In general, I listened to this and decided to look into it. The range rover interior lighting opens.
Either this entire on/off unit is changed, or the range rover interior lighting needs to be unsoldered and the microcircuit responsible for adjusting the brightness of the devices needs to be soldered in again.
As a result, we disabled this feature completely by forcing the maximum brightness. And since then everything has always been on for me, regardless of whether the first light or ignition is on. And in terms of brightness, I'm happy with everything.
I recently installed a small anti-theft system. Now I ride with a keychain and a bunch of other amulets.
A little later I will definitely tell you about this in more detail. I'm still getting used to it and learning how to use it. Our teammates took us on board. And we took a ride as passengers on a Discovery range rover. And it was there that I first noticed the interior lighting. Compared to the gray one, I had a black Frilom interior; the Discovery interior was impressive. Full size Rear door. Illuminated door release lever, door handle and door pocket.
And remembering this trip, I formed the task of how the backlight on my Sport should look and work. When you open the doors in the car, the standard door lights come on. It certainly illuminates something. And the interior lighting in the overhead lamp turns on. The backlight is bright. You could say white. It also illuminates, but not enough. That's why we decided to make the doors first, and then move on to the interior as a whole.
When opening the doors, the lighting of the door handle itself, the range rover interior lighting in the door and the upper lever that directly opens the door should turn on.
The range rover interior lighting must be white to match the standard interior lighting, otherwise there will be a collective farm. If we were to start a collective farm, then it would be beautiful. Full size Salon after lighting upgrade.
LED car interior lighting for BMW, MINI, Range Rover Sport
We walked up to the car, opened the doors, and the lights came on beautifully. We got into the car, started the engine, closed the doors, turned on the lights and low beams. Interior lighting range rover interior lighting.
When the dimensions are turned on, the standard instrument lighting turns on - green. Accordingly, our doors either have to turn off, and then it turns out that we did something, but nothing changed. Or glow white. But the interior is illuminated green. In this regard, we decide that the doors should glow green when the lights are turned on. Full size This is how the door is illuminated with the backlight on.
I also wanted the backlight to turn on and off softly. Smoothly flaring up and gradually fading. Ideally, it would be possible to adjust the brightness of the backlight.
But my range rover interior lighting was just broken, and since I didn’t want to buy a new one, they turned it on at maximum brightness all the time.
I also had to deal with the regulator. Unfortunately, we haven’t fully figured it out yet. Apparently you still have to buy a new one.