How to Remove the Dashboard of a VAZ 2105
How can I update the VAZ 2105, give it rotation and functionality through the instrument panel?
The dashboard informs the driver about the current state of the car. The article discusses the VAZ 2105 dashboard, its common faults, notes on removal and repair, as well as neat settings.
Description and location of indicators and instruments on the panel
In order to fully use the information provided by the dashboard, you need to know the location and purpose of its devices and indicators, and their characteristics. The description instruction describes neatness. The standard panel consists of a set of measuring and control devices, as well as signaling devices.
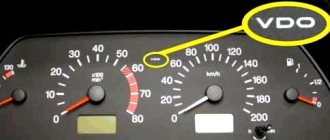
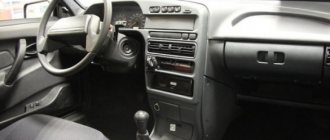
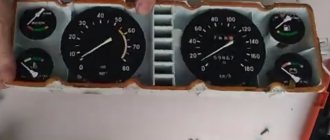
Panel of VAZ 2105 devices
Typically the toolbar contains the following components:
- speedometer. speed indicator with odometer;
- coolant and fuel level thermometers;
- indicator lamps for battery charging, oil level, fuel reserve;
- warning lamps, side lights, high beams, direction indicators;
- voltmeter;
- alarm unit;
- rear window heating switches, rear fog lights;
- switches for outdoor lighting and electric fan heater.
When installed, the on-board computer becomes possible to monitor more than 20 characteristics that allow you to monitor the operation of machine components and systems. The information is displayed on the screen ( video author RusLan 404).
Cleaning removal and repair may be required for the following defects:
- The backlight does not blink on the control panel . Wiring, contacts and fuses must be checked.
- The sensor does not work, the pointer works, the indicator lamps do not light up. First of all, check the fuse in the mounting block and replace it if it is blown.
- If the arrows point in different directions, the most common cause is poor contact with the ground.
- Malfunctions may be related to the operation of the dashboard . We need to remove the shield and make a diagnosis.
- Sometimes a neat presentation is caused by a lighter. The instrument panel does not work or does not work properly.
- Control panel performance sometimes disappears after setup.
Replacing lamps on a VAZ 2105. 2104 panel
MY TASK AND THE TASK OF THE AFFILIATE PROGRAM.
Replacement of torpedo vases 2105. 02/21/17 part 1.
Hi, I'm tired of promoting videos on YouTube and do you know why they have ads for this ad.
Adjusting the LED backlight
Installation and repair instructions
Removing the control panel may be necessary for repairs, panel adjustments, sensor replacement, and more. The procedure is simple and can be done at home.
Tools and materials
To disassemble and repair the dashboard, you need to prepare the following tools and materials:
- a set of keys;
- Screwdriver Set;
- diagnostic tester;
- new sensors and spare parts;
- items to customize.
When buying originals, it is better to avoid fakes.
Action algorithm
To disassemble neatly, follow these steps:
- Disconnect power from the machine by disconnecting the negative terminal from the battery.
- Remove the cover from the steering column by unscrewing the mounting bolts.
- After removing the plug and unscrewing the two screws, the instrument panel is removed.
- The plugs are then disconnected.
- After opening the glove, unscrew the mounting bolts. We unscrew the bolts in the same way to secure the shelves for things.
- It is necessary to pull the handle of the hydraulic light corrector to take off . Then use a wrench to unscrew the lock nut and tighten it.
- Disconnect the backlight power cable while wearing the glove.
- After unscrewing the two bolts, the Insulation Control Unit must be replaced.
- Next, clean up the spill.
- Next step. Unscrew all console equipment.
- While unscrewing the last two mounting nuts in the center, carefully remove the panel from the studs and remove it from the cab.
Next, repairs, adjustments, replacement of the sensor are required, backlighting is installed. After completing all the manipulations, assembly is performed in the reverse order.
To make assembly easier, disassemble the wires and disassemble the devices and sensors during disassembly.
Disabling wired connectors
Customization Ideas
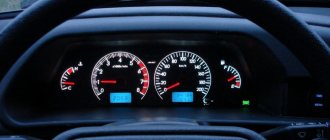
The VAZ 2105 was slightly modernized, mainly the engine. Five-wheelers, like UAZ cars, often go into tuning the dashboard to give it a modern look and expand functionality.
Setting up the VAZ 2105 is possible in the following ways:
- purchase a ready-made kit, which includes dials for sensors, instrument panels, lighting parts, wiring and connection terminals;
- a budget option. instrument lighting with LEDs of different colors;
- More technically challenging is the texture and color change of the console.
Using LED backlight, you can change the design of your control panel to make it stylish and personal.
Photo gallery
The VAZ is presented in a photo gallery with 2105 photos of different options for customizing the control panel.
Video “LED lighting for VAZ 2105”
This video demonstrates how to make a speedometer LED (made by Roldugin TV).
Instrument panel of the domestic seven
The VAZ-2107 panel, like any other car, is equipped with only the most important indicators of the “life activity” of the vehicle.
Of course, there are few of them, but they are mandatory and should be known well. This will help you notice a problem in time. While driving, every professional driver looks at the dashboard every few minutes to assess the operation of the vehicle's systems. This will help him, if necessary, correct his own actions in time.
However, there are times when inexperienced drivers do not fully understand the meaning of the instrument panel sensors.
The most common emergency situations are the following:
- The oil pressure warning light comes on. In such a situation, you need to stop driving by turning off the engine. It is necessary to check the oil level. If it is insufficient, you should add oil and only then start the engine. It is possible that the hazard warning lights will remain on. In this case, it is necessary to turn off the engine again and find a way to transport the car by tow to the place where the repair will be carried out. If you continue driving with the hazard warning light on, after a while the engine will “knock” due to the fact that the connecting rod bearings have rotated. If you continue to drive, the engine will jam. And in this situation, it will be necessary to carry out a major overhaul of the power unit.
- The battery warning light may come on. In this situation, you first need to check the terminals - perhaps they have oxidized and there is no reliable contact. If this does not help, then the problem is in the generator. It does not produce the required level of current to charge the battery. If the malfunction occurs during the daytime, it is better to try to get to the nearest service station. In this case, you need to turn off all electrical appliances. A high-quality battery in such conditions will “last” 100 or even more kilometers (the energy will only go to power the ignition system). Most often, in such situations, the voltage regulator relay fails.
- If the brake fluid warning light comes on, you should stop immediately. Driving without brakes is always a dangerous activity; this is not an extreme sport, but a normal safety precaution. If such a malfunction occurs, check the brake fluid level and, if necessary, add it. If the car can slow down, you need to try to slowly get to the nearest service station. If things are such that the car does not react, that is, does not brake, it is better to call a mechanic or, if you know how, eliminate the cause of the breakdown yourself.
- The sensor that shows the coolant temperature is “placed” in the red zone. The “classic” does not have a special alarm system that informs the driver about the “boiling” of the engine. Therefore, an inexperienced driver can easily “sleep through” such a moment (but it is very difficult not to notice the steam from under the hood). In such a situation, you need to stop and let the engine cool. You don't need to go under the hood right away. You may get severely burned. When the engine has cooled down, check the coolant level. If there is no break in the pipe of the coolant mechanism, then you need to try to get to a service station or garage and find out there why the temperature has increased. Most often this happens due to a thermostat failure or the radiator fan not turning on.
- The sensor that signals the fuel level is at zero. If there are less than five liters of gasoline in the gas tank, then the warning light will come on. In this situation, you need to refuel.
Removing the dashboard of a VAZ 2107
“Tidy” VAZ 2107 is a set of indicators and instruments that help the driver monitor the condition of the car, performance of systems and speed. The dashboard also includes the heating and ventilation control panel of the “seven”.
Before removing the dashboard, be sure to disconnect the battery ground terminal.
Further operations are performed in the following sequence:
- remove the plastic handles from the heating and ventilation control levers;
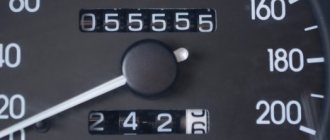
- pull out the handle of the daily mileage reset button;
- remove the decorative trim of the self-tapping screw securing the instrument panel;
- Unscrew the fastening screw using a Phillips screwdriver and pull out the panel;
- unscrew the knurled nut securing the speedometer cable and uncouple it;
- disconnect the vacuum air supply hose;
- unplug the wire connectors from the devices;
- pull out the dashboard.
Removal and repair of the instrument panel of a VAZ-2107 car
On the dashboard there is a panel with a combination of instruments, which combines in one housing:
— speedometer (with total and daily mileage counters);
— coolant temperature and fuel level indicators with fuel reserve indicator;
— a block of indicators (battery charge, high beam, turn indicators, side lights, parking brake, insufficient oil pressure and closing the carburetor air damper).
An additional signaling unit (heated rear window and emergency brake system) is installed in the radio panel insert.
The connection diagram for the instrument panel is shown in Figure 1.
The connection diagram in the instrument panel is shown in Figure 2.
Removing the instrument panel
Using a slotted screwdriver, release the handle latches and remove them from the heater levers.
Using a screwdriver, we remove the two nozzles of the central air duct.
We take out the heater switch.
We disconnect the wire lugs from the switch terminals, marking the order in which they are connected.
Using a thin screwdriver, remove the plug.
Use a Phillips screwdriver to remove the self-tapping screw securing the instrument panel.
Unscrew the nut securing the trip odometer handle.
We recess the handle into the instrument panel.
Pull the right edge of the shield towards you.
Putting your hand between the shield and the instrument panel, unscrew the nut securing the speedometer drive cable.
Moving the shield to the right, disconnect the hose from the econometric fitting and the connecting blocks from the terminals of the instrument cluster
The pads differ in color and number of connectors, so there is no need to mark them.
Install the shield in the reverse order of removal.
Before installation, having connected all the electrical connectors, connect the battery, turn on the ignition and make sure that all devices are working correctly.
Then we attach the shield to the instrument panel.
Replacing the instrument cluster
Remove the instrument panel.
Using a Phillips screwdriver, unscrew the two screws securing the instrument cluster to the dashboard brackets
Unscrew the four screws securing the combination to the shield
We install the shield on the new instrument cluster in the reverse order.
Replacing instrument cluster lamps
Replacing instrument cluster indicator lamps
Emergency indicators for the brake system and heated rear window are installed in the radio panel insert.
All other indicators are located in the instrument cluster.
To replace a faulty lamp, remove the instrument cluster.
Turn the lamp socket counterclockwise and remove it from the instrument panel.
We replace the faulty lamp together with the socket.
Replacing the instrument backlight lamp
Turn the socket counterclockwise, remove it from the instrument cluster and change the faulty lamp
Replacing a VAZ 2105 torpedo with a VAZ 2107
This alteration had been planned for a long time, all the parts were lying around and waiting in the wings. The installation of the torpedo was accelerated by a leaking heater radiator.
To replace you will need:
Torpedo VAZ 2107
(used 800 RUR)
Beard 2107
(200 RUR)
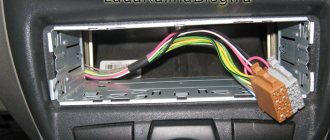
Wiring 2107 injector: from the fuse box to the dashboard
(used 800 RUR)
Dashboard, VAZ 2107 injector
(2900 RUR)
The whole job took me 2 days, I did everything slowly. The first day was spent disassembling the old torpedo and replacing the heater radiator (it’s still a mess)
I worked with a friend, more than half of the time was spent talking.
I was very pleased with the work done, all that remained was to set the clock and deal with the ESP buttons (I plan to move them to the armrests of doors with a kalina block)
The appearance will change a lot, 07 torpedo in my opinion
AutoNews / Reviews / Tests
How to Remove the Instrument Panel on a VAZ 2105
Nuance for replacing the device panel of the VAZ 2104-2105-2107
Disconnect the ground wire from the battery.
Unscrew the fastening screws and remove the facing casing of the VAZ 2107 control shaft.
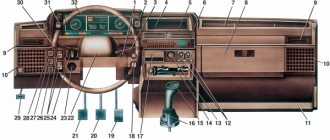
- panel and its accessories
- 1 - ashtray body
- 2 — bracket for securing the glove box lid lock
- 3 - ashtray
- 4 - glove box lid lock
- 5 — decorative insert for radio mounting panel
- 6 — radio mounting panel
- 7 — insert of the lower panel of the radio receiver mounting
- 8 — facing of the radio mounting
- 9 — liner of the upper panel for mounting the radio receiver
- 10 – plug for the windshield heating symbol display
- 11 — instrument panel
- 12 — loudspeaker trim
- 13 - instrument panel
- 14 — instrument panel insert
- 15 — glove box body
- 16 — glove box cover
- 17 — hinge link of the glove box lid
- 18 — instrument panel shelf
Using a narrow sharp tool, remove the side window heating nozzles from the device panel, the body ventilation nozzles of the VAZ 2105 and the plug 10 of the windshield heating sign board from the device panel 11.
Replacing lamps on the panel of a VAZ 2105 - 2104
Hello, I'm tired of advertising on video clips on YouTube, and you understand why their advertising, for this advertising...
Replacing the VAZ 2105 torpedo. 02/21/17. - part 1.
MY AFFILIATE PROGRAM Log in and EARN.
- — Unscrew the screw (located under the plug) securing the shield of 11 devices, remove the shield, disconnect the plugs and wires from the devices.
- — Remove the facings 12 from the left and right loudspeakers, overcoming the resistance of the two holders located along the upper edge of the facings.
- — Unscrew the four screws that secure the speakers, pull them out of the device panel and disconnect the wires.
- — Remove shelf 18 and body 15 of the glove box by unscrewing the screws securing them.
- — Unscrew the nut of the speedometer day counter and pull out the counter cable from the instrument panel of the VAZ 2104.
- — Remove the electronic clock, cigarette lighter and light switches and heated rear window from panel 6 of the VAZ 2107 radio mount. Disconnect from their wires.
- — After unscrewing the fastening screws, remove the radio and disconnect the wires of the VAZ 2105.
- — Pull out the lower insert 7 of the radio mounting panel by the upper part.
- — By pressing on the left and right sides of the edge of the panel 6 for fastening the radio receiver, release the hooks of the upper insert 9 and pull it out of the panel.
- — Remove the decorative insert 5 mounting panel by pressing out the two hooks in the upper part of the insert from the inside.
- — Unscrew the 6 screws of panel 6 securing the radio receiver (including two screws that immediately secure the device panel) and remove panel 6.
- Instrument panel mounting points. Arrows indicate attachment points
Through the gaps in the panel 11 of devices and the glove box, unscrew the four nuts of the upper fastening of the device panel, as well as the two remaining screws of the lower fastening, remove the panel and the panel insert
Install the device panel in reverse order.
Location of lamps on the instrument panel: 1 – speedometer illumination lamp (AMH 12-3-1 (T3W); 2 – indicator unit (A 12-1.2 (W1.2W); 3 – battery charge indicator lamp (AMH 12- 3-1 (T3W); 4 – instrument cluster illumination lamp (AMH 12-3-1 (T3W); 5 – insufficient oil pressure warning lamp (AMH 12-3-1 (T3W); 6 – fuel reserve warning lamp (AMH 12-3-1 (T3W); 7 – voltmeter backlight lamp (AMH 12-3-1 (T3W); 8 – indicator lamp for turning on the external lighting (AMH 12-3-1 (T3W); 9 – indicator lamp for turning on the direction indicators (AMH 12-3-1 (T3W); 10 – high beam indicator lamp (AMH 12-3-1 (T3W)
How to Remove a Torpedo VAZ 2104 ~ AVTO-MELVIN.RU
Replacing the device panel on a VAZ 2104 , VAZ 2107
Device panel Many people confuse the device panel with the torpedo itself, because in order for you to understand what this means, let us explain: The device panel is part of the torpedo. The panel houses the instruments themselves, as well as various kinds of switches and displays that are responsible for indicating the vehicle speed (Speedometer), a display that is responsible for indicating the level of fuel remaining in the tank, and various other things.
In order to replace the panel, you will need to stock up on a set of tools, which should include: Two types of screwdrivers (flat and Phillips), as well as a wrench in order to remove the terminal from the battery for safer work!
Why do you change the device panel on your car? (Write your answer in the comments)
How to replace the instrument panel, also known as the dashboard, on a VAZ 2104, VAZ 2107?
1) First, disconnect the terminal with the “-” value from the battery. (If you do not understand how to do this, then look at point “1” in the article entitled: “Replacing the battery”)
2) Next, use a screwdriver to pry off the three handles that are located on the interior heating control lever.
3) Then, by hand, unscrew the nut that secures the odometer reset handle. After unscrewing the nut, remove it, and also remove the washer that is located behind it. Once the nut and washer are removed, carefully push the protruding reset handle into the inside of the panel.
Repair of VAZ 2104 (we remove the interior, dashboard and electrics) part
How to remove the instrument panel of a VAZ 2107 Mutual subscription to your channel.
I'm removing the VAZ dashboard
2107 remove the dashboard.
In the photo above, the handle fastening nut is indicated by a reddish arrow, and the tip of the handle itself is indicated by a blue arrow!
4) Next, using a thin flat-head screwdriver, pry out the cover of the panel mounting screw.
5) After the plug is removed, use a Phillips screwdriver to unscrew the screw that secures the instrument panel to the dashboard bracket.
6) And then move the far right part of the panel as far as possible, and then try to remove the left part of the panel, in this regard you will get maximum access to the entire rear part of the panel.
7) When the panel is retracted, unscrew the knurled nut of the speedometer drive cable by hand and then disconnect the cable from the back of the panel .
 Now, from the econometric fitting, disconnect the vacuum supply hose by hand.
9) Next from the interior heating button, disconnect the wire connectors, two in number.
10) Then disconnect the three colored wire blocks from the harnesses located on the back of the panel.
11) Finally, remove the instrument panel from the car.
1) Installation of a new instrument panel is carried out in the reverse order of removal.
You can find more detailed instructions for removing and installing the instrument panel in the video below:
avto-melvin.ru
Possible reasons for dismantling the shield
In what cases is it necessary to remove the dashboard of a VAZ 2107 car? There may be several reasons for this:
- panel tuning;
- replacing burnt out light bulbs;
- repair of individual devices that have failed.
VAZ 2107 is a legendary car, which hundreds of thousands of car enthusiasts have repaired independently.
How to get rid of unevenness
Typically, irregularities occur when a smooth section of the dashboard gives way to a sharp bend. In this case, in this area you need to warm up the surface again with a hairdryer, after which it can be stretched in the right directions and smoothed. Do not forget that the material is very delicate and can be easily scratched.
Important! In hard-to-reach places where it is necessary to glue the material, for example, near an air duct, you must first heat and stretch the leather substitute, only then glue it along the edges of the hole.
For the VAZ-2105, tuning the dashboard should not be difficult, since everything in the car can be removed quite easily and the surface lines are smooth. With due desire and effort, the tuned car will be completely transformed, and the work will be of high quality and will decorate the interior of your car.
Replacing the instrument panel VAZ 2110 - 2112 step by step instructions
In order to remove and replace the instrument panel of a VAZ 2110, perform the following steps:
- So, the first thing you need to do is use a screwdriver to unscrew the two screws located at the top of the tidy.
- Next, use the same screwdriver to unscrew the two bolts that are located at the bottom of the dashboard.
- Carefully pull the plastic cover towards you and move it to the side so that it does not interfere.
- We unscrew the two screws that secure the tidy directly.
- Now we turn off first the first and then the second dashboard power supply.
- Pull the panel towards you; it should slide off the brackets.
- When the dashboard is completely dismantled, you can begin further work, in our case this is replacing faulty light bulbs.
- Attaching light bulbs couldn't be simpler - we take the body of the light bulb, turn it and take it out of the socket. We install a new one in its place.
- Further assembly is carried out in reverse order according to the same principle.
Video: Replacing the instrument panel VAZ 2110 – 2112 (instructions)
Instrument needle illumination
In the process of tuning the VAZ 2107 instrument panel, you can beautifully illuminate the arrows. It is better to take the tachometer and speedometer as an example, since the four small instruments have very miniature arrow mounts.
To work you will need:
-four white LEDs, 3mm long;
- four resistances of 1.5 kOhm each;
- a piece (length - four mm) of plexiglass for the hands;
-black paint or red nail polish;
-two caps for the arrow body (women’s mascara can help) and two furniture plugs;
After this, we decide how long the arrow will be (let's take 30 mm plus the mount itself inside the cap). Then we carefully grind the plexiglass on the machine; it is important to grind it in such a way that the arrow at the top is even and pointed at the bottom. In this case, the light will go along the arrow and its illumination will occur more evenly.
We grind the opposite end of the arrow at an angle of 45 degrees. We put it on glue. We paint the arrow with red varnish (please note that the bottom of the arrow must be painted more than once, but in several layers. In this case, the light will not fall on the instrument scale. To fix the arrow on the axis of the instrument, you can use a furniture plug. It must also be placed with glue.
After this, we weigh the standard arrow, as well as the one we made ourselves (the difference can be 100 mlg, which, in general, is not significant). Let's disassemble the "tidy". We dismantle the white scales and implant two LEDs. This process requires special patience and accuracy. The LEDs should be painted black on the sides. This will reduce the amount of light that will reach the scale.
If light leaks out from under the arrow, you should make a ring and paint it with red varnish. After this, you need to put it on the scale. Thus, a white trail is formed around the arrow body. We attach the LEDs to the dimensions. Then we definitely test the backlight. As a result, it should turn out that it will be bright even during the day. Perhaps the backlighting of the numbers will not be enough, but this is not so important - the main thing is that the arrow glows beautifully and very brightly.
How to dismantle the instrument panel: step-by-step instructions
First of all, you need to open the hood of the car and remove the negative terminal from the battery in order to de-energize our dashboard. After this, the work is performed in the following sequence:
- unscrew the dashboard shelf and the glove compartment body using a special screwdriver;
- turn off the power to the light bulbs that illuminate the interior of the glove compartment in your car;
- We very carefully remove the additional dashboard along with the clock and other devices. To do this, you will need to pry the part with a screwdriver and pull it out of the special grooves;
- turn off the cigarette lighter and warning lamps by removing the corresponding wires located behind the additional panel;
- we remove the switches located in the immediate vicinity of the gearbox lever and disconnect them from the on-board network;
- We unscrew the screws that you will immediately see under the switches and the bolts intended for fixing the main console of the torpedo. After this, you can freely remove it without fear of damaging the wires;
- remove the steering column cover;
- remove the heating system cover together with the air duct deflectors;
- dismantle the heater control unit;
- unscrew the last nuts holding the torpedo. For this purpose you need to use a key of 10.
Description and location of indicators and instruments on the panel
In order to fully use the information that the dashboard provides, you need to know the location and purpose of its instruments and indicators, and their characteristics. The instruction manual provides a description of the device. A standard panel consists of a set of measuring and control instruments, as well as alarms.
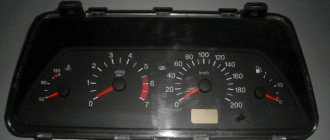
Instrument panel VAZ 2105
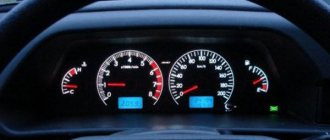
The dashboard typically contains the following components:
- speedometer – speed indicator with trip meter;
- coolant temperature and fuel level indicators;
- indicator lights for battery charge, oil level, fuel reserve;
- control lamps, turning on side lights, high beams, direction indicators;
- voltmeter;
- signaling unit;
- switches for heated rear window, rear fog lights;
- switches for exterior lighting and electric heater fan.
When installing an on-board computer, it becomes possible to monitor more than 20 parameters that allow you to control the operation of components and systems of the machine. The information is reflected on the display (the author of the video is RusLan 404).
The most common reasons for dismantling
There are a lot of reasons for removing the tidy on a VAZ 2107, and some of them can be called banal, but nothing can be done. The most common reason when you need to remove the instrument panel is a burnt-out backlight bulb. Replacing light bulbs in the dashboard of a VAZ 2107 is carried out only when dismantling the device, and this procedure is simply impossible to perform otherwise.
The dashboard on the VAZ 2107 must also be removed for a number of the following reasons:
- Malfunction of pointer indicators.
- Failure of the instrument lighting, as well as lack of functionality of the arrow indicators.
- Replacing the device with a new one, for example, if a digital panel is installed instead of the factory instrument panel.
- Tuning or upgrading the device.
As practice shows, most often the need to dismantle the dashboard arises precisely because the backlight bulb burns out. If the device is dismantled for this reason, it is recommended to immediately replace conventional light bulbs with LED ones.
Required Tools
Before starting work, you will need to prepare the necessary tools so that you do not have to be distracted during the process. Despite the fact that the work of removing the device in question is quite labor-intensive, to implement it you will need a small set of tools, including:
- Phillips and slotted screwdriver.
- Electrical tape to indicate chips that are disconnected from the device.
- Work gloves for unscrewing the speedometer cable.
When all the tools are prepared, it remains to make sure that the parts and elements that are planned to be installed or replaced on the dismantled device are available. After this, we proceed to perform the main part of the work.
Instructions for removing the dashboard on a VAZ 2107
Initially, it should be noted that the process of dismantling the tidy on VAZ 2107 cars, the injector and carburetor are identical, therefore the instructions described below are appropriate for sevens of all years of manufacture. Having prepared to carry out the work, you can proceed by following the following sequence:
- First you need to turn off the power to the car, for which you remove the negative terminal from the battery. This must be done, since the work will be carried out in the electrical part, and the likelihood of a short circuit occurring is quite high.
- Next, we move into the interior, and using a slotted screwdriver, we remove three caps from the levers responsible for the operation of the heater.
- Using a slotted screwdriver, remove the plastic plug on which the heating sign is depicted. This plug is on the right, and under it there is a Phillips screw that needs to be unscrewed. (There are 2 screws under the plug, but only one needs to be unscrewed - the top one, which secures the right side of the dashboard).
- Next to the hazard warning button, there is an odometer reset button, which is secured with a plastic nut. The nut must be unscrewed and removed with the washer located behind it. The button is recessed inside the panel.
- The right side of the tidy is weakened at this stage, and it remains to perform several additional manipulations in order to completely dismantle the device. To do this, pull out the right side of the device, thereby freeing access to its rear part. Here you need to disconnect all the chips and wires to perform dismantling.
- Initially, the power chips for the stove button are disconnected. Be sure to remember the location of the wires. It is recommended to take photos so as not to be confused when assembly is carried out.
- Next you need to disconnect the speedometer cable. It is secured with a special nut, which can be unscrewed by hand.
- All chips connected to the dashboard are disconnected. It is almost impossible to confuse their locations, since they have different fastenings and differ in size.
- The supply hose is removed from the economizer fitting. This cable is located on the left side of the device.
- After all the chips, cables and wires are disconnected from the device, you can dismantle it.
If the question arises about how to remove a VAZ 2107 torpedo, then this is also not difficult to do, for which you will need to unscrew an additional dozen fasteners. There are just a lot more reasons when you need to remove a torpedo or a beard. After the instrument console is dismantled, you can begin to repair, modernize and replace it. Once the work is completed, all that remains is to install the device in its place. This is done in the reverse order of removal.
In conclusion, we summarize that the work of removing the dashboard is not at all difficult, and only takes a couple of hours of time along with the repair. By devoting a few hours of time, you can not only fix the breakdowns, but also tune the panel, which displays all the most important information when driving a car.
Removal and installation of the instrument cluster VAZ 2101 Zhiguli
Without a doubt, in terms of repairs, VAZ 2101-07 cars can be called the simplest among all the cars produced by the automaker AvtoVAZ. It is for the ease of repair and the relatively low cost of spare parts that the VAZ 2101-07 models are valued by car enthusiasts.
However, in this article we will not discuss the advantages of the VAZ classic. Our topic is the process of removing the dashboard from cars such as the VAZ 2101-06 Zhiguli and VAZ 2107 Lada. By the way, dismantling the dashboard may be required not only to perform certain repair work, but also for tuning. For example, this could be replacing the standard backlight with LED (as an example: tuning the GAZ 3110 Volga instrument panel)
First of all, of course, we will consider removing the dashboard from the predecessor of all VAZ cars - the VAZ 2101. Note that the process described below is correct for all modifications of the Kopeyka: 2101, 21011, 2102, 21013.
So, dismantling the dashboard from a VAZ 2101 looks like this:
1. Put the car on the handbrake and disconnect the negative terminal from the battery.
2. Remove the decorative and protective casing of the steering column shaft, for which we unscrew the corresponding mounting screws. We also remove the decorative lining of the windshield pillars.
3. Remove the instrument cluster. To do this, use a straight screwdriver to remove the decorative cover of the radio socket and, through it, press the right spring clamp of the instrument panel by hand. Carefully push out the instrument cluster, disconnect the speedometer cable and the connectors with wires from it.
3. Use a straight screwdriver to pry up the heater switch, disconnect the wires and remove it.
4. Disconnect the wires that provide power to the glove compartment lamp. After this, unscrew the screws securing the side parts of the “glove compartment” to the dashboard.
5. Remove the handles of the heater control levers.
6. Unscrew the screws securing the instrument panel to the cross member of the front part of the body, according to the diagram:
7. Unscrew the fastening nuts: two of them are in the “glove compartment” opening, and two are in the instrument cluster opening.
8. Remove the dashboard from the car. Installation is carried out in the reverse order of removal.
How to remove the instrument panel from a VAZ 2106 car
The dashboard installed on the VAZ 2106 car is almost completely similar to the dashboard that was equipped with the VAZ 2103 model. Accordingly, the process of removing the panel is valid for both the VAZ 2103 and the VAZ 2106.
1. Disconnect the negative terminal from the car battery.
2. Using a Phillips screwdriver, unscrew the screws securing the storage shelf. After this, unscrew the screws of the lower fastening of the radio panel: one on the right side and one on the left. We also unscrew the screw on the top fastening of the radio panel.
3. Using a flat-head screwdriver, carefully pry the bar with the controls out of the radio panel. Disconnect the wires from the buttons and switches.
4. Unscrew the screws securing the radio console. And we remove it completely.
5. Unscrew the screws securing the decorative trim of the right windshield pillar and remove it. Similarly, we dismantle the left pillar trim.
6. Remove the decorative and protective casing of the steering column shaft. To do this, unscrew the five screws and carefully separate the top and bottom covers.
7. Using two straight screwdrivers, pry off the retaining plates that secure the instrument cluster. Pull out the instrument panel.
8. Unscrew the union nut of the speedometer drive cable. Disconnect the cable and move it to the side.
9. We make marks on the connectors of the wires that go to the instrument cluster so that later, when installing the dashboard in its original place, we do not mix them up. We disconnect the connectors and completely remove the instrument cluster.
10. Use a screwdriver to pry up the electronic clock located in the center of the dashboard, disconnect the wires from it and completely remove the clock. We do the same with the heater operating mode switch.
11. Using a small straight screwdriver, slightly open the latches of the heater control knobs and remove them from the levers.
12. Disconnect the conductors from the socket with the glove box illumination lamp.
13. Unscrew the screws that secure the side parts of the storage compartment. We remove the side panel. We unscrew the nuts securing the instrument panel to the body, which are located under the glove compartment lid.
13. Unscrew the screws that secure the instrument panel to the body from the bottom. We also unscrew the two nuts securing the panel at the location of the instrument cluster.
14. Having slightly lifted the dashboard up, remove it. Installation is carried out in reverse order.
So, everything seems to have been pulled together, now let’s get to work:
We remove the standard tidy along with the steering wheel. Removing the instrument panel 2101 is described in detail in the manual for 2101. The steering wheel can not be removed, but then the inconvenience during operation greatly increases.
We try on the dashboard to the seats on the body. The differences in the 2101 and –06 devices immediately become visible:
We begin to eliminate the listed interference:
Installation of both stove levers and places for mismatched fastening (Fig. 6)
The heater valve cable is short. Looking carefully at the end of the cable that fits onto the heater valve lever, we see that it is twisted into a ring 3 times - this is the necessary reserve. Unwind the ring - leaving 1 turn (Figure
The cables are sorted out. Now let's figure out where to place the offset fasteners!
We make a U-shaped bracket (Fig. 9)
Figure 9 – bracket for fastening
And we weld it to the intended place for fastening the dashboard -06. The result is a picture - Fig. 10
Figure 10 – Displacement of the fastening point
Now let's take care of the suction - we need to make brackets for it and place it approximately in the place of the old suction. The bracket is made according to TheForester's drawing (special thanks!)
Figure 11 – Homemade suction bracket
Figure 12 – Hand-made bracket for suction
We weld this example of crazy hands to the crossbar:
Figure 13 – Welded to the cross member
After welding, do not forget to prime to avoid rusting.
We insert a cable with suction into the manufactured bracket and screw in the end switch.
There is another important point - because. the speedometer in 2106 is shifted to the right than in 2101, then it is necessary to rewind the sidometer cable differently (see Fig. 14), however, due to the fact that the cable 2101 is longer, in the new place its length turns out to be excessive even after installing the panel due to excess radii If the cable bends, the speedometer needle may shake, so I recommend using a cable from 2103, 2106 that has a shorter length.
Figure 14 – location of the speedometer cable
This is where the mechanical part of the installation actually ends and the electrical part begins:
We screw the oil pressure indicator sensor with a tee (Fig. 4) and tighten the wire from the sensor into the passenger compartment, do not forget to put on the boot (2101-3724114 Fig. 4). We tighten the wire from terminal K - the ignition coil into the passenger compartment. We make a connection with the instrument panel harness 2106. The connection diagram when connecting new devices can differ greatly from model to model due to differences in the colors of the on-board network wires, and even the instrument panel harness 2106, so the correct one will be look at your diagram in place and make the appropriate connections.
In short, the decision comes down to a banal reconnection of wires. In 2101 there are 2 connectors of 6 contacts on the left and right, in 2106 - the left connector has 8 contacts, and the right one also has 6, like 2101.
Reconnecting the left connector:
From the existing left connector 2101, bending the contact locking plate, pull out the contact and insert it into the corresponding socket of the new 8-pin connector. We determine compliance using the paper diagram of our 2101 and 2106 harnesses. It often happens that the colors of the wires on the tank (on the CL contact and the rheostat) are mixed up - one option is indicated in the diagram, but in fact it’s the other way around. Having rearranged all 6 contacts of the left connector 2101 into a new 8-pin one, we deliver 2 more wires with contacts that we pre-tightened in steps 1 and 2.
Discontinued - old 6-pin connector 2101.
Reconnecting the right connector:
Connecting the buttons, I think, will not cause any problems.
Since talking on paper is very good, but I also want something as an example, Figure 15 shows a diagram of the connection to the wiring of a VAZ 2101 (precisely 2101). The diagram should be used as a guide, not forgetting about possible differences in reality. I think it will help you figure it out faster.
Next, for complete similarity with the 2106, you need to install the 2106 tape recorder console, but this is not for everyone - and in fact the topic of a separate article, because there it will be necessary to install an emergency light, a fuel pressure control lamp, and a rheostat, which IMHO is not needed at all - it is better to leave the switch in the dashboard as in 2101.
Removing the instrument panel from a VAZ 2107
Removing the dashboard of a VAZ 2107 is almost completely similar to the process of removing the dashboard in the VAZ 2104, VAZ 2105 models. The dismantling procedure itself is as follows:
1. Use a flat screwdriver to pry off the panel on the console on which the clock and cigarette lighter socket are located. We take out the panel and unscrew the two fastening nuts. Then remove the end cap of the console and unscrew the two screws that secure the console to the body.
2. Remove the console, having previously disconnected the connectors from the switches that are located on it.
3. Remove the handles of the heater control levers. After this, remove the plugs and unscrew the screws. We also unscrew the nut of the daily mileage reset handle.
4. Unscrew the screws connecting the upper and lower parts of the decorative casing of the steering column shaft. Remove the casing elements.
5. Take out the instrument cluster. We disconnect the econometric hose, the speedometer cable and three blocks with electrical wires. We completely remove the instrument cluster.
6. Unscrew the screws securing the storage shelf, which is located under the glove compartment. Two self-tapping screws are located at the bottom of the shelf, and one at the top. We remove the storage shelf.
7. Open the glove compartment lid and unscrew the screws on the right and left sides. Disconnect the glove box illumination lamp and completely remove it from the instrument panel.
8. Using a screwdriver, remove the headlight level control knob. Using needle-nose pliers, unscrew the corrector nut, and then push the corrector inside the panel.
9. Using a small Phillips screwdriver, unscrew the screws securing the dashboard to the car body. First of all, unscrew the lower screws, and then the screws that are located near the windshield.
10. With a certain force, we squeeze out the air duct pipeline from the side. Using an open-end wrench, unscrew the four nuts securing the dashboard to the car body.
11. Remove the dashboard. Its installation is carried out in reverse order.