February 27, 2015 Lada.Online 334 922 23
The relay and fuse box is also called the mounting block or black box. If problems are identified in the car related to electrical equipment, first check the fuses and relays. If they burn out, we replace them with the same ones, but first we must determine the cause of the burnout. The article contains a complete description of all Lada Largus mounting blocks.
Lada Largus fuse diagram
The first car of this VAZ family was released in 2011, and already in 2013 it became one of the leaders of the Russian car market, further consolidating its victory in 2014. Among the various options, the Largus Cross crossover is offered, which appeared in various trim levels in 2015 and 2021.
In 2017, it was announced the start of production of Lada Largus on gas, which was implemented in 2021, which also became the year of restyling of the family members. You can buy a car of the family with an 8-valve engine and a 16-valve engine. Unlike configurations, this does not greatly affect the set of fuses and relays that can be found in one of the two mounting blocks of the machine.
The first and main one is located in the cabin, and the second is under the hood, which is quite typical for AvtoVAZ models.
Cigarette lighter fuse Lada Largus - where is it located on the diagram?
The Lada Largus cigarette lighter fuse is the most frequently burned fuse, which can cause a lot of inconvenience. In this material we will look at what fuse is on the Lada Largus cigarette lighter and where it is located.
Where is the cigarette lighter fuse on Lada Largus?
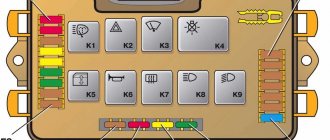
The Lada Largus cigarette lighter fuse is located in the mounting block in the car interior. The layout of the Lada Largus mounting block is shown in the photo:
In order to find a blown fuse, you need to open the driver's door and remove the cover of the mounting block. Next, using special tweezers, you can remove the burnt fuse and replace it with a new one.
In order to understand where the Lada Largus fuse is located, let's turn to the diagram.
Lada Largus fuse diagram for the cigarette lighter in the passenger compartment
The fuse for the cigarette lighter of the Lada Largus is located under number F38. At the bottom of the mounting block it is located in the third row, second from the bottom. In addition to the cigarette lighter, this fuse is responsible for the car's audio system.
What is the fuse for the cigarette lighter of Lada Largus?
The Lada Lagrus cigarette lighter is equipped with a Standard (Norma, Regular, Standart) fuse with a rating of 15A. Such a fuse can be purchased at any auto parts store, as it is suitable for a large number of cars, incl. for almost all AvtoVAZ cars.
Dimensions
Why does the Lada Largus cigarette lighter fuse light up?
If the car's electrical system is fully operational, then a common cause of the cigarette lighter fuse blowing is excessive load on the power wires.
This is due to the fact that the cigarette lighter connector of the Lada Largus is often used as a socket for connecting various accessories - for example, a compressor for inflating wheels, various chargers for gadgets (phone, recorder, laptop, etc.), voltage inverters, etc.
Often these devices consume a lot of current, and the wiring is of insufficient cross-section, so they overheat and the fuse simply blows.
However, if you do not use such devices, and the fuse continues to burn, then there is a short circuit somewhere. In this case, you need to sort out the wiring and only then replace the fuse with a new one.
Fuse box of Lada Largus in the cabin
The mounting block in the cabin is considered the main one, so the vast majority of electrical circuit fuses are installed here. To be more precise, this block is located to the left of the dashboard, at its end and is covered with a plastic cover, the fastenings of which are clearly visible.
| Fuse no. | Current (amps) | Which electrical circuit does it protect? |
| F1 | 20 | Windshield wiper, windshield wiper switch, heated tailgate relay |
| F2 | 5 | Instrument cluster, fuel pump relay, engine control unit (ECU) |
| F3 | 10 | Brake light switch |
| F4 | 10 | Diagnostic connector, immobilizer antenna unit, body electrical monitoring system |
| F5 | — | Reserve (R) |
| F6 | — | (R) |
| F7 | — | (R) |
| F8 | — | (R) |
| F9 | 10 | Instrument cluster, low left headlight |
| F10 | 10 | Low right headlight |
| F11 | 10 | Instrument cluster, high left headlight |
| F12 | 10 | Far right headlight |
| F13 | 30 | Rear door window motors |
| F14 | 30 | Front door power window motors |
| F15 | 10 | Electronic control of ABS system, acceleration sensors, steering angle sensor |
| F16 | 15 | Electrically heated front seats |
| F17 | 15 | Sound signal |
| F18 | 10 | Left front and rear side lights |
| F19 F20 | 10 7,5 | Right front and rear side lights, glove compartment lights, instrument cluster lights, hazard warning switch, HVAC controls, audio system, cigarette lighter, central locking switch, front power window switches, license plate lights, right rear side lights . Rear fog light |
| F21 | 5 | Electrically heated exterior mirrors |
| F22 | — | Reserve (R) |
| F23 | — | (R) |
| F24 | (R) | |
| F25 | — | (R) |
| F26 | 5 | SRS system |
| F27 | 20 | Rear door wiper motor, horn, TDC sensor, reverse light switch |
| F28 | 15 | Control of interior electrical equipment (energy saving mode) |
| F29 | 15 | Interior electrical control, diagnostic connector |
| F30 | 20 | Interior electrical equipment control |
| F31 | 15 | Fog lights and their relays |
| F32 | 30 | Heated tailgate glass |
| F33 | — | |
| F34 | — | |
| F35 | — | |
| F36 | 30 | Electric motor for heating, air conditioning and ventilation systems |
| F37 | 5 | Electric exterior mirrors |
| F38 | 15 | Audio system, cigarette lighter |
| F39 | 10 | HVAC Motor Relay |
Purpose of fuses in the block
The internal fuse block is equipped with elements responsible for the systems:
- 1 – windshield cleaning device, heated rear window;
- 2 – tidy, ECU control relay for fuel pump, navigation device;
- 3 – stop button;
- 4 – turn signals and power supply to the diagnostic block, control of the size relay, parking module;
- 5-8 – reserve cells;
- 9 – low beam of the left headlight, assistance in controlling the tidy, pump for the headlight cleaning system;
- 10 – is fully responsible for the low beam of the right headlight;
- 11 – far left side and tidy;
- 12 – far right;
- 13/14 – section of rear/front power windows;
- 15 – ABS device and steering wheel rotation and acceleration sensors;
- 16 – electric heating of the rear sofa;
- 17 – beep;
- 18 – side lights of the left side, illumination of license plates, glove compartment;
- 19 – dimensions on the right side of the car, illumination of license plates, glove box, emergency lights, acoustics, switches;
- 20 – rear fog lamp on the left side, and part of the dashboard;
- 21 – rear view mirror shades;
- 22 – navigation system terminal;
- 23 – empty;
- 24 – EUR;
- 25 – power supply to the gas installation;
- 26 – seat belt pretensioner device, airbag electronics;
- 27 – belt position indicator for driver, front passenger, rear window wiper, windshield washer pump control;
- 28 – acoustic module, instrument and interior lighting;
- 29 – diagnostic block, UCH;
- 30 – central locking;
- 31 – front fog lights;
- 32 – heated rear wind window and exterior mirrors;
- 33-35 – empty nests;
- 36 – stove and air conditioner;
- 37 – mirror control drive;
- 38 – cigarette lighter and speakers;
- 39 – depends on the configuration – is responsible for the stove, air conditioning, navigation system.
Removing the dashboard
Important elements of the car are hidden under the dashboard in Largus. To repair or replace them, you need to remove the dashboard. This is easy to do on your own; it is not necessary to involve specialists. Before you begin, read the instructions and make sure you understand everything in them.
- Phillips screwdriver;
- flat screwdriver;
- torx key t50;
- torx t20 key.
Stages of dismantling the Lada Largus instrument panel:
- Remove the negative cable from the battery.
- Lock the airbag control module.
- Remove the steering wheel.
- Disconnect the switch under the steering wheel with the driver's airbag.
- Unplug all appliances and set them aside.
Pull out the floor mats and unscrew the floor tunnel lining.
Largus fuse diagram under the hood
The mounting block in vehicles of the Largus family serves as the location for all relays and part of the fuses. Of the latter, those that protect the circuits of the motor control system are presented. The fuses are marked with the letter F.
The block is located to the left of the battery. To get to it, press out the latches holding the cover on the side, back and front.
| Relay/fuse no. | Current (amps) | Relay/fuse assignment |
| 231(A). | Fog light relay | |
| 753(B) | Headlight washer pump relay | |
| 233 | Heater Fan Relay | |
| F1/F2 | 60 | Electronic control of ABS and ESP systems |
| F1/F2 | 50/25 | Exterior light switch, interior fuse box |
| 700(A), | Cooling fan relay | |
| 474(B) | Air conditioning compressor relay | |
| F1 | 30 | Relay box power supply |
| F2 | 25 | Injection relay power supply |
| F3 | 5 | Power supply for injection system relay, ECU |
| F4 | 15 | Not used |
| 238(A) | Injection blocking relay | |
| 236(B) | Fuel pump relay |
Assignment of fuses in the engine compartment
Each structural element of the mounting block is responsible for its own circuit or separate device.
Purpose of fuse links:
- 43 – power supply for HBO electrics;
- 44/45 – control of ABS units;
- 46 – power supply to the ignition switch;
- 47 – signal to the cabin fuses located after the ignition switch;
- 51 – fuel pump, ECM, ECU relay, head fan, ignition coil protection (depending on modification), phase distribution, canister and DC 1 purge;
- 52 – air conditioning system clutch, radiator head cooler.
Separately, you should consider the protective relays located in the block:
- 299/1 – fog lights and headlight washer;
- 299/2 – turning on the stove;
- 597/1 – control of ABS and ESP systems;
- 597/3 – external optics switch drive, power supply to the interior fuse box;
- 784 – control of activation of the radiator fan and air conditioner.
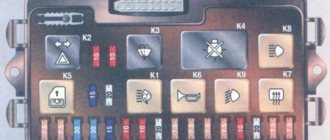
Fuse box in the engine compartment (VAZ 11189 (8 cells), 21129 (16 cells))
The second part of the electronic safety system is located under the hood. In the figure, the mounting block is indicated by the letter “B” and is hidden under a plastic cover. To open the panel, snap off the plastic clips or unscrew 4 screws (depending on the modification).
For the 8 and 16 valve versions, the placement of the platform is the same.
Video about additional cigarette lighter
Sometimes a second outlet is needed in the trunk or other location. For this you will need:
- drill with a bit of suitable diameter;
- files;
- wire cutters;
- cables, cross-section diameter 1.5 sq. mm;
- insulating tape;
- new cigarette lighter.
- We open the circuit.
- We find a level place.
- We cut a hole of a suitable diameter and clean the edges.
- We install the car cigarette lighter, connect it according to the pinout.
- We test the functionality and assemble the unit.
Below is a video on how to remove the cigarette lighter and install an additional socket on Largus and Kalina models, which will help you understand the situation.
Author of the material: Dumchenkov Mikhail
PROMOTION: SALE OF NEW CAR 2021 PRODUCTION
from 606,900 rub.
from 489,000 rub.
Did you like the material? Share with your friends:
- Audi
- Brilliance
- Faw
- Ford
- Chevrolet
- Citroen
- Geely
- Haval
- Changan
- Chery
- Datsun
- Great Wall
- Hyundai
- Kia
- Lada
- Volkswagen
- Renault
- Nissan
- Toyota
- Honda
- Mitsubishi
- Opel
- Lifan
- Mazda
- Skoda
- Rest
- Acura
- Alfa Romeo
- Audi
- Bentley
- BMW
- Cadillac
- Chery
- Chevrolet
- Citroen
- Daewoo
- Dodge
- Fiat
- Ford
- GAZ
- Geely
- Hawtai
- Honda
- Hyundai
- Infiniti
- Jaguar
- Jeep
- KIA
- Land Rover
- Lexus
- Lifan
- Lincoln
- Mazda
- Mercedes-Benz
- Mini
- Mitsubishi
- Nissan
- Opel
- Peugeot
- Porsche
- Renault
- Skoda
- SsangYong
- Subaru
- Suzuki
- Toyota
- UAZ
- VAZ
- Volkswagen
- Volvo
- New cars 2019
- New cars 2018
- Test drives
- Jeeps
- Repair and service
- Engine
- Chassis
- Electrical equipment
- Signaling
- Cigarette lighter
- Car Reviews
- Photo and video galleries
- News
- Tires
© 2021 Daciaclubmd.ru. If you do not agree with any provision of this Disclaimer, do not use this Site. Please read Disclaimer and Privacy Policy before use.
Copying materials is permitted only with an active hyperlink to our website.
Most electrical circuits on the Lada Largus car are protected by fuses. Powerful consumers, such as headlight lamps, fan motors, fuel pump and others, are connected through a control relay. Fuses and relays are installed in mounting blocks, which are located in the vehicle interior and in the engine compartment. In this article we will talk about fuses and relays of the Lada Largus, where they are installed, what ratings they should have, and which unit is responsible for powering them.
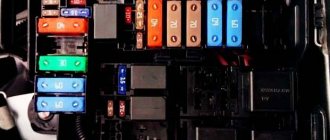
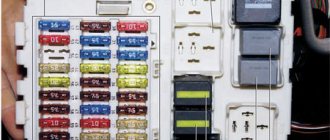
Most fuses are installed in the fuse mounting block located in the passenger compartment (Fig. 1), at the left end of the instrument panel, under a plastic cover.
In Fig. 1 shows the maximum possible set of fuses. On a specific vehicle, depending on the configuration, some fuses may be missing. The circuits protected by fuses on the Lada Largus car from the end of the instrument panel (shown above) are given in table. 1.
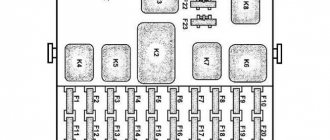
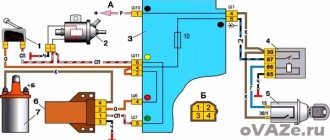
In addition, relays and fuses are located in the mounting block in the engine compartment of the Lada Largus (Fig. 2).
In the mounting blocks in the engine compartment of Lada Largus cars, six panels are used that have symbols corresponding to the symbols on the electrical diagrams. Depending on the vehicle configuration, some of the relays shown in Fig. 2 may be missing. In table. 2 shows the designations of relays and fuses in the mounting blocks located in the engine compartment.
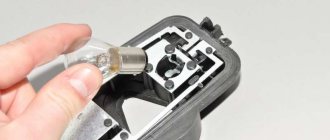
1. To gain access to the mounting block located in the passenger compartment, remove the cover on the left side of the instrument panel.
On the inside of the cover there is a diagram of the location of the fuses. The cover also contains spare fuses A of various current strengths and plastic tweezers B for removing fuses from the mounting block.
2. Before replacing a blown fuse, find out the cause of its blown and eliminate it. When troubleshooting, look at the information listed in the table. 1 circuits that this fuse protects. Do not replace fuses with jumpers, fuses rated for a different amperage, or homemade jumpers - this may cause damage to electrical devices and even cause a fire.3. Remove the fuse to be replaced using special tweezers.Fig. 2. Numbers of relays and fuses in the mounting block located in the engine compartment4. This is what a blown fuse looks like (the jumper inside the holder shown by the arrow has burned out and opened).