August 23, 2021 Lada.Online 3 019 0
From the factory, Lada NIva Travel (formerly ChevyNiva), Niva Legend (formerly 4×4, 2121, 2131) are equipped with a hydraulic timing chain tensioner. One of the popular and simple modifications is the replacement of the hydraulic chain tensioner with a mechanical (automatic) one. Let's figure out why this is needed and how to replace it yourself.
Advantages of an automatic tensioner
- Reduces noise from chain operation.
- Does not require maintenance.
- Does not require an oil line, which eliminates chafing and loss of oil pressure.
- The chain is tensioned regardless of whether the engine is running or not.
- Automatically tightens the vehicle chain as it stretches.
- There are no plunger elements in the design (this eliminates jamming of the tensioner).
- Due to the adjusted spring tension force, the mechanical tensioner practically does not wear out the chain tension shoe.
- The service life of all timing components increases due to correct chain tension.
Price
: from 600 rub.
Where can I buy
: in our online store (category Chain tensioners).
Replacing the timing chain Niva 21214 injector
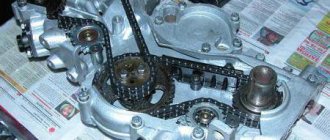
Here we will talk about independently replacing the timing chain drive on a Niva 21214. The timing belt affects the operation of the entire car, so the importance of this unit should not be underestimated. Replacing a chain drive is a rather complicated process, which, however, can be done by any car enthusiast, provided that he follows the instructions and shows a little diligence.
A chain has significant advantages over a belt drive. These include, first of all, its reliability. While a belt can break, this rarely happens with a chain. Usually it just stretches. It lasts much longer than the belt, which means it needs to be changed less often. But still, the chain does not last forever, and after a while it also has to be replaced with a new one. When replacing the chain yourself, it is very important to set the marks correctly and follow safety precautions.
How to replace
Replacement procedure for Chevy Niva
:
1.
Remove the plastic engine cover.
2.
Remove the air duct pipes.
3.
Remove the oil line along with the tee.
4.
Remove the hydraulic chain tensioner.
5.
Remove dirt and oil.
6.
Install the mechanical tensioner using sealant.
The process of installing an automatic chain tensioner on a Lada Niva Legend (4×4):
The process of installing an automatic chain tensioner on a Lada Niva Travel (Chevrolet):
Selecting tools and spare parts for replacement
Replacing the timing chain on a Chevy Niva is impossible without an inspection hole or a lift . Therefore, before you decide to carry out such repairs yourself, you need to find a suitable place. Convenient access from below is necessary to remove the engine protection and conveniently unscrew the auxiliary pulleys. You will have to remove the radiator with fans and drain the coolant. On average, the entire replacement operation will take from 3 to 5 hours.
Necessary tools for repair:
- set of keys and heads from 8 to 21;
- spark plug key;
- flat screwdriver;
- pliers;
- torque wrench (preferably, but not required);
- brake pipe wrench (for unscrewing the oil line);
- a special 38mm wrench for the crankshaft pulley nut or a suitable socket;
- hammer, mounting tool, rags.
With spare parts for repairs everything is also simple . Buy them only from trusted stores and well-known brands. The abundance of spare parts for VAZ engines in stores does not always mean a quality product. Timing units from factory manufacturers and official conveyor suppliers have proven themselves to be the best.
Important! Parts for different VAZ engines may differ in design. The Chevrolet Niva has the VAZ 21214 engine model, while the classic Niva may have the VAZ 2106, 21213, 21214, 21218 engine and their modifications.
We will need:
- valve train chain;
- crankshaft, camshaft, oil pump gears;
- plastic shoes for chain tensioner and guide;
- tensioner mechanism (mechanical or hydraulic);
- a set of gaskets for the front and valve covers;
- front cover crankshaft oil seal.
Advice. It is convenient to combine such a labor-intensive operation of replacing the chain with other work on the engine. For example, replacing the pump, radiator, leaking oil seal, drive belts of mounted units and other minor repairs.
Owner reviews
Review from the owner romanov696 about the ISAI tensioner:
The rustling of the chain was more annoying, especially when it was cold. Plus, the standard hydraulic system itself is not the most reliable or the best. I won't argue, but I don't like her. On the Classic I have a mechanical tensioner, no problems at all.
Review from excidium owner about ISAI tensioner:
As a result, the sound of the clanging chain disappeared when starting the engine. What was required to be achieved. Well, the reliability of a mechanical tensioner can only be judged during operation.
Review from the owner 31alexxx about the Trialli tensioner:
The hardware looks and feels well made, there are practically no backlashes or cracks. The mounting plate is much thicker than that of the hydraulic tensioner (I don’t know whether it was factory installed or not). Another thing that persuaded me to choose this spare part was the fairly large area of the piece of iron that rests on the plastic tensioner. By the way, the kit comes with a good quality gasket. Result: the slight clicking sound of the hydraulic compensators has become more clearly audible, the engine runs noticeably smoother!
Depecher owner's review of the Pilot tensioner:
By the way, I didn’t notice any difference in the behavior of the car on the way home; apparently, on an almost new car, the standard GNC still works quite adequately, so I didn’t feel anything at all after the replacement. Although there was snow on the street and low flow speeds of many kilometers of traffic jams, it was not particularly possible to evaluate the behavior of the car in a wide range of speeds. But this replacement of the State Scientific Center was necessary so as not to ruin everything in the future.
Comparison of mechanical tensioners Ryloth and Isai from 113region:
Today, I decided to change the Pilot to Isai, because... I thought that the Pilot was already tired after 50 thousand. But, having removed the Pilot, I didn’t find anything criminal - there was no wear on either the comb or the ratchet, the spring was normal. But since I took it off, I installed Isaiah - it won’t lie on the shelf for years, I need to try it))) I installed it. I went for a ride. Now a little comparison: Both Pilot and Isai are good, both perform their function 100%, if not fake (this applies to Pilot, because they say about Isai that we are unkillable). The only thing is that Isai is a little quieter, because... The Pilot has a moment when the chain is a little loose, but not enough for the comb to “click”, so at those moments it is a little noisier. But in general, the difference is not significant for the average user. Therefore, you can take both this one and this one.
Other improvements
:
- How to install electric headlight corrector instead of hydraulic corrector on Lada Granta, Niva
- How to make removable transfer case levers on a Niva, which 100% eliminate the howl and hum of the Republic of Kazakhstan
Keywords: 4x4 engine | Niva engine
+1
Share on social networks:
Found an error? Select it and press Ctrl+Enter..
Replacing the hydraulic chain tensioner on Niva
The new model Nivki, which is better known to us as the Chevrolet Niva, cutting through domestic roads, inherited the above-mentioned disease from its older brother, the VAZ 21214, which, in turn, is now proudly called Lada 4x4. But the problem is not as scary as its description. In order to keep the power unit in good condition, it is enough to always keep your finger on its pulse: listen to extraneous sounds, regularly carry out maintenance after 60-100 thousand kilometers and not let the problem take its course.
Please note that simply replacing a used VAZ 21214 hydraulic tensioner with a new one is not the right way out of this situation. At a minimum, it is necessary to change the timing chain, which is clearly in critical condition, disposable rubber sealing gaskets in the form of rings and oil seals. And, if replacing such a simple device as a hydraulic tensioner does not present any particular problems on a VAZ 21214, then as for the timing chain, this is already a reason for a separate article.
The part designed to regulate the chain tension in a Niva Chevrolet car is called a timing belt (gas distribution mechanism) hydraulic tensioner. In the Chevrolet Niva timing system, the hydraulic tensioner performs a very important function, so engine operation without such a part is simply impossible. Over time, all parts of a car tend to wear out.
Rotating parts of cars are especially prone to wear, weakening, stretching and breaking. This part includes the timing chain, which stretches over time and wears out. Chain stretching is normal but must be addressed. It is to eliminate chain stretch that a hydraulic tensioner is installed in the timing system. It has a wear property that is detected by loosening the chain to half the sprocket tooth.
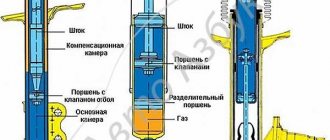
1 – tensioner body; 2 – valve unit; 3 – check valve ball; 4 – limit pin; 5 – tensioner plunger; 6 – volume limiter; 7 – plunger spring; B – working cavity; C – installation groove; D – hole; E – reserve cavity.
Oil from the lubrication system through tube 3 (see Fig. 2-11) enters cavity “E” (Fig. 2-46) of the tensioner, then through hole “D” and valve assembly 2 enters working cavity “B” and presses onto plunger 5. In tensioner body 1 there is a hole with a diameter of 1 mm for bleeding air from cavity “E”.
The diametrical gap between body 1 and plunger 2 should be 0.018–0.024 mm and is measured as the difference between the maximum measured diameter of plunger 2 and the minimum measured diameter of body 1.
During repairs, the tensioner body and plunger form a pair in which replacing one part with another after selecting the gap is not allowed. Plunger 2 must move in body 1 without jamming by a stroke of 16 mm.
When installed on the engine, the tensioner must be free of oil, pin 4 must not protrude from the housing.
As can be seen in the figure, the device has a cylindrical shape; it is screwed on the outside with a lid with a small hole through which oil flows. Inside the device there is a small ball and a spring, which ensures free flow of oil in one direction and does not release it in the opposite direction.
Inside the device body there is a cylinder with rings. On the inside of the housing walls there are spiral notches that have an inclined shape. When the chain is loosened, the piston, under pressure in the housing, moves to a certain notch on the housing wall. When the tension occurs, the body notches do not allow the piston to take its original position. It is carried out by engaging the piston rings with one-sided notches. This is how the tension device works.
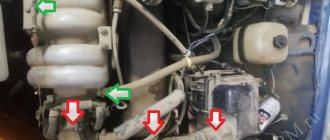
Where is the chain tensioner located?
It is located on the side of the engine, you can easily find it by the way if you approach the car from the right side of the engine compartment (The countdown starts from the back of the car to the front), there is also a battery installed nearby and there is a standard injection receiver in the form of curved pipes ( It is white), so when you stand on this very right side, look for the place indicated in the photo, this is the same tensioner.
Hydraulic chain tensioner. The genuine pain of the domestic auto industry
Hydraulics, as you know, is a science that loves precision. The diameters of holes and bushings are ideally adjusted to microns, valves work reliably like clockwork and high requirements for the purity and quality of the working fluid (in our case, oil). Alas, when it comes to cheap domestic spare parts, the path to hell is paved with good intentions, such as the use of a progressive hydraulic tensioner for Lada 4x4 engines.
It would seem like a finely tuned automatic system. No periodic adjustments or diagnostics for you: the plunger reliably self-locks at working cut-offs until chain wear increases and additional force becomes necessary to tension it. Alas, when it comes to domestic spare parts, all this is good only in theory.
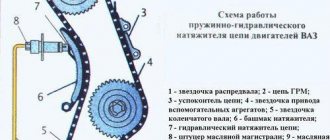
The principle of operation of the hydraulic tensioner on Niva
Without once again venting in angry odes towards the domestic automobile industry, we will simply summarize that the problem of extraneous noise from the internal combustion engine, the main cause of which is often the hydraulic chain tensioner on the VAZ 21214, exists and we have to deal with it somehow. And, as we know, there is no smoke without fire, and another common problem with the hydraulic chain tensioning system is the failure of the oil-conducting system. Killed by running a dry internal combustion engine sounds like a bad dream. What to do and how to continue to live?
How is the replacement made?
If chain stretching is detected and the decision is made to replace only the hydraulic tensioner, then this is an incorrect assumption. It is necessary to replace all parts: chain, hydraulic tensioner, seals, gaskets. Replacement is done in the following sequence, using all the necessary tools:
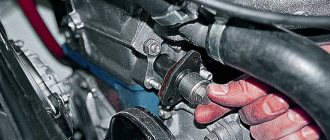
Use a spanner wrench to unscrew the tube fitting, which has a “10” head. The tube is designed to supply oil to the hydraulic tensioner.
Having loosened the fitting, the tube is removed and moved upward so that it does not interfere with further work. The two nuts securing the device itself are also unscrewed using a “10” wrench.
The device is ready to be removed from its mounting location. We grab the protruding part with our hands and pull out the device. There is a gasket on it, which also needs to be removed to replace it with a new one.
A used device cannot be repaired and requires the installation of a new one. Before installation, it is necessary to coat the gasket with a layer of sealant to prevent oil leakage.
Replacing an old device does not require serious mental and especially physical effort. Installation of a new one is carried out in the following steps:
- The device is inserted into the new seat, having first checked that the structure is identical to the old tensioner.
- Screwed in with two fastening nuts.
- The tube is inserted and secured.
It is simply impossible to make a wrong replacement.
After installation, the operation of the motor and the tension of the new chain are checked. An important point is to replace the timing chain in order to 100% protect the car and your health from unexpected breakdowns on the road. This article will tell you how to replace the chain.
Now the owners of the Chevrolet Niva can, without doubt and without errors, correct the existing problem with weakening the chain tension. Remember that if your car has traveled more than 100 thousand km, and there are no characteristic sounds from under the hood, then do not neglect the situation, but disassemble and check the looseness of the chain and the functionality of the tensioner. Happy renovation work!
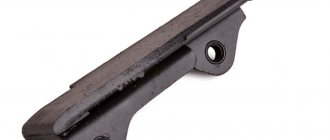
Mechanical chain tensioner. This is the first “tuning” part that should be installed in a car of the Niva family. An engine from the 60s of the last century, with an oil pump that is designed to drive oil on a 1.2 liter engine, not exceeding the speed threshold of 4000 rpm. What do AvtoTAZ designers do? They hang a hydraulic chain tensioner on the poor little oil pump and also, to make it not at all boring, 8 hydraulic supports. What do we have as a result? A small furry northern animal that crept up very close. Russia produces tanks and missiles well, but everything that the “designers” contribute to the design of the Fiat engine is rejected by it.
A few options for what I came across:
- cold weather, about 20 degrees below zero, the engine starts. Engine oil is cold and thick. The chain rattles terribly and finally jumps 6 teeth (as the autopsy showed), the curtain for the engine has dropped.
- normal weather. At idle, the hydraulics “whistle,” the chain “murmurs,” there’s simply not enough oil pressure.
- off-road conditions. The car is sideways on the mountain, oil is leaking from the oil receiver. The first thing in line that lacks it is the hydraulic tensioner and hydraulic supports. The engine begins to make death grunts.
When to change the chain tensioner
It changes only if it has become unusable, but how can you understand this, you ask? In general, when the tensioner becomes unusable, the car’s engine begins to run significantly louder, because the chain is weakened and thus there is such a roar as if you started the car with a diesel injection system, and not with a gasoline one, so if you hear something rattling in the engine, vibration may also appear, and by the way, this knocking should become less as the speed increases, that is, if the engine is noisy at idle and the chain rattles, then just give a little gas and if this knock goes away (the higher the speed, the weaker it should be knocking) then it is most likely really the tensioner, although many other parts could be to blame for this, but first you need to check it, since it is removed very quickly and is also checked accordingly.
An interesting article about biofuel produced from ordinary sawdust, read more here.
Installation
Installing tensioners in a carburetor engine is much simpler than in an injection engine. In principle, you don’t even need to remove the valve cover; the double-row chain will not go anywhere and will not jump out anywhere. But after installation, it is imperative to make a couple of timing revolutions so that the tensioner selects the total chain clearance. What I recommend paying attention to: the stroke of tensioners 21213 is less than the stroke of 21214, but this is not a minus, but a plus, from the point of view of chain control. Once the tensioner has completely selected its operating range, there is no need to weld anything onto it. This is a signal that the chain has “stretched”. Next, replace the chain, tensioner shoe and damper. High-quality double-row sprockets usually survive 2-3 chain changes. I anticipate the answer to the question that will be asked: which tensioner do you recommend installing? Of these three, I like TZA the most. Firstly, because Fiat)). Secondly, the most gentle work in relation to the chain. But this only applies to timing belt 21213.
Sources:
https://litezona.ru/kak-natjanut-cep-na-nive-21213-karbjurator/ https://avtorial.ru/VAZ2/Niva2121_20.html https://www.vazzz.ru/kak-na-vaz -2121-natyanut-tsep-zamena-natyazhitelya-tsepi-kogda-nuzhno-menyat/ https://auto.kombat.com.ua/regulirovka-natyazheniya-czepi-privoda-raspredelitelnogo-vala-vaz-21213-lada-niva / https://niva-fr.ru/natyazhitel-tsepi-dlya-21213/