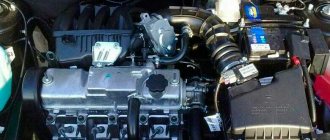
Dear customers, in order to avoid errors when sending an oil shock absorber for the VAZ 2190 series COMFORT rear suspension, in the “Comment” line indicate the type of shock absorber (oil, gas-filled), your car model, year of manufacture.
A car shock absorber is one of those components that can only work properly in a certain position. Modern shock absorbers are rarely disassembled for repairs; as a rule, they are replaced assembled. That is why, before starting to operate a new unit, it must be prepared. If this is not done, the consequences can be very unpleasant.
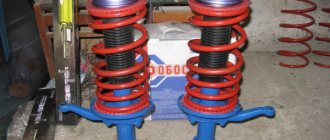
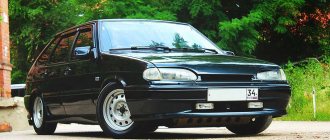
Comfort series – hydraulic struts and shock absorbers, an optimal balance between comfort and controllability, suitable for those who like a quiet driving style in the city and on the highway.
One hundred thousand kilometers for a rack in VAZ front-wheel drive cars is a record time.
Considering the disgusting road surface that has shrouded the whole country, the suspension of eights, nines and their followers is getting pretty nuts.
As a result, everyone tries to protect themselves and the car as much as possible from possible sudden consequences of suspension failure. When stock racks reach the end of their life cycle, it's time to look for a replacement.
Suspension wear manifests itself in different ways and makes itself felt differently under different vehicle operating conditions.
It’s one thing - a hundred thousand on the smooth asphalt of the capital, but it’s a completely different story when your car constantly swallows dust on country roads or on the post-apocalyptic asphalt of the outback.
Also, one cannot discount the driving style, which, like handwriting, is individual for each driver.
Being clearly aware of your ability to predict the road situation, it is quite easy to predict the life of the suspension.
How many hits does the suspension get per week? How often do you look at the condition of the shock absorbers and how important is the delicate handling of the car in the conditions in which it drives most often? Having answered these questions, you can confidently say which struts are best installed on your car.
Comfort series - racks optimally combine the high technical level inherent in the design and the economic effect of operation. TM ASOMI stands are designed for a wide range of consumers.
- Failed shock absorbers can cause rapid wear and tear on the mechanical components of the car: suspension springs, steering gear, cardan, differential, rapid wear of tires, rapid failure of rubber suspension bushings, wheel bearings, suspension and CV joints.
- ADVANTAGES OF KIT RACKS series Comfort:
- — Optimal combination of characteristics for handling and comfort;
- — Guarantee effective traction of the car with the road;
- — Stable characteristics in the temperature range from -45°С to +45°С;
- — Reliable and silent operation;
- — 100% testing of struts and shock absorbers on the stand;
- — Collapsible, repairable design;
- — High resource.
- Bleeding oil shock absorbers before installation:
- 1. Install the shock absorber with the rod up, smoothly recess the rod, but leaving a distance of 20 mm between the working edge and the edge of the glass;
- 2. Let the shock absorber settle for five seconds;
- 3. Smoothly bring the rod to the maximum level;
4. Repeat the operation several times until the dips disappear and the operation of the device becomes uniform and smooth.
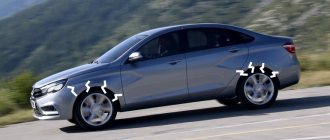
When accelerating, the car “squats” backward, loading the rear wheels and unloading the front wheels, thereby reducing their grip on the road. When braking, the opposite picture is observed. In both situations, the ideal would be a state in which the car would maintain its normal “horizontal” position.
The picture is approximately the same when maneuvering, but here the load shifts not along the axes, but along the sides of the car.
The main task of shock absorbers is to keep the wheel in constant contact with the road to prevent loss of control over the car. For this purpose, the wheel must go around the obstacle as softly and clearly as possible and just as clearly and quickly return to the road, providing the necessary grip.
Other articles of the product and its analogues in the catalogs: 2190-2915402, K190.2915.004-05.
- Lada Kalina 2, Lada Granta, Datsun / Datsun on-Do and mi-Do.
- Any breakdown is not the end of the world, but a completely solvable problem!
- How to independently replace the hydraulic shock absorbers of the rear suspension of the COMFORT series on a front-wheel drive car of the VAZ family.
- With the AvtoAzbuka online store, repair costs will be minimal.
Just COMPARE and BE SURE!!!
Don't forget to share the information you find with your friends and acquaintances, because they may also need it - just click one of the social networking buttons located above.
Rear suspension
+ Equipment and designations
+ Engine + Transmission + Brake system Steering, suspension and wheels
Steering column
Steering column Steering gear Steering drive Steering shaft Steering gear elements Steering gear housing Front suspension elements Front suspension arms Anti-roll bar Rear suspension Rear suspension arms with brakes Steering knuckles and hubs Wheels Wheels Rear wheel hubs + Electrical equipment + Body + Tools + Plugs + Tables normals + Wire harness fittings + Oil seals + Bearings
| 906-40 | ||||||||
| Item no. | Change notice no. | Release datefrom | Incl.w/h | Detail number | Option | Applicability | Col. | Name |
| 1 | + | 00001-0025745-11 | 2 | Nut M10x1.25 self-locking | ||||
| 2 | + | 21010-2905455-01 | 2 | Washer | ||||
| 3 | + | 21080-2915542-00 | 2 | Shock absorber bushing | ||||
| 4 | + | 21080-2915608-00 | 2 | Housing cover | ||||
| 5 | + | 11180-2912622-11 | 2 | Compression Progress Buffer | ||||
| 6 | + | 11180-2912622-10 | 2 | Compression Progress Buffer | ||||
| 7 | + | 21080-2915681-01 | 2 | Shock absorber housing | ||||
| 8 | + | 21100-2914046-00 | 1 | Lever bracket right | ||||
| 8 | + | 21100-2914047-00 | 1 | Left lever bracket | ||||
| 9 | + | 00001-0026297-01 | 6 | Washer 10 | ||||
| 10 | + | 00001-0005168-70 | 6 | Spring washer 10 | ||||
| 11 | + | 00001-0021647-11 | 6 | Nut M10x1.25 | ||||
| 12 | + | 00001-0061015-11 | 2 | Nut M12x1.25 | ||||
| 13 | + | 00001-0005170-70 | 2 | Spring washer 12 | ||||
| 14 | + | 21100-2914054-00 | ** | 2 | Lever joint | |||
| 14 | + | 21900-2914054-00 | * | 2 | Lever joint | |||
| 15 | + | 21080-2914040-00 | 2 | Lever bolt | ||||
| 16 | + | 21100-2915450-00 | 4 | Shock absorber cushion | ||||
| 17 | + | 21100-2912652-00 | 2 | Upper gasket | ||||
| 18 | + | 11180-2912712-10 | 2 | Rear suspension spring |
Removing the shock strut assembly with the steering knuckle
We carry out the work on a lift or inspection ditch.
Loosen the front wheel mounting bolts.
We remove the hub cap, unscrew the hub mounting nut with a 30mm socket and remove the washer.
Remove the front wheel.
We unscrew the nine screws and two bolts securing the engine mudguard and remove the middle engine mudguard.
Using pliers, undo the cotter pin and use a 19mm wrench to unscrew the nut 3 (Figure 2) securing the ball pin of the outer tie rod end 1.
We press the ball pin out of the swing arm 2 of the front suspension strut.
Using a 19mm socket, unscrew nut 3, Figure 3, securing the ball pin to the lower arm of the front suspension and press ball pin 2 out of lever 4 (article - Repair, removal of the ball joint).
Using a TORX E8 socket, unscrew the bolt securing the speed sensor (if the car has ABS) to the bracket on the steering knuckle and remove the sensor from the bracket.
We remove the sensor harness from the guide bracket on the front suspension strut.
Unscrew and remove the pad guide with the caliper and cylinder assembly.
We tie the bracket to the brake hose bracket (Figure 4).
We remove the outer CV joint from the wheel hub and fix it in a suspended state using a wire or a technological hook.
If after removing the shock strut you need to disassemble it, then use a 22mm spanner to loosen the tightening of the rod nut (Fig. 5), holding the rod from turning with a 6mm hexagon.
Using a 13 socket, unscrew the three nuts 2, Figure 5, securing the upper support of the telescopic strut 1 to the mudguard 3 of the body and remove the washers.
Remove the strut assembly with the steering knuckle and ball pin.
Remove the lower support from the upper support 1, Figure 6.
Installing the shock strut assembly with the steering knuckle
Install the speed sensor bracket onto the steering knuckle and secure it with a bolt. Bolt tightening torque 7 – 15 Nm.
We install the lower support on the upper support of the rack.
When installing the lower support, the direction of the arrow on it must coincide with the arrow on the upper support. On the left support to the right of the hole, on the right - to the left.
When installing the rack into the car body, the arrow on the support should be oriented in the direction of travel of the car.
We install the strut assembly with the steering knuckle, brake and ball pin into the car body, install the washers and tighten the three nuts securing the strut to the body mudguard. Nut tightening torque 20…24 Nm (2.0…2.4 kgf.m)
We insert the splined part of the outer drive joint into the wheel hub, put on the washer and tighten, without tightening, the new wheel hub nut.
We press the ball pin into the suspension arm and tighten the nut securing the ball pin. The tightening torque of the nut is 67…82 Nm (6.7…8.2 kgf.m).
We thread the front wheel speed sensor harness into the guide bracket of the front suspension strut, install the sensor in the sensor bracket and secure it with a bolt. The bolt tightening torque is 6…9 Nm (0.6…0.9 kgf.m).
Before installing the speed sensor, apply lubricant (LSTs-15 lubricant) to the surface of the mating hole.
We press the ball pin of the tie rod end into the swing arm of the front suspension strut and tighten the nut securing the ball pin. The tightening torque of the nut is 28…34 Nm (2.8…3.4 kgf.m).
We tighten the nut. If the cutout of the nut does not coincide with the hole in the ball pin, retighten the nut to an angle of no more than 60˚ to ensure cotter pinning.
Install the wheel and tighten it without tightening the front wheel mounting bolts.
We lower the car, tighten and lock the front wheel hub fastening nut, deforming the locking belt of the nut into the grooves of the shank of the outer drive joint housing. We install wheel caps. The tightening torque of the nut is 230 - 250 Nm (23 - 25 kgf.m).
Tighten the front wheel mounting bolts. The tightening torque of the bolts is 76 – 92 Nm. Install the engine splash guard.
Repair and service of cars, engines and automatic transmissions
_____________________________________________________________________________
Rear suspension design of Lada Granta, Kalina
The rear suspension of the Lada Kalina/Granta VAZ-2190 is semi-independent, made on an “elastic” beam with trailing arms, coil springs and double-acting telescopic shock absorbers. The rear suspension beam consists of two trailing arms connected by a U-shaped cross member.
This cross-section provides the connector (cross member) with greater bending rigidity and less torsional rigidity. The connector allows the levers to move relative to each other within small limits. The levers are made of pipes of variable cross-section, which gives them the necessary rigidity.
Brackets for attaching the shock absorber, rear brake shield and wheel hub axle are welded to the rear end of each lever. At the front, the beam arms are bolted to removable brackets for the body side members.
The mobility of the levers is ensured by rubber-metal hinges (silent blocks) pressed into the front ends of the levers. The lower shock absorber eye is attached to the beam arm bracket. The shock absorber is attached to the body by a rod with a nut.
The elasticity of the upper and lower connections of the shock absorber is provided by a rod cushion and a rubber-metal bushing pressed into the eye. The shock absorber rod is covered with a corrugated casing that protects it from dirt and moisture.
In the event of suspension breakdowns, the stroke of the shock absorber rod is limited by a compression stroke buffer made of elastic plastic. The rear suspension spring of the Lada Granta/Kalina with its lower coil rests on the support cup (a stamped steel plate welded to the shock absorber body), and with its upper coil it rests against the body through a rubber gasket.
The rear wheel hub axle is installed on the flange of the beam arm bracket (it is secured with four bolts). The hub with a double-row roller bearing pressed into it is held on the axle by a special nut. The nut has an annular collar that securely locks the nut by jamming it into the groove of the axle. The hub bearing is a closed type and does not require adjustment or lubrication during vehicle operation.
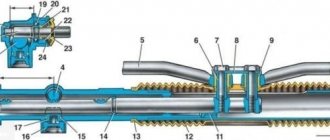
Fig.31. Shock absorber spring for the rear suspension of Lada Kalina/Granta VAZ-2190
1 - spring; 2 — rubber gasket; 3 — casing cover; 4, 10 — shock absorber rod cushion; 5 — spacer sleeve; 6 — shock absorber casing; 7 - nut; 8 — spring washer; 9 — support washer; 11 — shock absorber rod; 12 — shock absorber body; 13 — lower spring support plate; 14 — nut of the shock absorber lower mounting bolt; 15 - eye; 16 — bolt of the lower shock absorber mounting; 17 - compression stroke buffer Checking the technical condition of the rear suspension of the Lada Granta/Kalina must be carried out in accordance with the periodic maintenance regulations. You can evaluate the technical condition of the rear suspension while the car is moving. When driving at low speed on an uneven road, the suspension should work without knocks, squeaks and other extraneous sounds. After driving over an obstacle, the car should not sway. It is better to check the performance of shock absorbers after a long trip, until the working fluid in the shock absorbers has cooled down.
Vigorously swing the rear part of the car body in a vertical direction. If, due to inertia, the body continues to oscillate (more than two: up and down) after it has stopped swaying, it means that one or both shock absorbers are faulty.
To identify a faulty shock absorber, we repeat the test, applying force first on one side of the car and then on the other. This check can only identify faulty shock absorbers. The effectiveness of vibration damping by shock absorbers can only be checked on a special stand.
We inspect the shock absorbers of the rear suspension of the Lada Granta/Kalina - fluid leakage from the shock absorbers is not allowed. Shock absorbers should be replaced as a pair, even if the second shock absorber on the rear suspension is working.
Visually check the condition of the rubber-metal hinges for fastening the shock absorbers and the arms of the rear axle beam. We replace hinges with one-sided bulging of rubber, tears and cracks. Check the tightness of the nuts securing the suspension parts and tighten them if necessary.
We inspect the suspension parts. Deformation and fatigue cracks in suspension parts are not allowed. We replace damaged parts.
- Replacing the shock absorber and spring of the rear suspension of Lada Kalina/Granta VAZ-2190
- Replacing the silent block of the Lada Granta/Kalina rear suspension beam
- Replacing the rear wheel bearing of a Lada Granta/Kalina
- _____________________________________________________________________________
- _____________________________________________________________________________
- _____________________________________________________________________________
- Lada Granta, Kalina
- _____________________________________________________________________________
- _____________________________________________________________________________
- VAZ-2110
— We remove the luggage compartment shelf. — Fold down the back seat. — Using a slotted screwdriver, remove the plug. — We install the device for disassembling the struts on the nut and shock absorber rod. Using two keys, hold the shock absorber rod from turning and unscrew its nut. — Use a magnet to remove the spring washer and the upper support washer from the shock absorber rod. — Remove the upper rod mounting pad from the shock absorber rod. — Using two 19 mm wrenches, unscrew the nut of the bolt securing the lower end of the shock absorber to the rear axle beam and remove the bolt. — Move the lower end of the shock absorber towards the rear of the Lada Granta/Kalina car and remove the shock absorber. — Remove the spring and its gasket from the shock absorber, and also, if necessary, remove the lower cushion and spacer from the shock absorber rod. — Springs of the same class (with the same color marks) should be installed in the rear suspension of the car. — Before installing the shock absorber, secure the rubber gasket to the spring with insulating tape or tape. — Install the spring on the shock absorber and fully extend the rod. We put a buffer, a protective casing with a cover, a spacer sleeve and a lower cushion (if they are not on the rod) onto the shock absorber rod. — When installing the Lada Kalina/Granta VAZ-2190 shock absorber, it is necessary to orient it so that the end of the lower coil of the spring faces the wheel. — We insert the shock absorber rod into the hole in the body cup, at the same time an assistant puts the top cushion and support washer on the rod and tightens the rod nut a few turns. — Raise the lever until the holes in the shock absorber and beam bracket align. Install the lower shock absorber mounting bolt and tighten its nut (without tightening). — If you don’t have an assistant, you can first fix the shock absorber to the rear suspension beam. — Then, placing a stop under the rear lever, smoothly lower the car on the jack, while making sure that the shock absorber rod enters the hole in the body, and after that, put on the upper cushion with the support washer and tighten the nut. — We install the removed wheel (if the work was done without an inspection hole) and lower the car onto the wheels. We press the rear of the car several times to self-install the suspension elements. — Tighten the shock absorber rod mounting nut to a torque of 50-61.7 Nm (5.1-6.3 kg/cm). — Tighten the nut of the shock absorber lower mounting bolt to a torque of 66.6-82.3 Nm (6.8-8.4 kg/cm). To replace the silent block, removing the beam from the vehicle is not required. We change the silent blocks one by one: first at one, then at the other beam lever. — Place the car on a reliable stand and remove the rear left wheel. — Disconnect the elastic lever of the pressure regulator from the earring. — We release the left parking brake cable from the two brackets securing the cable to the left arm of the rear suspension of the Lada Granta/Kalina. — Unscrew the nut of the bolt securing the lever to the body bracket, holding the bolt with a 19 mm spanner. — We take out the bolt. Pull the lever down (without pulling the brake hose) and install the puller cup on the outside and a special washer on the inside of the lever. — Rotating the nut of the puller bolt, press the silent block into the cup. — The silent block has a stop on one edge, and therefore it should only be pressed out towards the threshold of the car. — Apply a soap solution to the cylindrical surface of the new silent block. — Install the puller cup on the inside of the lever. — Rotating the nut of the puller bolt, press the new silent block into the lever until it stops. — We install the lever in the Lada Kalina/Granta VAZ-2190 body bracket and fix it with a bolt and nut without tightening it. — The lever fastening bolt is inserted into the body bracket from the side of the car threshold. — We insert the elastic lever of the pressure regulator into the earring and secure it with a stopper. — We fix the hand brake cable in the brackets. — We install the wheel and remove the car from the stands. — Press the rear of the car several times to self-install the suspension. — We finally tighten the nut of the lever mounting bolt to a torque of 66.6-82.3 Nm (6.8-8.4 kg/cm). — We replace the silent block of the second lever in the same way. — Loosen the rear wheel hub nut in the same way as described on the front wheel. — Place the car on a stand, remove the wheel and brake drum. — Unscrew the nut and remove the thrust washer of the hub nut. — Use a puller to press the hub from the axle along with the bearing. — If the hub bearing has collapsed and its inner ring remains on the axle, we press it with a two-jaw puller, installing its grips in special recesses. — We install the rear wheel hub of the Lada Kalina/Granta VAZ-2190 in a vice. — Use a puller to compress and remove the bearing retaining ring. — Use a cup puller to press the bearing out of the hub. — Using the outer ring of the old bearing as a mandrel, we press the new bearing into the hub with a puller. — Use a puller to install the bearing retaining ring. — Install the hub on the axle. — Install the thrust washer and tighten the rear wheel hub nut of the Lada Granta/Kalina. — By tightening the nut, we press the bearing onto the hub axle. — Install the brake drum and wheel. — We lower the car onto its wheels. — Tighten the hub nut to a torque of 186.3-225.6 Nm (19-23 kg/cm) and jam the edge of the nut into the groove of the hub axis. — Install the hub cap.
Tuning the suspension of the Lada Granta sedan and liftback
The suspension system is modified in a variety of ways, some are trying to radically remake the suspension.
Installation of wishbones
Instead of standard levers, a rigid and durable unit - a triangular lever - can be installed on the Granta's front suspension. It is installed for the following reasons:
- increasing the rigidity of the unit;
- lifting the base up to 3 cm;
- castor adjustment at any time in the range from 1° to 4° in negative values.
The main purpose of the wishbone is to improve controllability. Installation requires removal of the front wheels and crankcase guard. After this, unscrew all the fastening nuts and bolts - braces, front arm brackets, ball joints and stabilizer struts of the Lada Granta.
Next, the standard levers are removed and new triangular ones are installed, with all actions performed in the reverse order. To achieve maximum castor, you do not need to tighten the clutch and install washers for adjustment. Finally, all the bolts and nuts are tightened with the car standing on all four wheels - all that remains is to do the wheel alignment.
Judging by the reviews of the owners, the installation of triangular levers is justified. There is a lack of beating and vibration in the steering wheel and improved handling. It becomes possible to quickly install a castor. The overall smoothness of the suspension on the Lada Grant is noted.
Subframe installation
The new Vesta and X-RAY are already equipped with a subframe from the factory. This element is not used on Grant and other AvtoVAZ models. The subframe has a number of obvious advantages:
- body rigidity increases;
- suspension mounts are more rigid;
- additional engine and crankcase protection;
- increase in castor up to 1.5°;
- increase in wheelbase by 15 mm;
- The likelihood of the front nodding during sudden braking is reduced.
Among the disadvantages: an increase in vehicle weight by almost 15 kg, a decrease in ground clearance.
Installation of the subframe is possible both with and without levers. To install the structure, you need to remove the crankcase protection and the stabilizer cross member. Then a wheel alignment should be carried out.
Reinforcement for the upper supports of the front struts
Often, when driving over potholes and potholes abruptly, cracks appear on the strut support. To avoid such situations, protective plates are installed to protect these weak points from deformation. Thanks to this, the contact area between the support and the body increases, which means that the load during an impact is distributed evenly, reducing the risk of damage. If there is already an existing crack in the support, the protective plates will prevent its further spread. The upper surface of the amplifier, which faces the body, is rubberized, which reduces the noise emanating from the chassis.
The support amplifier is a metal plate about 2-3 mm thick, repeating the shape of the engine cup, with the help of which you can slightly modernize the design. To increase rigidity, special flanges are installed in the center. For installation, it is necessary to unscrew the nuts securing the strut to the upper support and disconnect the steering knuckle. The tie rod end is also removed and the strut is dismantled. The amplifier is installed on it in accordance with the markings of the right or left side, after which everything is assembled in the reverse order. After completing the work, you need to do an alignment.
Installation of the bulkhead amplifier
The steering rack booster is designed to increase the rigidity of the front shield. After installing the product, the amplitude of the crankcase displacement is reduced by half in the longitudinal direction and five times in the transverse direction.
The reinforcement of the shield reduces the likelihood of deformation of the steering rack housing brackets. The steering angle of the front wheels is reduced by approximately 10°. The power steering rack improves vehicle controllability.
To install the bulkhead amplifier, you do not need to go to a service station; the work can be done with your own hands, spending no more than two hours. To do this, you will need a standard set of wrenches. First, remove the driver's side clamp and install the amplifier clamp onto the studs, after which the nuts are tightened. Then the right clamp is changed and placed on top of the studs of the rack slot.
The corner of the support is mounted with an eye on the stud of the body beam across. If there is an adsorber, then you need to remove the tube bracket in advance. The bracket is placed on top of the corner and with the help of an enlarged washer the entire structure is attracted to the body. Next, the cross member is installed and the bolts are tightened. If the clamps are mixed up, a gap will appear between them and the cross member. To eliminate it, you will need to swap the clamps.
Helical suspension
Recently, a tuning option with lowered suspension has gained popularity. There are many methods: from simply cutting off a few coils of springs to installing a pneumatic suspension system. Among them is an inexpensive but effective method of installing a coilover that is adjustable for the height of the strut.
A helical suspension (coilover) is an outwardly conventional strut consisting of a spring and a shock absorber. To adjust the degree of compression of the spring, it is possible to move the support down or up. The adjustable suspension has a special nut on the shock absorber body, by unscrewing or tightening which the height is adjusted.
The coilover allows you to adjust the ride height, spring compression rate and spring stiffness.
Unlike air suspension, coilovers can be installed by yourself. The disadvantages include a higher price compared to lowered struts. Those who have already installed a screw suspension system note a decrease in roll when cornering, no body sway, and no “dive” of the car during a sharp start or stop. On the other hand, car enthusiasts are dissatisfied with the decrease in the smoothness and softness of the suspension due to an increase in its rigidity.
Replacing stabilizer bushings with polyurethane ones
Many motorists have already appreciated the benefits of polyurethane. This material is much more technologically advanced and reliable than outdated rubber. Products made from it are durable, which means the service life of the entire suspension increases.
The stabilizer bushing made of polyurethane maintains the geometry of the vehicle's chassis even under conditions of harsh operation. The material is insensitive to loads. The vehicle's handling, softness and smoothness are improved. Polyurethane bushings do not wear out as quickly and withstand the aggressive effects of chemicals on the roads. The material is insensitive to low or high temperatures.
Lada Granta. Technical part. About suspension and handling
Yandex pictures
Lada Granta went on sale at the end of 2011 based on the Lada Kalina and gradually ousted its predecessor from the market. Eight whole years have passed since the car was released; Granta has been changed and improved. But in the minds of many, it is still the same Kalina, with the same set of problems and sores; few people notice any changes. Apparently, having once encountered a Lada Granta of the first releases, car enthusiasts, having heard the word Granta, begin to remember that distant Granta, released a certain number of years ago, and armchair experts rewrite the stories of past years with reference to the present time and the restyled Granta. At the same time, they actively savor the differences between the first and second Renault Logan, Stepway, Duster, third and fourth generation Kia Rio, Solaris and others. What does it all have in common? That's right, one platform. Granta and Kalina are on the same platform, the listed Renault cars are also assembled on the same platform, Rio, Solaris are twin brothers. Meanwhile, no one sees the difference between the Granta of the first years and the restyling. But there is a difference, including in the suspension.
Front suspension. Yandex pictures.
The front suspension of the Lada Granta, as in many budget cars, is independent, with telescopic shock absorbers, coiled conical springs, lower wishbones with braces and anti-roll bars. What modifications have been made to the front suspension?
- the presence of a spring with an oversized coil diameter;
- gas-filled shock absorbers;
- reinforced longitudinal brace structures;
- increase in the diameter of the transverse stabilizer bar by 2 mm.
One of the solutions recognized to improve directional stability at high speeds (from 150 km/h) was to increase the steering angle of the wheels. The front suspension caster has been increased to 2°45′.
Because of this, the required force that should be applied to the steering wheel during a turn slightly increased, but this problem was solved by integrating an amplifier into the unit, which has an increased compensating effect and the use of a steering rack with a short stroke.
Thus, not only stability has improved, but also handling has improved, the number of steering wheel rotations has decreased, and the steering wheel has become more informative and sensitive. It should be noted that for the “Standard” configuration, the caster settings remained the same 1°40′.
Rear suspension. Yandex pictures.
The rear suspension is a good old beam with trailing arms, coil springs and telescopic shock absorbers. The beam is simple and reliable; no special changes were required.
We installed reinforced springs and gas-oil shock absorbers. The rear suspension of the Grant received a negative camber angle, minus 1°.
This was done, again, in order to improve the driving characteristics, as well as the stability of the car on the road.
The suspension of the Lada Granta is quite reliable and does not cause any problems. Periodic inspections and diagnostics will allow it to serve for a long time without problems. The most vulnerable parts of the front suspension are the ball joints. The rear suspension is practically indestructible.
As for handling, based on personal experience, I can say that the handling of the Lada Granta is excellent and the car does not lose stability and steering wheel even at 180 km/h. To confirm your words, read my article with a photo report where my Granta goes 180 km/h. LINK. All the best and good luck!
Reviews about the suspension
The owners highlight a number of positive points:
- The suspension is well suited for Russian roads, especially outside the city.
- On the highway, the suspension does its job well, and the car holds the road well.
- The suspension is moderately soft even at -30C.
- After a big hole, we had to change two wheels; we checked the suspension during maintenance - no complaints. On all previous cars with such a mileage it was necessary to completely “shake up” the suspension.
There are also negative points:
- On bumps the suspension is noisy.
- Compared to the Renault Logan, the Lada Granta's suspension is a bit harsh.
Let us remind you that you can get acquainted with the car in more detail from other reviews and tests of the Lada Grant.
Keywords: front suspension of Lada Granta | rear suspension of Lada Granta | front suspension of Lada Kalina | Lada Kalina rear suspension
+2
Share on social networks:
Found an error? Select it and press Ctrl+Enter..
Sequence of actions when replacing the front shock absorbers of a Lada Granta with your own hands
We prepare a set of tools, rags, WD-40 fluid, a set of new racks, and other components for related repairs.
- We place the car within the perimeter of the repair area, jack it up, and secure the rear row of wheels with wheel chocks;
- We remove the wheel, disconnect the tie rod end, the ball joint;
- We loosen the rod (key to “9”), while holding the main nut to “22”;
- With a key set to “13”, unscrew the three nuts securing the upper support;
- In order to minimize the violation of the camber angle - wheel toe, we use a chisel to mark the relative placement of the steering knuckle and the bracket;
- Unscrew the bolts at the bottom of the fastening (key set to “17”);
- We remove the Grant shock absorber assembly;
- Use a puller to compress the spring several turns.
We replace the Granta racks and assemble the elements in the reverse order. At the same time, we carry out troubleshooting and replace worn-out consumables with new ones (anthers, bumpers). Don’t forget to visit a service station and have your wheel alignment adjusted. Otherwise, the tires will wear out faster. Motorists at a number of service stations prefer replacing the shock absorber assembly, as opposed to partial repairs. The cost of the service is a third less than the price of a new rack, but no one guarantees the serviceability of the accompanying elements. Ultimately, the cost of purchasing consumables will increase.
Suspension device
The basis of the suspension is the shock absorber strut, equipped with many modern innovations. Its bottom is necessarily attached to the steering knuckle, using two special fasteners for this task. Their role is played by bolts, one of which has a special belt and exactly the same washer. If you need to adjust the angle at which the front wheel camber occurs, you simply need to turn it.
There is a special spring on the telescopic stand. It is equipped with a polyurethane foam buffer responsible for the compression stroke. The support located at the top of the rack along with the bearing is also attached to it. It is fastened using self-contacting nuts (there are three of them) to the mudguard cup in the body of the car. The design with which the front suspension is produced has been significantly modernized in contrast to those previously used in cars of the domestic automotive industry.
Lada Granta is equipped with a modernized suspension
Now a steel bushing is installed in the Lada Granta car, which, in turn, is secured using the vulcanization method to the rubber support array. Thanks to this, it was possible to reduce and in some places remove backlashes and extraneous sounds penetrating into the car interior. It is worth noting that the bearing used has a much larger diameter and a completely different design. It is now placed between the top of the support and the spring. Under the weight of the vehicle, the bearing has to be in a compressed position. This allows you to eliminate any resulting gaps and knocks in a timely manner.
Lada Granta Liftback Orange › Logbook › Suspension 21928 (Part 4)
Hi all. Finally we come to the final stage of replacing the suspension. Left just a little bit.
In the previous part, the front struts and steering tips were replaced. Now all that remains is to change: levers, balls, front arm extensions, extension brackets (Crabs) and install anti-roll bar 21928 (24mm). All this will be discussed here. Well, let’s sum it up at the end.
To replace levers and everything else, it would be more convenient to hang both sides of the car at once
First of all, I unscrewed the stabilizer from the levers. To do this you need to take 2 keys for 17
Next, we proceed to removing the levers assembled with a brace, a ball joint and a crab. For removal, we will need the following tools: 2 19mm wrenches (It is better to take a long wrench and a head), a 13mm wrench for unscrewing the crabs from the body, and a Torx E12 socket for unscrewing ball joint from the steering knuckle (had to buy it in a store).
The lever is attached to the body with 1 bolt and nut, 19 keys. To unscrew the nut, I had to use an extension on the knob, since everything was tightened very tightly.
The ball joint came off quite easily, and the extension brackets (Crabs) too.
Let's look at the condition
But the condition of the ball joints after 115 thousand km leaves much to be desired
Now that everything has been removed, you can prepare new parts for assembly and installation.
It is very convenient to put everything assembled. And the design is so simple that sometimes you are even surprised at the Granta’s maintainability.
Now a few words about the anti-roll bar
After assembling the suspension, we immediately go to the wheel alignment
The numbers turned out to be as follows
Now about the sensations:
As soon as I assembled everything, the first thing that was noticed was that there was no significant sagging of the car body when entering the cabin. Previously, if I sat in the driver’s seat, the left side would noticeably drop down (even though I’m not heavy). Now everything is tough, and there is no such thing.
Then I went out and first of all checked the suspension on a dirt road with holes. Fortunately, in our dacha there are a dime a dozen of such roads. I immediately noticed that small pits and nervousness in the suspension began to go through a little softer. The installation of new rubber elements has a greater impact here. Still, the new silent blocks provide some softness.
Now asphalt. At low pit speeds, the suspension moves elastically, but at the same time, if you accelerate a little, it becomes a bit harsh. Especially if you fall into a hole of medium depth at a speed of 40 km/h. Driving quickly on a bad road on this suspension is very uncomfortable. Yes, and on oil, original racks, too, by the way. Yes, it’s a little softer there, but still there. This is already a design feature of this car, which, in my opinion, must be accepted.
But the advantages of the 928 suspension showed themselves in completely different ways:
1) I noticed almost no squealing noise when braking. The car stops hard, while the muzzle does not go much down, but seems to move forward and come back. This is already a plus.
2) There is less roll in corners! You can really feel it. For comparison, before I took the same turn on an oil suspension at a speed of 30 km/h and the car fell on its side. Now, at the same speed, the car is screwed into it without strong rolls. Moreover, it behaves more stable.
3) At high speed, over 100 km/h, on a highway with patches, the car throws less. It feels like the car clings to the road surface more confidently. He is less tossed from side to side. This is because the suspension is stiffer and feels more collected. But at the same time, every joint, and especially the height differences, became very noticeable. The profile of the road in particular. The car even wobbles on small bumps. But this is a price to pay for increased rigidity.
4) When overtaking, at a speed of 120 km/h, lane changes are more confident. Also, returning to your lane occurs more clearly, without unnecessary steering.
5) Sharp lane changes at a speed of 30-40 km/h, or avoiding a sudden obstacle also feel different. If you turn the steering wheel sharply to the side, the body follows the steering wheel clearly, without unnecessary swinging. I like it. Of course, you shouldn’t think that the car immediately turned into a sports car, but if you compare it with stock oil, there is a difference.
Pendant 21928 can be described as:
But here you need to understand that I am comparing the new one with the old one, which ran 115 thousand km. But in any case, there is a difference, and it is noticeable.
As a result, I came to the conclusion that of the factory suspension options for the Grant, only suspension 21928 will provide more confident behavior of the car. This is a good choice for those who want to maintain the factory ground clearance, while improving driving characteristics. Well, if that’s not enough, you can go further...