Modern cars use two types of transmission of torque from the timing mechanism to the crankshaft. This is a belt and chain design. The second option is more reliable and durable, however, untimely maintenance and repairs can lead to the device operating too noisily. Chain tensioners, which are equipped with all timing kits, allow you to correct the transmission condition.
Purpose
The mechanism in question ensures the normal operation of the chain and the entire drive. The unit is easy to maintain and simple in design. The tension is carried out under the influence of a spring or oil in the working rod of the device. The engine chain tensioner is a fairly reliable element and rarely fails. However, if extraneous noise is heard, it is necessary to check its condition and, if necessary, replace it.
Ignoring this problem leads to the chain weakening and jumping off, which can lead to more serious damage to the power unit. It is quite possible to clean and replace the part on your own. Next, we will consider the features and operating principle of these devices.
016_moto_0811_070
To clean and lubricate the chain, it is convenient to place the motorcycle on the center stand (or hang it on the side using an additional support), start the engine and engage first gear.
We spray the compounds onto the inner surface of the lower branch of the chain, making sure that they do not get on the rim and tire. To clean and lubricate the chain, it is convenient to place the motorcycle on the center stand (or hang it on the side using an additional support), start the engine and engage first gear. We spray the compounds onto the inner surface of the lower branch of the chain, making sure that they do not get on the rim and tire.
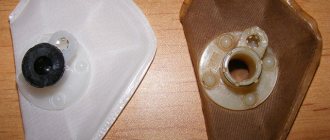
Mechanical chain tensioner
In this case, the required tension value is achieved using a plunger spring. Under its influence, the working element leaves the landing compartment and comes into contact with a special shoe. The load on it continues until the chain resists. This allows you to prevent it from sagging and fix the desired position using a stopper.
With prolonged use, the chain stretches and requires repeated adjustment. After unscrewing the plunger lock nut, the spring will again adjust the degree of sagging. Such chain tensioners have a significant disadvantage. They are susceptible to clogging with small particles, which increases the likelihood of the plunger jamming. This problem can be solved simply by tapping the element. If the device body is damaged, it must be replaced.
Due to the relatively labor-intensive maintenance of a drive with mechanical chain tension, many car owners are switching to an automatic type, which independently adjusts the chain tension and prevents the device from jamming.
Removing the hydraulic chain tensioner
Algorithm for replacing tensioners on ZMZ 409 power units installed on Patriot SUVs with a manual transmission:
- To remove the tension devices, you will need a 12 mm box spanner and a flat blade screwdriver. To change the upper assembly, you need to unscrew 2 bolts. The body of the device is held by hand as the product is pushed out of the mounting socket by the force of a compressed spring.
- Remove the cover and remove the worn element from the standard hole. When dismantling the device, it is recommended to inspect the shoes and sprockets, since wear of the elements increases the noise of the camshaft chain drive.
- To fix the case during further disassembly, vise jaws are used, spaced apart at a distance of 19 mm. It is strictly forbidden to clamp the casing, as the material will deform and crack.
- Using a flat-head screwdriver, unscrew the screw plug with the valve installed inside.
- Pull the spring out of the housing cavity and then pull out the plunger.
What does a hydraulic tensioner consist of?
The lower tension unit is removed and disassembled according to a similar scheme. Before starting dismantling, it is recommended to prepare a rag or rag, since 15-20 ml of engine oil will spill out of the channel.
The removed tensioner covers must be washed with gasoline and the bolt closing the technological channel must be unscrewed. The thread is cleaned of contaminants, coated with thick lubricant, and then the bolt is screwed into place.
Automatic design
This type of timing chain tensioner has a ratchet that automatically controls the sagging and stretching of the transmission element. The unit consists of a housing and a spring-loaded pawl located in it, as well as a gear strip. The teeth are made with a slope in one direction in increments of one millimeter.
The operating principle of this design is as follows:
- the spring of the device acts on the toothed bar with force, depending on the sagging of the chain;
- the bar transmits force to the tensioner shoe;
- reverse movement is eliminated thanks to the ratchet locking pawl;
- the stopper falls between the teeth, preventing the bar from moving back.
This principle of operation consists in the constant action of the spring on the bar with tension on the chain, and the ratchet device prevents it from weakening.
CHAIN DRIVE VAZ 2107
The chain drive on VAZ cars is designed to transmit movement from the crankshaft to the camshaft. The rotating camshaft opens and closes the valves with cams, through which the cylinders are filled with the fuel mixture, and the working cycle occurs in them. Malfunctions in the gas distribution system lead to malfunctions or to a complete stop of the internal combustion engine. Therefore, the chain drive must be maintained in good condition and adjusted if necessary.
DEVICE
The timing device of the VAZ 2107 is quite simple; there is nothing superfluous in the mechanism. The gas distribution mechanism of VAZ classic engines with a chain drive contains the following parts:
- Intake and exhaust valves on the cylinder head;
- Rocker;
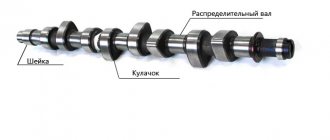
- Camshaft;
- Intermediate shaft gear (sprocket);
- Intermediate shaft;
- Metal gear (sprocket) of the camshaft;
- Valve train chain;
- Tensioner;
- Tranquilizer;
- Tensioner “shoe” (lower damper);
- Crankshaft gear.
The crankshaft and camshaft are installed relative to each other in a certain position. For precise installation, there are special marks on the crankshaft pulley and camshaft sprocket. Incorrect installation, at best, leads to unstable operation of the internal combustion engine, in the worst case, the valves in the cylinder head bend, and serious repairs are already inevitable.
TENSIONER
The chain tensioner plays a very important role in the gas distribution mechanism - it keeps the chain taut. On classic VAZ models there are three types of tensioners:
- Standard mechanical;
- Auto;
- Hydraulic tensioner.
The hydraulic tensioner is standardly installed on the Chevrolet Niva and Niva VAZ 21214. But in order to install it on the VAZ 2107, it is necessary to convert the timing belt to “hydraulics”, especially since such a device is quite capricious on the “Classic”.
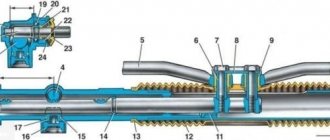
A standard tensioner consists of the following elements:
- Cylindrical body;
- Two springs;
- Plunger;
- Rod;
- Rusk;
- Cap fixing nut.
Standard tensioners can be from different manufacturers; the price of parts ranges from 250 to 450 rubles; the most expensive and reliable parts are those produced by AvtoVAZ and TZA. But in general, the reliability of these tensioners is quite low - they often fail.
The VAZ 2107 automatic chain tensioner is installed instead of the standard one. It is more reliable, since its design does not contain a mechanical plunger mechanism with a clamp, which causes a lot of trouble for owners of classic VAZs. In an automatic device, the chain is tensioned by a rack plunger. The retractable chain tensioner is securely fixed and does not compress under the shock load of the chain. This type of tensioner appeared on the market relatively recently, but has already proven itself on the positive side.
Possible malfunctions and their causes
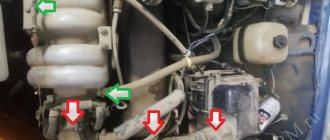
If an increase in noise during operation of the gas distribution unit is clearly noticeable, the chain tensioner of the ZMZ or another engine should be removed and checked. It is located on the right side of the power plant. A similar mechanism works using a spring and oil pressure in the housing, which depends on a similar indicator in the engine itself.
Reasons leading to the appearance of extraneous sounds during operation of the timing chain:
- poor quality purge of the plunger device;
- clogged ventilation holes;
- Excessive plunger wear;
- incorrect spring adjustment;
- failure of the ball valve.
Let's consider the procedure for disassembling and installing this device.
Operating principle
The device is a metal body of a cylindrical configuration, which is connected to the oil line. Inside there is a movable plunger equipped with an auxiliary spring. The design of the unit includes a transport stopper, which is used during installation or storage of the removed element.
After starting the power unit, liquid enters the internal cavity of the tensioner, which leads to the extension of the plunger body from the housing.
The element acts on a special shoe or on the tensioner lever (depending on the ZMZ 409 motor model).
The plunger is able to move backward when dampening chain vibrations. When the rotation speed changes, the timing drive oscillates, and force is transmitted to the shoe and to the plunger rod. There is a ball check valve inside the casing that closes the oil channel.
Read: which oil is better to pour into the UAZ Patriot 409 engine
Vibration damping occurs due to spring compression and oil filtration through the gap between the plunger and the housing. The design of the unit includes a special ring that automatically limits the reverse stroke of the plunger as the camshaft drive chain wears out.
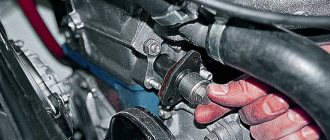
Replacing the chain tensioner
In order to remove the mechanism, it is necessary to unscrew the plunger fixing bolt. This must be done carefully, since the screw is under great pressure from the spring. Then you need to dismantle the spring-plunger filling. The unloaded length of the spring should be 155.5 millimeters.
The next step is to check the device. To do this, the plunger is shaken, while the ball (working element) must move freely. Then the functionality of the valve is checked. When compressed air is blown in, it should open, and after repeating the manipulation on the other side, it should close. If this does not happen, you need to remove the valve from the mounting sleeve and clean both elements. You also need to pay attention to the cleanliness of the blow-out slot.
When is it time to change the chain?
Replacement or adjustment of the chain is necessary if the following symptoms are present.
- Loud knocks and grinding noises in the hood area after starting the engine. As the crankshaft speed increases, the noise frequency also increases.
- Fuel consumption cannot be called economical if the cylinder block is not operating properly. The increase in consumption occurs by a third or even two times.
- Gaps form in the engine's power output, which can be noticed both at idle and when accelerating.
- The vehicle's reaction to activating the gas pedal is not good enough; the reaction may be delayed by a couple of seconds.
Installation and adjustment
Mechanical type chain tensioners are installed after filling the working chamber with the required amount of oil. The plunger with a spring and a new gasket is placed in the seat, after which the fixing screw is turned. The cone-shaped edge of the spring should face the locking bolt.
After installation, it is necessary to unscrew the cylinder head mounting bolts, after which its cover and the camshaft gear cover are removed. The tensioner should be moved in both directions until oil appears near the fixing screw and real resistance to the movement of the part is felt. At the final stage, the closing bolt is tightened with a force of 35 Nm, and the cylinder head covers and camshaft gears are replaced.
How to assemble the device
Installation of a new or cleaned tensioner is carried out after lubricating the channel in the cylinder block. To reduce the risk of oil leakage, it is recommended to replace the gasket located under the tensioner cover.
Before installation, the tensioner is charged, which is performed with a special mandrel or using improvised means.
The assembly algorithm for a cleaned tensioner for the ZMZ 409 motor consists of the following steps:
- To assemble the elements, you will need to make your own cylindrical mandrel from a steel sheet. To form the device, it is necessary to cut a strip of sheet 12-15 mm wide and 23-25 mm long. It is recommended to use a material with a thickness of about 1.0 mm to ensure structural rigidity. The mandrel is formed with pliers, the diameter of the part is equal to the diameter of the plunger.
- Insert the bushing into the body cavity, the side walls press the limit spring.
- Push the plunger according to the template (until it stops at the end of the body). During installation, it is allowed to use a thin screwdriver, which additionally bends the ring spring element.
- Remove the template from the housing.
- Mount the spring into the cavity of the plunger; the unit is installed in a vice (clamping the casing is prohibited).
- Carefully tighten the screw plug with the valve. When twisting, you feel the force caused by the compression of the spring.
- The tensioner is considered to be correctly assembled with the plunger completely pushed into the body cavity.
- Mount the part on the engine; do not apply any force to the protruding plane of the plunger. After placing the part in the channel of the block or cover, do not press the tensioner.
After installing the unit, it is necessary to bring the plunger into the working position (discharging the tensioner). To access the working element, there is a plug in the cover, closed with a bolt. Use the tip of a thin screwdriver to press the tensioner. The activated spring pushes the tool out, and at the same time the plunger comes into contact with the tensioner shoe drive.
Installation of an automatic device
Automatic timing chain tensioners are of a similar design on most vehicles. They are sold with a working rod placed in the body, which is secured with a pin at the end. Removal and installation of this device is identical to the mechanical version.
After installing the device, you need to remove the fixing pin using wire cutters or pliers. After this, the spring will press on the bar. Then the control bolt must be screwed into the end part of the housing. It serves to prevent the spring from falling out and is supplied complete with the main unit. In fact, the process of replacing engine tensioners is similar, regardless of the modification and type of device. Knowing the sequence of operations, you can easily do this work yourself.
Design features of tensioners on domestic cars
The VAZ chain tensioner of early modifications is a design with a spring. Modern models (after the seventh series) are equipped with hydraulic devices. The plunger rod is driven by the pressure created by the oil. This type is fully automatic, requiring no additional intervention to adjust the chain tension.
This part, like any other, is subject to wear and deformation. If damaged or clogged, the tensioner should be replaced or repaired. The device is removed according to the standard version. In early versions of the Zhiguli, it is additionally necessary to dismantle the oil supply tube located at the end of the unit body. To prevent liquid from leaking out during the operation, the hole must be blocked with a bolt of suitable diameter or a rag.
Suitability test
After removing the part, you need to check the element for clogging. Oil can carry small particles and other contaminants that can negatively affect the performance of the device in question. Their excessive accumulation causes unstable operation of the plunger rod and its jamming.
You can clean the tensioner yourself without much effort. Place the part in a tank of gasoline for several hours, rinse and dry it thoroughly. When inspecting the case, you need to pay attention to the presence of dents, cracks and scratches. The plunger mechanism is checked in the same way. If no visible damage is detected, check the functionality of the device.
The device is taken in one hand, and with the other we try to move the plunger rod in the frame. It should move freely without getting stuck. If movement is difficult, the washing process must be repeated. If this does not help, the part must be replaced. The element is installed in the reverse order of removal.
000_moto_0811_070
The service life of a chain on the same motorcycle can vary significantly depending on operating conditions and maintenance.
Sharp accelerations, wheelie riding and mud reduce it quite noticeably. The service life of a chain on the same motorcycle can vary significantly depending on operating conditions and maintenance. Sharp accelerations, wheelie riding and mud reduce it quite noticeably.
After work, I often stop by an old friend’s workshop. The pleasant atmosphere and the opportunity to tinker with the hardware yourself are very invigorating. One day, a new snow-white R6 stops at the entrance and a young guy asks if the service is still working. As usual, he needed to check the chain tension and lubricate it. After 10 minutes, satisfied service workers shook hands with the equally satisfied owner of the Yamaha. “What a wonderful client,” I thought then, still not understanding why he didn’t do such a simple procedure himself.
Manufacturers of modern goods are purposefully turning us into white-handed people. We don’t wash our cars, we don’t wash our clothes, we don’t hem our clothes. Many people no longer cook food at home. And they are unlikely to prepare anything edible if all the restaurants in the area close. Simply because they have never done it. Moreover, some believe that wasting time on such nonsense is beneath them. Maybe so, but I am sure that a person should still have a choice. I may not do something because I don’t want to, but not because I don’t know how. It's worth knowing! Be able to ride a horse, be able to cook deliciously, be able to take care of your own home, be able to drive a car and motorcycle well and be able to maintain them.
The chain drive is one of the most loaded components on a motorcycle. In powerful motorcycles, the forces generated in it reach several tons. And when accelerating and braking, they change direction. This often happens very abruptly, and at this moment the chain experiences serious stress. If the chain is loosely tensioned (sags a lot), then at the moment of load change, this excess supply of chain will first be selected, and then, when its free play ends, a sharp blow will occur, harmful to all elements of the transmission. By the way, it’s also unpleasant for the driver to drive such a motorcycle that jerks whenever the gas is opened or closed, especially in a sluggishly creeping traffic jam. The second disadvantage of a sagging chain is that when the tension is weak, its unloaded shoulder tends to move in a straight line by inertia, which is why it rests imperfectly on the sprocket teeth, thereby wearing them and itself out.
Is it possible to tighten the chain so that it does not sag at all? No, because as the rear suspension operates, the distance between the drive and driven sprockets changes. And the tensioned chain will be subjected to enormous loads (stretch greatly) if you do not leave it with a little slack, which will be removed during suspension operation. (And the shafts with bearings with a tightened chain, I note, will have a hard time.) The reason is that the axis of the pendulum and the axis of the drive sprocket on most motorcycles are located at a distance from each other, so the maximum tension occurs approximately in the middle of the suspension stroke - when the axles of the secondary the gearbox shaft, pendulum and rear wheel lie in the same plane.
There are many ways to adjust chain slack. Shorten or lengthen the chain itself, increase or decrease the diameter of the sprockets, move the mounting point of the pendulum... When tuning racing motorcycles, all these methods are used. But the easiest way to change the chain tension is to move the rear axle mounting point along with the driven sprocket. It is this solution, familiar from bicycles, that is used on all motorcycles.
There are two basic ways to move the axle mounting point. The first one is linear. The motorcycle pendulum has longitudinal slots along which the axle moves. Additionally, tensioners are installed. They come in different designs, but have a common principle: when you turn a screw or nut, the axis moves along the slot, respectively, loosening or tightening the chain. You just need to figure out the direction. It is also important to understand that while the nut on the wheel axle is tightened, you should not turn the tensioners - they can only be damaged by stripping the threads (however, after completing the adjustment, it is not harmful to tighten them so that they do not unwind on the road). Therefore, the axle nut must be unscrewed first. There are always marks on the pendulum and tensioners to help maintain wheel alignment. But in any case, I recommend tensioning the chain more or less synchronously, alternately gradually tightening the right and left tensioners.
If you ride your motorcycle aggressively, like to lift it onto the rear wheel and brake sharply, then the chain may stretch unevenly. Therefore, before checking the tension, hang the rear wheel and spin it in neutral gear. If the chain slack doesn't change as the wheel rotates, good. If the chain either tightens or loosens, it means that it is stretched unevenly and is damaged by ferrous metal. Well, if there is a need to “drive” it another hundred or two kilometers, adjust the sag to the “tightest” position.
The second option for the chain tension system is eccentric. A round hole of sufficiently large diameter is cut in the pendulum, inside which a bushing with an eccentrically drilled hole for the wheel axle rotates. Turning the eccentric moves the wheel axis, allowing you to change the chain tension. More often this option is found in cantilever (one-sided) pendulums, but it also happens in ordinary ones. These systems require a little more skill. Adjustment usually requires a large diameter hex wrench. On older motorcycles, it happens that the eccentrics stick to the pendulum. It is important not to damage them by applying excessive force, but to patiently pour kerosene on them and try to move them, using not too rough percussion tools.
One of the most frequently asked questions is what position the motorcycle should be in when measuring chain slack. Standing on the ground under your own weight, with the rear wheel hanging out (on the center stand) or under load (with the driver and passenger seated)? And what should this sag be? The recommendation of the vast majority of manufacturers is to evaluate sag when the empty motorcycle is standing on two wheels (on a side stand) and the rear shock absorber is loaded only with its weight. Sag for road motorcycles is usually in the range of 30–45 mm, and for off-road motorcycles with increased suspension travel it can reach 55 mm.
After the adjustment is completed, you need to check if everything worked out as expected. If the wheel is level, the marks on the tensioners on the right and left show the same thing, and the chain has the desired slack, then everything is done correctly. All that remains is to lubricate the chain. It's up to you to decide who you like best. If there is no central stand, then the easiest way is to hang the rear wheel by tilting the motorcycle towards the side stand, start the engine and put it in gear. When the wheel starts to rotate, direct a stream of lubricant from the bottle onto the inside of the lower chain branch. The main thing is to lubricate the internal rollers and seals. Lubricant on the connecting plates only collects dirt and, in general, is not needed for the transmission to operate. The main thing is not to direct the jet from the cylinder past the chain - onto the rim or tire. Hardened lubricant is very difficult to remove from the rims, but there’s probably no need to talk about why you shouldn’t lubricate the tire.
There were also automatic lubrication systems that made it possible to lubricate the chain on the move, but they did not take root on modern motorcycles, giving way to relatively expensive, but also durable lubricants.
It is, of course, worth choosing a lubricant in accordance with the type of motorcycle and, most importantly, its operating conditions. So, expensive lubricant for racing motorcycles will not work well off-road. By the way, the chain has the hardest time in mud and sand baths. Therefore, a good lubricant should not only easily penetrate into all crevices, but, when dry, form a durable film that does not collect too much dust. In case of force majeure, of course, any oil is better than dry friction, but remember that depending on the operating conditions and care of the chain, its service life on motorcycles of comparable power can vary significantly - from 5 thousand km to 30–40 thousand .
Another pressing question: to clean or not to clean the chain before lubrication and if to clean, then how. Of course, only those who have a chain lock with a latch can afford to remove the chain and wash it in a bath with a brush. It’s hardly worth removing the pendulum for this, and there are aerosol cleaners on sale that make this procedure as simple as possible: just rinse the chain generously from the can and dry it. But for off-road motorcycles, this is often not enough. The only thing that helps to clean the chain well is a bath with brushes, through which the chain passes, poured through the nozzles with diesel fuel or a special washing liquid. The liquid is usually run in a circle through a fine filter. However, few people have such a device even in the workshop, let alone while traveling. Therefore, many generally limit themselves only to lubricating the chain - and with regular care, the transmission lives a long time. The main criterion for good care is that each chain link should move freely, without jamming (this can be easily checked by slightly loosening the chain). And it is better to do all operations with the chain immediately after returning: the lubricant penetrates the warm chain more easily, and somehow protects it from rust.
OK it's all over Now. To be honest, reading this article will probably take longer than adjusting and lubricating a motorcycle chain, so think for yourself whether it makes sense to go to a service center with such a problem or take care of yourself to the envy of those who don’t know how to do anything themselves.
What do users recommend?
Car enthusiasts give different advice on how to improve or select a chain tensioner. Mercedes and other foreign cars from well-known manufacturers are often equipped with a timing chain drive. As a rule, the device for tensioning the chain in modern cars is designed to be automatically adjusted. This makes it easier to maintain and repair the unit, ensuring its reliable operation.
In addition, when replacing the tensioner, users recommend setting the rod of the new device to the minimum position. This makes it possible to pump the working chamber as much as possible, avoiding jamming and unnecessary noise. This, in turn, contributes to the correct adjustment of the degree of chain tension.
006_moto_0811_070
The snail tensioner is simpler and more convenient: you only need one key, positioning accuracy is ensured by fixed notches on the snail and embossed dots opposite each number.
In addition, the required chain tension is ensured automatically if you turn the “snail” only by hand, without a key. One division roughly corresponds to one chain link. That is, in the case shown in the photo, you can easily take a chain 2 or 4 links longer. The snail tensioner is simpler and more convenient: you only need one key, positioning accuracy is ensured by fixed notches on the snail and embossed dots opposite each number. In addition, the required chain tension is ensured automatically if you turn the “snail” only by hand, without a key. One division roughly corresponds to one chain link. That is, in the case shown in the photo, you can easily take a chain 2 or 4 links longer.
Completion
Such a small but important part as the engine chain tensioner is a kind of fuse against the transmission element weakening and jumping off. Such things can lead to serious malfunctions of the power unit. If an older car model has a manual version, it is easy to upgrade it by replacing it with an automatic version.
It is more convenient in that it ensures tension of the chain without additional human intervention, eliminates jamming of the rod, and is easier to disassemble and install. According to their operating principle, all variations of timing chain tensioners have a similar sequence. The same applies to replacement and repair of parts.