Extraneous sounds always indicate that some problems have arisen. Especially if the noise comes from under the hood. Drivers are especially concerned about sudden strong impacts. This is how the chain guide on a VAZ 2107 behaves when it fails.
It is dangerous to continue driving with a broken damper. This will lead to rapid wear of the guide teeth on the sprockets, which will damage the links of the chain itself. As a result, serious engine damage.
Our instructions will help you understand the structure and features of replacing this important element of the car's design.
Purpose of the sedative
The damper is designed to dampen vibrations and jerks that occur during startup on the timing chain. Without this device, the chain would easily break off the guide gears and break at the most inopportune moments.
Most often, the timing chain breaks at the moment when the crankshaft rotation speed reaches its maximum. The break occurs so quickly that the driver has no chance to react in time and turn off the engine. As a result, all engine valves fail.
After the valves, problems begin in the cylinders. It is almost impossible to restore the engine after such a breakdown. Especially when it comes to seven. After all, the cost of repair work can significantly exceed the cost of the entire car. And it’s easier to sell a car for spare parts than to restore the engine.
Therefore, we can conclude that the timing chain guide is one of those parts that needs constant monitoring. This is the most important protection of your engine from major breakdown.
Sunday, January 14, 2021
Replacement of sprockets and timing chain of VAZ-2107i. Part 1
If the tensioner and its shoe are in good working order, as well as the drive sprockets are not worn, it is not possible to restore the chain tension, it means that it is overextended and must be replaced. This is especially noticeable when the chain has served more than 100 thousand km. And with a mileage of 150-200 thousand, it is better to replace it completely as planned in order to avoid a break with the corresponding consequences for the engine. Also, a stretched chain reduces traction and stability of operation, the engine noise increases, the valve timing angles “go away”, and the chain can jump. The length of the new chain on VAZ 2103-06 engines (116 links) is 495.4-495.8 mm; if the length increases to 499.5 mm, that is, by 4 mm, its immediate replacement is required. As a rule, the chain is changed together with the sprockets, otherwise it will not last long and will quickly stretch. In our case, the car has already traveled more than 220 thousand km on the factory chain, although it is still properly tensioned, it is better to replace it. We will change it along with the sprockets, damper and shoe.
Mechanism design
This is a simple plate made of high quality carbon steel. It has two mounting holes.
There is also a second design element. It is called the hydraulic tensioner shoe. It is located under the timing cover. To extend service life, the side exposed to increased mechanical stress is coated with durable polymer material.
To replace the chain guide on a VAZ, you need to remove the cover and loosen the tension roller.
Video “Chain Knocking on a Classic”
Replacing the hydraulic chain tensioner on a Chevrolet Niva with a manual one
https://youtube.com/watch?v=L27fdFKEj-U
This video examines the cause of engine knocking and demonstrates chain drive tension.
A VAZ 2107 timing chain tensioner is installed on the front right side of the car engine. The main purpose of such a mechanism is to tension the chain, which in turn is extended during operation.
Replacement work is not difficult and is completed within a short period of time. To replace the tensioner you must:
- Open the hood of the car and in the engine compartment, use a ten-point socket wrench to unscrew the two bolts securing the tensioner to the cylinder block and carefully remove it. A sealing gasket will be installed between the tensioner and the block. Check its condition and, if necessary, replace it with a new one.
- Having removed the tensioner body, we clamp it in a vice and use a thirteen key to unscrew the central cap nut, thereby checking the serviceability of the collet lock. If a crack is detected, it is necessary to replace the cap or the tensioner itself.
After checking the tensioner and if it needed to be replaced, you can begin installation. Before installing it, the tensioner must be charged; to do this, push the plunger all the way in and, holding it in this state, tighten the cap nut.
I tighten the cap nut, install the tensioner in its place and tighten the bolts that secure it. Then we turn the crankshaft one turn, thereby tightening the camshaft drive chain, after which we release the cap nut, releasing the tensioner, and tighten it again. At this point, the repair work to replace the timing chain tensioner of the VAZ 2107 is completed.
Sometimes a car enthusiast encounters extraneous sounds that come from the area of the front engine cover and resemble a kind of tapping. This may be a sign that the chain guide needs to be replaced. The damper on the VAZ 2107 model is necessary to soften the vibrations of the chain during its rotation. If you can clearly hear a clattering or metallic tapping sound, this means that the damper is very worn and needs to be urgently replaced. Another possible cause of the problem is that the chain tension is too loose. In this car model, the damper is located on the left, in front of the cylinder block. Use the diagram supplied with the machine to determine the exact location of the part to be replaced.
Replacing a chain guide on a VAZ 2107 is not a complicated procedure. Each driver will be able to carry out such an operation independently if he takes into account several important points. When replacing a part yourself, you need to proceed like this.
The long fastening bolt is installed at the top, and the short one at the bottom. If the bolts have a significant degree of wear, they need to be replaced, otherwise even after replacing the damper, the characteristic tapping sound may remain.
If the damper simply breaks into pieces while moving, you need to remove all its components. Sometimes this is quite difficult to do and you have to invent various devices to get the debris out. In such a situation, a magnet attached to the end of a long wire can help out. Place all the removed parts together to determine if there is anything left inside.
Do not buy the parts needed for replacement at a service station - there they will cost 1.5-2 times more than at the car market or in a specialized store.
Operating principle of the chain damper
When you start the engine, you force the crankshaft and timing shaft to move. Ideally they should work synchronously. But it doesn't always happen this way. The teeth on the guide gears sometimes break, and the chain stretches and begins to sag.
This leads to the fact that the timing shaft begins to move a few moments after the crankshaft. The chain stretches even more and can easily come off the gear.
That is why cars are equipped with a so-called calming system, which consists of two parts.
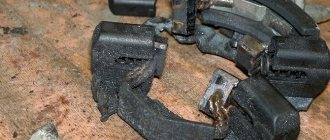
This is what a sedative looks like
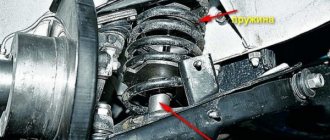
The shoe is connected to an oil line containing an oil pressure sensor. If the chain slack reaches a high value, the lubricant pressure drops sharply. This results in an additional volume of oil being pumped in, which allows for additional pressure to be created.
The shoe moves and transmits pressure, bringing the tension state into order. All this happens instantly, which protects against circuit breaks.
But due to a sharp blow to the shoe, it begins to vibrate strongly. The vibrations are transmitted to the opposite side, where there is a damper designed to dampen them.
Replacing the timing chain
- We remove the throttle valve pipe, the vacuum brake booster and crankcase exhaust pipe, and the throttle cable. 10mm socket and Phillips screwdriver for clamps.
- We remove the radiator by disconnecting the two pipes from it and unscrewing the two bolts located in the upper right and left corners. The head is 10. The radiator from below is inserted into the grooves in which rubber gaskets are installed, do not lose them.
- Replacing the timing chain on a VAZ 2107 with your own hands
Remove the valve cover by unscrewing the eight nuts by 10.
- Loosen the nut of the tension element of the generator and move it towards the cylinder block. Remove the generator V-belt. The key is 17.
Set top dead center (TDC)
- Turn the crankshaft clockwise until the marks on the pulley and the marker on the front timing chain cover match. Key or socket 38.
- The marks on the sprocket and the marker on the camshaft bearing housing should also match.
Removing the old timing chain
We lock the crankshaft by tightening the handbrake, placing chocks under the wheels and engaging fifth gear, unscrew the pulley nut. Head 38.
Unscrew the two nuts by 10 and remove the timing chain tensioner.
We bend the stopper petal and unscrew the camshaft sprocket bolt.
Remove the sprocket along with the chain
Please pay attention to the wear of the teeth if you suddenly decide to keep the old ones. If the teeth become sharp, replace the sprocket
Remember which hole on the sprocket the key on the camshaft is inserted into. There was once a case when his comrades mixed them up and it’s good that before starting it he manually turned the crankshaft, naturally the valves rested on the cylinders, after which he had to disassemble everything again.
Having unscrewed three nuts and seven bolts, three of which are on the side of the pan, remove the front timing chain cover, you can immediately change the crankshaft oil seal. The head is 10. We loosen the adjacent bolts on the pallet so that it sinks down a little and when installing the cover back, the gasket does not interfere with us.
The mark on the crankshaft sprocket must match the mark on the block.
Unscrew the bolt securing the middle gear and tensioner shoe.
We unscrew the limiting pin and remove all the sprockets and the old timing chain. The key is 17.
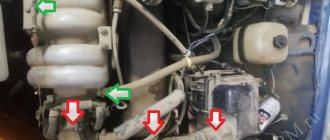
In the bustle, we forgot to take a photo of the mounting location of the damper, but you can easily find it on the right side of the cylinder head, secured with two 10mm bolts.
Installing a new timing chain
- Be sure to lubricate the new timing chain with engine oil.
- We put it on the crankshaft sprocket and the middle sprocket, install them in place, be sure to tighten and lock them.
- We install the limit pin, tensioner shoe and damper in place. We stretch everything out.
- Check the crankshaft mark.
- We put the chain on the camshaft sprocket, but it is not the camshaft. The descending branch of the chain must be tensioned and the marks must all match. If during installation the mark on the camshaft does not match, simply move the chain the required number of links onto the sprockets, having first removed it.
- Tighten the camshaft bolt, lock it, and bend the tab on the washer.
Timing chain tension
- We install the new tensioner in place; automatic ones are available for sale; I recommend using them. It is better to lubricate the gasket with sealant, tighten the two nuts to 10.
- We remove the pin for automatic or unscrew the cap nut 13 for a regular semi-automatic, you will hear a characteristic click, this means that the tensioner has worked. The chain will be taut.
- If you are using an old tensioner, it must be cocked before installation. Unscrew the cap nut several turns until the plunger moves freely. Push it all the way into the tensioner body and tighten the nut. You'll have to get the hang of it because the spring is quite powerful.
- In the case of a semi-automatic tensioner, turn the crankshaft slightly clockwise and tighten the nut to 13.
We install all the parts in the reverse order of removal, fill in antifreeze. We start the engine and enjoy. Everything is quite simple, replacing the timing chain on this car with your own hands is quite possible, the only condition is the presence of an inspection hole.
Signs of a malfunctioning damper
The driver can judge the breakdown by two characteristic signals:
- Strong knocks and grinding noises that are heard under the timing cover. Unpleasant sounds occur when the engine starts, especially if it is cooled.
- The motor loses momentum. This is especially noticeable until it warms up. A non-working part is not able to dampen vibrations, which leads to desynchronization in the operation of the cylinders. The engine behaves inappropriately, does not respond to the gas pedal, and failures occur.
Signs of damper failure
The main task that this part performs is to prevent excessive vibration of the timing chain during engine operation. Such an important part as a chain guide is not present on all types of cars, but only on those whose timing belt is equipped with a chain drive. On cars of the classic Lada family, the timing belt is equipped with a chain drive, so both injection and carburetor engines have a chain guide.
The main symptoms of malfunctions of the chain guide on the VAZ 2107 include:
- A loud knocking sound occurs in the engine. Moreover, this sound occurs directly in the front of the engine.
- Engine malfunction. This is due to the fact that if the part in question fails, the valve opening phases shift.
The cause of damper failure is often a weakened chain. To avoid loosening of the chain, it is necessary to periodically check its tension and, if necessary, tighten it. Regardless of whether the 7 has an injection or carburetor engine, if the part in question breaks down, the same replacement work must be carried out.
What is required for replacement
To replace a part on the “seven”, you will need to prepare a set of the following tools:
- Screwdrivers.
- Spanners.
- Hook or long tweezers.
- Sealant.
- New product.
To carry out the replacement, you will also need good lighting, especially when working in the garage. When carrying out work, it is necessary to avoid dust from entering the timing mechanism.
Replacement with "seven"
Not many owners of this car model know how to replace a chain guide on a VAZ 2107. This is due to the fact that the damper is not a part that needs to be changed frequently. Changing it on a “seven” is not difficult, so you don’t have to go to a service station.
The replacement begins with the first step being dismantling the VAZ-2107 chain guide. The process looks like this:
Initially, you need to remove the air filter housing. The second step is to remove the cylinder head cover. It is secured with 8 bolts. After removing the cover, you need to evaluate the condition of the gasket and, if necessary, replace it. Set the camshaft sprocket in such a position that the mark on it coincides with the cast on the housing. The cap nut on “13” of the chain tensioner is loosened. There is no need to unscrew it completely. The chain tension is weakened. This can be done using a screwdriver, squeezing its shoe. After loosening the chain, you need to fix the cap nut. The damper should be hooked through the technological hole using a hook or tongs. This is done to avoid the damper falling into the engine sump. After making sure that the hook securely fixes the part being removed, you need to unscrew its fastenings in the form of two bolts
These bolts are of different lengths, so it is important to remember their location. If the product cannot be removed after unscrewing the bolts, then it is necessary to turn the camshaft sprocket bolt, as shown in the photo below.
Installation of a new part is carried out as follows:
- A new damper is installed in place of the old one. To do this, you will also need to use tongs or a hook.
- When the fixing bolts are tightened, the timing chain tension will need to be adjusted.
- At the final stage, you should install the cylinder block cover, as well as the air filter housing.
The fixing bolts and the product in question for the VAZ-2107 are shown in the photo below.
In conclusion, it is important to mention that it is recommended to lubricate the damper mounting bolts with sealant before screwing them in. This is done to avoid oil leakage
The VAZ-2107 engine has a chain guide installed. In order to correctly replace this part, you should understand what breakdowns may precede this procedure. In our article we will look at all the key points of replacing it with a VAZ-2107.
Why does it fail
The stabilizer on the VAZ 2107 faces serious loads throughout the entire engine operating cycle. No wonder it sometimes breaks down. There may be two reasons for this:
- Loosening the mounting bolts. Shocks continuously strike these bolts, causing them to become loose. Gradually becoming loose, the fastening element can easily break.
- Metal destruction. The mechanism is constantly running under voltage. Continuous impacts over time lead to the appearance of microcracks that are invisible to the naked eye. Gradually some of them are increasing. There comes a time when a spare part unexpectedly breaks down.
How to replace a dampener
To work you will need:
- new part (cost approximately 500 rubles);
- 20 centimeters of one and a half millimeter steel wire;
- open-end and socket wrenches;
- flat screwdriver.
- Remove the air filter.
- Using a 13mm socket wrench, unscrew the mounting bolts on the cover. Remove the cover.
- Loosen the cap nut that secures the chain tensioner.
- Using a screwdriver, carefully press out the shoe and hold it in this position.
- Tighten the loose cap nut.
- Insert the wire hook into the eye of the damper.
- Unscrew the mounting bolts, holding the device itself with a hook so as not to drop it into the motor.
- After the mounting bolts have been removed, use a spanner to turn the timing shaft a third of a turn. This will release the chain tension.
- Using a steel hook, carefully remove the damper.
- Put a new one in its place.
- Follow steps 1 to 9 in reverse order.
So in a short time you can easily replace the damper in your garage, saving about 700 rubles. Usually this amount is asked to the service station for similar work.
What is needed to replace the VAZ 2107 damper
The set of necessary tools, parts and materials looks like this:
- Set of keys and socket heads.
- Screwdriver.
- Long tweezers, magnetic telescopic handle or stiff wire hook.
- Engine head cover gasket.
- Automotive sealant.
- New chain guide for VAZ 2107.
To replace the damper, an inspection pit or lift is not required. A little space and good lighting are enough. The work can be done both in the garage and on the street. In the latter case, you should avoid getting dust on the timing parts when the cover is removed.