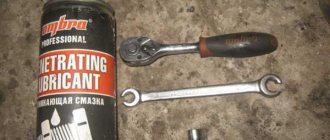
USEFUL ADVICE Carry out bleeding of the clutch in the inspection ditch with an assistant.
1. Fill (or add) fluid into the clutch reservoir to the bottom edge of the filler neck.
2. Place the hose onto the clutch bleeder fitting. 3. Press the clutch pedal 4-5 times and keep it pressed.
NOTE The assistant must press the clutch pedal sharply, with intervals between presses of 2-3 s.
4. Place the free end of the hose into a fluid container. 5. Unscrew the fitting approximately 3/4 turn. Liquid with air bubbles will come out of the hose into the container. 6. After the flow of fluid from the hose stops, tighten the fitting and release the clutch pedal. 7. Repeat steps 3, 5 and 6 several times until liquid begins to emerge from the hose without air bubbles.
WARNING Do not allow the fluid level in the clutch reservoir to drop below 10 mm from the bottom of the reservoir. Add fluid in a timely manner, otherwise when the bottom of the reservoir is drained, air will enter the system and bleeding of the clutch will have to be repeated.
8. Add brake fluid to the reservoir to the bottom edge of the filler neck. Close the clutch reservoir cap.
Installing the clutch master cylinder repair kit
It is not difficult to determine when it is necessary to repair the master cylinder; the main signs of its malfunction are:
- Insufficient clutch release (clutch drives)
- Any type of leakage, whether from under the nuts securing the hose and tubes, or from the end from under the rubber seals
- Master cylinder stuck in pressed position
In my situation, the main leak was due to a worn out sealing ring, in other words, fluid flowed down the clutch pedal into the passenger compartment.
I started the repair by dismantling the reservoir hose, unscrewed the clamp on the main cylinder and quickly removed it from the main cylinder, turned it up and pinched it behind the reservoir cap so that the liquid did not flow out of the reservoir. Next, I unscrewed the tube that goes to the working cylinder, I did this with a special key, it’s a pity there is no photo, but you can buy one without any problems at any auto store. All that remains is to unscrew the main one itself, it is secured with two 13 nuts and remove it from under the hood.
The boot was removed and it was noticeable that fluid was flowing from here.
Having picked up the boot with a screwdriver, I saw exactly where the liquid was flowing from; the assumption was absolutely correct.
Next, you need to wipe the cylinder, remove dirt and rust.
Attention. Do not use gasoline or similar liquids for washing, as they will very quickly ruin the new rubber bands. To flush the clutch and brake elements, use clean brake fluid.
After cleaning the dirt, you can begin disassembling. To do this you will need an awl or similar object.
Next, you need to carefully remove the insides, keeping in mind that the piston is under the action of a spring.
This is what it looks like
Next, you need to clean the master cylinder body, you cannot scrape the parts with a screwdriver, sandpaper, etc., this is just in case, I use a rag with brake fluid. In repair manuals, I often came across such expressions that if rips, scratches, etc. appeared on the parts, then it is unusable. But despite all this, practice shows that despite all the risks, provided that a high-quality repair kit is installed, the master cylinder works without problems. I used this kit:
Repair kit for clutch master cylinder VAZ
We remove the old rings, clean all the grooves and holes. There should be no dust or debris there.
The ring is removed, clean the piston, install a new one
Thanks for subscribing!
And by the way, here is the reason for the clutch cylinder leaking:
The ring is not worn evenly
After cleaning and replacing the rings, you can assemble the cylinder, below is a photo of what should be there and how:
Here is a photo not cleaned, I added it here to show the correct assembly
Having assembled the cylinder, install the corkscrew ring
Bleeding the clutch on a VAZ 2106
After the repair has been made, it is necessary to bleed the clutch. In all repair manuals you can find standard instructions for bleeding the clutch, but it may not always help.
- The first bleeding option is standard; it consists of filling the tank with liquid, unscrewing the bleeding fitting, putting a hose on the fitting, and lowering the other end into a container with clean liquid. Then, by pressing the pedal, we monitor when the air stops being released, and also do not forget to control the level in the tank.
- The second method is to use an assistant - one person presses the pedal 4-6 times and keeps it pressed to the floor. The second unscrews the bleeder fitting; air bubbles should come out of the fitting; as soon as they stop coming out, you need to screw the fitting in and then release the pedal. And so on until normal operation of the pedal is restored and air bubbles stop coming out.
- There is also the simplest method of pumping, but which does not always work - to implement it you just need to pour liquid into the reservoir and unscrew the fitting on the working cylinder. The liquid will flow by gravity through the entire system and when it begins to flow steadily out of the fitting, it can be closed and the pumping can be considered complete.
Operating principle and replacement of the clutch master cylinder
The clutch master cylinder itself serves to transmit the maximum fluid pressure from the foot pedal of this mechanism to the VAZ 2106 clutch slave cylinder, forcing it to move within the required limits in its plane. As has already been noted, the transmission of the pressure force of the foot drive through the clutch master cylinder entails an increase in the pressure parameters in the hydraulics of this complex.
Next, the system pressure is transmitted to the clutch slave cylinder, which drives the vehicle’s transmission. However, there are defects that require repair and replacement of the GCS and RCS. This can be determined if the following signs are present:
- The drive unit of the system does not completely disengage (the clutch “drives”).
- Leakage of working fluid from the components of the unit, incl. from hydraulic pipes and their connections.
- “Wedging” of the clutch master cylinder when the foot drive is in the lowest (recessed) state.
Timely replacement of the VAZ 2106 clutch cylinder is done in the following sequence:
- Use a bulb or other device to pump out the working fluid from the clutch hydraulic reservoir.
- Having loosened the fastener in the form of a crimp clamp, disconnect the hydraulic hose from the drive fitting.
- Unscrew the pipeline drive fitting using a “13” wrench.
- Unscrew the 2 nuts of the studs securing the foot clutch drive using a socket set to “13”.
- Carefully remove the GCS.
- When installing an updated product, assembly is carried out in reverse order.
- We pour special fluid into the hydraulic tank and pump the hydraulic system.
- We remove from the end part the cap for the protective function of the VAZ 2106 clutch cylinder, the price of which is low, which protects this spare part from mechanical deformation.
- Use a screwdriver with a thin blade or an awl to remove the lock washer-gasket and dismantle the fitting device with the seal.
- Having installed the clutch master cylinder in a vice on a bench, use a 22mm wrench to unscrew the plug.
- We take out the retaining ring and the remaining elements of the GCS.
- We inspect in detail the components of the GCS: the “mirror” of the product and the piston outer surface must be smooth, without burrs. The return element must have the necessary rigidity, otherwise it will need to be replaced. The sealing o-rings must be replaced with updated products, as well as the protective cap. If the lock washer of the fitting device is defective, it must also be replaced.
- We wash all the elements of the GCS with a degreaser solution, after which we assemble the product into a single whole.
in this video I change the clutch master cylinder
for
VAZ
2107. similarly,
the master cylinder is replaced
...
Operating principle and replacement of the clutch slave cylinder
If a car owner is replacing the clutch slave cylinder of a VAZ 2106, then it is necessary not only to prepare a set of plumbing tools, cleaning and degreasing products. It is required to have sufficient skills in plumbing, to imagine the structure of the product being dismantled and to have the desire to make such a replacement.
Dismantling the clutch slave cylinder is carried out according to the following algorithm:
- Starting the dismantling process, it is necessary to slightly loosen the screw securing the rubber hydraulic tube, which leads to the connection with the clutch slave cylinder of the “six”.
- We remove the spring mount that pulls back the clutch fork, and then dismantle it.
- We fix the location of the pusher element of the clutch working cylinder, and then remove the cotter pin.
- Remove the bolted connections of the clutch slave cylinder to the vehicle's clutch housing.
- Remove the spring-type pull-out bracket and remove the pusher element from the mechanism fork.
- The next stage is the removal of the clutch pipeline from the control center, this requires fixing the front tip from rotation, while using a circular motion we dismember the connecting element from the control center.
- Then we remove the sealing washer, which during further assembly of the product must be replaced with an updated product, because its reuse is unacceptable.
- After this, we substitute an empty tank to place the liquid in it, which circulates in the hydraulic drive of the mechanism.
Product location
The master cylinder on a VAZ 2107 is located under the hood, directly on the wall separating the interior from the hood, near the driver’s feet. Directly above it is the expansion tank, and next to it are the vacuum booster and the brake master cylinder. Usually, simply looking at the product is enough to determine the problem. The presence of a leak indicates that the part is faulty and requires repair or replacement.
Purpose of the device
Cars are equipped with clutch master and slave cylinders, without which the operation of the mechanism is impossible. The VAZ 2107 clutch master cylinder is designed to push out brake fluid. Below is a diagram from which you can visually find out the operating features of the unit.
When you press the clutch pedal, the piston moves in the device in question, thereby pushing out the brake fluid. This liquid enters the working cylinder through a tube, where the reverse process is observed (the liquid pushes out the piston). Brake fluid drives a piston, which is connected by a fork to the clutch disc. As a result, the clutch disc and flywheel are separated, allowing you to change gear. The GCS is also called the main one, since it is with its help that force is supplied from the pedal when it is pressed.
The need to replace the device: when required
Like all parts of any car, the GVC tends to wear out, resulting in the need for repair or replacement. The simplest breakdown of a product is wear of the boot, which can be determined by the characteristic signs of a fluid leak.
To identify a cylinder malfunction, an initial visual inspection is required. It is possible to repair a failed main circulation system on a VAZ 2107; for this you can look for repair kits, but this is not always rational due to the quality of modern spare parts, so it is easier and faster to replace it entirely. The malfunction can also be determined by the characteristic loss of pressure in the system, which is determined by pressing the pedal. Let’s take a closer look at how to change a faulty VAZ 2107 mechanism.
We change it ourselves
Replacing the VAZ 2107 clutch master cylinder begins with the need to pump out the brake fluid from the hydraulic reservoir. This can be done using a syringe or a rubber bulb. Together with this socket or a 10mm wrench, unscrew the bracket securing the expansion tank and move it to the side to gain access to the cylinder.
The next step involves removing the clutch expansion tank hose. To do this, you need to loosen the hose clamp, then disconnect the hose and position it so that it does not interfere with further work. If you want to remove the tank completely, this is done very simply.
Further actions are performed in the following sequence:
- Using a “10” wrench, you need to unscrew the pipeline securing nut to the device. Once the nut is unscrewed, the tube can be moved to the side.
- There is a hose nearby near the steel pipeline, which also needs to be disconnected from the main device. This can be done by loosening the fixing clamp.
- The GCS is fixed to the body using two fastening nuts. To unscrew them, you will need to use a wrench with an extension and a “13” socket. After unscrewing the two nuts, you can remove the product and drain the remaining brake fluid from it. If it is not possible to dismantle the unit, you can press the clutch pedal, as a result of which it will move.
- But repairs are usually not rational, so after removing the old one, a new unit is installed in its place. Installation is carried out in the reverse order of removal. After installation, it is necessary to carry out the process of pumping the hydraulic drive, first pouring fuel fluid into the tank. You can find out how the system is pumped from the relevant material on the website.
Removal and installation of the clutch master cylinder on a VAZ 2106 car
Remove the clutch master cylinder from a VAZ 2106 car for replacement or repair if there is a fluid leak, incomplete disengagement of the clutch (can be caused by a fluid leak or wear of the front sealing ring), as well as in case of incomplete engagement of the clutch (as a result of clogging of the compensation hole). To remove the clutch master cylinder from a VAZ 2106, you will need: a 13mm wrench (socket head with extension), a screwdriver, and a rubber bulb. 1. Use a rubber bulb to pump out the fluid from the clutch reservoir.
2. Disconnect the expansion tank fastening belt, remove the tank and move it to the side so that it does not interfere with work.
3. Remove the nut securing the pipeline from the clutch master cylinder. Remove the pipeline and move it to the side.
4. Loosen the clamp and remove the hose from the clutch master cylinder.
5. Unscrew the two nuts securing the clutch master cylinder and remove it from the VAZ 2106. 6. Install the clutch master cylinder in the reverse order of removal. 7. Bleed the clutch hydraulic drive
VAZ cars: repair, maintenance, tuning
Failures in the clutch operation of the classic VAZ 2107 - VAZ 2101 must be eliminated immediately. The clutch hydraulic drive system is not too complicated, maintenance work does not take much time, so removing, disassembling and repairing the VAZ clutch master cylinder will not be difficult even for novice drivers. Let’s find out how to deal with problems in the VAZ clutch right now.
Bleeding the system
The design of the VAZ-2106 clutch master cylinder is approximately the same as on a similar element of the brake system. Pumping is done in the same way:
- The entire system is assembled, threaded connections are tightened.
- Liquid is poured into the expansion tank to an average level.
- A tube is put on the bleeder fitting and lowered into a small container with brake fluid.
- An assistant presses the clutch pedal several times and then locks it in the pressed position.
- At this time, unscrew the bleeder fitting a little so that the air comes out.
Repeat the last two steps several times until air stops escaping from the system. Be sure to monitor the brake fluid level. Otherwise, the mechanism will run dry, and it may be necessary to disassemble the VAZ-2106 clutch master cylinder for repair.
Clutch drive device VAZ 2107
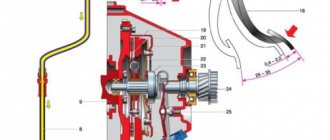
We dealt with the clutch mechanism of the classic VAZ 2101-2107 not so long ago. There is nothing complicated there either and you can refresh your knowledge here. In all rear-wheel drive VAZ cars, the clutch release drive is hydraulic. The clutch master cylinder is installed in the engine compartment on the shield, the cylinder is located coaxially with the clutch pedal rod. A pusher is attached to the pedal itself through a hinge, which presses directly on the master cylinder piston. The VAZ clutch drive diagram is presented below.
Clutch drive diagram VAZ 2101-2107
Thus, the rod, through the pusher piston, acts on the incompressible brake fluid in the master cylinder, which transmits force to the piston of the working cylinder, already installed on the gearbox housing through the hydraulic hoses.
Clutch drive system
There are only two main components in the VAZ-2106 clutch system. The clutch master cylinder allows pressure to be created in the pipes using the driver's muscular strength. The worker acts on the fork, which drives the release bearing. Briefly, the operation of the entire system can be described as follows:
- When you press the pedal, the rod in the master cylinder moves. Since the system is closed, the pressure rises sharply.
- Under the influence of this pressure, the piston is extruded in the working cylinder, which is installed on the clutch housing.
After releasing the pedal, the reverse process occurs:
- When the pedal is released, the master cylinder rod returns to its initial position, as a result of which the volume inside the system increases and the pressure decreases.
- A return spring acts on the working cylinder, which allows the rod to move to its initial position.
- The system has an expansion tank into which liquid is filled.
DOT-3 type brake fluid is used as the working fluid. It contains many additives, they contribute to the normal operation of the mechanism. These additives have a beneficial effect on the metal and allow the cylinders to cool better.
Try to fill the system only with those fluids recommended by the manufacturer. Effective operation depends directly on the quality of the liquid that is poured into the system. Never allow the level to drop to the minimum level. Add fluid if necessary.
Malfunctions of the VAZ 2107 clutch master cylinder
Like any mechanism, the master cylinder is subject to wear, which reduces the efficiency of the system as a whole. The main malfunctions of the cylinder are fluid leaks or loss of nominal dimensions of the cylinder mirror, piston, wear of cuffs and seals. This is expressed in incomplete disengagement of the clutch, the pedal may fall through or be too tight. At the first suspicion of the clutch drive, we perform an initial diagnosis of the system:
- Check the fluid level in the clutch reservoir. A level that is too low indicates a brake fluid leak.
- Inspect the master cylinder for leaks. It should be taken into account that it can leak both in the area of the hydraulic drive fitting, the plug gasket, and in the area of the protective cap, which faces towards the pedal. In this case, the liquid will penetrate into the interior under the carpet and the leak may not be noticed immediately.
In this case, the leak was caused by wear of the piston cuff; fluid flowed into the passenger compartment. - If the clutch starts to engage only after a few presses of the pedal, then most likely air has entered the drive system. In this case, it is necessary to find out the cause of airing (loss of tightness, leak of the main or working cylinder), and only then perform bleeding and removal of air from the hydraulic system.
How to check the VAZ clutch cylinder, free play adjustment
In order not to do unnecessary work, it is better to spend half an hour and conduct independent diagnostics of the clutch drive. To do this, it is enough to place the car on a flat surface, it is advisable to have access to the gearbox housing from below (pit, overpass). Next, we check the operation of the system in this order:
- From inside, we check the free play of the clutch pedal. The nominal free play is from 0.4 to 2 mm. If adjustment is necessary, take a 10mm open-end wrench and loosen the lock nut of the limiter A in the photo below, setting the free play.
- We go down under the car and check the free play of the working cylinder pusher. Before doing this, it is advisable to apply WD-40 penetrating lubricant to it. To do this, press the pusher fork back with your fingers; the free play should be within 5 mm.
- To adjust the free stroke of the rod, use keys 13 and 17 to loosen the locknut.
- Using a 8mm wrench we hold the rod, and using a 17mm nut we achieve such a rod length that the free play is within 5mm.
- Tighten the locknut, go to the salon and check the free play of the pedal until the clutch disengages, which should be within 30 mm. If necessary, add brake fluid to the reservoir.
How to repair a clutch slave cylinder
Before describing the cylinder repair process, a few words should be said about repair kits. The vast majority of problems in six cylinders are related to leaks. And this happens due to wear of the cylinder sealing cuffs. Cuffs can be purchased individually or as a set.
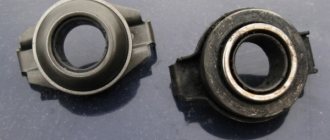
The set includes three cuffs and one protective cap
Experienced car owners prefer the second option. They take the kit, disassemble the cylinder and change all the seals in it, regardless of their degree of wear. This simple measure significantly increases the service life of the wheel cylinder and ensures that there are no brake fluid leaks for a long time. The repair kit for the “six” clutch slave cylinder consists of a protective cap and three sealing collars. Its catalog number is 2101–16–025–16, and it costs about 100 rubles.
For repairs you will need the following tools:
- pliers;
- open-end wrench 8 mm;
- rags;
- flat screwdriver;
- vice.
Repair sequence
It will be extremely difficult to perform all the operations listed below without a normal bench vice . If they are, then you need to do the following:
- The clutch cylinder, removed from the car, is clamped in a vice so that the air valve is on the outside.
- Using an 8 mm open-end wrench, the air valve is unscrewed and inspected for wear and mechanical damage. If the valve shows even minor scratches or abrasions, it should be replaced.
- After unscrewing the valve, the vice is loosened, the cylinder is installed vertically and again clamped with the vice. The protective cap must be on the outside. This cap is carefully pryed from below with a flat screwdriver and pulled off the stem.
- Now you can remove the pusher itself, since nothing else holds it. To remove the pusher, the cylinder will have to be clamped vertically in a vice
- After removing the pusher, the cylinder is again clamped horizontally in a vice. The piston located in the cylinder is carefully pushed out of it using the same screwdriver.
- Now the locking ring is removed from the piston, under which there is a return spring with a washer (you need to remove the locking ring very carefully, as it often jumps off and flies away). Following the ring, the washer is removed, and then the return spring. The retaining ring must be removed very carefully
- There are only two cuffs left on the piston: front and rear. They are pryed in turn with a thin flat screwdriver and removed from the piston (some drivers prefer to use a thin awl to pry up the cuffs). To remove the cuffs from the cylinder piston, you should pry them with an awl or screwdriver
- The surface of the piston, freed from the cuffs, is carefully inspected for scratches, cracks and other mechanical damage. If dents, burrs, cracks or other defects are found, the piston will have to be replaced. The same rule applies to the inner surface of the cylinder body: if defects are found there, the best option would be to buy a new cylinder, since such damage cannot be repaired.
- In place of the removed cuffs, new ones from the repair kit are installed. After this, the cylinder is reassembled with the installation of a new protective cap from the same repair kit.
Video: we independently disassemble the “classic” clutch cylinder
How to remove the clutch master cylinder VAZ 2107 - 2101
During operation, rubber parts and the piston most often wear out, and after 200 thousand mileage it is necessary to carefully check the cylinder mirror.
VAZ master cylinder mirror with signs of wear
In order to remove the VAZ clutch master cylinder, you must first drain the brake fluid from the system. To do this, first of all, we put the hose on fitting 9 of the working cylinder (photo below), and lower the second end of the hose into a clean vessel.
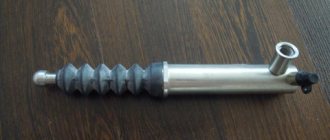
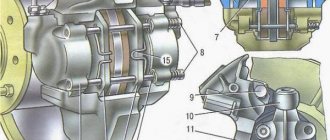
Slave cylinder and clutch release fork: 1-clutch release bearing; 2-ball joint; 3-clutch release fork; 4-pusher; 5-adjusting nut; 6-lock nut; 7-tension spring; 8-body plug; 9-fitting for bleeding; 10-cylinder body; 11-o-ring; 12-wire cap; 13-piston; 14-seal; 15-plate; 16-spring; 17-support washer; 18 circlip
After this, unscrew fitting 9 half a turn and press the clutch pedal until all the liquid goes into the container. Screw in the fitting and remove the tube. If you need to remove the working cylinder (obvious leak, damage to the boot), remove spring 7, the cotter pin from the end of the pushers and unscrew the two mounting screws. To remove the master cylinder, simply disconnect it from the expansion tank and unscrew the two fastening nuts, as shown in the photo below. Remove the cylinder by unscrewing the hydraulic drive fitting.
Bleeding the clutch of a VAZ 2106 with the help of a partner
Replacing the cylinder or any other manipulations with the clutch inevitably leads to depressurization of the hydraulic drive and air getting into the clutch hoses. To normalize clutch operation, this air will have to be removed by bleeding . Here's what's required:
- 0.5 liters of new brake fluid;
- a piece of rubber hose 30 cm long;
- open-end wrench 8 mm;
- empty brake fluid container.
Sequence of work
For normal pumping you will have to use the help of a partner. It is simply impossible to do everything alone.
- When the clutch slave cylinder is repaired and installed in its original place, brake fluid is added to the reservoir. Its level should reach the upper mark located near the neck of the tank. The fluid in the clutch reservoir must be added to the mark next to the neck
- The clutch cylinder has an air valve with a fitting. One end of the hose is put on the fitting. The second is lowered into an empty container (a regular plastic bottle is best suited for these purposes). The second end of the hose attached to the fitting is lowered into a plastic bottle
- After this, your partner must press the clutch pedal six times. After the sixth press, he should keep the pedal completely recessed into the floor.
- Unscrew the air valve fitting two or three turns using an 8 mm open-end wrench. After unscrewing, a characteristic hiss will be heard and bubbling brake fluid will begin to flow into the container. You need to wait until the bubbles stop appearing and tighten the fitting.
- Now again we ask the partner to press the clutch pedal six times, unscrew the fitting again and bleed the air again. The procedure is repeated until the liquid flowing from the fitting stops bubbling. If this happens, the pumping can be considered completed. All that remains is to add fresh brake fluid to the reservoir.
Repair of clutch master cylinder VAZ 2107
After dismantling the master cylinder, carefully wipe it from any remaining liquid and dirt and clamp it in a vice for disassembly.
First, let's estimate from the diagram which parts of the cylinder will need to be replaced.
Master cylinder parts: 1-body; 2-lock washer; 3-fitting; 4-gasket; 5-cap; 6-stop ring; 7-piston pusher; 8-o-ring; 9-piston of the main cylinder; 10-spring
First of all, after disassembly, we check the condition of the cylinder mirror. If the internal diameter is larger than the nominal 19.05 mm, there are obvious deep scratches and stepped wear on the mirror, repair does not make sense. You'll have to buy a new cylinder. If everything is fine with the mirror, we proceed to inspect the piston return spring. If it has lost its elasticity, we only change it. Next, using a standard repair kit, we replace all seals 8 and boot 5.
Complete repair kit for clutch master cylinder VAZ 2107
After replacing worn parts, we thoroughly rinse the entire cylinder and each part with fresh brake fluid, only then reassemble it according to the diagram.
Which clutch master cylinder is better to install on a VAZ 2107, articles and prices
To completely replace the VAZ 2107 - VAZ 2101 clutch master cylinder, analogues from other cars are not suitable. Fortunately, there are more than enough original cylinders and analogues on sale. As a rule, the public tries to choose a branded VAZ cylinder with catalog number 2101-1602610 . Other manufacturers also use this article, but when purchasing, it is better to start not so much from the price of the cylinder, but from the level of trust in the brand. A branded master cylinder will cost us 8-9 dollars and this is one of the most expensive options.
Next, you can choose from what is on the counter:
- The DK cylinder is half the price of the branded one, but often leaks due to poor-quality plug gaskets. As a temporary option, it will do.
- BAZALT , price about 200 hryvnia (about 7 dollars), Basalt and Phenox are highly not recommended due to the disgusting quality of mirror polishing.
- Excellent German Metelli , price approximately equal to the original one, factory article number 55-0014G .
- German ATE, HORT do not cause any complaints, the price is around 10 dollars.
- There are a lot of Chinese cylinders, like AT 2610-001H , the price is about 6 dollars, the quality is unstable.
Instability in China
Upon completion of the master cylinder repair work, fill in DOT4 brake fluid from any manufacturer and bleed the clutch drive in the same way as bleeding air from the brake system.