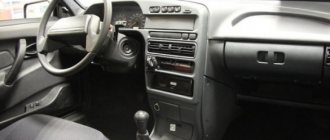
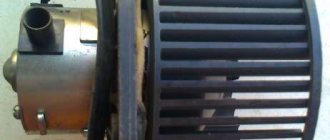
Appearance and location of the stove motor
The device is located in the middle of the so-called torpedo and is a small DC electric motor to which a fan protected by a plastic casing is attached. This motor has three operating modes and is designed to supply warm air to three zones: on the windshield, on the passengers’ feet, or directly into the cabin.
Heater motor of a VAZ 2114 car
What is a heater fan
The VAZ-2114 stove fan is a conventional DC electric motor, powered by the vehicle’s on-board power supply. The air flow is created by the rotation of a cylindrical impeller mounted on the armature shaft.
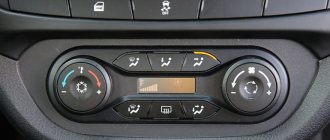
The fan is controlled using a special switch located on the control panel. It has four positions corresponding to its operating modes: “OFF” mode and three speeds. The higher the speed of rotation of the impeller, the stronger the flow of air supplied to the cabin.
When does the heater motor need to be replaced?
There are several signs that will tell a car owner that something is wrong with the heater motor. Here are the most common of them:
- When you try to turn on the stove, you cannot hear the hum of the motor, and this picture is observed at all three speeds.
- The motor supplies air at all speeds, but operates intermittently.
- The operation of the motor is stable, there are no interruptions in the supply of warm air, but instead of a uniform hum, extraneous sounds are heard, a grinding sound, which later develops into a piercing creak.
Fan disassembly
In the case where there is a motor with an impeller, we disassemble the fan housing. To do this, remove the foam seal from the outlet socket, then remove the housing clamps, after which it will split into two halves.
We extract the email. motor, for which we unfasten the spring clamps of the motor cover, remove this cover and remove the electric motor. the engine together with the impeller from half the housing. The electric motor is replaced only as an assembly with the impeller, and it is not recommended to disconnect them so as not to disturb the alignment. When assembling, be sure to stick a foam seal around the perimeter of the outlet socket, otherwise the air flow will dissipate due to the cracks, which will reduce the efficiency of the stove. If the electric motor of the stove made a strong squeal during operation, you don’t have to change the electric motor, just disassemble the fan and put grease in the bushings. But these measures will help eliminate the squealing for a short period of time and ultimately the stove motor will have to be replaced.
Important points
In order for the stove repair to proceed as quickly as possible, and its results not to disappoint the car owner, you should adhere to the rules below:
- When removing the old motor, be sure to turn it. If this is not done, part of its fastening may break and get stuck in the torpedo, or more precisely, in the mounting bracket. And getting to the stuck fragment will not be so easy.
- When tightening the mounting screws with a Phillips screwdriver, you should not use too much force: they are small, so the threads in their sockets can easily be stripped.
As practice shows, replacing an engine is not particularly difficult even for a novice car enthusiast if he has held a wrench and a screwdriver in his hands at least once in his life. The whole procedure takes 40–50 minutes maximum. The main thing is not to overdo it with tightening the fasteners, and everything will be fine.
Stove tap repair
VAZ heater valve
The heater tap (see photo above) is designed to regulate the flow of coolant through the heater radiator. On VAZ 2113, 2114, 2115 models the same heater faucet is installed. The main failures of the stove tap are oxidation, jamming, leakage, which results in a puddle of coolant appearing under your feet.
Why is the faucet leaking?
- With the onset of spring, we close the heater tap and move the regulator to the extreme position.
- From spring to autumn, we don’t use it, so the faucet turns sour.
- In winter, we open the tap again, turn on the stove, and as a result the tap flows.
- In this case, it must be replaced.
- In addition to replacing the faucet itself, it is recommended to replace the cabin filter in the fall because... it becomes clogged with leaves and the air flow weakens.
Which faucet to choose
In the spare parts store you can see three heater taps:
- The body of a ceramic faucet is ordinary plastic, but the locking mechanism consists of two ceramic plates.
- Factory cost from 80 to 100 rubles. The operating principle of which is based on a rubber membrane. As practice shows, it is not reliable, subject to acidification and is installed only if there is nothing better at hand.
- Let's move on - ball valve. Its operating principle is based on a ball with holes instead of a membrane, as in the second version. This specimen is subject to oxidation, but is much more reliable than a factory faucet.
- The ceramic faucet is the most reliable of all of the above; we recommend installing it to avoid unnecessary problems.
- The only drawback is the reduced throughput of the ceramic faucet, which reduces heat transfer. It turns out: the most reliable faucet is a ceramic one, but the heating weakens when using it.
Where is the stove valve located?
The heater valve is located under the console (in the center). Remove the side panel near the passenger's feet. Two pipes lead to it. To change the heater tap you do not need to drain the antifreeze or remove the dashboard. But in this case, you have to lie head down and do some of the work by touch.. To change the heater tap you will need:
https://youtube.com/watch?v=jzYwcI9TPzw
How to replace a stove faucet
We carry out the work on a cold engine:
- Completely remove the instrument panel.
- Place a rag under the passenger's feet and the faucet to absorb spilled coolant.
- Open the hood, remove the heater hose clamps, then remove the pipes from the tap itself, drain the antifreeze into a prepared empty container.
- We move to the salon. Using a Phillips screwdriver, unscrew the clamps securing the heater pipes to the faucet and remove them. We place a container for coolant under the pipes
- We take out the lever rod bracket and pull it out of the hole.
We take out the rod bracket, pull it out of the hole in the lever
- Let's move under the hood again. Using a 10mm wrench, unscrew the fastenings of the faucet to the shield.
- We return to the salon and take out the faucet.
We insert the new tap in the reverse order of removal:
- Installing the new faucet in place
- We secure it from the engine compartment using two nuts (pre-lubricated with a product that protects them from corrosion)
- From inside, open the tap completely and tighten the bracket.
- Then we put on the pipes from the passenger compartment and secure them from the engine compartment.
- Pour in coolant
- We start the engine and warm it up. We check the pipe clamps, tighten them if necessary, and turn on the heating.
If you don't fully understand something, be sure to watch our video.
How to replace the VAZ-2114 stove motor with your own hands
A warm interior is the key to good and comfortable travel by car. A non-working stove can not only cause discomfort, but also become an argument against further travel by car at all. It’s one thing when you came to the garage, noticed a non-working heater and refused to move further in the car during the breakdown, but if this breakdown caught you on the road, the nearest service center is far away, and it is not possible to drive a car with a non-working interior heater, because the windshield becomes covered with frost and further movement becomes dangerous. Then the only option left is to either transport the car using a tow truck, or try to fix it yourself.
External view of the VAZ 2114 heater fan motor
Stop trash
In some cases, it is possible to reach an agreement with the engine by lubricating the bushings with graphite grease. There is no guarantee that he will calm down, but you can try. Throw it away anyway. Noise, creaking and squealing of the fan can be associated not only with the engine itself. Often there is a simple clogging of the air duct and debris getting inside the fan. The meanness of the situation is that it is almost impossible to check this without dismantling the fan.
What do you want? You have to fight for warmth in the car. And if this heat is also silent, there is no price for it. But it’s still better to try to prevent debris from getting into the air duct, and then the VAZ 2114 will delight its owner with a warm and quiet interior. Good luck on your journey!
Diagnostics
The primary task is to identify the cause of the breakdown and assess your own capabilities in a specific situation.
Let's start with something simple and move on to something more complex:
- We check the fuse (F-7 with a voltage of 30 A), which is responsible not only for the heating system, but also for the operation of: the cigarette lighter, heated mirrors, glove compartment lights, and headlight washers. Therefore, when this fuse blows, all of the above devices refuse to work. If it is working, we move further along the chain.
- Turn on the car's ignition and switch the speed control to positions 1, 2, 3 in order. If the fan does not work in any of these positions, we move on.
- If the electric motor does not show signs of life in the first and second positions of the speed switch, but starts working in the third position (the fan is powered at the first and second speeds through a resistor, and at the third speed the current flows directly to the electric motor), the problem lies in the resistor or in the motor itself. switch
- If the heater motor turns on after the car engine has warmed up, the problem is a faulty ignition relay. Solved by replacing the relay.
- If the heater motor refuses to work in any mode, there remains one malfunction - the heater motor itself.
The process of dismantling the fan motor
For the final verdict, let’s apply “+” directly to the motor by removing the positive wire terminal from the motor. If the motor does not come to life, the last thing you can try is to try to clean the place under the ground mount on the electric motor. Often this place oxidizes and the contact weakens.
Basic heating system malfunctions
If the stove stops supplying warm air to the cabin, or if this air is supplied with great difficulty, then the fan is not always to blame.
Thus, we can distinguish the following main types of malfunctions of the electrical component of the heater:
- fuse is blown;
- contacts in the common block have oxidized;
- The heater switch has failed;
- The additional resistor burned out.
The first thing to start troubleshooting with is the fuse, designated in the general block as F7 and rated for an amperage of 30 A. It should be carefully removed from the block, ringed and, if necessary, replaced with a new one rated for the same current. .
VAZ 2114 fuse box
Since fuse F7 protects not only the motor of the VAZ 2114 stove, but also devices such as mirror heaters, glove compartment lighting and the cigarette lighter, then the failure of the fuse element can be judged by their performance.
The second thing that should be checked (if the fuse turns out to be serviceable) is its contacts at the point of attachment to the common block. If oxides or severe dirt are noticeable on them, they should be removed with a cloth moistened with VD or kerosene, or simply with very fine-grained sandpaper. Very often, such basic repairs can return the fan to normal operation.
Poor contact of the VAZ 2114 mounting block
The third step of checking should be the switch, for easy access to the contacts of which the center console should be removed. After this, you should take a device, which is a 12-volt car light bulb with wires soldered to its outputs, and alternately connect its “positive” wire to contacts 1, 2, 3 of the switch.
The negative wire must be connected to body ground, and the ignition must be turned on. If in all modes the light comes on with different brightness, then the switch is working; if not, it means it needs to be replaced.
Sometimes a faulty additional switch resistor is to blame for the stove’s incorrect operation, which can be indicated by the fan turning on only in mode 3.
Having checked all the specified components (as well as ringing all the wires connecting them), you should also check the motor of the VAZ 2114 stove. Very often, the same oxidized contacts are to blame for its inoperability, which should be cleaned in the same way as the contacts in the mounting block or soldered wires that need to be soldered.
We recommend: Car floor mats, what types are there?
In order to check the fan for sure, it should be connected directly to a 12-volt voltage source - if its impeller remains motionless, then the device has failed and requires replacement.
How to remove the heater fan on a VAZ-2114
If none of the above brings success, then we will remove the electric motor of the stove; for this you will need a screwdriver and a small set of keys.
- Disconnect the terminals from the battery.
- There is a positive terminal and a negative terminal located in the cabin under the dashboard; they must be disconnected.
- Next, we move into the engine compartment of the VAZ-2114; the fan casing cover can be removed after unscrewing the four fastening screws.
- After opening the casing, you need to unscrew the two screws that secure the fan.
- Next, we unscrew the screws that secure the air intake grilles to the housing in front of the windshield. Let's take them off.
- Next, we remove the electric motor of the stove, since all its fastenings have already been removed. The fan is placed on a hook located on the body - move it towards you and lift it up.
- After removing the fan housing from the hook, you need to rotate it 90 degrees to remove it from the casing, or disassemble the heater housing for convenient removal.
- We disconnect the motor with the impeller from the casing.
- Remove the impeller from the motor.
- There are several further options: either replace the electric motor with a new one, or try to bring the old one back to life (if this is appropriate, for example, by replacing the brushes. If the winding is broken or there are problems with the armature, then it is better to replace the entire motor).
- Next, we collect everything in the reverse order, removing all the debris from the heater shaft.
New and old heater motor
After the work has been done, we enjoy the rustling of the heater motor, the warmth and comfort of our car. These simple tips will help you save money and continue your planned trip.
Step-by-step replacement process
- Open the hood and disconnect the negative terminal of the battery.
- Behind the engine shield, unscrew the four screws securing the fan casing and remove it. Phillips head screws.
- After removing the casing, remove the two screws that hold the fan housing in place.
- Using a slotted screwdriver, open the latches and separate the plastic fan housing into two halves.
- Disconnect the heater motor power supply terminal (it is located above the gas pedal).
- Unscrew the nut by ten and remove the ground terminal of the heater motor (the terminal is located above the gas pedal).
- After removing the wires, remove the fan along with the motor.
- Unscrew the two screws and you will be able to remove the plastic casing.
- After completing the above operations, the fan and motor are free. We take a new fan and reassemble it.
The process of replacing the VAZ 2113, 2114, 2115 stove fan is clearly shown in this video:
Modifying the stove, simple techniques
Modernizing the VAZ 2110-2112 stove is a thorough and multifaceted process. If you don’t have the time or opportunity to fully remodel the stove system, but you need a positive result in the shortest possible time and with minimal effort, because winter is almost upon us, you can try to listen to the following advice.
1. The easiest way to increase the air flow of the heater for heating the feet of the front seats in the cabin is by blocking the heater ducts for the rear ones. Any tool at your disposal will do
Thus, you sacrifice the comfort of your passengers, but is this really important if, for example, you prefer to drive alone; 2. A similar result can be achieved by blocking the air channels of the central deflector oven by cutting a suitable plug from a sheet of aluminum
Obviously, in this case, the heat flow directed to the side windows and other furnace ducts in the car increases.
Stove damper tens
- 3. Often, standard VAZ 2110 door seals are not enough for reliable sound and heat insulation. Simply gluing additional insulating tape around the perimeter (for example, from K-Flex) can significantly improve the comfort inside the VAZ interior with minimal time and money investments;
- 4. Replacing the 5-hole thermostat with a more modern 6-hole thermostat, which controls the engine cooling and heating system in VAZ cars. These thermostats are completely interchangeable, so there should be no problems. A 6-hole thermostat is technologically more advanced, and therefore the heating of the stove radiator in a car will be more efficient. Such pleasure costs about 350 rubles.
Upgraded thermostat
Repair of the electric heater motor - replacement of the commutator and brushes
The information is suitable for repairing many vehicles.
In general, the original heater motor on my car, after 27 years of operation and 442 thousand km, stopped spinning. Once upon a time, there was a case that it whistled for a year or more (approximately 2010 - 2012 it whistled) - lubricated it with cyatim and since then it worked quietly for many years, until the factory commutator and brushes wore out. I had no experience with such repairs, so I made a lot of mistakes in places - but nevertheless, I’ll tell you how it is, then the next ones won’t mess up. Removing the motor does not require dismantling the stove, but you need good screwdrivers and a retaining ring remover. 3 self-tapping screws and 1 retaining ring - removable and the motor can be removed (this is in versions without climate control). I would like to note that when reinstalling, be careful with the position of the protrusion, which should clearly fit into the groove of the stove body, do not use force.
By the way, the motor number is 4A0 959 101A
, some people recommend
Termal 402102M
; in theory, you should have bought it right away, but the desire to restore the original engine was stronger
At first, I didn’t notice that the commutator lamellas were basically gone and thought that I could get by with simply replacing the brushes. To replace them, you need to bend the 2 edges at the top of the holder and pull out the brush and spring:
Brush size 8x8mm:
I only had larger brushes at hand - I ground them to 8x8 using sandpaper + a file and set them up:
I expected everything to start spinning again - to hell. Then I already noticed that the collector was not just drained, but worn down to plastic. So let's sort it out. I messed up the sequence, so I’m writing right away in the way that, in my opinion, would be better. We drill out 2 rivets (replace them with self-tapping screws during reassembly) to put the plastic with the connector aside. Where the grease is smeared in the photo, there is a retaining ring hidden on the shaft that needs to be removed, and the plastic on the rivets will get in the way:
It is necessary to flare the bends so that the component parts are separated:
Then remove the top cover to the side accordingly. It is necessary to remove the impeller - I just heated it with a hairdryer (to a medium-hot state, the main thing is that the plastic does not “float”, but is just hot) and installing a drift in the shaft - I knocked down the impeller, which was lying on the knees. It is important to do this with the lightest blows possible. I messed up here somewhere, because the shaft shifted relative to the rotor, which “came back to haunt me” later. If anyone has good ways to remove the impeller, write.
And here is the state of the collector:
The condition of the bushings is almost perfect despite 27 years, so it was time to lubricate it when it whistled.
Causes of malfunction
Note that the reason that the fan does not turn on is problems with the power circuit. Oxidation of wiring contacts, blown fuse, faulty resistor - all this leads to the cessation of operation of the electric motor. Therefore, if it does not turn on, you should first check the power circuit components. Common problems with the fan motor are the occurrence of extraneous sounds during operation - squeals, rattling, interruptions in operation - spontaneous stopping, difficult starting, etc.
The reason for the appearance of third-party sounds:
- Deterioration in the landing bushings into which the electric motor rotor is installed, lack of lubrication in them. Because of this, the rotor becomes loose during operation, which creates increased vibrations and rattling, and “dry” friction is accompanied by squealing.
- Interruptions in operation are caused by critical wear of the graphite brushes and contact plates of the rotor. Because of this, the brushes and plates cannot make normal contact with each other, which leads to problems in the operation of the fan motor - it does not spin up when turned on and may stop spontaneously.
Troubleshooting the electric motor of the stove is a problematic process and not always advisable; it is easier to purchase a new fan and replace it.