17.01.2018
12587
Cars, Repair
What is a "lean mixture"? This is an air-fuel mixture containing a LOT of air and a LOT of gasoline. Based on this information, you need to start looking for the causes of error P0171.
Let's start with the first one - too much air. Injection vehicles are equipped with air flow meters (MAF or DAMV). It is installed immediately after the air filter and counts all the air that is sucked into the intake manifold to form the air-fuel mixture. Based on the readings of this sensor, the controller knows how much air has passed and how much gasoline it needs to supply for a given amount of air.
If excess air enters the intake manifold, not taken into account by the flow meter, then there will be more air and, as a result, we get a lean mixture . The most difficult thing is that it is quite difficult to find where exactly this unaccounted air is sucked in.
The main places for air leaks are the intake manifold gasket, throttle body gasket, corrugation from the filter to the throttle body, IAC, injector O-rings, vacuum brake booster, canister valve.
And now we’ll look at 3, in my opinion, the most effective methods for finding air leaks into the intake manifold.
1449644110_2279_4_13_01_kopirovat
Remove the fuel pump fuse from the mounting block.
Remove the fuel pump fuse from the mounting block.
Remove the fuel pump fuse from the mounting block.
We start the engine and let it idle until it stops due to fuel exhaustion. Then turn on the starter for 3-4 seconds. After this, the pressure in the fuel system will be released.
The fuel filter is mounted on the fuel tank next to the right side sill.
Common mistakes when diagnosing code P0172
The most common mistake when diagnosing a P0172 code is not checking the coolant temperature sensor and cooling system. If the engine is cold, more fuel is added to the fuel mixture so that the engine can warm up to the required temperature. If the coolant temperature sensor is not working properly, it sends an erroneous signal to the vehicle's ECM, which in turn may assume that the engine is constantly cold. This may result in the mixture becoming too rich.
Selecting new filter elements
To purchase fuel purification system parts for VAZ 1117-19 models, you need to know what they look like:
- The coarse filter is a flat mesh bag made of chemically resistant plastic that captures large particles of 80-100 microns.
In the center of the element there is a plastic fitting that fits onto the counterpart of the gasoline pump. The mesh element is equipped with a pipe that fits onto the fuel pump fitting - The fine filter is made in the form of a cylinder with two fittings at the ends.
The body is made of metal or special plastic - polyamide, and there is filter paper inside it. It traps particles measuring 15-50 microns. The pipes are equipped with clamps for fastening fuel hoses. The element is equipped with clamps for fastening fuel line connections
All modifications of the Lada Kalina, including the second generation, are equipped with absolutely identical filter elements - a “barrel” and a mesh catcher. The dimensions of the spare parts are also identical.
There are no tricks in choosing a coarse mesh - the parts are made according to a single sample and cost from 30 to 45 rubles. The only caution: in order not to purchase a low-quality product or a fake, contact well-established stores. Although the fuel pump mesh costs a penny, it plays an important role in the fuel system: it catches large debris that can quickly clog the filter paper of the next cleaning element.
In operation, the plastic case is not inferior to the metal one in terms of reliability.
The material from which secondary filters are made does not play a big role. What is important is the contents of the “barrel”, which cannot be seen or touched. Therefore, there are only 3 selection criteria:
- correspondence between the body dimensions and the diameter of the fittings;
- the presence of plastic clamps;
- brand (manufacturer).
The mounting clamp on the Kalina is designed for a case diameter of 56 mm
In order for the spare part to fit the mounting clamp, the case diameter must be 56 mm. The internal size of the gasoline pipes put on the fittings is 8 mm.
There are many different fuel filters sold in stores, and not all of them are equipped with clamps (in other cars, the hoses can be secured with clamps). The part for “Kalina” must have latches, otherwise the tubes cannot be secured.
A plastic latch secures the hose to the filter fitting
In the countries of the former USSR, the following manufacturers of gasoline filters have proven themselves best:
- BOSCH;
- FRAM;
- FILTRON;
- SCT Germany;
- UFI.
At the moment, second-generation Kalina machines are equipped with fine filters made of polyamide. But users are not very complimentary about the factory spare parts: after disassembly, it was discovered that the paper “accordion” was poorly glued to the body. As a result, half of the fuel passed through the gas pipeline without filtering. At the same time, based on the practice of isolated cases, it cannot be unequivocally stated that metal filters are better than plastic ones.
Inside the filter element there is porous paper that traps small particles
Elimination method
It usually consists of three large stages:
- Checking fuel sensors.
- Checking the fuel system and injectors.
- Check the tightness of all hoses and manifolds.
Sensors
A clogged MAF (mass air flow sensor, mass air flow sensor) is the most common cause of error P0171. Dust and dirt accumulate on its wires over time. As a result, it does not immediately respond to changed air flow. It's not just dirt that can get into this sensor. Combustion products may be deposited on it, which come out of the throttle valve and from the intake manifold with vapors after the engine stops. Because of these vapors, a thin layer of paraffin appears on the wires, after which the sensor begins to send a signal to the system that there is little air in the fuel mixture. Something similar can happen with other sensors. All of them are thoroughly cleaned using a special spray for cleaning electrical appliances. The second solution to the problem is to completely replace all “suspicious” sensors with new ones. We should not forget about the service life of the sensors. They can simply serve their purpose. Example: it is recommended to change the differential pressure sensor every 80,000 km.
Replacing a faulty valve
The regulator to be replaced is located in the fuel block, which includes other elements: an electric fuel pump, a coarse filter and a Kalina fuel level sensor. You will need to remove the entire block from the tank and then change the regulator. To do this, relieve the pressure, as described above, and then remove the rear seat.
New Lada: Osago on Lada Kalina
The pressure ring holding the assembly is twisted to the left. You can move it from its place with light blows of a hammer on the protrusion through the adapter. Then the fuel module along with the float is carefully removed from the opening.
You need to remove the wire from the regulator installed in it and pull out the spring retainer with a Phillips screwdriver. After this, the valve can be easily removed and replaced with a new one. Before reinstalling, the O-rings of the new part must be lubricated with fresh engine oil.
When assembling the unit, it is important to monitor the condition of the gaskets and replace them if worn. When installing the fuel module into the opening, you must ensure its orientation; the arrow on the cover should point towards the trunk. At the end, it doesn’t hurt to check the pressure again, and only then you can screw in the spool and start the engine.
To be sure, the Lada Kalina should be tested in motion, making sure that the dynamic properties of the car are restored.
tweet
back The process of replacing the clutch on Kalina
Next Why doesn't the Lada Kalina ECU work?
Tags: replacement, umbrella, valve, fuel pressure regulator, installation
How to find an air leak
First method. It is the simplest, it allows you to find out whether there are any air leaks at all and does not require absolutely any equipment. All we need is just the key for “10”. You need to unscrew the mass air flow sensor from the air filter and pull it out together into the corrugation.
Now we start the engine and, using the palm of our hand, completely block the air inlet into the intake manifold through the mass air flow sensor. The corrugation should shrink from the vacuum and after a couple of seconds the engine will stall. We don’t let go of our hand and listen for where things hiss—this is an extra air leak (more details in the video below).
Second way. Here we need some kind of flammable liquid - gasoline, ether, WD-40, carburetor cleaning fluid, etc. It is best, of course, to use gasoline or ether, they are more natural for engine operation. We fill a syringe with gasoline or take a can of any of the above liquids and spray all the connections of the intake manifold. If any of the connections are not sealed, then the liquid will definitely get inside the manifold and the engine speed, at the same time, should change (either decrease or increase). If the engine does not react in any way, then the connection is sealed, there are no problems with it and you need to look further. Well, if the engine starts to react, consider half the job done. We change the gasket or hose and rejoice that error P0171 has disappeared.
The third method is to use a smoke generator. If you don’t have such a thing in your garage, you can ask your friends for it or make it yourself. There are many options for making smoke generators on the Internet. I chose the simplest and fastest - a smoke generator made from a regular cigarette.
How does the regulator (RDT) work?
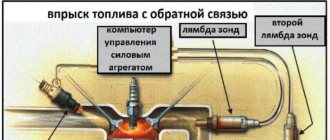
The fuel system has a fuel pressure regulator. This injection system component is a conventional diaphragm valve. Its task is to maintain a constant level of pressure in the line and ramp, regardless of the operating mode of the motor. The pressure generated by the pump is maintained within 3.7-3.9 bar.
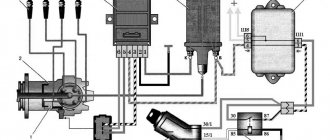
The operating features of the power supply system are discussed in detail in the diagram below.
To correctly diagnose the fuel pressure regulator, you will need to familiarize yourself in detail with the algorithm of operation of the injection system.
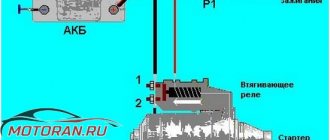
- When the ignition is turned on, the fuel supply pump (item 6) comes into operation. It creates the required pressure in the ramp (item 2) and the line. If after a few seconds the starter is not turned on, the on-board controller gives a command to turn off the pump power circuit.
- First, the fuel passes through filters designed for coarse and fine (item 7) cleaning. Next, it is sent to the fuel pressure regulator, after which it is supplied through the line (pos. 4) to the ramp and injectors (pos. 3).
- The start and further operation of the LADA Kalina 8 valve engine is characterized by fuel combustion. It is sprayed into the manifold by means of nozzles, after which, mixing with air in a certain proportion, it is directed into the engine chambers, where combustion occurs.
New Lada: Lada Kalina immobilizer does not see the key - Auto Magazine
At idle speed, the RTD dumps the overwhelming share of fuel into the tank (position 5), because consumption is insignificant, and the pressure generated by the pump is constantly high.
At higher speeds the situation is different. Here the valve does not operate in reset mode, since the engine requires large portions of fuel.
Experts distinguish between two types of RTD faults. This is a decrease in the pressure level in the line or, conversely, its excessive increase. In the event of a breakdown, the LADA Kalina 8 valve element cannot be repaired. It is being replaced with a new analogue.
Over-lean mixture of VAZ 2114
Before studying the reasons for a lean mixture on an injector, it is probably worth understanding what a lean mixture means (in the very concept), and how this, in principle, threatens the car. However, it is worth knowing the signs of excessive impoverishment, identifying the reasons (unless this was not intended) and being able to deal with them, if in your immediate plans the first item is not a serious repair of the car or even replacing it.
The reasons, by the way, are not so varied, and eliminating them is often quite simple. The main thing is to understand what is happening to your car and take action before it gets offended at you and completely refuses to drive, and your nerves become completely unusable.
Why is she poor?
The reasons for a lean mixture on the injector, as already mentioned, are quite trivial. Anyone who has an engine with an injector in their car knows that it can regulate the ratio of gasoline vapors to air. However, not everyone thinks about the correct balance. For people who are not inclined to go into technical details, we explain: the norm is the proportion of a kilogram of those same vapors per 15 kilograms of air.
It maintains parity between economical consumption and engine power. If the weight of air is reduced to 13 kg, there will be more gasoline, the engine will gain more power, but fuel consumption will also increase significantly.
In the opposite situation (often allowed with full consciousness of what is being done), when air is introduced in an amount of 16 kg, the power drops by 10 percent compared to an enriched mixture, but the savings increase by 15-20%. However, further dilution of gasoline leads not only to a decrease in engine thrust, but also to an increase in consumption: trying to crawl up some hill, you press on the gas, burning more fuel, and efficiency is zero.
Therefore, no one sets the injector to 20 kilos of air per 1 gasoline. That is, there are some problems with the node itself.
Signs of impoverishment
The main and main symptom of a lean mixture is a stalling engine. A very weak mixture leads to the fact that the engine does not start at all, and if it starts, then when you try to move, it immediately runs out of steam. It’s just that the mixture is not rich enough and the car jumps and moves jerkily when driving. However, this driving style is not only characteristic of a lean mixture.
A car can behave this way even if it has problems with any part of the ignition - coils, spark plugs, distributor cap, cables, coal or slider. Therefore, we need to look at other, indirect or less noticeable signs. Experienced drivers recommend the following.
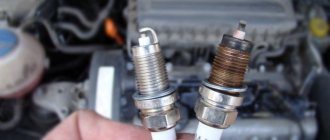
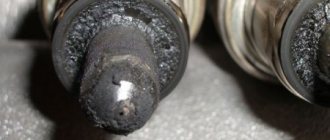
Turn out the candles and look at their color
. If they are light brown, the injector is working properly; dark - not enough air; light – its excess. However, carbon deposits cannot serve as an accurate indicator - its shade does not correspond to the norm both when the ignition is set incorrectly and when there are errors in the selection of the spark plugs themselves. Read the article “How to check spark plugs” for more information.
Shooting or popping noises in the muffler. If the mixture is lean, the muffler emits an automatic burst without strong recoil; if the mixture is too rich, it produces separate, noticeable explosions.
Individually, the symptoms may indicate various flaws, but collectively, they may indicate problems with the injector. Ideally, of course, it would be worth picking up a gas analyzer, but few people have one lying around on a shelf in the garage.
Factors causing impoverishment
There are only 3 of them, and we will look at each in detail.
- The most common is dirt. It clogs the injectors and filters, resulting in insufficient fuel supply to the engine;
- Extraneous air leak. Either a crack has appeared in one of the hoses and pipes connected to the manifold, or it itself has become depressurized, or some connections are poorly tightened;
- The fuel pump died quietly. Or it’s still alive, but works at a quarter of its strength, which means it will have to be changed anyway.
Speaking of dirt
. If your injector has mechanical injection, then it may also clog the pressure regulator. As a result, the backlash on the dosing plunger increases. Dosing channels and mesh filters also become clogged with dust and debris (this is also true for injectors with electronic-mechanical injection).
Whatever the reasons for the poor mixture on the injector, they must be eliminated immediately - if you want to drive your car, and not wander around it when it stops, stalling on a long journey.
Source: https://kalina-2.ru/remont-vaz/pereobednennaja-smes-vaz-2114
Changing the fine filter
The process of replacing this component in the Lada Kalina is a very simple action and is also included in the maintenance regulations. The most significant condition is to provide access under the bottom of the car, to where the filter itself is located, which may require a lift, overpass or pit.
How to remove the old filter? As a tool, you can arm yourself with a regular screwdriver. This operation will take a maximum of about forty minutes.
Information! Some modifications of the “Kalina” (for example, “1119”, “1186”, “21126” and “21127”) provide for fastening the filter component housing with a bolt, therefore, we can safely “change” the screwdriver to a wrench with a dimension of “10” .
1. At the very beginning of our “operation” we relieve the pressure present in the fuel circuit. For this purpose, we open the pump power circuit. This action can be accomplished in two ways:
- we take out the fuse with the number “F21”, located under the tunnel cover near the gearshift lever (to remove the cover you will need a screwdriver with a flat blade);
- disconnect the connector of the fuel pump itself, which is located under the rear seat cushion; here you will need to unscrew the 4 screws of the cover and after removing it, access to the connector will be provided.
Advice! We recommend using this method if it is necessary to replace the coarse filter component.
After turning off the pump, we start the Lada Kalina engine and wait for the fuel to be exhausted from the line, after which we observe a natural stop of the engine.
2. The filter itself is located under the tank and in most versions is secured with a plastic clip.
3. Before dismantling the filter, you will need to disconnect the fuel pipes, also secured with clamps. They should be disconnected, after which the filter can be freely removed.
Attention! The filter, which is fixed near the tank using a combination of clamp-bolt fasteners, is dismantled using a wrench of the specified standard size.
4. Installation of the new element (its catalog code is “2190-1117010”) on the LADA Kalina car is carried out between the provided stops and following the reverse dismantling algorithm.
5. We put the previously removed fuel pipes onto the corresponding fittings until the characteristic click of the clamps is felt.
New Lada: Buy eyelashes for straight headlights in body color for Lada Kalina (VAZ 1117, 1118, 1119) in the online store | Motorring online store
Important! We carefully examine the surface of the filter housing and find a schematic arrow on it, which on the installed component should be oriented towards the direction of fuel supply.
6. Make sure that the specified fasteners are securely fixed and return the fuse marked “F21” to its original place (or connect the cable harness to the pump block and install the cover).
7. Start the engine. Here you will need several correct actions:
- turn the ignition on and off immediately several times in a row;
- wait a pause to allow the pump to pump fuel into the line;
- finally start the engine.
Now you know how to change the fuel filter in a car.
When the unit does not fully start on the first try, we repeat this procedure again. This is necessary for the pressure in the fuel supply system to reach its operating value.
content .. 106 107 108 109 ..Lada Kalina. Lean air-fuel mixture
Causes
A too lean air-fuel mixture is a fairly common problem that leads to serious engine malfunctions. Errors and disturbances in the mixture formation process can occur on carburetor or injection engines, as well as on power units with additionally installed gas equipment.
A lean and rich fuel mixture is a deviation from the norm, as a result of which the engine may begin to overuse fuel, has difficulty starting, loses power in different modes, smokes, and overheats.
If a lean mixture is constantly supplied to the cylinders, the consequences can be quite serious. In a number of cases, the appearance of a white coating on the spark plugs and misfires have been noted; a lean mixture causes local overheating, burnout of valves and melting of the pistons.
The main reasons for this impoverishment are:
- insufficient fuel supply; - supply of excess air;
The main signs of a lean mixture are that the engine starts poorly and runs unstably at idle, the engine stalls immediately after attempts to start moving, while driving the driver presses the gas pedal hard, but the car does not accelerate, the power unit “does not pull” under load , twitches, chokes, etc.
Note that the symptoms of a lean mixture may resemble individual problems with the ignition system or POP failures. On carburetor engines, the engine “sneezes” into the carburetor when running on a lean mixture. The injector may experience popping noises in the intake manifold. Moreover, if the elements and settings of the ignition system are in perfect order (spark plugs, spark plug high-voltage armored wires, etc.), then you need to move on to diagnosing the intake system and power supply system. Let us add that in some cases it is possible to unscrew the spark plugs from the engine, after which the initial diagnosis is further carried out by the color of the carbon deposits on the spark plugs. Brown light soot will indicate that there are no obvious problems with mixture formation, that is, the mixture burns normally in the engine.
Black soot is a sign of excessive enrichment of the mixture. Grayish light or whitish soot indicates that the engine is running on a lean mixture, is overheating, etc. We also note that carbon deposits and its color can be considered an accurate sign only if the engine is in full working order, the ignition is adjusted and working normally, and there are no problems with the spark plugs.
Lean mixture at idle and under load: carburetor, injector
To determine the possible causes of a lean mixture, let's start with a simpler carburetor internal combustion engine. On such motors, the problem is most often localized in the power system. The list of common faults includes:
the carburetor prepares a mixture whose composition does not correspond to the operating mode of the engine; there is an insufficient supply of fuel from the fuel tank; there is a low fuel level in the carburetor float chamber; fuel does not reach the carburetor in full, that is, a leak has occurred; It turns out that incorrect settings of the dosing system (carburetor) can lead to a lean combustible mixture. For example, if the fuel level in the float chamber is set to low. Also, one should not exclude the possibility of clogging of fuel jets, individual violations during their adjustment, etc.
It is also possible that the shut-off needle in the carburetor float chamber is in the closed position. At the same time, it is necessary to check the fuel lines and fuel filters, the tightness of the gas tank, the operation of the air valve in the tank cap, and the fuel pump. As for the air supply, third-party suction is most often noted in those places where the carburetor is connected to the intake manifold, as well as in the area where the intake manifold is connected to the internal combustion engine, etc. Excess air can be sucked in as a result of loose fasteners, destruction of sealing gaskets, cracking of structural elements and other defects.
Lean mixture on the injector
The fuel injection system is more complex than a carburetor, as it includes a large number of electronic sensors. Failure of individual devices or depletion of the mixture for other reasons leads to the fact that in some cases a “check” lights up on the instrument panel.
For example, air may be sucked in at the place where the idle speed sensor is installed. One of the simplest reasons may be a cracked or damaged rubber gasket ring, which seals and seals the connection.
Let us add that problems with mixture formation and leanness on many engines are detected by the system as error p0171, lean mixture. In this case, it is necessary to conduct computer diagnostics of the engine. If a “lean mixture” engine error occurs, then you should check the intake system, power system, ECM, as well as individual elements in the exhaust system. In the list of the most common problems, experts highlight:
- contamination of injection nozzles; - air intake at the inlet; -oxygen sensor (lambda probe); -mass air flow sensor (MAF);
Constant malfunctions of the internal combustion engine due to mixture formation are usually caused by a dirty air flow sensor. This sensor simply loses the ability to correctly calculate the amount of air consumed. Also note a possible vacuum leak.
Another cause could be the EGR valve. The specified valve of the exhaust gas recirculation system becomes very dirty during operation and ceases to close tightly, as a result of which excess air is sucked into the intake through the slightly open valve. Increased air flow through the EGR valve can also be caused by a failure of the pressure difference sensor in the recirculation system.
As for the power system, the mixture becomes leaner:
decreased fuel pump performance; contamination of fuel filters and fuel supply lines; decreased performance and contamination of injection nozzles; leaks through the fuel pressure regulator in the fuel rail; In the exhaust system, special attention should also be paid to the lambda probe and catalyst. Quite often, it is the lambda that shows a lean mixture, when scanning, the error “lean catalyst mixture” is recorded, the diagnostics determines an incorrectly functioning oxygen sensor, a lean mixture is formed due to malfunctions of the oxygen sensor and a failed/burnt-out catalytic converter.
Checking and eliminating causes
General diagnostics begins with the ECM sensors. Typically, the P0171 code occurs due to a malfunction of the MAF sensor (mass air flow sensor). The fact is that the specified sensor ceases to respond in a timely manner to changes that relate to air flow. The cause is usually an accumulation of contaminants.
Contamination of the MAF sensor can occur due to the ingress of fuel vapors that penetrate through the intake and throttle assembly at times when the engine is not running. As a result, a layer of paraffin forms on the sensor, as well as on its wiring, which causes the sensor to send an incorrect signal to the ECU about the lack of air to prepare the mixture. In this case, the control unit automatically reduces the fuel supply so that the amount of air increases. The result is a lean mixture at different operating modes of the power plant. After this, error P0171 occurs; in parallel, error P0100 or P0102 can be detected. Such codes usually indicate problems and malfunctions in the mass air flow sensor.
To eliminate the causes, the sensor must be removed, after which it is cleaned. You can use carburetor cleaner as a cleaner. The device must be cleaned carefully so as not to damage the sensitive element. If cleaning does not help, then the sensor needs to be replaced.
If the mass air flow sensor is in working condition, then further checking is to determine possible depressurization and air leaks. Defects may occur in the inlet pipe area, in the throttle body area.
It is necessary to separately check all vacuum hose connections, intake manifold mounting location, throttle body gasket, intake manifold gaskets, etc. Also, cracking or other damage to the crankcase ventilation system pipes, fuel vapor recovery system hoses, and plugs on the intake manifold is not allowed. The exhaust system must be completely sealed (without corrugations, etc.), since defects near the installation site of the oxygen sensor will also lead to mixture formation failures. As for the EGR system differential pressure sensor, if present, this sensor can also cause the P0171 code to appear if it fails or malfunctions. The specified sensor is located on the engine, connected to the main pipe for supplying exhaust gases to the USR using two separate pipes. The sensor controls the exhaust recirculation valve.
Contamination of the differential pressure sensor affects its sensitivity, causing the sensor to signal that not enough exhaust gas is entering the system, thereby forcing the EGR valve to open for a long time. This discovery leads to more air in the mixture and depletion occurs. Now let's move on to checking the fuel system, since reducing the volume of fuel supplied in some cases does not allow the mixture to be enriched, leaving it lean. Fuel supply diagnostics involves the following steps:
First of all, you should make sure that the fuel filters allow the fuel to flow in the proper volume. Then you will need to measure the fuel pressure in the fuel rail, and also make sure that the pressure regulator is working. At the same time, you may need to check the fuel pump and its performance. Another operation will be diagnosing the injectors (preferably on a bench), as well as cleaning them if necessary. Having a professional car scanner or a compact device that connects to the OBD II diagnostic connector allows you to evaluate a number of parameters without disassembling the engine and removing equipment. If error P0171 appears with some frequency, then the cause may be an unreliable connection or damaged electrical contacts. In this case, the wiring of the sensors, wiring harnesses to the controller, and ground are checked.
Gas equipment malfunctions: “lean mixture” error on gas
You need to understand that HBO is a separate power system. For this reason, to check the lean mixture when driving on gas, only some of the operations will be the same as in the case of determining the cause of lean mixture on a conventional carburetor or injection engine.
At the initial stage, you should check how the car behaves on gasoline. In some cases, it happens that when switching to gasoline, the car works normally, no errors occur. However, after switching to gas, misfires begin, the check light comes on, etc. If no air leaks are detected anywhere, and the electronic sensors are also in perfect order, then special attention should be paid to the following points:
correct installation and configuration of gas equipment; cleanliness of gas filters and gas supply channels; condition and settings of the gas reducer; gas injectors, their performance and quality; Taking into account the fact that there are many generations of HBO, various malfunctions occur on such systems. So in some cases it is necessary to diagnose certain installed elements.
For example, the first generations of gas installations (GBO-I, GBO-II) were characterized by such a problem when the performance (power) of the installed gearbox could simply be insufficient, as a result of which when operating in loaded modes there is not enough gas, the mixture becomes lean, the engine does not pull , errors appear, etc.
Also, the gas injectors themselves can be a common cause of a lean mixture, regardless of the generation of gas equipment. It is enough to imagine a situation where the electronic unit opens all the injectors for the same time, but one of them closes earlier. As a result, the mixture will become lean in only one of the cylinders.
content .. 106 107 108 109 ..