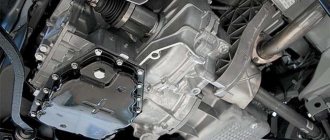
Replacing the outer CV joint of a VAZ 2114
Hi all. We will replace the outer CV joint of the VAZ 2114. This is not a difficult job; if you have the tools, you can do it yourself.
Tools:
- good wrench and head for thirty
- hammer and screwdriver to hit
- pipe
- wooden block
- universal tongs and pliers
Vendor code:
- 2108-2215012 — external CV joint. I recommend installing a CV joint from GKN-Spidan, Loebro.
Step by step replacement
1. Remove the decorative cover of the hub nut and flare it.
2. We rip off the hub nut, if you can’t rip it off, then put the pipe on the knob for the lever.
3. Remove the wheel.
4. Unscrew the 2 ball fastening bolts.
5. Completely unscrew the hub nut.
6. Remove the rubber band securing the brake hose from the groove and pull the hub towards you so that the CV joint comes out of the hub.
7. As a rule, the boot is already torn, so we place the pipe on the inside of the CV joint and knock it out of its seat.
8. Remove the metal ring on the drive shaft. This ring comes with the new CV joint and needs to be replaced.
9. Fill the CV joint with lubricant, it is included in the kit.
10. We put the ring on the drive shaft.
11. We put on the boot, lightly coated with the same lubricant as in the CV joint.
12. We put the CV joint on the splines on the drive shaft and stuff it through a wooden adapter.
13. Move the boot closer to the CV joint and secure one side of the boot with a clamp. Tighten the clamp using pliers.
14. Fix the other side of the boot with a clamp. Tighten the clamp with pliers.
15. Mount the CV joint into the hub. Install the washer and tighten the hub nut. All this comes new complete with CV joint.
16. Fasten the two ball bolts. Use a pry bar to press the lever down and align the ball mounting holes.
Do everything slowly so as not to tear the new boot.
17. Install the rubber band into the groove that secures the brake hose.
18. Install the wheel and remove the car from the jack.
19. Tighten the hub nut.
20. Raise the car and remove the wheel.
21. Roll the nut and install the wheel.
Checking the condition of the CV joint
To carry out diagnostics it is necessary to use several methods. After all, you need to determine whether the VAZ-2109 CV joint needs to be replaced. The very first is the appearance of a crunch when cornering. As a rule, this is a sign that the outer hinge is very worn and requires replacement. In addition, a similar crunching noise may occur when reversing. This is not fatal, but it is also not very pleasant, since you have to forget about a comfortable ride.
The main thing when diagnosing is not to confuse the symptoms with those that occur when certain suspension elements break down. For example, when moving in a straight line, only heavily worn joints will crunch. The most common cause of such sounds is the ball joint. A more detailed picture can be obtained if the car is placed on a lift and the entire suspension is suspended. In this position, you can determine what kind of play the hinge has, and whether there is a knock in the ball joint. In addition, this position is most convenient when replacing the outer CV joint of a VAZ-2109.
You can talk endlessly about how to change joints correctly, what lubricant to use, which manufacturer you should trust. In fact, the most suitable components are those whose manufacturers supply them to the AvtoVAZ plant. When replacing the external CV joint of a VAZ-2109, preference should be given to the manufacturer who supplies them to the plant. As practice shows, the service life of these elements turns out to be higher than that of foreign analogues. No matter how much they scold our auto industry, the reliability of domestic units is an order of magnitude higher than the vaunted German or Italian ones.
How to look younger: the best haircuts for those over 30, 40, 50, 60 Girls in their 20s don’t worry about the shape and length of their hair. It seems that youth is created for experiments with appearance and daring curls. However, already last.
Our ancestors slept differently than we do. What are we doing wrong? It’s hard to believe, but scientists and many historians are inclined to believe that modern man sleeps completely differently than his ancient ancestors. Initially.
10 charming celebrity children who look completely different today Time flies, and one day little celebrities become adults who are no longer recognizable. Pretty boys and girls turn into...
11 Weird Signs That You're Good in Bed Do you also want to believe that you please your romantic partner in bed? At least you don't want to blush and apologize.
Never do this in church! If you are not sure whether you are behaving correctly in church or not, then you are probably not acting as you should. Here's a list of terrible ones.
9 Famous Women Who Have Fallen in Love with Women Showing interest in people other than the opposite sex is not unusual. You are unlikely to be able to surprise or shock anyone if you admit it.
Replacing the inner and outer CV joints on a VAZ 2114
Knocks in the chassis are a frequent companion in life for VAZ 2114 owners. Many elements that can cause knocking, bad roads, and low-quality parts can cause extraneous noise in the suspension.
A common source of the problem is the angular velocity distributor, or CV joint (grenade). The process of replacing a part is simple, so you can change it yourself. The question is often asked which CV joint for the VAZ 2114 is better: regular or tripoid. Among the most common arguments: tripoid is more reliable, but it hums and vibrates at high speeds. The regular one is less reliable, but the car handles better at high speed. However, you can find opposing opinions and arguments on this matter.
There is no clear answer which type is better. Operation in harsh conditions showed that there is no fundamental difference in driving sensations and reliability. The main thing is to buy a high-quality grenade made of well-hardened metal, install it correctly and monitor the safety of the anthers.
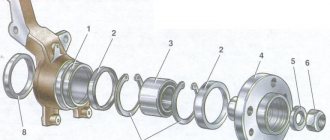
Scheme for disassembling the VAZ 2114 CV joint
Causes of malfunction
Among the main causes of CV joint failure:
- low quality metal and lubricant;
- insufficient amount of lubricant;
- rupture of the boot, entry of dirt.
The CV joint is a moving element, so it heats up when moving. A lack of lubricant or its lack of the necessary properties leads to wear of the hinges and the appearance of extraneous sounds. Due to the rupture of the boot, dirt gets into the grenade, solid particles harm the moving elements.
Fault diagnosis
The VAZ 2114 has 2 external and 2 internal CV joints. First you need to determine which one is knocking. The optimal test would be on a suspension diagnostic stand. If this is not possible, diagnosis by ear is possible.
Two signs indicate a grenade malfunction in a VAZ 2114:
- the sound resembles a crunch;
- It usually appears when turning.
The simplest and most accurate way to do a garage check is as follows:
- Place the car on a flat surface;
- Turn the wheels to one side (to the middle position or a little further);
- Drive off with medium speed. It is worth remembering that starting too smoothly may not reveal a crunch due to insufficient load on the CV joint, and starting too abruptly may lead to the drive flying out of the wheel.
- Repeat the operation by turning the steering wheel in the other direction. The appearance of a crunch indicates a malfunction of the outer CV joint on the side in which the steering wheel is turned.
Visual detection of ruptured anthers will also be a sign of a CV joint failure. If you discover a damaged protection for any grenade, it must be immediately removed, disassembled and cleaned. If there is enough grease and there is no significant wear on the hinges yet, it is enough to replace the boot and fill it with new grease. If the wear of the balls is obvious, it is better to change the grenade.
CV joint boot VAZ 2114 with a defect
It is more difficult to diagnose a malfunction of the internal grenade on a VAZ 2114. If it malfunctions, it crunches when starting off in a straight direction, and not when turning. But the same symptoms, for example, include play in the steering rack or wear on the engine mounts.
Sometimes the problem can be diagnosed from the pit by tugging on the drive from the gearbox side: strong play or the appearance of extraneous sounds indicate that the internal CV joint should be replaced.
Replacement
It is better to change a grenade yourself with an assistant.
Algorithm:
- remove the wheel, remove the wheel bolts and the hub nut washer;
- unscrew the ball from the steering knuckle;
- pull out the splined end of the outer CV joint;
- pull out the drive with the internal CV joint from the gearbox;
- if you plan to remove both drives, remove the internal grenade from the drive and insert it into the gearbox so that the differential does not move after removing the second drive;
- remove or cut off the anthers, thoroughly clean all hinges with a special liquid or just gasoline;
- when filling the CV joint, use a special lubricant suitable for these purposes; ordinary lithol does not have the required temperature characteristics;
- the retaining rings of each CV joint and the hub nut must be replaced;
- The inner CV joints are inserted into the gearbox until they are completely fixed; when adjusting, you can use a hammer with a wooden spacer.
It is quite possible to diagnose and replace a CV joint with your own hands. This does not require sophisticated car mechanic skills and engineering knowledge, but it allows you to get in touch with the car, see and feel how it works. Whatever the reason for the crunching sound, you need to check the condition of the grenade as quickly as possible. Delaying this will almost certainly mean bringing the part to the point of complete wear, and timely repairs will allow you to get by with “little loss.”
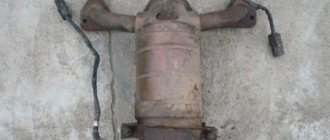
Causes and malfunctions of the CV joint
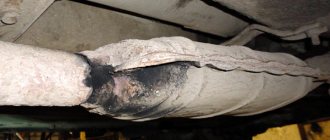
The reason for replacing the “grenade” (as motorists nickname the CV joint due to its external similarity) is usually the ingress of sand and dirt through a torn boot (cover).
A damaged boot can often not be detected immediately, and when operating a unit with this fault, 200 km of run is enough before it completely fails.
The nature of the malfunction is probably familiar to all motorists; it is a strong crunching sound when turning, while simultaneously accelerating. If you discover such a symptom, it is necessary to repair the drive as soon as possible.
The constant availability of spare parts for domestic cars in stores, as well as their affordable price, makes it possible to make CV joint repairs not too costly in financial terms.
But you should know that, for example, replacing a CV joint boot on a VAZ 2109 in terms of the scope of work is practically no different from replacing an internal or external drive.
Therefore, in practice, in terms of labor intensity, repairing a CV joint cannot be called easy; moreover, skills in working with metalwork tools and compliance with all safety regulations when performing such work are required.
A little about the device
Two VAZ 2109 drives consist of four CV joints, two of which transmit torque to the axle shaft directly from the gearbox and are called “internal”.
The other two are installed at the ends of the axle axles and transmit torque directly to the wheels, being called “external”.
This scheme allows the rotation of the wheels when turning and simultaneous (constant) operation of the car’s suspension, so we can simply say that the external drives are responsible for transmitting torque during turns, and the internal drives are responsible for the vertical movement of the wheel (hitting an obstacle, roll, etc.) .P.).
Replacing the outer CV joint boot of a VAZ 2114
Yesterday late at night I came from the garage, as in that song “Tired, hungry and angry, but very pleased with myself!” Anthers have been replaced. And it was like this.
So for work we need:
- CV boots - 2 pcs.;
- Anther clamps - 4 pcs;
- Hub nuts - 2 pcs;
- CV joint grease - 1 tube;
- Head for 30 (I took it with touch control using a crowbar) - 1 piece;
- Well, and a bunch of other tools (wrench, tweezers, chisel, hammer, vocabulary of obscenities, etc.)
Work plan
So, let's begin. We remove the cap from the wheel (those who don’t have it have less work), remove the hub nut cap. Unscrew the nut, I used a dowel, take a 30mm socket and loosen the hub nut. Then loosen the wheel bolts.
All this needs to be unscrewed
We jack up the car and remove the wheel, immediately put it under the car (just in case), and unscrew the hub nut.
Unscrewed
We unscrew the bolts securing the ball joint to the steering knuckle (I unscrewed it with a balloon)
Those that are higher
We press the lever down using a crowbar, hold it in this position with your knee, and at this time we move the steering knuckle and pull the drive out of the hub (after turning the steering wheel to the left). Cutting off the old boot
Drive pulled
Well, then it’s time to remove the CV joint from the shaft. I read that it can be removed by lightly tapping the inside. It wasn't like that. I remembered all my swear words, but it didn’t do any good. It was too late to go to the store for a puller, so I took out a welding tool and invented a puller. With his help, the CV joint was removed within five minutes. But I couldn’t do anything with a hammer in two hours.
Here's a simple helper
After that, we take gasoline and thoroughly wash the CV joint, at least to this condition
It’s clean, and most importantly, it can be easily tossed and turned in all directions.
Well, then we apply grease inside, put the boot on the shaft and put the CV joint in place. To do this, we screw on the old nut and, with a short but sharp blow of a hammer, drive it until the thrust washer. We put the boot on the CV joint and secure it on both sides with clamps. We put the drive in the hub and attach a new nut.
Collected.
Next, install the wheel, lower the car and tighten the hub nut with the same force as it was unscrewed. And don’t forget to seal it
Energized. I used a dull chisel for this.
We repeat the same procedure on the right wheel. That's basically it, the boots have been replaced, the car is running, I now have a puller for CV joints and invaluable experience in removing them.
Possible causes of crunching
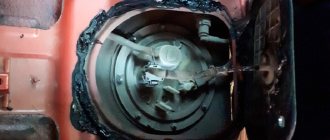
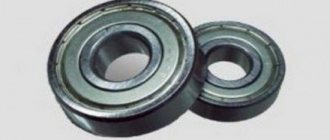
An experienced driver can by ear determine the location of a car malfunction. This quality comes with age. However, it is very difficult to confuse the crunch of a grenade with another sound. Let's figure out what a CV joint is. On the outside it is made in the form of a bowl, and on the inside the body has semicircular grooves. There are six of them.
In the internal space there is a spherical fist (clip) with 6 grooves and a splined connection for the axle shaft. Rotation occurs through the force that the cage transmits to the body through the balls located in the separator. The balls, moving along the grooves, change the angle between the axes.
- low-quality or defective products, including counterfeit ones, have been identified;
- low-quality lubricants are used or they are absent;
- boot damage;
- driving on bad roads or aggressive driving style.
There are 2 grenades installed on the drive wheels (internal and external): the first transmits rotation from the gearbox, the second - from the axle shaft to the wheel hub. Therefore, if an extraneous sound occurs, you need to determine which CV joint is making the sound (located on the left or right, inside or outside).
The design of these grenades is the same, they differ only in size (the outer one is smaller). Outer CV joints wear out more intensively because the loads and turning angles are greater. Knowing the design and difference of grenades, which ones wear out, how quickly and why, the car owner will more carefully monitor the condition of the CV joints.
How to change the CV joint on a VAZ 2114
Replacing CV joints on VAZ 2115, VAZ 2114, VAZ 2113
In front-wheel drive cars, one of the most problematic areas is the constant velocity joints. Abbreviated as CV joint or "grenade". The CV joint is a kind of ball bearing; its races have transverse grooves, which allows you to change the angle between the drive and driven axle shafts. All elements of the CV joint are made of ultra-strong alloys, the wear of which occurs extremely slowly, but, as practice shows, signs of a CV joint malfunction can appear even in a car that has recently left the assembly line of a car plant.
On cars of the VAZ family, it often becomes unusable after
55,000 km .
Causes and symptoms of CV joint failure on a VAZ 2115
The most common reasons:
- low quality CV joints, installation of fakes or defective spare parts;
- lack or poor quality of lubricants;
- damage to the boot and entry of abrasive debris or water into the mechanism;
- aggressive driving style and disgusting condition of the road surface.
One of the signs of replacing a VAZ 2114 CV joint is the appearance of a characteristic “crunch” . This sound can only be produced by balls that roll along grooves, because... have too much output. Working in close contact under constant load inevitably leads to changes in the properties of rubbing parts, their sizes, and the formation of wear.
Where there is no close contact of these elements and extraneous noise appears. The sound can appear at any time, but usually it occurs when turning, sharp acceleration, or overcoming obstacles. There are other signs indicating a hinge failure :
- slight jerks when starting the car or changing dynamics;
- play of the shaft located between the CV joints when trying to move it in different planes.
Replacement frequency
It is hardly possible to name the exact mileage after which it is necessary to replace 2114 grenades. In many ways, the service life of the elements depends on the following factors:
- Manufacturer. Domestic and European grenades last much longer than the Chinese ones that have flooded the market in recent years.
- Metal quality. The main thing is that the metal is hardened, otherwise wear out will occur very quickly.
- Driver's driving style. If you are accustomed to an aggressive style, then you cannot envy the grenades, as well as the entire car. The resource of elements decreases.
Signs of failure of the outer grenade (CV joint).
Most often, the outer CV joint of the VAZ-2109 is replaced, since its resource is approximately three times less than that of the internal one. But the repair algorithm is generally similar.
Even to install new boots, you will need to completely dismantle the drive - it’s much more convenient to work this way. To determine if grenades are damaged, you need to do the following:
- Turn the steering wheel to the left all the way.
- Drive away and listen for any extraneous sounds.
- Turn the steering wheel to the right all the way, then drive off again and listen to the sounds.
If a characteristic crunch appears, you need to change the grenade. It is useless to repair it - these elements cannot be restored. If both CV joints are faulty - internal and external, then it will be easier to install a new drive assembly. At least there won't be any problems knocking down old grenades.
Unlike other cars, it is especially difficult for the VAZ-2109 to keep the grenade boot in working condition for a long period. The main reasons for its failure, first of all, can be unfavorable climatic and external factors. As a result, cracks will form on the parts, and further operation will be impossible.
There are two options here:
- signs that your grenade has already broken,
- signs that the grenade will soon come out and break.
Of course, the first sign of a malfunction of the external grenade is a crackling sound. If you hear a crackling noise while driving with the steering wheel turned, it is definitely a CV joint. The greater the angle of rotation of the wheel and the harder you press on the gas, the louder the clicks. Another sign that does not always appear is vibration on the steering wheel at speeds above 80 km/h. The vibration is only slightly similar to the vibration from an unbalanced wheel. It usually manifests itself as a slight twitching of the steering wheel.
If the CV joint breaks, the car will stop moving. In any gear engaged, press the gas, the speed increases, but the car does not move.
How to understand that it is the outer CV joint that has broken, and not the internal one or the clutch in general (the first signs of failure are similar to the signs of a clutch failure)? First of all, start the car and put it in any gear. Next, open the hood and look in turn at each of the shafts going from the box to the wheels (one short, the other long). If any shaft is spinning, it means that the CV joint has broken on this side.
The hinge components are made of high-quality materials, and the working surfaces have high-quality processing. Therefore, VAZ-2108 CV joints can work for a significant period without any intervention or maintenance of the unit itself.
But there is one caveat - the reliability of the unit is maintained only if there is no contamination. The ingress of sand and dust, which are abrasives, intensively wear out the working surfaces, which leads to the destruction of the hinge.
The assembly is protected from contamination by anthers - special rubber elements, fixed on the shaft with a clamp on one side, and on the outer race on the other.
But the resource of the anther is limited. Due to constant contact with the external environment, the rubber “ages”, which leads to the formation of cracks through which sand and dirt penetrate into the unit.
Diagnostics of the drive comes down to inspecting the anthers. If even minor cracks are detected, an immediate replacement of the CV joint boot 2108 is required. Additionally, the element is washed and fresh lubricant is added.
A sign that a VAZ-2108 CV joint needs to be replaced is the appearance of a pronounced crunch and clicking sound when turning the steering wheel. With slight wear, third-party sounds appear only at the extreme positions of the steering wheel, but as wear progresses, a crunching sound appears at lower turning angles.
At the initial stages, you can still try to extend the service life by washing, adding lubricant and replacing the boot. But we note that if a crunch appears, it means that the working surfaces have already begun to wear out, and these procedures will only delay the replacement of the unit, but in the end it will have to be done.
First of all, when driving, there may be extraneous noise from the front. First you need to make sure that the CV joint boots are not torn and there are no cracks or oily marks on the surface. To check, just turn the steering wheel all the way and carry out a visual inspection behind the wheel.
Found any damage? Change the boot immediately so that stones, small particles, and water do not subsequently get into the CV joint mechanism. Otherwise, the hinge will quickly become unusable.
It is quite easy to determine the need to replace the hinge itself - during turning maneuvers the driver notices characteristic knocking noises. The presence of play during swinging of the drive shaft will help confirm this fact.
Tripod CV joint with needle bearings
A tripoid grenade design is often used as an internal hinge on modern cars:
In the body of such a hinge there is a three-beam fork, pressed onto the splines of the driven shaft. Three working rollers are attached to the ends of the fork, which can move along the guide grooves of the body when the unit is rotated or axially displaced.
To protect tripod joints from wear and metal scuffing, special synthetic compounds without solid additives are used.
How to remove a grenade from the drive?
The internal grenade is removed from the gearbox by light tapping. But one condition must be observed - if you remove two inner grenades from the box at once, do it one by one. First, take out one, replace it with a plug, then the second. Otherwise, the differential may simply fall apart. And for repairs you will need to completely disassemble the gearbox.
Now let's talk in more detail about how to change the external grenade on a VAZ-2109. This is not a very difficult matter, but it will require skill. The first thing you need to do is cut off the old boot - you won’t need it anymore, so you can remove it in this “barbaric” way. The clamps, of course, also need to be removed.
After this, clamp the shaft tightly in a vice so that the grenade is at the bottom. Position it so that it sits flat on the shaft - you can knock it down faster. Apply several sharp blows through the wooden spacer. The grenade should come off the shaft without any problems. You cannot strike with metal objects, as you can destroy the integrity of the element. When replacing grenades on a VAZ-2114, it is necessary to remove the drives completely, this will significantly simplify the repair.
Installing new hinges
And the final stage remains - installing new hinges on the drive. You already know almost everything about how to change a grenade on a VAZ-2109. All that remains is to install a new element.
First, wash the shaft, get rid of dust and lubricant residues, then put on a new boot. Next, perform the following manipulations:
- Install a new retaining ring.
- Carefully, trying not to damage it, place the grenade on the shaft. To make it sit down, you need to apply several sharp blows through the wood spacer.
- Apply lubricant under the boot and on the inside of the hinge. By the way, the kit comes with a small amount, it is recommended to add a little more.
- Secure the boot with two clamps.
Once you have assembled the entire drive, you can begin installing it on the car. The work is done in reverse order. First put the inner CV joint in place, then the outer one.
Tighten the nut and secure it with a chisel. To prevent corrosion, you can apply a small amount of Litol to the nut and close it with a cap. Now you know how to change a grenade on a VAZ-2109 yourself. The procedure will not take much time, but you can save a lot of money. Workshops will charge about the same amount for repairs as a set of hinges costs (about 1,000 rubles).
Hello!
My VAZ 2109 requires replacement of the outer grenades, that is, the CV joint. I bought these from a friend at an interesting price:
now I’m hesitating on further actions: install different ones, or buy Belmarg or trial and install the same ones? If you buy, which one? OR BOTH BULLSHIT. -) WHAT TO DO?
Comments 67
I would take GLO, Belmag is definitely bullshit, I don’t know about the second one, well, since you bought it, put different ones, there’s nothing supernatural in this, as soon as one of them crunches, you take the same ones, although if you keep an eye on the anthers, they’re unlikely to crunch on you))
The left outer GLO has already passed 60 thousand, the rest of the Lada-Detal - about 45 each. Everything is normal, no crunch. The boots on the GLO and the internal ones are original, on the external Lada-Detal I changed them once.
Set it and forget it. When necessary, they will remind you of themselves... sooner or later, and there you will already draw conclusions, which are better, which are worse. And so many different companies will recommend it, you’ll hear enough, buy it, and it will move a little and then crunch again. Either people gave the wrong advice, or marriage, or a leftist...
I used both options. About 20 thousand passed. So it’s complete crap. I put it on, so to speak, the original - I don’t worry.
enough for a couple of years, don't worry
Belmag itself built the norm, everything is done according to GOST standards. Trialli CHINA soft metal .GLO is also shit. China will not send us good things.
In my opinion about bullshit, how much did you even get it for?
DIY car repair and maintenance
Step-by-step plan for replacing CV joints (grenade)
So, the grenade (both internal and external) on front-wheel drive models of domestic “cars” (God forgive me) starting from the VAZ 2108 and ending with at least 2115 is the same (well, maybe from different manufacturers and different service life of the final ). The same principle applies to Priora, Kalina and Grant.
Greetings, dear visitors! I want to devote this article to replacing the external grenade. If you follow the sometimes unclear terminology (which I don’t always like) - replacing the constant velocity joint, i.e. CV joint. I try to write my articles in everyday language, in which people ask for information.
The photo above shows a damaged Lada 2114, already repaired. The front right side, which we are repairing, was collected in a heap by a frontal impact along with the entire front end (look at the gaps between the parts after the repair, in my opinion, the repair was done perfectly). Looking under the front right wheel I noticed that the drive was bent. I jacked up the car slightly (after making sure the car wouldn't roll), loosened the wheel bolts and immediately removed the cap and loosened the CV joint nut.
If you don't loosen it while the wheel is on the ground, it will be very difficult to unscrew it later. After which, I jacked up the car completely and removed the wheel and unscrewed the grenade nut. There is a washer under the nut (don't lose it, as the new CV joint doesn't come with one).
Next, you need to unscrew the ball. This can be done by unscrewing two 13mm bolts, or you can unscrew the bottom nut of the pin by 17mm and knock it down by pressing it down with a pry bar, while simultaneously tapping it with a hammer (not on the pin or ball), which is what I actually did. Additionally, release the brake caliper hose. This action is shown in two photographs below.
By moving the hub to the side (having previously pushed the grenade inward with the mounting tool and pulling the hub towards us), we release the outer grenade, which we would simply replace without pulling out the entire drive along with the inner CV joint,
...if it weren't for the drive that was bent into a ram's horn. And you see the fate of the outer grenade in the photo - it crumbled.
So, let's replace the drive too. The photo below shows a CV joint from an Italian manufacturer called TRIALLI (Trialli) for 900 rubles. Quite a cheap product of very good quality.
And the photo below illustrates the components of the CV joint:
- The grenade itself.
- Two clamps.
- Protective cover (boot).
- Retaining ring.
- A tube of special lubricant (calculated for the entire service life of the hinge, if the case remains intact all this time). There is another cheap but excellent CV joint - 4 for lubricating a grenade for 50 rubles in any auto store
- Hinge nut.
Since we were changing the drive, we had to knock off the support washer from it and replace it with the new drive, which should fit clearly into the lower groove (photo below). In theory, they should be installed on the new drive anyway. After that, put on the boot and lower it into its seat.
And install the retaining ring. If it is too stretched, first squeeze it and place it in the upper groove. The easiest way to do this is with cone-shaped pliers, inserting them inside the ring and stretching the ring to fit it into the groove. And then, using a special wrench or simple pliers, tighten the lower clamp, but do not tear it off.
Next, you need to inspect the inside of the hinge for any flaws or debris. Then fill it with lubricant. Insert the neck of the tube into the separator, press it firmly and press the lubricant until it comes out through all the cracks. Usually almost the entire tube fits there.
After this, you need to plant the grenade, forcing it to slip down through the locking ring. And for this, you can use an ordinary piece of wood (so as not to damage the thread) and a hammer (see photo below). A light tap on the board will do the job.
Squeeze the remaining lubricant into the boot and put the cover on the CV joint. But, before tightening the clamp, pry the edge of the boot with a screwdriver and release the air from it.
After that, you can install the clamp (strictly in the groove), tighten it as much as possible by hand and engage the teeth, and then tighten it with pliers.
In this case, we took out the drive, and to avoid oil leaking out of the box, we prepared the old inner CV joint in advance (you can also hammer in a wooden plug covered with a clean rag) and after removing the drive together with the grenade, we immediately inserted the old joint. We worked together, so we made it, losing only a few grams of oil.
And just like that, having taken out the “plug”, we quickly inserted the drive into place, straightened it on the grenades and, with a moderate blow, seated the inner CV joint.
After which, you need to insert the outer grenade into the splines in the hub (exactly along the splines, without damaging them), straighten the grenade relative to the drive and push the hub inward.
Estimated cost
Russian car owners can buy a CV joint on a VAZ 2109 for about 400-1500 rubles.
Estimated cost of different types of grenades:
- External - about 900 rubles .
- Internal – about 1400 rubles .
Approximate prices for products from different companies:
- AvtoVAZ - from 1200 rubles .
- GKN – from 1400 rubles .
- Hofer – from 850 rubles .
An old spare part in good condition can be purchased for 400-700 rubles .
Tools for repairs
The procedure for replacing VAZ grenades is quite simple, but you will have to suffer a little, since knocking the old element off the drive is problematic. You need these tools:
- Set of sockets and keys. In particular, you will need a socket wrench or a “30” socket.
- Jack (it is best to use a hydraulic one paired with a support).
- Hammer.
- Chisel. Before replacing the grenade on the VAZ-2109, it must be removed; to do this, you will need to loosen the nut.
- Capacity 4-5 liters.
- Puller for retaining rings.
- Vise.
You will also need a new repair kit. It consists of a grenade, a locking ring, lubricant, a nut, a boot and two clamps.