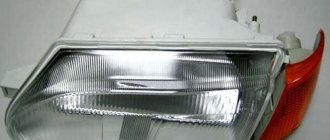
How to change the bulbs in the headlight of a VAZ 2170
To replace the low beam bulb, wear clean gloves and disconnect the battery.
Then remove the rubber protective cap, which is located closer to the fender.
Carefully disconnect the wires.
- Remove the latch (to do this, press down and remove it from behind the hooks).
- Remove the lamp and install a new one. Installation is carried out in reverse order.
Replacing high beam bulbs is no different.
If you frequently drive at night, especially in bad weather, make sure you always have a spare set of light bulbs in your car. Probably every driver has experienced the fact that one lamp burns out at night and the lighting becomes much worse. You also endanger other road users, since it is difficult to assess the situation during the same overtaking when one of the headlights of the oncoming car is not on.
To replace the bulbs in the rear light, you will need to dismantle it. (see Replacement of the rear light)
Remove the taillight and turn the parking lamp (in the Priora, the parking light is combined with a double-filament fog lamp).
Remove the lamp by turning it counterclockwise.
Install a new one. Make sure that the tabs on the plinth fit into the grooves on the parton. All other lamps are changed in the same way.
To replace the rear license plate lamp on a Lada Priora you need:
The best optics for the VAZ 2110
Unscrew the trunk lid attachment, which is secured with 4 bolts
Remove the socket and change the light bulb.
If you cannot remove the cartridge itself, remove the flashlight itself
To do this, you need to bend the plastic clamp a little (Caution, they are very fragile). After this, you can apply a little more force to unscrew it. Install everything in reverse order
Install everything in reverse order
If you want to change the trunk light bulb, then:
Pull the lantern out of the opening as in the picture below.
- Bend the antennae that hold the lamp and change it.
- Reinstall the lantern in its original location.
At this point the repair can be considered complete. Connect the battery and check operation. If the replacement does not help, then most likely you should check the wiring.
Video on the topic
How to change the light bulbs in the headlight of a Lada PRIORA
During the operation of the car, drivers may encounter minor troubles. For example, at night they notice that the headlights do not light up. If the check does not reveal faulty fuses, then the cause may be a burnt out light bulb.
We are looking for reasons for fogging headlights
Before replacing lamps, make sure the optics are turned off. To replace the lamps in the left headlight of the Priora, there may not be enough free space; to do this, remove the battery. Do not touch the lamp bulb with bare hands; use cotton gloves. If there is dirt on the bulb, it is recommended to wipe the lamp with a swab moistened with a 70% ethyl alcohol solution.
Lada Priora headlights can be of two types:
- High beam and DRL (daytime running lights) are combined. Option A - with two protective plugs.
- high beam without DRL. Option B - with one large plug.
Priora headlights | Club LADA
Not long ago they came up with an interesting way to make your car stand out from the crowd - by making turn signals instead of dimensions. That is, one area of the headlights performs two functions at once (direction indicators and side lights). There are many ways to implement such tuning, but we will focus on one of the simple ones.
Headlights play one of the main roles in the exterior design of a car.
It doesn’t matter whether it’s repairing or tuning headlights, it all starts with their dismantling. We are studying the question of how to remove the headlights of a LADA Priora
Many saw angel eyes on a BMW for the first time. Now, thanks to the rapid development of the lighting industry, you can easily install angel eyes with your own hands in almost any car, and Lada Priora is no exception.
Without a doubt, tuning headlights significantly changes the appearance of a car, which is why tinting headlights is very popular. You can tint the head optics with film or paint. In this article we will figure out what is required to paint the Lada Priora headlight mask with your own hands.
In the Norma configuration on the Priora there are no PTFs, and there is also no wiring harness for them, a power button in the light control module (LCM) and a relay. But this is not scary, because you can install and connect fog lights on a VAZ 2170 with your own hands.
The life of the lamps in the headlights is not eternal, so they should be changed during the operation of the car. This article contains instructions for replacing Priora lamps with your own hands.
Dimensions Priora initially have a yellow color and a dim glow. To get rid of yellowness and increase brightness, you can replace the lamps in the dimensions with LEDs.
Tuning Lada Priora headlights, on the one hand, can be like decorating a car, on the other, improving the headlights. The most correct way to improve lighting is to install bi-xenon lenses in the Priora.
How to inexpensively, quickly and easily tune Lada Priora headlights? Install eyelashes! You can make them yourself, or buy a ready-made kit, but how to install them correctly? First things first...
If you decide to tune the optics of a VAZ 2170 (paint the headlight mask, install angel eyes), then the first thing you will need to do is remove the headlight glass. Let's look at all the intricacies of disassembling a Priora headlight with our own hands.
Almost every owner had to change the headlights on a Priora. And the reasons for this may be different:
- road accident damage
- to perform modifications (tuning)
- to eliminate fogging (sizing)
- to replace the internal parts of the headlight - corrector, reflector, etc.
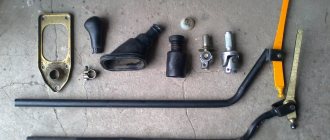
To replace the headlight unit on a Priora, we will need the following tool:
- Phillips screwdriver
- 8 mm head
- Ratchet
- Extension
Adjusting headlights using a corrector
You can make adjustments without disassembling the head optics. On the back of the headlight you will find adjustment screws that can be used to lower and raise the light beam. To set it up, you will need to place the Lada Priora on a flat surface opposite a wall or garage - the distance from the headlights to the wall should be 5 meters. Also check whether the corrector is working or not. It is recommended that a person of similar build sit in the driver's seat during the inspection.
The Priora corrector should be set to “0” - only the driver is present in the car. Under the hood you will find the adjustment bolts. While the corrector is working, the second headlight must be covered with thick cloth. The adjustment can be considered complete if lines “A” and “B” pass through the intersection of the inclined and horizontal beams of light, and the upper limit of the light coincides with line “2”.
Tuning priors: tuning headlights, bumpers, body kits 2021.
Painting headlights
Tuning the front and rear lights on a Priora is not limited to increasing the aperture ratio. They can be tinted. But this does not mean that you need to paint the glass - the light will simply become cloudy. The tinting effect is obtained due to a change in the color of the substrate. This is done using high temperature paint.
This is done in the following order:
- The entire block is removed and the backing is removed;
- Wipe off the chrome from the substrate (zero polish will help). Cover the substrate with two or three layers of primer and wait about an hour;
- Apply 4-5 layers of paint over the primer, wait for each layer to dry;
- Assemble the block lights, close all the cracks to prevent fogging;
- After painting, all that remains is to adjust them. The main thing is that the light is not too dim and does not cause inconvenience when driving.
Adjustment after any modification of the optics is performed as follows:
- Place the car at a distance of 5 m from a flat wall (for example, opposite the garage);
- Set the adjusting screws under the hood to “0”. Put a person of similar height behind the wheel;
- The headlights are adjusted one by one; while one is being adjusted, the second one is closed;
- The clear edge of the light should be 10 mm below the top edge of the headlight.
Installation of LEDs and overlays
A fairly simple way to transform your Priora is to buy ready-made “eyelashes” in specialized tuning stores. However, it will be much cheaper to make them yourself. To do this, just take tubes or a piece of plastic (an alternative is vinyl film) and cut them into thin lines with a stationery knife. You can curl future “eyelashes” with your own hands using a hair dryer and soap solution. They are then attached to the car body using double-sided tape, glue or sealant.
The optics are painted glossy black, “angel eyes” are installed on the Priora
For this DIY upgrade you will need:
- disassemble the front or rear headlight, having previously dismantled the element;
- stick masking tape on the outer part of the glass of the optics, which will prevent it from being damaged;
- bend the plastic sides (brackets) of the optics, under which the reflector is located;
- heat the sealed adhesive with which the glass is fixed in the headlight using a household or construction hair dryer and remove the glass;
- remove the reflectors using a Phillips screwdriver. Don’t forget to cover the turn signal lens with tape for protection;
- Apply several layers of black paint to the reflector. This, combined with bright LEDs, will provide a greater tuning effect. Let the paint dry;
- take an LED strip with a cross section of 2.6 mm. Remove the reflector's metallic backing, bend the tape into a circle and attach it using fasteners or glue;
- After the glue has dried (about 2 hours), reassemble the headlight or lantern. Don't forget to re-apply the sealant to the glass.
Headlight tuning, bi-xenon lenses, Laser Lights modules for Lada Priora
The main reasons for replacing and adjusting headlights
- cracks and breaks in the body;
- breakdown in the electrical connectors of the headlight;
- damage to reflectors;
- defects in fasteners;
- clouding of the optics (the headlight sweats or becomes dirty).
The fuel pump on the Lada Granta does not work. How to replace the fuel filter on a Lada Kalina with your own hands. installing a new fuel pump strainer
Replacing a headlight is one of the activities after which it is impossible to do without adjusting the lighting fixtures, since the light must be properly dispersed. Headlight leveling plays a decisive role in improving driving safety. Therefore, knowing how to replace front or rear lights is only half of the whole replacement process, where an important role is also played by how to adjust new headlights correctly.
With the right approach, the process of replacing headlights is not difficult.
It is important to follow the exact sequence of actions when disassembling and assembling the flashlight
Coloring masks
The next type of tuning the appearance of optical devices is painting the Priora headlight masks. These changes are also not expensive and will not hurt the car enthusiast’s pocket. The mask is a specific insert that is placed inside the headlight structure. The factory version of the mask is chrome-plated. After painting the mask (traditionally black), the appearance of the car will change quite seriously. Therefore, this tuning of headlights on Priora is quite common.
Adjusting the headlights of the Lada Granta
However, there is a difficulty in its implementation, which lies in the need to completely disassemble the lighting device. Since the Priora's headlights are not dismountable, the glass is securely glued to the body using sealant. However, with the right approach, disassembly can be done. After this, the mask is removed from the headlight, cleaned (the chrome coating is removed), primed and painted. Then the lighting fixture is put back together and installed in its original place.
Headlight tuning
Despite the fact that the Lada Priora has a completely modern appearance by today's standards, not all owners of this car are satisfied with its factory design. And in order to improve the appearance and add originality, many carry out external tuning (aka facelift). Only some elements of the car body are subject to changes, including optical instruments. Tuning headlights on a Priora is a fairly popular operation for changing the appearance of a domestic car. Let's consider the topic in more detail.
Kinds
To change the appearance of a car, they often use minor types of headlight tuning on a Priora that are accessible to literally everyone:
- visual change in design, for which “eyelashes” are actively used;
- creating LED lighting or “angel eyes”;
- painting the headlights black (it is the surface of the headlight reflector that is painted);
- tinting the glass of a lighting fixture.
Eyelashes for headlights
“Ciliations” are the fastest and most inexpensive option to change the appearance of your car’s optical devices. “Eyelashes” are special linings that are glued to the top of the headlight glass. They can be of various shapes and widths, and can also be painted to match the body or simply black.
These headlight covers, since they are located at the top, do not affect the quality of illumination of the road surface. At the same time, they make the appearance of the car stylish and daring. You can make such extensions with your own hands or buy ready-made “eyelashes”.
Homemade tuning of headlights on a Priora is the most profitable option, since you can create linings of literally any shape with your own hands.
Coloring masks
The next type of tuning the appearance of optical devices is painting the Priora headlight masks. These changes are also not expensive and will not hurt the car enthusiast’s pocket. The mask is a specific insert that is placed inside the headlight structure. The factory version of the mask is chrome-plated. After painting the mask (traditionally black), the appearance of the car will change quite seriously. Therefore, this tuning of headlights on Priora is quite common.
However, there is a difficulty in its implementation, which lies in the need to completely disassemble the lighting device. Since the Priora's headlights are not dismountable, the glass is securely glued to the body using sealant. However, with the right approach, disassembly can be done. After this, the mask is removed from the headlight, cleaned (the chrome coating is removed), primed and painted. Then the lighting fixture is put back together and installed in its original place.
Installing lenses in headlights
Today, there are a lot of car enthusiasts who install other lenses in their headlights. Such elements in factory lighting devices are mounted in optics for the following purposes:
- As a tuning for Priora headlights and rear instruments. Most people like the look of lighting fixtures with lenses. Most often, they can have “angel eyes” in their design, an LED rim around the lens.
- Lenses are installed together with xenon lamps. If you install xenon at certified service stations, then it is supplied only with lenses.
- Standard installation from the factory. In this situation, lenses are often installed by the manufacturer in expensive models. And the lighting devices in such cars are already a whole computer, they have a lot of functions and even have cornering lights.
Lensed headlights on a Lada Priora are probably the most expensive way to carry out a facelift. It consists in replacing factory optical devices with lensed optics.
"Angel Eyes"
Changing the configuration is not a particularly expensive method of tuning Lada Priora headlights. Such optical devices began to be used for the first time on BMW cars, but this does not prevent them from being mounted on the model under study. Moreover, the shape of the lighting elements fully allows this to be done. “Eyes” refer primarily to side lights. They are special rings that are installed around the perimeter of the reflectors. They glow with a beautiful “cold” bluish light.
Some car enthusiasts manage to make “angel eyes” on the Lada Priora on their own, for which they use silicone tubes or special plexiglass rods, as well as LEDs. You can buy ready-made devices in automobile accessory stores.
Headlight tinting
Tuning "Priora" rear lighting and front optics using tinting is carried out in several ways - using special paint or a tinting membrane. What color film to choose is decided solely by the car enthusiast. The most common and classic color is black. However, when tinting, a film that matches the color of the car body can be used. It is important to remember that tinting headlights leads to a deterioration in the light output and reduced visibility on the road in the evening and at night.
Headlight polishing
During travel, factory lights are exposed to the negative effects of sand, gravel, dirty water that fly off from nearby passing vehicles, as well as the chemical action of road reagents and salt. Because of this, the surface of the headlights acquires a yellowish tint, becomes matte, and the intensity of the luminous flux decreases. At night, visibility deteriorates.
Modern optical devices are made of polycarbonate, which means that to polish them you will not need to buy expensive diamond paste, which is comparable in cost to the price of new headlights. A budget abrasive will undoubtedly help improve the situation. Tools and materials that will be needed for self-polishing, that is, for tuning the Priora headlights and rear lights:
- scotch;
- sandpaper of different abrasiveness;
- grinding machine;
- car shampoo;
- polish;
- rags.
The polishing process is as follows:
- Clean the headlight well with shampoo and then degrease.
- Dry and tape nearby metal of the car body with tape to protect it.
- Initially, work the surface with a weak abrasive, and then with a coarser one. Each type of abrasive is used for 2-3 minutes.
- Wash the surface of the headlights thoroughly and dry it.
- Using a foam pad and polishing agent, polish to a high shine.
Making chameleon headlights
Want to make "chameleon lights"? Then use a special tint. You can purchase ready-made versions of the film without any problems at any automotive supply store. Their cost varies depending on the manufacturing company. The most budget-friendly one is from a Chinese manufacturer.
The film material is heated with a hairdryer and applied to a pre-wetted headlight. Smooth it well so that there are no folds or bubbles left. As a result of such tuning of the Priora headlights, the photo of which you see above, the car acquires very stylish optics.
Source
Source: https://drive.temaretik.com/1680464150871411569/tyuning-far-na-priore-opisanie-interesnye-idei-foto/
Working with the radiator grille
You have replaced the bumpers - the car already looks more attractive. But we can do even better. Here you can replace the radiator grille. You can make this product yourself from stripes, honeycomb shapes or any other style. There are several different options for this.
You can order a grille replacement without replacing the front bumper. This is very economical, but such a grille cannot always transform the front end so much.
The second method involves replacing the grille along with the bumper. These modifications will greatly affect the appearance and style.
Optics tuning options
Most of the methods listed below can be done by yourself. You will need a minimum number of tools and specific upgrade kits. Today Lada Priora owners prefer:
- Install more powerful optics or headlights with a different shade of light.
- Carry out tuning by tinting reflectors. The rear and front lights can also be dimmed.
- Install additional lighting (angel eyes) - LED strips significantly transform the appearance of the car.
- Linings - among motorists they are better known as “eyelashes”.
We decided to pay attention to the overlay of additional elements and angel eyes. They do not violate the rules, and even a novice driver can install LED strips independently
Installing eyelashes
Issue price: 300-600 rubles.
You will find ready-made eyelashes in automotive stores. But if you don’t want to spend money on tuning, you can make LED eyelashes with your own hands. To do this, you need plastic tubes or a solid piece and use a utility knife to cut the material into thin strips; as an alternative, you can use vinyl film.
Eyelash curling is done using a soap solution and an industrial solution. You can attach eyelashes to the car body in different ways: some people choose sealant, others prefer to use glue or double-sided tape. Use your imagination when creating eyelashes, here is a Lada Priora with purchased components in the form of a drop:
Angel eyes
Issue price: 2500-3500 rubles.
This is not only stylish, but also useful Lada tuning, as LED strips improve visibility on our roads. You can attach strips to the rear or front lights. As with the previous option, you can purchase angel eyes or try to make them yourself.
We'll tell you how to do this tuning yourself. To work, you will need the following materials and tools: LEDs, dichloroethane, a drill that matches the diameter of the diodes. The number of diodes is calculated for one “eye”. You can take plexiglass as the main material. For example, from blinds.
The process goes according to the following scheme:
- We know that headlights have different diameters, so angel eyes should also differ in size;
- Pour boiling water into a suitable container and place a plexiglass rod there. He should lie there until he softens. You need to bend the ring quickly before they harden. The easiest way to do this is to use jars. Small circles can be made using a jar lid, and large circles can be made with a coffee can;
- We take a drill and make holes in the ends for the diodes. As a result, you should get something like this:
- Now we make notches on the circles. The distance between them should be 2.5 mm. We put on gloves and take dichloroethane. One drop should be placed into each niche and carefully distributed along the wall of the workpiece;
- Let's move on to the main step - installing LEDs and connecting elements using wires;
- We dismantle the necessary headlights and disassemble them. Apply masking tape to the outer part of the glass, and then bend the holders. You can remove the glass using a hair dryer; it should come off quickly;
- Install LED strips. For example, “eyes” can be installed instead of dimensions, since new components will fulfill their role. Check that there are gaps between the lenses. We assemble the front or rear lights of the Lada Priora. Tuning is complete.
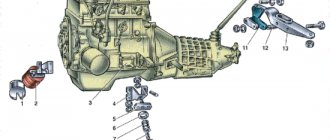
Step-by-step replacement of Lada Priora headlights
1. First you need to dismantle the bumper or dismantle the part where you will change the headlight. We will be changing the right headlight, which means we need to unscrew and remove the right part of the front bumper.
2. Disconnect the power plug from the headlight from the inside. Use a screwdriver as shown below and pull it towards you.
3. Unscrew the 2 headlight mounting bolts. Ten bolts.
4. We also unscrew one screw on the side, it is for a Phillips screwdriver.
5. Remove the headlight.
6. Installation of the headlight is done in the reverse order:
- The headlight is immediately secured with a screw on the side
- Tighten the two bolts at the top and bottom
- Connect the plug
You will need: a 10mm wrench, a Phillips-blade screwdriver.
- 1. Disconnect the wire from the negative terminal of the battery.
- 2. Remove the front bumper of the VAZ 2170 (see “Removing and installing the front bumper”).
3. Press the latch and disconnect the wiring harness block from the headlight.
4. Remove the front lower bolt...
5. ...and the side screw securing the Lada Priora headlight.
6. Unscrew the four screws securing the headlight housing of the VAZ 2171...
7. ...and remove the casing.
8. Unscrew the bolt of the upper fastening of the headlight unit VAZ 2172...
- 9. ...and remove the headlight from the Lada Priora.
- 10. Install the headlight in the reverse order of removal.
Almost every owner had to change the headlights on a Priora. And the reasons for this may be different:
- road accident damage
- to perform modifications (tuning)
- to eliminate fogging (sizing)
- to replace the internal parts of the headlight - corrector, reflector, etc.
Replacing headlights from A to Z
The toolkit for the procedure for replacing headlights on a car consists of:
- socket wrench to “10”;
- Phillips screwdriver;
- flat screwdriver.
Replacing a headlight on a Priora begins with disconnecting the negative terminal of the battery (the author of the video is the channel In Sandro's Garage).
Replacing low and high beam lamps on Lada Priora
Before removing the headlight on a Priora, you need to remove the bumper. Then you need to remove the headlight covers from above. Next, pressing the latch, the block with wires is disconnected. When the headlights are removed, you can change the bulbs, for example, with Bosch xenon ones. The glass version of the optics can be replaced with a lens one.
The rear lights of Priora 2 are removed in the same way. The upholstery is dismantled and the wires are disconnected. Now you can remove the rear lights of Priora 2.
Tail lights on Priora
To disassemble and replace the headlight glass, you will need the following materials and tools:
- industrial dryer;
- thin screwdriver;
- new glass;
- new lamp;
- sealant.
Before disassembling the headlights on the Priora, you need to place them on a clean, dry surface. Then heat the glass until the sealant begins to melt. Next, the glass should be pryed off with a screwdriver and separated from the body. The next step is to remove the old sealant.
Before changing the light bulb and replacing the headlight glass, the seat must be lubricated with a fresh layer of sealant. Then the glass is carefully placed and pressed firmly. After 12 hours you can assemble the lantern.
Installation and connection of bi-lenses with xenon in Priora headlights
Fifth generation lenses (G5) are excellent for VAZ 2170 headlights. The price of such pleasure starts from 3000 rubles.
- Installation of bilens in Priora
- Connecting lenses in Lada Priora headlights
Installation of bilens in Priora
First you need to remove the optics and then disassemble them (see the article 'painting headlights'). Depending on the size and design of the lens, it may be necessary to modify the headlights locally, for example:
Use a rasp to slightly bore the lamp socket, because... the diameter of the lens base may be slightly larger. Trim the headlight reflector a little so that nothing interferes with the corrector’s operation. Grind off the edges that do not allow direct installation of the adapter washer from the H7 to H1 lamp. etc.
When nothing prevents the installation of the bi-lens, we put a rubber seal on the lens body and insert it into the hole on the headlight. On the other side, we also install a sealing rubber and on it an adapter washer under H7 (if any). Press firmly and secure with the nut included in the kit. We pass the wiring from the bi-lens curtain into the hole that remains from the reflector cap.
We tighten it tightly and check that the lens is well fixed inside the headlight. We install the lamp holder, which is secured with 3 screws, and the lamp fixing spring.
Next is the assembly of the reverse sequence optics:
Connecting lenses in Lada Priora headlights
There are a lot of options for connecting bi-xenon lenses:
The near and far are in a bi-lens, but we refuse the standard light. The near is in a bi-lens, and the far is standard (we do not connect a curtain in the lens). The near and far are in a bi-lens, as well as the standard high. Options with connecting 2 lenses into one headlight. Etc.
If you proceed according to the first option, then you need to connect the lens shutter: we take the “plus” and “ground” from the main beam and connect them to the shutter contacts on the lens, respectively.
If we consider the third method, then in parallel to the standard high beam we connect the curtain to the same contacts.
After installing the optics, all that remains is to check the new Priora xenon, making sure that the light beam is formed in accordance with GOST and does not blind other road users:
An easier way to tune headlights is to install LEDs in the headlights. Don’t forget about the harsh fines for xenon, and to legalize xenon you need to install automatic headlight leveling and headlight washers, but that’s another story.
| Tuning Lada Priora headlights, on the one hand, can be like decorating a car, on the other hand, it can improve the headlights. The most correct way to improve lighting is to install bi-xenon lenses in the Priora. |
Types of tuning
You can remake the Priora taillight in different ways. Some of them are simple to implement, but require certain skills; others may require financial costs. But, in general, we can highlight several of the most basic ways to remake headlights:
- Replacing standard lights with tuning ones;
- Tinting;
- Installation of LED lighting elements instead of standard ones;
- Use of overlays;
Read Installing an additional brake light with your own hands
Let's consider each of the methods separately. But let us immediately note that tuning will almost always require removing the headlights on the Priora.
Priora headlight tuning
Therefore, first, let’s talk about how to dismantle the rear optics from a car. This operation is not complicated, and not many tools are needed to carry it out. All you need are 8 and 10 keys and a screwdriver.
Now about the process itself:
- All work is best done in good lighting. Before starting, you should de-energize the on-board network by removing the terminal from the battery;
- We open the trunk and find special windows in the upholstery in the area where the lights are located. We open these windows;
- We find the connector for connecting the lights to the wiring and disconnect it;
- Unscrew the three nuts securing the headlight unit and, holding it from the outside, remove it;
As you can see, everything is quite easy to understand. And then you can start tuning to improve the rear view of the Priora.
Disassembling the Priora headlight
Adjusting the headlights of a Lada Priora with your own hands: video instructions
Unlike the VAZ-2110 headlight block, the Priora headlight glass is secured with a sealant, and not with latches alone. Therefore, to replace the main headlight glass you will need the following tools and materials:
- household hair dryer;
- replacement glass;
- new Abro brand sealant for headlights;
- thin screwdriver or knitting needle.
Place the headlight in the prepared area and warm the glass with a hair dryer set to maximum heat until the sealant softens and begins to melt. Use a thin screwdriver or a knitting needle to pry up the glass and pull it out, being careful not to damage the protective edge. Thoroughly clean the seat from any remaining old sealant and allow the surface to cool. Fill the landing ditch with a fresh layer of adhesive, spreading it evenly over the surface. You need to fill the groove to about half the depth. Quickly and carefully install the new glass prepared for replacement. Press firmly. It is best to secure it by pressing the repaired Priora headlight with adhesive tape and leave it to dry. We recommend keeping the glass for at least 12 hours.
After the specified time has passed, carefully remove the adhesive tape and begin assembling the Priora back. Reinstall the headlight after replacing the glass. Connect the wiring harness. Secure the upper protective cover and put back the front bumper. The repair of this unit is now complete. Check whether the headlight turns on and off.
All that remains is to adjust the beam of light. There are many instructions on how to do this yourself by drawing the necessary marks on the wall. But practice shows that it is still better to contact a service to do this using the device.
The video shows the removal of headlight units on a Priora in order to repair or replace it:
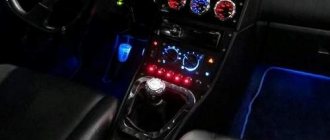
Replacing the dashboard light
As a result, the lighting will be more uniform and calm.
View gallery
To achieve this, you need to purchase light bulbs and LEDs. The perimeter of the panel should be covered with pieces of LED tape at certain intervals. Then the tape and factory backlight contacts are connected.
It is recommended to replace the display filter along with the backlight. You can simply replace the entire filter, or simply leave the backlight white.
It looks very original on the arrows. To do this you will need 10 CMD diodes. Using a soldering iron, these diodes are soldered into the glass of the panel from the outer part opposite the arrows. Resistance sensors are soldered inside.
Technical modernization
The standard power unit that is installed on the Priora, with proper maintenance and operation, behaves as necessary. But if you approach this issue correctly, then there is every chance of increasing engine power by as much as 40%.
View gallery
The upgrade includes installing a mechanical supercharger, boring the cylinder block, installing low pistons and a high crankshaft. All this will help make the car faster and faster.
Nowadays, tuning the Priora engine with your own hands is as easy as shelling pears. All the necessary components for this can be purchased in specialized stores. In addition, this does not require any knowledge or skills from the driver.
For example, some install, as already written above, a compressor. It pumps a denser mixture of fuel and air into the combustion chamber, thereby increasing power tenfold. But you have to pay for everything - an increase in power will entail increased consumption.
If you think that a compressor is too boring, then here it is - a full-fledged turbocharger.
View gallery
On a Priora car, do-it-yourself tuning can significantly improve the dynamic characteristics.
But now you have strengthened the power unit, what next? And then you also need to strengthen the clutch - only then will you be able to feel all the power without harm to your car.
There are many more different nuances in technical tuning. It is simply impossible to consider them all. Since the car has an ECU, you can do chip tuning and play with some options.
Tuning the headlights
When working on the front part, many people do their own tuning of Priora headlights. So, you can install eyelashes and lenses. All this has the best effect on the originality and uniqueness of your car.
View gallery
And if you also replace the factory side lights with LED ones, this not only allows you to uniquely style, but also gives a brighter light. You can also convert your turn signals into parking lights. This will expand functionality.
Many people tint their taillights. This DIY tuning of a Priora hatchback, together with a set of original body kit, will make people turn around and stare after your car for a long time.
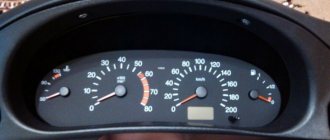
Dashboard
If you compare the Priora with previous models from AvtoVAZ, the interior is much more attractive. It should be noted that when creating it, the designers used special high-tech plastic, which in appearance resembles a leather surface. The “Lux” package is distinguished by additional modifications that add solidity to the interior.
But, despite all this, tuning the Priora panel with your own hands can significantly change the appearance and also improve functionality.
Improvements must begin with the organization of lighting. To complete this task, you will need some tools. It is also worth stocking up on LEDs and reflective foil.
The first step is to remove the panel. In fact, it is very simple - everything is done using an ordinary screwdriver. Then the main instruments are disassembled. Remove the dials, hand and cover.
Many people remove the factory coating from the numbers. And then, when illuminated, they will glow bright white. However, this is too simple and may not be suitable for those car enthusiasts who want to make the interior look solid and expensive.
The method of gluing cellophane inserts of various colors to some panel elements also looks great. To do this, stock up on bags and cut out some sections from them. These pieces must be glued to the back of the panel. For example, imagine the part of the speedometer where the speed limit is marked. It's quite impressive.
Of course, all this is quite banal. And if a car enthusiast can independently dismantle and then disassemble the instrument panel, then the backlight should be replaced.
Alteration or tuning of headlights – Priora
Well guys, let me start by saying that I bought these headlights at the willow tree, there is one place where they are sold. The guys who deal with plastic on a large scale have bumper grilles, etc. At first, when I took the headlights, I was happy, but 3 days after installation, the glass on one headlight became cloudy, not in the area where the lens shines, but completely. I took it back, but three days of use is no big deal.
And what did I hear there? that I probably put Xen in the headlights and it was all because of him! What?! The same person initially told me that xenon can be installed in them, but now he tells me that the manufacturer does not recommend this. He said that he would try to change them, gave the headlight, waited for two weeks. Allegedly, the manufacturer is located in Moscow, and my headlight was sent there for examination.
And finally, calling myself every two days, I heard that the headlight had arrived. I came to pick it up - these idiots got it mixed up and sent me the second left one. Simply gorgeous. I waited another four or five days, and finally the one I needed arrived. Thank you God! By the way, I originally brought two headlights, but they only replaced one for me. And the attitude was not so hot!
Well, having received a new headlight, I decided to disassemble it anyway, since applying paint over chrome is the peak of stupidity of manufacturers, I was promised that everything would be done efficiently - I didn’t see any quality anywhere near it.
And he began to analyze. First, I removed all the lamps from the headlight, then took out the metal pins - there are only 4 of them in the office. I took a hair dryer and a large cardboard box. I placed a partition between the barrel of the hair dryer and the headlight so that a hot stream of air would not blow on the headlight itself.
I left the headlight to warm up for 15 minutes. After heating, the glass came off the headlights easily. By the way! I forgot to say! in one headlight, which they didn’t change for me, the lens was pressed closely to the glasses, and because of this, the sunlight that fell on it somehow managed to melt the plastic on the glasses.
We will also repair it. and what turned out to be after the analysis? These idiots missed the pin of the electric corrector when assembling the headlight - as a result, the lens rested on the glasses, and as a result, sunlight through the lens melted the plastic. once again, huge respect to the crooked hands - whoever assembles this, with such hands you can only plant potatoes, and even then under supervision)) after removing the glass, a gorgeous view opened up to me in full panorama)) what is called chrome here, in my opinion, is just ordinary paint from a spray can under chromium. By the way, here is the condition of this chrome after a month of use.
I didn’t even think about removing chrome with KROT liquid, since under the influence of a regular degreaser this “chrome” takes on a wonderful roughness for applying primer and paint. By the way, now I only use paint and primer like this.
The only place where, in my opinion, the chrome was in good condition was in the DRL area. I decided to leave it as is. Because at least this place inspired my trust. We seal the area that we need to preserve with masking tape.
Well, in the meantime, we sand and seal with fiberglass putty the place where the plastic has melted on the glasses.
We apply two layers of primer, with breaks between layers of 10-15 minutes, and three layers of paint with breaks between layers of 10-15 minutes. We wait until it dries and remove the masking tape.
And the last jamb is the vertical and horizontal tilt controls. These plastic things failed in the adjustment mechanism.
I refused them because I don’t know that if I bought new ones, they wouldn’t wear out either. cut it off and stuck it in as plugs. I made places at the ends for a flat-head screwdriver.
I cut holes for a screwdriver in the case.
Well, something like this, of course it’s not very convenient to regulate - but it’s quite possible) Something like this))
I haven’t had time to take a photo of how the headlights look on the car now, thank you all for your attention. Good luck to all!)
How to change a headlight on a Priora
Replacing headlights on a Priora and adjusting the light
Lada Priora is a very good car, but very often owners have a desire to change something in the appearance of the car, for example, to perform tuning optics. Often there may also be an urgent need for configurations such as changing lighting on a priority basis. For those who decide to do this procedure themselves without the help of a professional mechanic, it will be useful to read the recommendations below. Let's find out what the prerequisites are for replacing headlights and how to do it yourself. Below is an explanation of how to disassemble the headlight and adjust it correctly.
The main reasons for replacing and adjusting headlights
The main condition for replacing headlights can be considered its failure or inability to fulfill its functional purpose. For Priora, the main reasons for the need for replacement are:
- cracks and fractures of the body;
- failure of electronic headlight connectors;
- damage to reflectors;
- fastener defects;
- cloudiness (the headlight sweats or gets dirty).
The replacement process not only restores the original characteristics of the lamps, but also improves driving safety. By replacing a tail light or headlight, the driver provides better control of the vehicle both at night and for other drivers on the road.
Replacing the headlight. This is one of the steps that cannot be done without adjusting the lighting as the light must be diffused correctly. Headlight alignment is critical to improving safety. Because knowing how to replace headlights or taillights is only half of the entire replacement process, where proper adjustment of new headlights plays an important role.
Rules for replacing headlights
An experienced mechanic can change both the front and rear lights in a short time and without much hassle. But to do this job yourself, you will need the following tools:
To remove the headlights, first disconnect the wire from the “-” battery terminal and then remove the bumper from the Priora. Then you need to release the latch, which will allow you to freely disconnect the headlight wiring from the harness. Remove the 4 retaining clips by pulling out the side mounting screw. If you are removing the housing, you should be aware that the top mounting bolts will need to be removed in the future. Now that you know how to remove the headlight, you need to install the new one and place all the tools in reverse order.
studio
atelierTuning Priora headlights in the style called “angel eyes” requires not only dismantling the headlight, but also disassembling it.
This will allow you to wear out the “eyes” and tint the surface of the reflector (mask, blender) using black paint. List of materials and tools required to complete the work:
- masking tape, which allows you to preserve the glass during dismantling;
- to remove the blender - a screwdriver with a T20 tip;
- technical hair dryer;
- black spray paint;
- plastic tube;
- a set of LEDs with corresponding resistors;
- aluminum tape;
- glue;
- hacksaw for metal;
- automotive sealant.
And eyes like an angel
To tune the optics in the “angel eyes” style, you will need to not only dismantle the headlight, but also disassemble it to get to the very “essence”. Therefore, you can combine two methods of improvement at once - install “eyes” and tint the reflector (mask, blender) black.
Materials and tools:
- masking tape – to preserve the glass during dismantling;
- screwdriver with T20 tip - for removing the blender;
- technical hair dryer;
- black spray paint;
- plastic tube;
- LEDs with suitable resistors;
- aluminum tape;
- glue;
- hacksaw;
- sealant.
Step 1. Remove the headlight according to the instructions for the car. Cover the headlight glass with masking tape so as not to damage the surface during further dismantling.
Step 2. Bend the brackets (on Bosch headlights) or plastic sides (headlights made by Kirzhach). Using a hair dryer, remove the sealant and remove the glass.
Step 3: Remove the chrome reflectors using a Phillips screwdriver. Cover the turn signal lens with tape.
Step 4. Sand the chrome surface and treat it with 2 layers of aerosol primer for plastic. Dry for an hour.
Step 5: Apply several coats of black spray paint, allowing each layer to dry. After the last layer has dried, remove the tape from the turn signal lens.
If tuning the optics is limited only to tinting the reflector, the headlight can be assembled, not forgetting to apply a layer of sealant to the junction of the glass and the housing.
You can continue tuning and install “angel eyes”. The easiest way is to use a ready-made set of “angel eyes” made from gas-discharge tubes.
But “our people don’t take a taxi to the bakery” - let’s try to create a unique work with our own hands.
| Step | Description of actions |
| Step 1. | Rings for “eyes” can be easily bent from plastic tubes or a bracket from blinds, heating them with a hairdryer and giving the desired shape to an open ring with “legs”. Each headlight has two wells of different diameters. |
| Step 2. | After cooling, transverse notches are applied around the perimeter of the ring. You can do this with a hacksaw. The distance between the notches is about 2.5 mm. |
| Step 3. | LEDs of any color are installed at the ends of the tubes. You can glue them in with sealant or glue. Connect the diodes of each ring in parallel, the resistor is soldered into the gap of one of the wires. |
Optics decorated with LEDs
Place aluminum tape on the surface of the rings that will face the headlight body so that the light of the tube does not reflect in the reflective layer of the lamps. Wrap the ends of the tubes completely with tape.
Secure the rings to the blender using instant glue. Assemble and install the headlight, connect the “eye” wires to the side lighting.
Step-by-step instructions for installing angel eyes
First stage. The headlight is dismantled strictly according to the instructions supplied with the car. Masking tape is glued to its glass, which will prevent damage to the surface during the removal process.
Second phase. If the headlights are from Bosch, then the brackets are bent, and on the headlights produced in Kirzhach there are plastic sides. Next, the sealant is heated using a technical hair dryer and removed. The glass is removed.
Third stage. Use a Phillips screwdriver to remove the chrome reflectors. Tape is applied to the turn signal lens.
Fourth stage. The chrome surface is cleaned with sandpaper and an aerosol primer for plastic is applied to it in two layers. The parts are dried within an hour.
Fifth stage. Black aerosol paint is applied in several layers to a well-dried surface. Moreover, before applying each new layer, the previous one is given time to dry completely. After painting is completed, the tape is removed from the turn signals.
If only tinting of the reflector was necessary, then the headlight can be assembled, for which a layer of automotive sealant is applied to the junction of the body and glass. If the installation of “angel eyes” was also planned, then the work must be continued. To do this, it is possible to use simple gas-discharge tubes, but you can also try to create something completely unique.
This is done as follows:
- Eye rings are bent from plastic tubes or brackets used in blinds. To do this, they are heated using a technical hair dryer, which allows them to be given any desired shape, which should resemble an open ring with “legs”. For each headlight, two rings of different diameters are made.
- As soon as the rings have cooled, transverse notches are applied to them along the entire perimeter. To do this, you can use a hacksaw. There should be a distance of at least 2.5 millimeters between the notches.
- LEDs of the desired color are glued to the ends of the tubes using sealant or glue. The diodes of each ring should be connected in parallel by soldering a resistor into a gap made in one of the wires.
- The surface of the rings facing the headlight body is covered with aluminum tape to avoid reflection of the tube light in the reflective layer of the headlights. The ends of the tubes are completely wrapped with tape.
- The rings are attached to the blender using instant glue.
- The headlight is assembled and installed, while the “eye” wires are connected to the side lighting connectors.
Painting Lada Priora headlights
After I studied a lot of materials on the Internet on the topic “Why do you still paint headlights?”, I realized that there is not much practicality in this. Painting headlights attracts those who want to improve the aesthetic appearance of their car and make their desires come true. This article will give an example of painting headlights, or rather reflectors from these headlights for a Lada Priora car. If you decide to paint the reflectors on your car, a different model, then these general recommendations are quite suitable for you.
Tools and materials needed for painting headlight reflectors
— A construction hairdryer, — alkyd or acrylic paint (color of your choice), — a primer for plastic (preferably), — a stationery knife, a flat-head screwdriver, a hacksaw for metal (you will need these tools if the headlight glass is glued with hard glue and not for sealant), - sandpaper, - sealant, - masking tape,
- solvent or gasoline.
Technology for disassembling headlights for painting reflectors
First of all, you will need to remove the headlights from the car. You can see how to remove the headlight on a Lada Priora car in the article “Removing the headlight unit on a VAZ 2170 2171 2172 Priora car.” Headlights from various manufacturers are installed on Lada Priora cars. Bosh company and located in the city of Kirzhach, Vladimir region. If we talk about the features of both headlights, then in Bosh headlights the glass is held on by a soft sealant, and the glass of headlights produced in the city of Kirzhach is glued to glue, which hardens as it hardens.
Similar methods of glass fastening are found on other car models, including foreign cars. Depending on the method you choose for attaching the glass to the headlight, you will have to make a further choice whether to paint the headlight reflectors or not. The fact is that the glass that is held on by the sealant is much easier to remove by heating the sealant. If the glass is fixed with glue, then it will be necessary to mechanically carefully cut the glass to get to the reflectors. If you have definitely decided, let’s continue.
We cover the headlight glass with masking tape, this is necessary so as not to scratch it when disassembling the headlight.
Next, if you have a Bosh headlight, then heat the sealant around the perimeter of the glass with a hair dryer. Direct the air flow towards the sealant, monitor the condition of the plastic in order to prevent clouding of the glass and changing the shape of the plastic. There are options for removing glass without a hair dryer. The headlight block was placed on a board in the oven and waited for the sealant to soften. At the same time, constant monitoring of the condition of the headlight glass is also necessary. Afterwards we tear the glass away from the body. The sealant is removed with a rag soaked in solvent or gasoline.
If you have headlights manufactured in the city of Kirzhach, then, as I wrote earlier here, you will have to cut off the glass mechanically by sawing it out of its place. In this case, a screwdriver or a stationery knife can be used (as in the photo below). Metal blades are also used. Here, the process of removing glass from the headlight is more labor-intensive and, accordingly, time-consuming.
The headlight glass is gradually cut off from the body along the perimeter.
As a result, the removed glass from the headlight will look something like this.
Let's remove the reflector that we have to paint. The reflector has a small lens for the turn signal. When painting, it is removed from the main reflector and painted separately. The headlight with the reflector removed will look like the photo below.
We sand the reflector with fine sandpaper; it is not necessary to remove all the chrome. This is more necessary in order to even out unevenness in the plastic and remove flash from plastic molding. Degrease reflectors for painting.
Painting the headlight reflector
For painting, it is better to use acrylic or epoxy based paint; its normal operating temperature is up to 120 degrees Celsius. The most common alkyd paints in aerosol cans work normally at temperatures up to 100 degrees Celsius (although these paints also provide a normal reflector appearance under normal operating conditions of the headlight). Before painting, for better adhesion, it is preferable to apply primer to the plastic on the reflector.
Paint in two layers.
On the market you can also find specialized paints for plastic, directly for headlights (pictured below). In this case, paint in accordance with the technology described in the instructions for the paint. This paint is usually translucent, as if based on varnish. It will not be possible to paint reflectors in a contrasting color when using such paint; the chrome will show through it.
This is its minus or plus, it all depends on your preferences.
We paint the reflector (large - main and additional - for the turn signal) in the color of our choice. (usually painted matte black or body color)
Next, dry the reflector. In our case, a sealant (black ABRO) was used to assemble the headlight; we install the glass in place. Do not apply too much sealant to the junction of the housing and glass, so that it does not crawl inside the headlight. We twist the headlight with uncured sealant with a rope or electrical tape and wait for the sealant to dry.
When using such a sealant, we are forced to warn you about the risk of marks appearing on the headlight glass from its volatile compounds. In order to avoid such problems, it is better to use specialized tapes for gluing headlight glasses. See the article “Sealant used when replacing headlight glass.” After the sealant has dried, install the headlight in place. This is what a car with painted headlight reflectors will look like. In the photo, the headlight reflectors are painted black to match the body color.
Source: https://autosecret.net/tuning/tuning-kuzov/1114-pokraska-far
lens
lens Films of different colors are used to tint headlights, but the most common of them is black.
If desired, you can tune the Priora headlights by choosing the color of the film to match the color of the car body. It should be remembered that with tinted headlights, the power of the luminous flux may change and the illumination of the road section may deteriorate in the direction of travel. You can tint the entire surface of the headlight glass, or some of it. You can also apply some kind of design using paint or film specifically designed for this purpose.
How to disassemble the headlight of a Lada Priora
Most car enthusiasts, after purchasing their car, try to embellish it in every possible way, giving it an original appearance. One of these methods is to perform headlight tuning. It involves painting the chrome headlight backing with acrylic paint in matte black. By using this procedure, it is possible to achieve the visual effect of dark-colored headlights. In this case, it may seem that a tinting film has been applied to it. However, before you start painting the headlight, you should disassemble it. Due to the rather labor-intensive nature of this operation, it needs to be considered in more detail using the example of the Lada Priora.
To disassemble the headlights on the Lada Priora you will need a screwdriver, a mounting cutter and a hair dryer. Before you begin disassembling the headlight, it should be heated. This is required to melt a special sealant that is used at the factory where the headlights are made. This is necessary to ensure easy separation of the headlight glass from the housing. It should also be noted that melting of the sealant occurs already at a temperature of 300 degrees Celsius. This temperature does not cause much damage to the body or glass of the headlight, but it will help you disassemble it without much difficulty. Heating should be carried out slowly, using an industrial hair dryer at a distance of approximately 2 centimeters from the headlight. The best heating rate corresponds to thirty seconds of passing the headlight around its circumference. This procedure should be repeated up to 5 times. It should be taken into account that the headlights of the Lada Priora have one distinctive feature. They come in two varieties: Bosch and Kirzhach. If your vehicle has the first type of headlights, then performing the above operation will not be difficult for you. If you use Bosch headlights, then you will need to make some efforts to disassemble them. This is due to the fact that the glass surface of this headlight is fixed to the body using a solid sealant. It is impossible to melt it without causing damage to the headlight itself. In this case, you should use the following method. Use a mounting cutter to cut a strip of plastic from the headlight housing, all around the glass, including this sealant. The second and final step during disassembly is to carefully pry off the headlight glass using a screwdriver. At the same time, you should cut off the layer of sealant located under this glass. Once you do this, you will have the opportunity to separate the housing from the headlight glass. At this point, the process of disassembling the headlight can be considered complete.
Interesting things nearby: Lada Priora Premier
Headlight polishing
During travel, standard headlights are exposed to the mechanical influence of sand, gravel, dirty water from surrounding vehicles, the chemical influence of road reagents, and salt. The surface of the lighting fixtures acquires a yellow tint, becomes matte, and the intensity of the luminous flux decreases. At night, visibility and traffic safety deteriorate. Modern headlights are made of polycarbonate and plastic glass - to polish them you do not have to buy expensive diamond paste, comparable in cost to a new light fixture. A budget abrasive will help improve the situation. Required materials and tools:
- masking tape;
- fabric-based sandpaper (800, 1000, 2000, 4000);
- Sander;
- washing car shampoo;
- polish (for windshield);
- rags.
The polishing process is as follows:
- Wash the headlight using car shampoo and degrease if necessary.
- Dry thoroughly and cover the mating surfaces with masking tape to protect them from damage.
- Starting with a coarse abrasive (800), gradually move to a fine one (4000), using a fraction of each size for 2-3 minutes. After each stage, when switching to a finer grain, the surface to be treated is thoroughly washed.
- Before polishing, rinse and dry the surface.
- Using a foam pad and polishing agent, buff to a high shine.
During the grinding and polishing process, it is important not to overheat the surface being treated. To do this, you should not process one area for a long time, the movements of the grinder should be wave-like and progressive, and each fraction of the abrasive should be moistened
Polishing headlights on Priora
Do-it-yourself modification of the Priora stove
As their service life increases, sand, small stones, dirty water, and road chemicals negatively affect the light conductivity of the outer glass of lighting fixtures, and overall efficiency decreases. The solution will be restoration and polishing of the glass surface. When you decide to polish glass, thoroughly study the technical side of the process, materials, stages of work - everything affects the result. If you are not confident in your abilities, it is better to entrust the work to professionals, otherwise the result of the work done may be worse than the original result. If, nevertheless, you decide to polish the optical devices of your car, first remove the entire module, remove dirt, and protect surfaces that cannot be treated.
For polishing use:
- Abrasives;
- Sandpaper (1000 - 4000 units);
- Circles: felt, fabric, foam rubber;
- Polishing pastes.
First, a rough layer of plastic is removed with a depth equal to the depth of chips and scratches. As a result, the protective layer of varnish applied by the manufacturer will be erased, which must be restored after polishing. Applying a special varnish is a rather technically complex process. Another option is to stick a protective film, otherwise the result of your work will disappear in a couple of months. Change the sandpaper to finer sandpaper every 2 - 3 minutes. We monitor the removal of traces left by the previous number of abrasives. After each change of sandpaper, you must thoroughly wash the surface. The dried surface is ready for polishing.
Important: polish the tool used at low speeds to avoid overheating and clouding of the plastic; it will be impossible to restore this. Using polishing wheels, we bring the glass surface to the desired shine.
Polishing is often carried out due to varying degrees of wear on the vehicle's optical devices, for example, one headlight was damaged in an accident and was replaced with a new one
Using polishing wheels, we bring the glass surface to the desired shine. Polishing is often carried out due to varying degrees of wear on the vehicle's optical devices, for example, one headlight was damaged in an accident and was replaced with a new one.
"Priora": do-it-yourself tuning. Working on appearance
It is recommended to start work by modifying the geometric parameters of the bumpers, as well as the hood. You can install universal hood stops. They will help solve the manufacturer's shortcomings.
Bumpers that can be installed on this model can be purchased without any problems at the appropriate stores. Today their choice is available for every taste. For example, the “Sniper” or “I Robot” model are lightweight and made of plastic.
View gallery
You can also purchase fiberglass products. There is an option to order a custom product. The bumpers for your project will easily install onto existing mounts. This does not require any modification or modification. This is an inexpensive, but quite effective do-it-yourself tuning. "Lada Priora" will change before your eyes.
Replacing bumpers will not only completely refresh the appearance of the car. This also allows you to improve some technical parameters. So, simply replacing a bumper with a wide air intake hole can significantly increase the speed at which the engine cools.
To transform the appearance, you can also add plastic trims and spoilers. This will completely change the design of your car.
Video on replacing the headlight unit on a Lada Priora car
This procedure was clearly carried out using the example of Priora specifically for this article.
Lada Priora is a very good car, but very often the owners have a desire to change something in the appearance of the car, for example, tuning the optics. Often there may be an urgent need for changes, for example, you need to replace the headlights on a Priora. For those who decide to do this procedure on their own, without the help of a professional mechanic, it will be useful to familiarize yourself with the recommendations presented below. Let's look at what are the reasons for replacing a headlight and how to do it yourself. Below are instructions on how to disassemble the headlight and adjust it correctly.