It's no secret that a spark is needed to ignite fuel. It is formed by the so-called ignition system. And no, the system does not represent one or several elements - it is a real system, which in modern cars is also smart, if you can talk about it that way. The system is responsible for timely ignition and the most efficient use of available fuel. The ignition coil is just one of its components. Many people confuse the coil with the ignition module. These devices have the same operating principle, but differ, firstly, technically, and, secondly, in their areas of application. Let's figure out how the ignition module works, what can damage it and how to find a replacement for it.
What is the difference between a module and an ignition coil?
The ignition control module, as it is more correctly called, is essentially one of the control elements. It controls the ignition coil, and also sets the ignition timing and, if necessary, changes it. Of course, in accordance with the commands given by the car ECU. The design of the ignition module includes the following elements:
- Keys ( high voltage );
- A pair of ignition coils.
Optionally, an electronic switch can be used. The control unit is responsible for generating control signals that are clearly consistent with the position of the vehicle's crankshaft. As soon as the signal period comes to an end, spark ignition begins - this is how the ECU controls the module, which controls the coils. Typical module malfunction: loss of ignition in a pair of cylinders. In this case, they say that one channel is out. Often the ignition remains normal, but is unstable when the engine is cold. We will look at these points later.
In the vast majority of modern cars with modern internal combustion engine control systems, the module has given way to four-terminal ignition coils. Let us recall that the ignition coil is essentially a step-up transformer - there is a low voltage at the input and a high voltage at the output. On cars with 16V , there are four ignition coils, so there are problems with the ignition system. There is only one module, it is controlled by a computer and, roughly speaking, is an evolution of the usual ignition coils (many call this a new generation of coils).
Repair
So, for the VAZ 2110 the most common problem is the disappearance of voltage on cylinders 2 and 3. After some time, the engine starts working normally again if you press the rear plate of the module.
You should not put up with such a situation; it is better to immediately check the functionality of the unit, restore or replace it completely.
Removing the module
The procedure is quite simple.
- Disconnect the negative cable from the battery.
- Remove the plastic cover that covers the motor.
- Remove the wires from the spark plugs.
- Disconnect the wires from the ignition module. Their numbering is indicated on special white rings. And the cylinder number is indicated on the ignition module housing.
- Disconnect the connector from the ignition module.
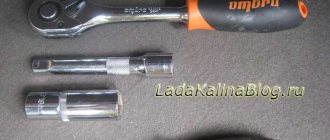
- Using a 10mm socket, unscrew the three nuts that hold the block we are looking for.
- Carefully remove it, after which you can begin further work.
Now let's move directly to working with the module:
- Open the aluminum plate on the ignition module. A flathead screwdriver is useful for this.
- Inside you will find a small printed circuit board with electronic components. It is covered with a transparent layer of silicone, which will have to be removed.
- There are also wires that connect the board to the connector contacts. They are made of aluminum, so they can tear quickly.
- Tear off all the wires from the contacts, don’t be afraid. Others will be installed in their place. By the way, experts recommend using stranded wires used in computer mice.
- The ignition module circuit includes two switches and two powerful transresistors. If you decide to change these elements, you need to know that the switches are manufactured by SGS-THOMSON (model L497D1), and the transistors are of the BU931 type.
- The contacts are made of aluminum, so you will need a special flux to work with this metal.
- We solder the wiring to the board. It is more difficult to solder to the transistor collectors, since they are covered with a special material, the soldering of which is problematic. Therefore, try to hide the top coating from the element as carefully as possible. To prevent the soldering iron from transferring all the heat to the plate, place it on the stove and heat it to 180 degrees Celsius.
- Solder the wires to the contacts on the module so that they are as short as possible.
- Cover the areas where you soldered with varnish. Regular nail polish borrowed from your wife will do.
- Check if the ignition module is working.
- If everything is fine, coat the inner surface with a special autosealant, then reassemble in the reverse order.
- Upon completion of assembly, the wiring should be positioned fairly freely. Make sure that they are not compressed inside the box and that the integrity of the connections is not broken.
Carrying out such a repair of the ignition module on a VAZ 2110 with your own hands will not be difficult. But be careful, act carefully and consistently. Pay special attention to the soldering process.
But keep in mind that we have addressed the problem of bad contacts. She is not the only one for the “ten”. You may need to pinout the ignition module on the VAZ 2110. For this, it is better to contact specialists.
If the cause of the malfunction lies elsewhere, then there is a high probability that it is better to simply replace the VAZ 2110 8-valve ignition module with a new one. The search may drag on without yielding results. Replacing the element will completely solve the current problem.
So what is the advantage of modules?
Older carburetor engines had a coil that worked in tandem with a distributor. Engineers decided to use a module in injection engines. According to experts from Beru[/anchor], one of the leading manufacturers of ignition system components, the future of internal combustion engines lies in the ignition coil block ( module ), in which the elements operate independently of each other. Structurally, this is advantageous because each element does not require a large number of connecting wires. And the system itself turns out to be more reliable, especially when compared with the ignition of older models. Car enthusiasts are thinking about replacing conventional coils with a module for other reasons:
- Misfire . It is more difficult to start the engine when cold, the car consumes more fuel, etc.;
- The coils are burning . Many people complain that the coils fail very quickly and literally one after another;
- Repair price . Rather a corollary from the previous point. Good reels made in Japan or Germany cost a lot of money. The module includes everything necessary for the operation of the ignition system and boasts high fault tolerance and reliable operation in almost any conditions.
Ignition models also have their own “diseases,” but they are few and progress slowly. As a rule, module failure occurs due to an interturn short circuit. It is preceded by a break in the high-voltage wire. The module will still work , but much less efficiently. Perhaps this is the only serious problem that those car enthusiasts who decide to remake the ignition system may encounter.
Custom ignition coils, which company is better?
| On 16-cylinder "tens" engines (for example, on a VAZ 21124 engine), the plant installs individual ignition coils (IKZ). High-quality IKZ is the key to uninterrupted engine operation. Do you know which ignition coils are best to choose? |
On VAZ 2110, 2111 and 2112 cars, IKZ from different companies were installed from the factory. You can distinguish them by the catalog number (article) that is stamped on them. For example:
- 2112-3705010-10 - “BOSCH”, Germany;
- 2112-3705010-11 - NPP "ITELMA", Moscow;
- 2112-3705010-12 - JSC "SOATE", Stary Oskol;
- 2112-3705010-13 - PO "SEVER", Novosibirsk.
Depending on the manufacturer, the price of ignition coils can vary significantly. Imported IKZ for VAZ can now be found for 1500-1800 rubles. Cheaper Russian analogues are 2 times cheaper. It is worth considering that there are a huge number of IKZ counterfeits on the market. The service life of such products is significantly lower than the original ones. For example, according to reviews from owners, after installing Chinese ignition coils, the “cylinder misfire” error appeared after just a few hundred kilometers. And after the same amount of time they completely failed. An example of how to distinguish original Bosch IKZ from a fake. Before replacing ignition coils, make sure that they are the cause of the malfunction. To do this, you can check the ICP with a multimeter. Some car enthusiasts are trying to repair IKZ using a heat seal. You can buy individual ignition coils in online stores (there is a discount for site users in some stores) So, let’s vote and leave reviews about individual ignition coils for the VAZ of the tenth family:
- How long did the old IKZ last?
- Which company did you choose?
- Did you change one IKZ or a set at once?
ps Off-topic comments will be deleted.
xn--2111-43da1a8c.xn--p1ai
Ignition module malfunctions
It is very easy to identify the main malfunctions of the ignition module. A car enthusiast should acquire an accurate device for measuring active resistance. The reasons for its use may be the following:
- Weak discharge on a candle, several candles or all of them;
- No spark discharge.
Obviously, all of the above is the cause of increased fuel consumption, malfunctioning engine operation, and increased exhaust toxicity. Everything that is typical for faulty spark plugs is transferred to the module. You can check it yourself, as in the case of a spark plug: between spark plugs (more precisely, terminals) 1-4, as well as 2-3, the resistance should not be less than 4000 Ohms . If it is smaller, then we can talk about a turn circuit. The normal resistance depends on who manufactured the module. In most cases this is 4000-5000 Ohms .
Some problems with automotive ignition modules are related to the switch. It is a board consisting of a number of microcircuits that are filled with a special heat-removing gel. The device can be found behind the module on a large metal plate. Module malfunctions are observed when the connections of the coils and the switch become unusable. The easiest way is to replace the entire module, but car enthusiasts who are well-versed in repairing electronic boards can try to make the repairs themselves.
Signs of malfunction of the ignition module of VAZ 2110 and 2114. We disassemble and fix
This electrical unit is more modern than on the “classic”, but it is quite possible to identify signs of a malfunction in the ignition module of the VAZ 2110 and 2114 even for a novice car enthusiast. Of course, provided that there is a desire to engage in such testing. This is not such a primitive design as the classic so-called bobbin, but the module also cannot be called a super complex thing. Therefore, self-diagnosis is accessible even to a beginner. But the solution to the problem itself is your choice: either replacement or repair with your own hands, or a trip to a familiar service station. Signs of a malfunction of the ignition module of the VAZ 2110 and 2114, as a rule, can be identified in several cases of abnormal operation of parts and components. We will talk about this in our article today. Floating speed: The situation when the idle speed of a running engine without any action taken by the driver begins to change spontaneously is usually called “floating speed”. Moreover, they can vary their performance so much that the engine sometimes stalls. Of course, this factor may also indicate a malfunction of some other mechanisms that are no less important for the smooth operation of the machine. For example, incorrect ECU settings or clogged injectors. These same signs may indicate poor quality of the fuel being poured. So the situation when the speed floats at idle can only be called an indirect indicator. The engine is doubling, not to be confused with tripling! That is, not one cylinder is not working, but a pair: either 1/4 or 2/3. Well, this sign is quite easy to determine by listening to the operation of the car’s engine. This is also clearly felt by the vibrations and sounds of the functioning of the running engine. You may also feel dips in traction when trying to accelerate or when driving up a hill, albeit a small one. Another indirect sign indicating a malfunction of the ignition module is the Check Engine light. True, the light bulb can light up for various reasons (and even without them). Computer diagnostics If you carry out scanning diagnostics using the appropriate equipment, you can understand from the identified errors that the ignition module is sinning.
- P3000 (and also 3001-3004) – the ignition in the cylinders does not work;
- P0351 – winding break in a pair of 1/4 cylinders;
- P0352 – winding breakage in a pair of 2/3 cylinders.
If you discover any of these errors using a smart machine, do not rush to get too upset, since they do not necessarily indicate the death of this node. For example, high-voltage wires with breakdown or spark plugs can also create a problem. Therefore, professional diagnosticians advise going from small to great: that is, at the beginning, exclude more correctable and minor symptoms, taking on large and global ones last. And only after checking other elements of the ignition system for malfunctions: unscrewing and inspecting the spark plugs, for example, ringing and replacing the wires, then begin diagnosing the problems of the corresponding module. How to check? Professional car service technicians advise the simplest method of checking. To do this, install a known-good ignition module instead of the one being tested.
- Remove the negative from the battery (disconnect the terminal);
- Remove the tips from the spark plugs;
- We press out the fastening clamp. Disconnect the wire block from the ignition coil;
- We unscrew the fastenings of the gearbox bracket, as well as the lower bolt on the cylinder block fastening;
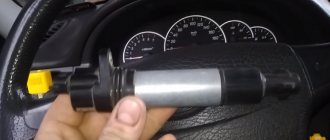
- We take out the ignition coil together with the bracket, disconnect the wires;
- We release the fastening of the bracket and coil;
- We remove the coil and replace it with a known-good similar device. Reassemble in reverse order;
- If everything works, then the problem is in the ignition coil. As a rule, it is not repaired, but simply replaced with a new device. So you’ll have to run to the nearest auto store or car market to get the required spare part.
A little advice: when reinstalling, it is necessary to correctly connect the high-voltage wires leading to the coil and to the spark plugs.
By the way, there are marks on them so that you definitely don’t miss. So pay attention to this nuance so as not to create additional troubles. What to do if there is no working module? If it is not possible to install a test element or borrow it for a while, for example, from a neighbor in the garage, then you will have to be patient when picking up test lamp and multitester. We measure the resistance between the winding terminals (paired). The probes must be installed according to the scheme: 1/4, 2/3. The measurement results should be almost identical (approximately 5.5 kOhm is shown by the device). If the errors between them are 100 Ohms or more, the module needs to be replaced, since the secondary winding has failed. Next, in order to identify signs of a malfunction in the ignition module of the VAZ 2110 and 2114, we call the wire block and check the serviceability of the ECU. If you don’t have a multitester at hand, some testing steps can be carried out using a test light. AutoFlit.ru
If the module does not have a built-in switch
Some modules do not have a switch. The manual for them says “dual ignition coil”. Since such modules do not have switches, their main faults are related to the coils. In rare cases, the problem lies in the ECU. Note: the ignition system still has a switch, but it is a separate element. Checking the coils with a multimeter should show the following:
- The primary winding must have a resistance of over 3000 Ohms ;
- The resistance of the secondary winding cannot be less than 4000 Ohms .
An important point: the measuring device has a measurement error, but it should not be greater than the difference between the coils of different pairs of leads. One more point: in very rare cases, the secondary winding shorts to vehicle ground. Such a malfunction is very difficult to identify. In almost all cases, the breakdown of the secondary winding occurs through microcracks that cover the module body after long-term operation. One output breaks through, so that out of a pair of candles only one stops working.
What errors are associated with the ignition module?
Fortunately, the ECU system controller will help us determine whether the ignition module is faulty. She constantly “monitors” that there are no breaks in the ignition system. The DTC is displayed under the following conditions:
- The driver turns on the ignition;
- The system checks whether the condition for setting the code is met;
- It is determined whether there is an open circuit, whether there is a short to ground or a short to battery;
- The lamp lights up, signaling a malfunction;
- The controller records a diagnostic trouble code.
These errors are directly related to the operation of the ignition module:
- A break in the coil of cylinder 1-4 was detected;
- A broken coil of cylinder 2-3 was detected;
- P3000, as well as P3001 to P3004. Multiple misfires detected.
Please note: errors could occur due to non-functioning spark plugs or a broken high-voltage wire. They need to be checked, as well as the ignition module . It is recommended to replace the latter if it is faulty - the unit can be called repairable only conditionally.
Checking the ignition module of the injection VAZ 2110 8/16 valves
Content
The top ten may have an eight-valve engine 2111, with a volume of one and a half liters, or an engine 21114, with a volume of 1.6 liters. The difference between them is in the ignition modules.
The module for a one and a half liter engine has the article number 2112-3705010, and the module with a volume of one thousand six hundred cubic meters has the article number 2111-3705010. They also differ in price. If the cost of the first ranges from one and a half thousand rubles to 2100, then the cost of the second is cheaper by about five hundred rubles.
Which one should you choose? The most reliable ones are produced in the city of Stary Oskol.
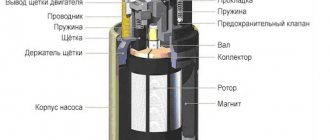
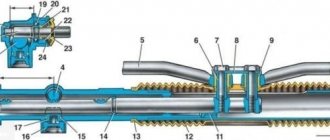
Module structure
It consists of two ignition coils and two high-voltage switch switches. The coils are designed to create high-voltage pulses.
In essence, it is a simple transformer that has two windings: a primary winding, with an induction voltage of approximately five hundred Volts, and a secondary winding, with an inductive voltage of at least twenty kiloVolts. Everything is placed in one housing with one connector for signal wires and four for high-voltage.
Schematic diagram of the VAZ 2110 module
The operation of the ignition module is based on the “idle spark principle”. The module is capable of distributing a spark in pairs: to the first and fourth, second and third cylinders when transmitting pulses from the electronic control unit.
Possible faults
You can ring the VAZ-2110 ignition module yourself.
The main task of the module is to supply current to the spark plugs. A high-quality spark is enough to ignite the working mixture. If there is no spark, then problems with the engine are inevitable in the form of a decrease in power, an increase in fuel consumption, dips during acceleration, the speed fluctuates, and the engine refuses to work during startup.
Symptoms and check
If one coil fails, two cylinders stop functioning. This is easy to notice, since the engine becomes heated at idle, starting is difficult, gasoline consumption increases sharply, and dynamics are lost.
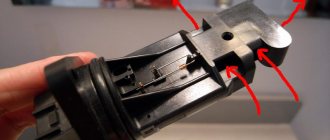
We remove the connector from the VAZ 2110 module by slightly moving the latch and pulling the wire.
We check the voltage between pin 15 and the block ground.
Circuit for checking the primary windings
Secondary winding test circuit
Scheme for checking the module for short circuit
You need to make sure the spark plugs are working. They are unscrewed and the spark is checked separately on each of the spark plugs. A high-voltage wire is placed on the spark plug head. The spark plug is placed in such a way that the threaded part of the spark plug and the engine mass are in contact. If, when cranking the engine with the starter, the spark is very weak or absent altogether, then it needs to be replaced. If there is no result, you need to check the high-voltage wires. This excludes spark plugs, caps and high-voltage wires from the list of faults. This means it’s time to move on to checking the ignition module. How to do this?
First of all, the body is carefully inspected, the surface of which must be intact. If chips, cracks or burns are detected, then the module must definitely be replaced.
If spark instability is noticed only on the first and fourth, or second and third cylinders, then the conclusion arises that some coil is damaged.
Even if this is the case, due diligence needs to be done.
Checking the VAZ-2110 ignition module with a multimeter 8 valves is as follows:
- The connector with signal wires is disconnected from the module.
- It is then removed from the module. The latch must be moved to the side and pulled by the wire.
- The ignition is turned on to check the voltage at the terminal of the central block of control wires. If there is no voltage when the battery is charged, or if the value is less than the nominal value, which is twelve volts, it is concluded that the electronic control unit is faulty.
- The high-voltage wires are removed, and it is necessary to unscrew and remove the module mounting bots.
- The resistance on the primary windings of the coils is checked. The multimeter is set to resistance measurement mode. Using the device, readings are taken from the rightmost and central terminals, then the leftmost and central ones are checked. The nominal resistance should be about 0.5 ohms.
- The primary windings are checked. The resistance in the secondary windings is measured between the terminals of the first and fourth, second and third high-voltage wires. Nominal resistance 5.4 kiloohms. If a discrepancy is found, it means that the coil is not operating correctly.
- The module is checked for a short circuit. One of the tester probes is installed on the central terminal, the other on the metal body. If there is no indication of a short circuit, a conclusion is drawn that the housing of one of the coils is short-circuited.
Errors
The error scanner detects a module malfunction. If the error codes are P-3000, P-3001, P-3002, P-3003 and P-3004, this is a lack of sparks. This means that the problem is either in the module itself, or the spark plugs are faulty, or the high-voltage wires, or the electronic control unit.
If the error code is P-0351, then the coil of the first to fourth cylinders is faulty, with the code P-0352 the second to third.
Such a scan does not say anything about the functionality of the module. The problem may be in the spark plugs or broken high-voltage wires. But if they were diagnosed before testing, then the ignition module is definitely to blame.
Here the car owner makes the decision. Only he can decide to repair it himself, or buy a new one. Choosing the second option will be simpler and faster, guaranteeing uninterrupted operation of the ignition system.
What a car enthusiast can do on his own
Everything that was stated above. Working with a measuring device does not always give the result in which you can be confident. The fact is that the winding resistance values of different modules may be different. It's best to do the following:
- Go to the service center and ask the technician to check the module on a special stand. Such stands can be either made at the factory or made in a garage. The second option should not scare you: homemade stands are usually made from a distributor removed from a carburetor “nine” and a drill drive;
- Install a known working ignition module on the car and see how it behaves. Obviously, the car enthusiast will need to monitor the operation of the spark plugs.
All 3 options are good in their own way. The vehicle owner should always have measuring instruments - the lion's share of automotive electronics can be diagnosed in a garage and determined whether sensors, coils, modules, etc. need to be replaced. The remaining 2 options are more accurate, but require compliance with conditions.
Procedure for checking the ignition module on a Chevrolet Niva
Before proceeding with dismantling the module, you need to make sure that the cause of unstable operation is not a simple lack of power contact. To do this, we “move” or turn on and off the connected block of wires several times. If such a procedure does not bring any results, then the functionality should be checked on a dismantled device.
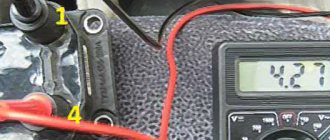
- When the element is removed, we prepare the multimeter for use and check the integrity and cleanliness of the sockets on the terminals (A, B, C, D - approx.).
- First of all, connect the red probe to contact – D, the second one to ground. We turn the multimeter into voltmeter mode - 20 volts, and if the socket is working, then the readings on the tester should be 12 volts.
- Next, go to contact – C, the second again to ground. We switch the multimeter to the ohmmeter mode and look at the readings of the device, and if it is less than 1 ohm, then the socket is normal.
- We check contacts A and B one by one, but in the same order. We connect the multimeter in voltmeter mode and if the readings do not exceed 0.3 volts, then the device can be considered fully working.
How to choose a car ignition module
When choosing a module, a car enthusiast may be faced with the fact that in the store there are two modules that look identical at first glance: an old one and a new one. They are not interchangeable. There is confusion in concepts: sellers in stores call modern coils modules, although they essentially are not them. But let’s not deviate from the “store concept” and look at the features of both modules.
Spare parts for Opel astra
Ignition module (switch)
ASTRA G sedan (F69) (09.98 - 12.09)
Spare parts for Mercedes e-class
Ignition module (switch) E-Class sedan (W124) (12.84 - 06.93)
Old-style modules (roughly speaking, having 4 connection wires) have a built-in signal amplifier. The new model modules do not have such an element, and the transistors, also known as high-voltage switches, are located directly in the “brains” of the engine. If you really want to install a new type of module, you will also have to change the ECU with wiring or try to introduce transistors into the system. The work is not easy, and there is not much point in it. To accurately select the module you need, use the following search methods:
- By VIN code . This is the simplest and most accurate method of searching for original spare parts and their closest analogues;
- According to the car . We are interested in: car make, model, engine data. The ECU data is directly connected to the engine. Simply put, if you select a module according to the technical data of the car, then you definitely won’t have the idea of looking for a part for a car with a 16-valve engine or an 8-valve one;
- According to the spare part code . Usually the car owner does not have the code for the required module. You can find the spare part code in the electronic catalog using the above method: brand - model - ... - the spare part you are looking for. Advanced systems automatically add analogues to the list of suitable ignition modules, which is very convenient.
Choosing the wrong module risks at least the fact that the device will not be able to be installed on your car. Modules of old and new models differ from each other - this should not be forgotten. If a car enthusiast decides to remake the ignition system with individual coils, then he needs a new model module (often sellers describe it simply as a “small” module), connector and wiring. The ECU will need to be flashed.
Brand tour
Today, most ignition modules are manufactured by only a couple of companies. They control most of the market, and, which is favorable for the car enthusiast, the quality of the products is consistently high. He can’t go wrong by purchasing an original module or the closest analogue from the following companies:
- Bosch (Germany);
- Lucas (UK);
- Era (Italy);
- Stellox (Germany);
- Delphi (UK).
With the exception of Stellox, the car enthusiast will be able to find the same original under the name of the above brands. For example, Era is a packer and works closely with Siemens VDO, Pierburg, Bosch and many others - those whose products are the standard of quality. It is also worth noting the ]NGK[/anchor] ignition modules (Japan) - they are not inferior in quality to Delphi , but are often cheaper.
Conclusion
If the ignition module fails, the problem cannot be ignored. Firstly, the power performance of the engine will drop significantly. Secondly, the ride will become less comfortable. Thirdly, the exhaust will become more toxic, and this causes great harm to the environment. In fact, choosing the right module is very simple. You just need to be guided by the technical data of the vehicle, spare part code or vehicle identification number. There is also no difficulty in choosing a manufacturer: all products from well-known companies can boast of high quality workmanship, high fault tolerance and durability.