Repair of the front caliper VAZ 2110
The caliper in a car is one of the most important parts.
It is a unit necessary for attaching the brake pads of a vehicle. Only a small proportion of drivers pay due attention to the braking system, although this part of the car should be a priority. Many owners of domestic VAZ cars have managed to appreciate the importance of the caliper, or rather, the need for its full serviceability. For example, some drivers almost crashed into the vehicle in front because the braking system failed at the most inopportune moment.
The driver should definitely periodically check the serviceability of the brake caliper on the VAZ 2110 and other domestic car models. If this part is damaged, it can be restored. In cases where the possibility of restoring the caliper is excluded, the component part is completely replaced.
Replacing the main brake cylinder on a VAZ 2109
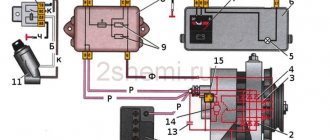
The vacuum brake booster (VUT) makes it easier to operate the brake pedal. This assembly is divided into two chambers - one has a permanent connection with the intake manifold, and the second is connected to the atmosphere when the brake pedal is pressed.
The unit is located under the hood behind the brake master cylinder. Through the rod it is connected to the brake pedal.
Replacing caliper guide pins and their boots on VAZ 2114-2115
The first step is to jack up the front of the car. Then remove the wheel and use a flat-blade screwdriver to bend the locking washers of the caliper bolts.
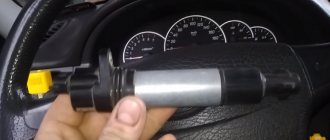
Then unscrew the two fastening bolts at the top and bottom, as shown in the photo.
Next, compress the brake cylinder using a screwdriver by inserting it between the bracket and one of the pads.
Next, you can lift the cylinder with the bracket up, as shown below, and move it to the side so that it is out of the way.
And now you can easily remove the caliper pins, both from above and from below, with minimal effort.
Then we clean the fingers from the old grease with a special product or buy a new one. Also, it is necessary to install a new boot if the old one is damaged.
Apply special caliper grease to the pin and under the boot, as shown in the photo. Then we put the finger in its place all the way so that the boot is securely fixed.
Now you can assemble the entire structure in reverse order, and do not forget to press the brake pedal several times before leaving the repair site so that the pads take their position in the guide.
Replacing caliper guide pins
If you begin to notice rattling of the calipers on your own car, then you should first pay attention to two things:
- On brake pad springs that may have weakened
- The caliper guide pins may have worn out due to lack of lubrication.
This article will examine the second option, when specific wear on the guide pins leads to similar dilemmas. First, you should pay attention to the condition of the anthers. If they are torn or even cracked, then they need to be replaced with new ones, and the fingers themselves must be re-lubricated. But more on this below.
Necessary tool for inspecting calipers on VAZ 2110, 2111 and 2112
- Flat blade screwdriver
- 13 and 17 mm wrench
- Copper grease
- Lubricant for caliper guide pins
- Brake Cleaner
Replacing the front brake pads of a UAZ
Operating a vehicle with a faulty brake system is prohibited for your safety, the safety of passengers and pedestrians. The UAZ is quite a heavy car and the serviceability of the brakes is of great importance. Since the front of the car is heavier, the front wheels are more effective when braking. This article will discuss how to replace the front brake pads of a UAZ.
Front brake pads on UAZ drum type
Do-it-yourself dismantling of the caliper on a VAZ-2110
The very simple design of the product and the triviality of the process of dismantling it allow even a novice motorist to carry out repairs and maintenance. If you carefully follow the recommendations below, you are unlikely to encounter difficulties at any stage of the process. You will save a lot of money spent on a trip to a service station, and a considerable amount of time, because the service time is comparable to the time required to travel to the workshop.
Dismantling VAZ caliper
The sequence for dismantling the product is as follows:
- The first step is to jack up the car and remove the wheel. To be on the safe side, it can then be placed under the bottom of the car in case the jack fails;
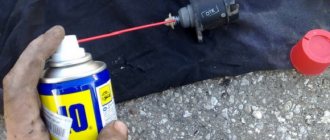
- On a VAZ 2112, the caliper is attached to the bracket using two M17 bolts, which you should unscrew. Penetrating lubricant may be needed to strip the bolts;
- If you need to replace the VAZ caliper or carry out a comprehensive repair, unscrew the product from the brake hose. You seal the hose tip and you can begin further disassembling the product.
Lubricating calipers: how, with what and why?
Any “extra” sound coming from the front suspension will certainly alert an experienced motorist. A worn-out bearing, a loose ball or a spinning wheel can lead to loss of controllability and even cause an accident. However, of the many knocks that chassis parts can make, the one that stands out the most is the sound made by the brake calipers - or rather, their brackets and guides. Today we will fight him.
This unpleasant and loud defect is known firsthand to many drivers, and it causes completely different reactions. Most often, the owner prefers “not to interfere with the car’s operation” - after all, this is the easiest way, and the “sound accompaniment” does not particularly affect the operation of the braking system itself. However, there are many meticulous motorists who fight sound in various ways - for example, by lubricating the guides and even modifying them.
The knocking noise occurs due to excessive clearance in the guide-bracket pair.
What to lubricate
It would seem that what could be simpler than lubricating the caliper guides? Many owners do this - during the next “overhaul” of the brake system, they take and lubricate their fingers with whatever comes to hand. As a rule, the garage assortment includes lithol and its derivatives, as well as graphite. More advanced people are puzzled by finding a specialized composition intended specifically for use in brake system components.
And now - surprise: in most cases, both of them do the wrong thing! Yes, the caliper guide pins do need to be lubricated, but not with what is usually considered a suitable lubricant, even if it is positioned as such in a car shop.
Car manufacturers produce guide lubricants under their own brands.
Here is a list of original OEM lubricants from some automakers, indicating catalog numbers:
- BMW 81 22 9 407 103, 83 23 0 305 690;
- FORD/Motorcraft D7AZ-19A331-A, XG-3-A;
- Volkswagen/Audi G 052 150 A2;
- LAND ROVER RTC7603, SYL500010;
- HONDA 08C30-B0224M, 08798-9027;
- MAZDA 0000-77-XG3A;
- NISSAN 999MP-AB002;
- SUZUKI 99000-25100;
- TOYOTA 08887-80609;
- CHRYSLER/Mopar J8993704;
- Volvo 1161325-4.
There are also lubricants produced by companies producing auto components and chemicals under their own brands:
- ACDelco 89021537 (10-4022);
- Federal Mogul F132005;
- FTE Automotive W0109;
- Stahlgruber 223 1712, 223 1729;
- TRW Automotive PFG110.
Such different lubricants
Unfortunately, in the vast majority of cases, car dealerships (both online and offline) will usually offer “the wrong thing” - that is, anti-creaking lubricant, which simply cannot be used in guides!
The fact is that copper and ceramic anti-squeak pastes are intended for application to the back side of the pads and mating elements of brake calipers, but they are not suitable for “guides” for several reasons. Firstly, after lubrication with grease, lithol, “graphite” and other lubricants based on mineral oils, the rubber boots on the fingers almost always swell, stop sticking to the fingers and, in fact, simply stop performing their function.
Secondly, only special greases based on synthetic oils and a thickener are suitable for lubricating the guides. Thanks to this, the lubricant becomes refractory and does not “drain” from the guides after heating, and also does not coke over time from exposure to water and high temperatures. High-quality specialized lubricants can easily hold up to +300C, but at the same time they are non-aggressive to seals. Moreover, such lubricants not only do not melt, but also do not dissolve in water, alkalis, dilute acids, brake fluid, as well as methanol and ethanol.
Using the wrong lubricant in practice can lead to the opposite effect - that is, the lubricated guide pins become sour in the caliper, which is why the floating bracket loses its mobility, and the pads begin to jam and overheat.
On thematic forums, hundreds of pages are devoted to choosing the “right” lubricant for guides, but the theoretical calculations and practical reviews given often contradict each other, which leads to even greater confusion.
Front brake pad guide bracket VAZ 2112 R14 (1 piece)
- We guarantee fast processing of your order during business hours (we work from 11-00 to 20-00, Saturday and Sunday are days off).
- We guarantee reliable packaging of your order (when sending it by Russian Post or transport company).
- We guarantee the fastest possible dispatch of your paid order (within 2-4 business days after receipt of payment).
- We guarantee a refund or exchange for another product (with recalculation) within 14 days from the date of receipt of the order (the product must be in good condition, without traces of installation, delivery costs are not reimbursed).
- We guarantee a free exchange of goods (transportation costs at our expense) if the purchased goods turn out to be defective.
Guide faulty
The main problem if the brake does not work can be jamming and souring of the caliper guides.
Repairing this malfunction with your own hands will not be difficult. By the way, in this case there is no difference when disassembling both the front and rear calipers. To do this, you need to unscrew and pull out both guides. Clean them from dirt or poor-quality lubricant, remove and replace the torn boots with new ones, after filling them with special grease for calipers.
Then put them in place, insert and screw the guides back. Then you should try how freely the pressure bar moves along them. This can be seen visually in the attached video at the end of the article.
We should not forget about the housing of this brake element. If significant rust, dents, sagging or other mechanical damage is found on it, it should be replaced completely.
If the repair had to be done on a removed caliper, then after installing it in place, the brake system should be bled.