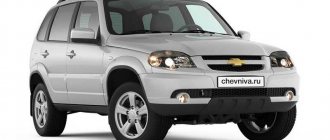
What is the door trim of the Niva Chevrolet
As a rule, the casing in any car is made of plastic . It hides the inner parts of the doors in the car. There may be other decorative elements on top of the plastic parts.
The product has several main functions:
- Installation of speakers, storage of small items inside special pockets.
- Reduced external noise levels inside the cabin.
- Place for mounting a handle that opens and closes the door.
- Creating an attractive appearance and a certain style.
- Hiding the metal base of a Niva Chevrolet, how to remove the front door trim - everyone can figure it out.
How to remove the trunk door trim on a Chevrolet Niva
Chevrolet Niva replacement and painting of the trunk door
How to remove the rear door handle on a Chevrolet Niva
Niva Chevrolet. just how to remove the rear handle
We open the back door, Niva Chevrolet
Door handle repair for Niva Chevrolet.
Niva Chevrolet rear door lock
Chevrolet Niva replacement and painting of the trunk door (Slideshow)
Chevrolet Niva, interior improvements!
How to remove clips without ruining them
How to open a Niva Chevrolet. Method number 1 (simple)
The four-door body of the Niva Chevrolet, in comparison with the Niva 2121, looked like just a limousine. What a shame it is for Shnivy owners when this body turns into a three-door. What to do when the back door on a Chevrolet Niva does not open, we will consider the reasons and solutions to the situation right now.
The process of dismantling the front door trim from a Chevrolet Niva
There are various reasons why there is a need to carry out such work . For example, when repairing a door mechanism or installing additional speakers. The work is easy to do yourself, you just need to spend some time studying the nuances.
The procedure is not at all complicated.
- The inner handle has two plugs; under them there are mounting screws for this design. To remove the plugs, just poke at the structure with a sharp object.
- Use a screwdriver to unscrew the screws from the armrest, and the latter is removed.
- Three screws hold a special pocket on the plastic, with which you can store various items inside. The screws themselves are located at the bottom.
- The plastic cover of the handle for opening the door is dismantled next. The handle is unscrewed, then the screw inside is removed. Remove the decorative trim by pulling part of the part towards you. The main thing is that the trunk is not damaged.
After this stage, everything is ready to get rid of the outer skin . Plastic dowels hold the product to the base. The keys are removed from the holes in the door sequentially - they are passed along the entire perimeter with tools. After this, there should be no problems with removing the trim in front.
What are the doors of the Chevrolet Niva made of?
The Chevrolet Niva is a 5-door SUV, with 4 doors designed to accommodate passengers and the driver, and a fifth to open access to the trunk. They all have the same principle of operation, which is to press the handle and open it for landing. They consist of a metal base, glass, canopies, handle and lock. These are the main details, but there are also auxiliary ones, which include:
- A handle or electric button for raising and lowering the glass.
- Window lift mechanism.
- Mirrors placed on the outside of the door.
- Internal handle for closure.
- Sheathing. Can be plastic, fabric, leather or leather substitute.
- Internal locking lock.
- Front door pocket. It is designed to store a first aid kit and cleaning supplies.
Latest models of the Pulls contain holes in the front doors for installing speakers. Many craftsmen install speakers completely freely and without first maintaining a place for them.
How to remove trim from Shnivy door
There are many reasons for removing the casing. This can be either replacing the window lift mechanism, lubricating the mechanism parts, quieting the door, installing speakers, replacing the handle or its mechanism, the lock cylinder, and more. Therefore, cases often arise when it is necessary to remove the casing and carry out repairs or maintenance, and some drivers, for the purpose of modernization, change the old casing to a new one. To remove the casing, you must perform the following sequence of actions:
- Take the necessary tool in the form of flat and Phillips screwdrivers and a knife.
- Pry out the plastic plug on the handle and remove the armrest handle.
- At the bottom there are 3 screws that secure the pocket. The screws are unscrewed with a Phillips screwdriver and the pocket is removed.
- Having pressed the opening handle, the screw is unscrewed with a screwdriver. The opening handle is not removed along with the trim, so you should not try to pull it or tear it off.
- The cladding is removed by passing the handle under the cladding. Then we control the door lock lever; you need to lift the trim up so that the lever remains in place.
- The cladding has been removed and the necessary repairs are being made.
You can read more about this in the article about removing the door trim on a Chevrolet Niva. Removing the trim from the rear door is carried out in the same sequence.
Removing the front door from its hinges
There are not many reasons for removing a door from its hinges, but they sometimes arise, and there is no escape from it. These reasons may be: detachment of loops; painting the door; alignment; straightening or filling of dents after impacts or accidents; replacement with new ones. Removal takes even less time than removing the casing.
To learn the principle of removing a door from its hinges, you need to read the article or watch the video.
So the sequence is:
- The first step is to remove the “-” terminal from the battery.
- The opening limiter must be removed. To do this, unscrew the bolts that secure it and disconnect the limiter.
- The block that powers all the electrics located in the door must be disconnected. It rotates along its axis and is disconnected.
- Now the locking brackets are removed from the hinges; to do this, you need to use a screwdriver.
- When the brackets are removed, the door must be supported to prevent it from falling to the ground.
- It is carefully removed by lifting it up along the axis.
The rear door is removed in the same way. Any parts are repaired or replaced and installed back in the same sequence.
Removing the door handle
The reason for removing the handle may be its wear or replacement with a new one, as well as for repairs. To remove the outer handle from the car, you must:
- Remove the inner trim. The handle is secured with bolts that are located inside and the main mechanism is located there, so without removing the casing, it will not be possible to remove the handle.
- Using a screwdriver, the rod is pryed up and disconnected from the handle lock.
- Using an eight-point wrench, unscrew the nut that secures the handle to the base.
- The bolt that secures the handle is removed and it is pulled out to the outside.
- The mechanism is replaced, repaired or lubricated. Installation is carried out in reverse order.
The process of removing the trim from the rear door
Painting, straightening, any welding work - these are situations in which it is necessary to remove the rear door . Or this is done in the case when the presence of such an element interferes with the organization of any other work.
First, prepare the necessary set of tools. Then they move on to the actions themselves, the sequence of which is standard :
- The minus terminal is disconnected from the battery to de-energize the entire vehicle. The driver's steering wheel is no exception. The bolts securing the door opening limiter are unscrewed with a ten-point socket.
- Rubber protection elements are removed from the wires that fit under the door. By squeezing the plastic clamp, the pads are disconnected from each other.
The retaining clips are removed from the door hinges using a flathead screwdriver . It is quite easy to pry the indicated space with it.
The door must be pulled up along the axes with a hinge to be removed from its place . At this stage, the repair work can be considered almost complete. Installation is in reverse order. The door mechanism is checked for functionality.
Removing and installing rear door window regulator
Remove the upholstery as described above
Disconnect the rod of the internal handle and locking lock
Fix the glass in the raised position (you can use a screwdriver)
Unscrew the bolts of the sliding glass mounting plate
Unscrew the two central nuts securing the window regulator
Unscrew the upper nut of the window regulator
Unscrew the lower nut securing the window regulator
Remove the window regulator assembly through the technological hole
Install the window regulator in reverse order.
Lubricate the window regulator parts with Litol-24 grease or an equivalent.
Replacing the sliding glass of the rear door of Niva Chevrolet
Remove the door trim as described above
Unscrew the bolt securing the sliding window guide and remove the guide
Removing the lower glass seal
Remove the top glass seal
We turn the glass in the window opening, as shown in the photo
Removing the glass from the opening
Install the glass in reverse order
Trim tuning: different solutions
Tuning of the interior parts is carried out to increase the comfort of passengers and the driver . The modern market offers many solutions, with different characteristics and features.
Interior insulation: what materials are used
The most common solutions:
- Madeleine. A type of seal with a fabric base.
- Bitoplast. Prevents so-called skips. It is distinguished by the presence of a sticky layer that simplifies fixation.
- Stizol. Suitable not only as a sound insulator, but also to contain heat inside.
- Isotone. It has excellent performance in absorbing sound waves.
- Vibroplast. Increased elasticity is the main characteristic due to which the base has become so widespread.
- Vizomat. Self-adhesive substance capable of absorbing vibrations of any type. The basis of impregnation is bitumen mastic. A closed car provides complete protection.
Reupholstering doors and panels with glue
Reupholstering complex surfaces raises the most questions , even among experienced craftsmen.
But it would be a good idea to familiarize yourself with the main nuances :
- First prepare the surface. Washing, sanding and degreasing are mandatory steps. Then the adhesion of materials increases, they adhere to each other faster and better. Special substances will help cope with degreasing.
- Next, glue is applied to the working surfaces and the material used. Applying with a brush helps with areas that have a lot of unevenness.
- Heating with a hair dryer promotes faster and better adhesion. Materials become more elastic.
Tips for using sewing machines
General recommendations for better results:
- The surface and elements are prepared for further use of the pattern.
- Paper is used as a blank, where the elements are transferred.
- Lines along which further work is carried out are marked on the material.
- The stitching of the material is carried out along the lines outlined in advance. Afterwards everything is stitched.
- Excess parts are carefully trimmed.
- The adhesive composition is applied to the reverse side. After which the products are connected to each other.
- The main thing is to protect the front surface from glue. Removing it does not cause any trouble.
How to disassemble the trunk door of a Niva Chevrolet
In this article we will look at disassembling the tailgate of a Niva Chevrolet car.
To complete the task you need the following keys: TORX key T20, T40, a set of screwdrivers, a key for 8, 10, 13, heads for 8, 13.
Removing the tailgate trim
Use a Phillips screwdriver to unscrew the four screws securing the top door trim
Removing the top door trim
We remove the plug from the right trim by prying it with a flat screwdriver
Unscrew the self-tapping screw securing the right trim using a TORX T20 wrench.
We also unscrew the self-tapping screw of the left trim
Unscrew the two self-tapping screws securing the right trim with a Phillips screwdriver
Removing the right door trim
Using a Phillips screwdriver, unscrew the self-tapping screw securing the left trim
Removing the left door trim
Unscrew the lid of the tailgate glass washer reservoir
Remove the rubber lining of the tank neck
Use a screwdriver to pry off the door trim from the inner door panel
Place a piece of rag under the screwdriver to avoid damaging the paint.
We separate the upholstery, starting from the door lock and further, moving along the perimeter.
We remove the upholstery. There are 12 pistons on the upholstery.
If the pistons are damaged, replace them with new ones.
Body types
The type of trunk itself and the features of the lining are determined by its design. There are several types of body. Their design is almost the same regardless of the model - Qashqai, Granta Liftback, Opel Antara, Lada.
- The sedan is the most common option. A closed body in which the trunk is separated from the passenger compartment and does not have a lift-up door.
- Hatchback is distinguished by a shortened rear overhang, and the trunk is closed by a door in the rear wall.
- A station wagon is a more voluminous, bulky body. Here the luggage compartment is integral with the interior, and its lid is extended to the rear clearance. The volume of the luggage section becomes noticeably larger.
- Liftback is an average solution between a hatchback and a station wagon. Unlike the first, the liftback - for example, the Granta Liftback, has a longer rear overhang. In this case, the door can be sloping, like a station wagon, or more stepped, like a sedan.
Luggage compartment Grant Liftback
- Coupe is a closed body, the luggage section is fenced off from the passenger compartment, there is no door. The volume of the section in this case does not exceed 0.93 cubic meters. m.
- Convertible is a model with a different type of convertible top. There is no luggage compartment.
- Roadster is a sports version without a roof or with a hard roof.
- Targa is a variant of a sports car with a roll bar behind the seats and a removable roof.
- A limousine is similar in design to a sedan, but with an elongated body and a rigid screen between the driver and passenger compartments. The luggage compartment is like a sedan.
Limousine
- Stretch – has an elongated interior due to an additional section between the rear and front seats.
- The van is a two-seater version with a closed body. The luggage section has its own door.
- An SUV is a closed model with a luggage compartment similar to a station wagon. The car has increased cross-country ability.
SUV
How to repair the luggage compartment of a Nissan car
In fact, it all depends on the design and the value of the finish. Usually it performs a purely decorative function.
- For example, it takes literally 5 minutes to remove the Qashqai trunk door trim. To do this, you need to unscrew the self-tapping screw in the door opening handle. Then the latches are released at the plastic joining areas in the compartment. Then you can remove the trim from the pistons. Installing the cover in the trunk takes the same amount of time.
Nissan manufacturers prefer the simplest possible engineering solutions in matters of finishing, and therefore replacement of the trim in almost all Nissan models, not only Qashqai, but also Sentra, Tiana, Terrano, is carried out according to the same principle.
Nissan car trunk
How to remove trim from a Chevrolet Niva
The trunk trim of the Chevrolet Niva is also a purely decorative detail. The material washes well, so it is quite possible to remove it for a while to wash it if, for example, dry cleaning is not available.
- Having opened the trunk door, use a Phillips screwdriver to unscrew the top screws on the decorative frame.
- Remove the decorative plugs on the lower parts of the frame. Unscrew the screws under them.
- Unscrew and remove the washer fluid reservoir cap. Then remove the neck located under the plug.
- Use a flat screwdriver to pry up the trim around the perimeter and carefully remove it. The plastic retaining pins are also removed along with the casing. The latter break during this procedure, so you will have to purchase new parts. The pistons are universal and any are suitable for the Chevrolet Niva.
How to remove the trunk trim of a Granta Liftback
For Lada - both station wagon and hatchback, the procedure for repairs is the same. Granta Liftback is no exception.
- Open the luggage compartment, find a plastic internal handle and use a Phillips screwdriver with a thick blade to unscrew the fastening bolts.
- Then use a flat screwdriver to pull out the retaining pins around the perimeter of the trunk. In this case, use a screwdriver to slightly pry up the finish itself.
- After the bolts are removed, remove the casing from the latches - the latter are placed in the upper part, where the lock is located.
- Remove the entire casing. Now it can be cleaned or replaced with another model if there is a lot of wear.
Tiguan luggage compartment repair
On Volkswagens the procedure is slightly different.
The trunk trim of a Tiguan, for example, is removed as follows.
- First, use a hex wrench to unscrew the side clips. Then the lining is separated from the eyes to fix the mesh. In this case, you need to apply force.
- The casing is then pulled off from the top clips.
- Unscrew the screw from the top, the side frame screws and from the folding hook.
- Then the casing is separated - with force - around the perimeter, releasing the remaining clips.
- The fixation in the Tiguan is quite rigid, so it is recommended to remove the casing one at a time: first from the left, then from the right side.
The video demonstrates the removal of the trim on different models: Tiguan, Opel Antara, Qashqai.
Removing and installing the tailgate lock
Disconnect the negative terminal of the battery.
Remove the tailgate trim as described above.
Disconnect the wiring connectors for the trunk light switch and the electric drive.
Use a flat-head screwdriver to pry and disconnect the lock switch rod end from the door handle
Use a screwdriver to pry the door handle rod off the lock lever.
Use a Phillips screwdriver to unscrew the three screws securing the lock to the door.
Using a Phillips screwdriver, unscrew the two screws
Removing the electric locking drive
Install the lock in reverse order
Removing the outer tailgate handle
Remove the door trim as described above.
Disconnect the lock switch and door handle rods as described above
Using an 8 wrench, unscrew the nut securing the outer handle
Using a 10mm wrench, unscrew the bolt securing the outer handle
We move the outer handle to the left until it stops; in this position, the locking protrusions of the handle disengage with the mating protrusions on the tailgate panel
We move the handle all the way up and remove it from the holes in the door panel.
Install the handle in reverse order
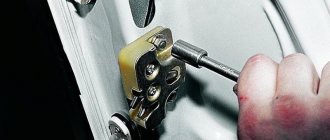
Removing the tailgate spike and spike socket (old version)
Using a 8mm socket, unscrew the two bolts securing the tenon to the door.
To remove the tailgate spike, mark the position of the spike socket relative to the body
Using a Phillips screwdriver, unscrew the three screws securing the tenon socket
Remove the tenon socket along with the gasket
Removing the tailgate spike and spike socket (new version)
Marking the position of the spike
Use a 13 key to unscrew the tenon
Marking the position of the tenon socket
Use a Phillips screwdriver to unscrew the three screws securing the socket (you can use an impact screwdriver)
Mark the position of the trunk door lock latch and use an impact screwdriver with a TORX T40 bit to unscrew the two latch screws.
Install the parts in reverse order. We install the parts according to the established marks.
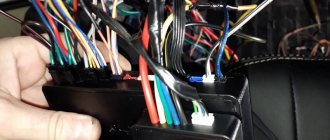
Removing door trim from Niva Chevrolet
To understand how to remove the Niva Chevrolet door trim, it is worth studying the basic rules of this procedure and the nuances of self-repair. The sequence of dismantling actions may vary depending on further goals. If the fabric is worn out, the fabric needs to be replaced; if the door card is deformed, the structure must be disassembled and the defects corrected. Preparing equipment, selecting new materials and decorative elements will ultimately create an updated look for the salon.
How to open the rear trunk door of a Niva Chevrolet
The rear door is without trim. There is only one way out in this situation - dismantling the door card, aligning the rods, dismantling, lubricating and cleaning the lock.
Moreover, the sooner you do this, the less likely you are to end up with a completely blocked rear door. Design features, or a tricky spring Jammed trunk lock on a Niva Chevrolet There are no particularly complex mechanisms in the rear door lock on a Niva Chevrolet.
The lock is ordinary, it works according to the VAZ principle, the only way to open the trunk of a Chevrolet Niva is that it is locked and unlocked by an actuator. Actuators also fail, but this happens extremely rarely.
And even in this case, to open the trunk of a Chevrolet Niva, it is possible to open or close the door manually. However, this system also has some nuances - if you activate the central locking while the trunk of the Chevrolet Niva is open, even if you click on any door, the lock of both the rear and any other door may jam.
And also interesting: Electrical diagram of the Niva Chevrolet: electrical wiring diagram of the VAZ 2123, Chevrolet Niva, electrical diagram and connection of the speed sensor, charging with description
Tricky spring. In most cases, it's all about the spring in the housing, which loads one of the rear door lock levers. Probably, the steel from which the spring is made does not meet the operating conditions, so the spring tendrils often break off.
As a result, one of the lock levers lives its own life - it wants, it will lock the lock, it wants, it will open the door on the go. It is unpleasant to open the trunk of a Chevrolet Niva, so at the first whims of the lock or its drive, it is worth removing it and eliminating the cause.
We remove the rear door lock on a Chevrolet Niva for repair. You will have to remove the rear door trim.
Even if the door no longer opens, you can easily get to the lock and unlock it, and then remove it and repair it. The handle is idling, the central locking opens and closes! I ran into the problem of not being able to open the trunk door.
That’s it, we’ve arrived, I thought. The Chevrolet Niva is equipped with a standard central lock; therefore, each of the five doors has an actuator that unlocks the lock when the central device is activated. How to open a locked rear trunk, open the trunk of a Niva Chevrolet in a Pajero Pinin and repair it with your own hands. And I remembered that from time to time the rear windows actually opened a centimeter on their own.
The fact is that the rear windows on the Chevrolet Niva are manual, and the front windows are electric. Therefore, when shaking, the rear windows gradually open.
What is the Chevrolet Niva door trim and its purpose?
The Chevrolet Niva lining has a standard appearance, but over time, natural wear and tear of the material occurs. Removing the rear door trim of a Niva Chevrolet will be required after an accident, mechanical damage to the door structure from the inside, or a desire to update the interior. The main purpose of the fabric element is to close the metal structure of the door, which contains electrical wiring and sound-proofing material.
The upholstery improves the appearance of the vehicle and makes the interior more cozy and comfortable.
Dismantling is recommended in cases where it is required:
- replacing the material with a new one due to stains, abrasions or damage;
- checking the functionality of electrical wiring, power windows, rear-view mirrors;
- installing speakers, disassembling a door handle or lock;
- replacing the clips that hold the panel, they are plastic and dry out over time;
- improvement of sound insulation, increasing the level of vibration protection.
Fabric inserts are found not only on the rear/front doors, but also in the trunk area. If removal does not involve replacement, then it is not necessary to completely remove the decorative panel from the door. It is enough to unfasten a few clips to gain access to the niche. During the replacement, it is possible to carry out a small auto-tuning of the interior.
Why doesn't the back door of a Niva Chevrolet open?
The Chevrolet Niva is equipped with a standard central lock; therefore, each of the five doors has an actuator that unlocks the lock when the central device is activated.
However, as practice shows, electronics are not at all involved in problems with locks.
In 99% of cases, the problem is still in the mechanics , either in the lock itself, or in damage to the rods. We will not consider cases where the door freezes to the body; this is an exception, but most often the owners are let down by the lock.
Broken lock rod (rod is bent)
The rear door lock rod is marked with an arrow.
There are often cases when the lock rods bend not due to improper assembly (although this is possible), but due to the banal entry of dirt into the door cavity.
It all happens something like this: the protective polyethylene film can peel off from the door frame in some places, and because of this, dust gets into the door cavity. Everything would be fine, but dust accumulates not only at the bottom of the cavity, but also on the levers of the lock itself. One fine moment we go to the car wash or get caught in a heavy downpour, the dust turns into dirt and limits the working strokes of the lock.
Trying to open the door with the handle, we make more and more effort, as a result of which the rod bends. It bends until the central locking actuator simply does not have enough movement to unlock the door. Even straightening the thrust, we will not achieve anything.
The rear door is without trim.
There is only one way out in this situation - dismantling the door card, aligning the rods, dismantling, lubricating and cleaning the lock. Moreover, the sooner you do this, the less likely you are to end up with a completely blocked rear door.
Design features, or tricky spring
Jammed trunk lock on a Niva Chevrolet
The rear door lock on the Chevrolet Niva does not have particularly complex mechanisms. The lock is ordinary, it works according to the VAZ principle, the only difference is that it is locked and unlocked by an actuator. Actuators also fail, but this happens extremely rarely. And even in this case, it is always possible to open or close the door manually.
However, this system also has nuances - if you activate the central locking with any door open at least one click, the lock of both the rear and any other door may jam.
In most cases, it's all about the spring in the housing , which loads one of the rear door lock levers. Probably, the steel from which the spring is made does not meet the operating conditions, so the spring tendrils often break off . As a result, one of the lock levers lives its own life - it wants, it will lock the lock, it wants, it will open the door on the move. It’s an unpleasant story, so at the first whims of the lock or its drive, it’s worth removing it and eliminating the cause.
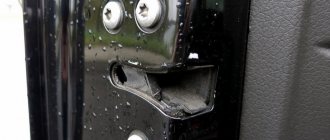
Removing the front door trim
It is more convenient to work from the salon. To disassemble the driver's door in order to remove the trim, the following algorithm of actions is provided:
- Use a knife to pry off the plugs under which the screws are located.
- Remove the front and side bolts. You don't have to remove the cover if you don't intend to completely disassemble the handle.
- Disconnect the latches on the lock mechanism. It is better to put them inside so that they do not interfere with the removal of the panel.
- Unscrew the side mirror adjustment lever. Disconnect the electrical wiring: speakers, power windows.
- Unfasten the clips. Release the column from the facing niche. Remove the casing.
After this, access to internal elements will be gained. If repairs of individual parts are required, the casing will not interfere with the process. Reassembly is carried out in a similar manner.
Removing the rear door lock on a Niva Chevrolet for repairs
Even if the door no longer opens, you can easily get to the lock and unlock it, and then remove it and repair it. This is done like this:
- The rear door door card is removed even when the door is locked. First, unscrew the two screws from the bottom of the door card.
- Remove the window handle by bending the handle with a flat screwdriver and pulling the latch upward.
- Unscrew the screw securing the decorative trim under the door handle, pulling the handle towards you.
- The door card is held on by six pistons - two at the bottom, two at the center and two at the top. They snap off if you pry them with a long screwdriver. The door card can now be removed.
The process of dismantling the front door trim from a Shniv car
of reasons why you need to dismantle the front door . This can be either installing speakers or replacing them, or repairing internal devices. The upholstery is designed in such a way that it is very difficult to realize at first glance how it is removed. In fact, everything is very simple, it is important to be careful and attentive so as not to destroy the fastening elements of the material during dismantling.
Dismantling and assembling the front door of a Chevrolet-Niva car
Let's move on to the storage pocket. It is fixed to the base with three mounting screws located at the bottom.
How to remove the rear door handle on a Chevrolet-Niva
Removing the door Required tools: - Phillips and flat screwdrivers - T-15 sprocket - 8, 15mm sockets
The process of removing the front upholstery includes the following sequence of actions:
- There are two small decorative plugs on the handle, under which there are fasteners. It is necessary to remove the plugs with a sharp object, picking up their edges.
- Use a Phillips screwdriver to unscrew the mounting screws and remove the armrest handle.
- Let's move on to the storage pocket. It is fixed to the base with three mounting screws located at the bottom. Unscrew and remove the plastic pocket.
- Next, remove the plastic cover of the opening handle. It secures the upholstery, so without removing it it will not be possible to dismantle the upholstery. To do this, press the opening handle towards yourself and use a Phillips screwdriver to unscrew the fastening bolt.
- The lining is dismantled as follows: the handle is pulled back slightly and the decorative lining is pulled out through the hole.
- Everything is ready to remove the front trim. It is secured around the perimeter with special plastic dowels. The keys are fixed in the holes, and their removal can only be done by removing the casing by hand. First you need to go around the perimeter with a sharp screwdriver and press out the casing 2-3 centimeters.
- After this, it can be easily removed from its seat.
The process of dismantling the front door trim from a Shniv car
There are plenty of reasons why it is necessary to dismantle the front door trim. This can be either installing speakers or replacing them, or repairing internal mechanisms. The upholstery is designed in such a way that it is very difficult at first glance to understand how it is removed. In fact, everything is simple, it is important to be careful and attentive so as not to damage the fastening elements of the material during dismantling.
The process of removing the front upholstery includes the following sequence of actions:
- There are two small decorative plugs on the handle, under which there are fasteners. It is necessary to remove the plugs with a sharp object, picking up their edges.
- Use a Phillips screwdriver to unscrew the mounting screws and remove the armrest handle.
- Let's move on to the storage pocket. It is fixed to the base with three mounting screws located at the bottom. Unscrew and remove the plastic pocket.
- Next, remove the plastic cover of the opening handle. It secures the upholstery, so without removing it it will not be possible to dismantle the upholstery. To do this, press the opening handle towards yourself and use a Phillips screwdriver to unscrew the fastening bolt.
- The lining is dismantled as follows: the handle is pulled back slightly and the decorative lining is pulled out through the hole.
- Everything is ready to remove the front trim. It is secured around the perimeter with special plastic dowels. The keys are fixed in the holes, and their removal can only be done by removing the casing by hand. First you need to go around the perimeter with a sharp screwdriver and press out the casing 2-3 centimeters.
- After this, it can be easily removed from its seat.
Now you can carry out any repair or diagnostic work on internal parts or casing. Removal takes no more than ten minutes; it is important not to rush when dismantling the cladding, as the fastening dowels can be damaged. Installation of the casing is carried out in the reverse order of removal.
Removing and installing the tailgate trim of Niva Chevrolet
To replace the Chevy Niva trunk lid trim, you will need flat-blade and Phillips-blade screwdrivers. Open the rear trunk lid
Remove the top screws securing the glass frame
Remove the decorative caps on both sides of the frame and remove the screws located under the caps.
READ How to remove the steering wheel on a Volkswagen Polo
Unscrew the filler plug and remove the neck trim of the tailgate glass washer reservoir
Carefully pry up the upholstery with a screwdriver at the locations of the fastening rivets and remove it. Installation of the trim and glass frame of the Niva Chevrolet trunk lid is performed in the reverse order of removal. Replace broken upholstery fastening pistons with new ones.
How to open the door on a Chevrolet Niva
In any case, such a breakdown leads to the fact that one of the lock levers begins to move in a random direction and it is impossible to predict whether the lock will open at the moment or not. There are even situations when the Niva Chevrolet rear door lock can open while driving.
Therefore, you should not wait for unpleasant situations to arise and carry out repairs immediately if any problems arise with the lock. Before starting repairs, the door trim on the Niva Chevrolet must be removed.
The door card can be removed even after the door is completely locked.
After this, the window lifter handle is removed. Even straightening the thrust, we will not achieve anything.
The rear door is without trim. There is only one way out in this situation - dismantling the door card, aligning the rods, dismantling, lubricating and cleaning the lock.
Moreover, the sooner you do this, the less likely you are to end up with a completely blocked rear door. Design features, or a tricky spring Jammed trunk lock on a Niva Chevrolet There are no particularly complex mechanisms in the rear door lock on a Niva Chevrolet.
The lock is ordinary, it works according to the VAZ principle, the only difference is that it is locked and unlocked by an actuator. Actuators also fail, but this happens extremely rarely. And even in this case, it is always possible to open or close the door manually.
However, this system also has nuances - if you activate the central locking with any door open at least one click, the lock of both the rear and any other door may jam.
Replacing the Niva Chevrolet door limiter
To replace the Chevy Niva trunk lid limiter, you will need a 13 mm wrench, a Phillips screwdriver and a hammer. Remove the rear trunk lid trim
Chevy Niva. How to remove the rear door trim from the interior. The door does not open.
Remove the bolts securing the limiter to the body
Unscrew the screws securing the tailgate glass washer reservoir and remove it
Unscrew the bolts securing the limiter to the door and remove the limiter
Installation of the Chevy Niva limiter is performed in the reverse order of removal. Use a hammer if necessary.
Simple trim tuning
To carry out high-quality tuning, you need to draw up a plan for future changes. To make your salon more stylish, but without requiring significant expenses, you can use simple instructions:
- Replace speakers, car radio, standard handles with euro ones.
- Update the upholstery, choose a more expensive material for this.
- Make lining of additional niches.
- Cover plastic panels with film.
- Add LED and reflective elements.
Tailgate Niva Chevrolet
Removing the spare wheel bracket for Niva Chevrolet
To remove the bracket, you will need a 17mm wrench. Remove the spare wheel from the bracket and Unscrew the four nuts securing the bracket to the tailgate and remove the washers installed under the nuts
Remove the bracket and rubber washers from the tailgate studs. Installation of the Chevy Niva spare wheel bracket is performed in the reverse order of removal.
Removing and installing the tailgate trim of the Niva Chevrolet
To replace the trunk lid trim of a Chevy Niva, you will need flat-blade and Phillips-blade screwdrivers. Open the rear trunk lid
Remove the top screws securing the glass frame
Remove the decorative caps on both sides of the frame and remove the screws located under the caps.
Remove the trunk lid glass frame
Unscrew the filler plug and remove the neck trim of the tailgate glass washer reservoir
Carefully pry up the upholstery with a screwdriver at the locations of the fastening rivets and remove it. Installation of the trim and glass frame of the Niva Chevrolet trunk lid is performed in the reverse order of removal. Replace broken upholstery fastening pistons with new ones.
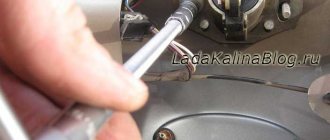
Removing and installing the trunk lid door lock drive Niva Chevrolet
To replace the Chevy Niva trunk lid lock, you will need flat-blade and Phillips-blade screwdrivers. Remove the upholstery
tailgate
and disconnect the wire from the negative terminal of the battery.
Remove the screws and remove the lock drive activator. Disconnect the wiring harness block from the activator. Installation of the rear door lock drive activator on a Chevrolet Niva is performed in the reverse order of removal.
Removing and installing the lock and handle of the trunk door lock of the Niva Chevrolet
To replace the lock or handle of the trunk lid door of a Chevy Niva, you will need keys 8 and 10, flat-blade and Phillips-blade screwdrivers. Remove the tailgate trim and disconnect the wire from the negative terminal of the battery
Remove the screws securing the trunk lid lock
Using a screwdriver, disconnect the rods from the door lock switch lever and from the door handle
Disconnect the black and white blocks of the wiring harnesses from the Chevrolet Niva trunk door lock activator and remove the lock assembly with the drive activator
Unscrew the door handle fastening nuts and remove the handle bracket bolt
In the "open" position, slide the handle to the left and remove the handle from the door opening. Installation of the Chevy Niva rear cover door lock and its handle is performed in the reverse order of removal.
How to remove the trunk lid of a Niva Chevrolet
To remove or install the Chevy Niva trunk lid, you will need keys 10, 13, 17 and a screwdriver. Disconnect the wire from the negative terminal of the battery
Unscrew the screws and remove the rivets securing the left trunk trim
Move the upholstery to the side and remove the screws securing the side panel trim
Remove the decorative trim for the seat belt eye and remove the bolt securing the eye to the body.
Remove the Niva Chevrolet seat belt from under the side panel trim and remove the trim
Disconnect the wiring harness connector from the trunk light and disconnect the tailgate wiring harness connector.
Remove the exhaust ventilation deflector and unscrew the nut securing the earth wire terminal
Remove the rubber bushing from the body hole and remove the trunk door wiring harness from the body hole.
Remove the bolts securing the door opening limiter
Remove the bolts securing the lower and upper hinges of the tailgate, having previously marked the position of the hinges on the body (if you are installing the previous door)
Remove the trunk lid. Installing the firecracker on a Niva Chevrolet is carried out in the reverse order of removal; after installation, be sure to adjust the position of the door in the body openings and the trunk lid lock.
Adjusting the position of the Chevrolet Niva tailgate
The position of the tailgate is adjusted by changing the position of the lock latch and the door tenon socket. You will need an impact screwdriver to make adjustments.
Using an impact screwdriver, loosen the screws securing the door lock retainer and the tailgate tenon socket. Move the retainer and socket in the desired direction and tighten the screws. This completes the adjustment of the trunk lid lock.
Removing the rear door lock on a Chevrolet Niva for repairs
You will have to remove the rear door trim.
Even if the door no longer opens, you can easily get to the lock and unlock it, and then remove it and repair it. This is done like this:
- The rear door door card is removed even when the door is locked. First, unscrew the two screws from the bottom of the door card.
- Remove the window handle by bending the handle with a flat screwdriver and pulling the latch upward.
- Unscrew the screw securing the decorative trim under the door handle, pulling the handle towards you.
- The door card is held on by six pistons - two at the bottom, two at the center and two at the top. They snap off if you pry them with a long screwdriver. The door card can now be removed.
The decorative card has been removed.
Video about removing the lock on a Niva Chevrolet
Opening the door
The lock can be unlocked by pulling the plastic tab of the actuator or another lever; using a long screwdriver, you can move the lock latch itself.
When the door has opened, you can remove the lock, but before that you need to remove the negative terminal from the battery. The lock is held on by fastening screws at the end of the door.
Trunk door lock.
After removing them with a long screwdriver, you need to remove the drive rods, disconnect the terminal blocks and remove the lock from the door cavity along with the actuator . After this, when the lock is in hand, the reason will become visible. In extreme cases, the lock can be replaced. Good luck to everyone and obedient locks!