Domestic cars such as the Lada 2170 are extremely in demand among domestic consumers due to their low cost and budget maintenance. Among the benefits, one can also highlight its disadvantages - the Priora’s tidy is not the most reliable element of the car, which necessitates frequent intervention in the electrical part of the car. The dashboards of cars from different years of manufacture are almost identical. The symbols on the board of the 2013 version differ little from their 1st and 2nd generation counterparts. Here are signs indicating identical faults and corresponding to similar indicators.
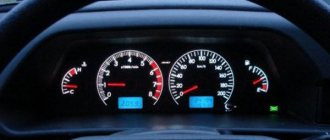
Priora dashboard indicators with interpretation
A separate category of indicators is mainly responsible for indicating the status of on-board systems and mechanisms. Such symbols do not indicate serious damage, they simply notify the driver.
The description and full explanation of the indicators looks like this.
| Visual Identification | Decoding |
| Fuel level indicator | Indicates the remaining gasoline in the fuel tank. When the supply is exhausted, the following sign lights up. |
| This indicator indicates that there are less than 10 liters of fuel left in the gas tank and the car needs to be refueled urgently. Initially, the red symbol of the gas station flashes, but when the fuel reaches 5-6 liters, it lights up constantly. | |
| On VAZ models, it indicates a low battery or a strong drop in voltage in the network. It usually appears after prolonged attempts to start the car in the cold. To fix it, just replace or charge the battery. | |
| The key against the background of the red car indicates that the immobilizer is turned on. This option is not available on 2008 models. Depending on the configuration, a green key may flash on the car’s dashboard. If the lamp blinks, the system is faulty. | |
| Standard turn signal activation indicators. The indicator lights light up for left or right turns respectively. If the indicator lights blink simultaneously, the hazard warning system is on (the red triangle lights up in parallel). | |
| A similar indicator lights up when the car is parked with the handbrake. It may also indicate a serious malfunction of the engine. | |
| The ABS system is not working correctly or the wheel is punctured. The system is present in cars optionally and is not directly related to the brake system. | |
| The red watering can is marked accordingly. The light indicates a critical drop in engine oil pressure. If the indicator goes out after the car warms up and the speed of the power plant is equalized, everything is in order. | |
| The green symbol indicates the activation of the side lights. | |
| The car's headlights are in long range mode. Lights up only when the mode is activated. | |
| Antifreeze temperature dial indicator | The indicator is installed on all machines without exception and displays the actual antifreeze temperature. |
Elm327 settings for Priora
Settings of the Torque Pro program for working with right-hand drive cars using the example of Toyota Mark II 2001 via ELM327
For right-hand drive Toyota Mark II (2001) Torque Pro, you need to write a command to programmatically reduce the speed of the ISO 14. and ISO 9. protocols (see the picture attached to the article)
For other models and brands of JDM (JDM-Japan Domestic MArket - Japanese domestic market), the following initialization lines should be entered to specify the protocol exchange rate:
Toyota Mark II 2001 y.o.: ATSP4\n ATIB96\n ATIIA13\n ATSH82 13 F0\n
Toyota Celica ZZT230: ATSH8213F1 \n ATIB96 \n ATIIA13
Toyota Vitz 01.2002: ATSH8213F1 \n ATIB96 \n ATIIA13, OBD2 protocol ISO 14230-4 (5b init, 10.4k baud)
Japan Domestic Market Nissan: ATSP5\nATAL\nATIB10\nATSH8110FC\nATST32\nATSW00
Japan Domestic Market Nadia/Harrier: ATIB96\nATIIA13\nATSH8213F1\nATSPA5\nATSW00
JDM Nadia/Harrier: ATIB96\nATIIA13\nATSH8213F1\nATSPA5\nATSW00
Toyota Common: baud rate - 10400 baud, ATIB10\nATIIA13\nATSH8013F1\nATSPA4\nATSW00
JDM Nissan(will test this with Xtrail): ATSP5\nATAL\nATIB10\nATSH8110FC\nATST32\nATSW00
Toyota Fielder: ATIB96\nATIIA13\nATSH8113F1\nATAL
JDM Toyota Caldina Gt-Four( 2004 model) Protocol: ISO 14230-4(5b init, 10.4k baud), ATIB96\nATIIA13\nATSH8113F1\nATSPA4\nATSW00
For the rest of the majority of right-handed Toyotas, it is enough to write the initialization line: ATSH8213F1\nATIB96\nATIIA13
Source
What do the icons on the Priora dashboard mean?
There is a separate group of icons indicating the presence of breakdowns and malfunctions within the vehicle’s on-board systems. The emblems are displayed in the space surrounding the main instruments. The following is a transcript of the signs with photo accompaniment.
| Icon | Decoding |
| If the car with the key is flashing, this indicates a malfunction or lack of response from the immobilizer. To fix the problem you need to check the block. | |
| An exclamation mark surrounded by brackets blinks on the dashboard, indicating a malfunction in the brake system or ABS. A similar indicator located slightly higher may indicate an incorrectly pumped brake system. | |
| The electric power steering is faulty or defects have been detected in the operation of the mechanism. Mostly installed on cars after 2011 model year. | |
| Failure in the wiring or units responsible for controlling the airbags. If the icon lights up after starting the engine, the specified element may not work under shock load. | |
| Seat belts are not fastened. Can also be red. At the same time, it is accompanied by a sound signal. | |
| The passenger airbag is not activated or is faulty. Usually lights up when the engine starts. | |
| If the indicator blinks constantly, this indicates a battery failure or critical discharge. | |
| An urgent check of all engine systems is necessary - a critical malfunction has been detected. |
The reasons why these icons may light up always require driver intervention. Ignoring machine signals can cause serious damage.
Depending on the year of manufacture and configuration, the interpretation of the instrument panel indicators may differ. The exact definition can be found in the vehicle's service manual.
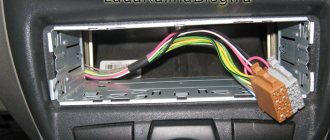
Pinout of the instrument panel of a Priora car
The panel pinout looks quite complicated, but there is a more simplified diagram that will help you figure out the wires connected inside:
The decoding is as follows:
- EUR
- "emergency light"
- Engine oil
- Handbrake
- Immobilizer
- Airbags
- Headlights and dimensions
- Right turn signal
- Left turn signal
- Electronic control unit
- Pad wear sensor
- Seat belts (closing sensor)
- ABS
- Reset button
- Brake system, brake fluid
- ABS
- High beam headlights
- Torpedo shield lighting
- "Weight"
- Thirtieth terminal
- Fifteenth terminal
- Fuel consumption
- Forward key
- Back key
- Ambient temperature sensor (minus)
- Ambient temperature sensor (plus)
- Fuel level
- Speed sensors
- Coolant temperature
- Odometer
- Diagnostics of the shield (service)
- Generator regulator
How to enable autotesting on Priora
Self-diagnosis of the VAZ Priora dashboard is necessary to be able to detect hidden problems or defects in on-board systems. To complete the procedure, you will need to perform a certain sequence of actions.
- Get into the car and insert the key into the ignition lock.
- Press and hold the daily mileage reset button.
- At the same time, turn on the car's ignition.
- If everything is done correctly, the instrument arrows will make several full revolutions and return back. All indicators will also flash.
The problem will be identified if any signal does not respond to manipulation.
When is pinout required (device chips) and how to do it
All car parts fail sooner or later. There are times when they need to not only be repaired, but replaced. The instrument panel may also break, causing it to be removed and a new one installed in its place. This work is easy to do with your own hands if you have at least the slightest knowledge of mechanics. If you are well versed in your Priora (sedan), then you need to perform the pinout in this way:
- First, the dial hands are removed using a regular knife.
- Next, the gasket in the speedometer is scraped out to replace the backlight.
- If there is no need to change the sensors, you can simply remove them and clean them.
Very often, motorists cover the panel with a special LED strip to achieve even lighting. You can also use CMD diodes, which can be easily fused into glass with a soldering iron. To do this, you need to disassemble the dial and solder diodes directly under the base of the hands.
If you understand the purpose of all the contacts, and also know the purpose of a particular connector on the panel, then you can easily do the pinout yourself. The main thing is to carry out everything strictly according to the instructions so that the connection is successful and the panel continues to function efficiently. If you know which is better to install a tidy: with a canbus or a regular one, then it’s better to ask professionals who understand this. If you have no experience in such work, and you do not understand the purpose of certain wires, then the technical service will help you improve the operation of the instrument panel. Of course, you will have to pay for this, but you will not waste your time, and the work will be done efficiently.
Error codes on the Priora dashboard
When entering self-test mode, combinations of numbers and letters may appear on the display indicating the part of the circuit where a malfunction is detected.
Usually, after entering the service mode, one or more numbers appear on the device:
- 2 – a critical overvoltage was detected in the on-board network, caused by a short circuit or breakdown of the unit;
- 3 – an error has been detected in the fuel level sensor, a circuit break is possible;
- 4 – there is overheating of the cooling system, or the corresponding sensor is broken;
- 5 – the thermometer that determines the temperature outside is broken or there is an open circuit in versions before 2012, mounted optionally;
- 6 – the engine has boiled, you need to wait for cooling or check the serviceability of the sensors;
- 7 – the oil pressure in the crankcase of the power plant is too low, the sump may leak or the lubricant level has dropped significantly;
- 8 – breakdown of the brake line or units of the corresponding system;
- 9 – the battery is discharged or the element is faulty; it can also appear after the car has been idle for a long time in the cold;
- E – the firmware has failed or there is a critical error in the EEPROM data packet.
Possible faults
What instrument panel malfunctions may Lad Prior car owners encounter:
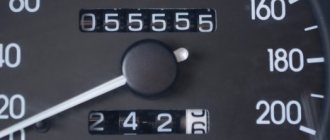
- The speedometer or tachometer needle does not work; when the speed increases, the needles continue to lie in place. In this case, first of all, it is necessary to check the signal that comes from the speedometer regulator; perhaps there is a break somewhere in the circuit or the sensor itself has failed. There is a possibility that the sensor will have to be replaced.
- The daily mileage or fuel level sensor does not work. Yes, these components are different, but they are both closely related to the speedometer, so follow all the instructions above. Checking the signal from the sensor will be relevant if power is supplied to the panel. It would also be a good idea to check fuses F10 and F20; they may need to be replaced.
- The device generally does not work correctly, the sensors show incorrect data. The problem may be with the processor itself or with a short in the circuit; this needs to be checked by an electrician. There is a possibility that the cause of the problem is a bad mass.
- Coolant temperature sensor. Check your contacts.
When do you need dashboard repair or replacement?
The Priora tidy does not have a large number of parts that are subject to frequent breakdowns. Typically, repair of the indicator unit comes down to replacing light bulbs and individual elements of the device. Users resort to replacing the board only when there is a malfunction of the contact group, connectors, or the board is damaged.
In case of serious damage (major short circuit leading to burnout of the main structural elements), repair may not be cost-effective. The cost of labor and materials often exceeds the price of a new module.
Possible malfunctions and ways to eliminate them
When operating a vehicle, individual components of the instrument panel may fail. Among the most common breakdowns are factors.
- Burnt out contact of one of the indicator lamps. Usually resolved by replacing the light bulb.
- Failure of the contact group can be eliminated by completely replacing the module - resoldering the part is not economically profitable.
- Malfunction of arrow indicators. It can be fixed by replacing the block.
The ECU on Kalina is filled with antifreeze - what to do?
After the block filled with antifreeze has been removed, its initial inspection should be carried out. For these purposes, it is necessary to remove 4 screws using a star screwdriver. Then you should slowly remove the control board for a visual inspection. The most common failure is the burnout of the ignition coil output switch. In this case, repair will not help.
As a result of such a malfunction, the Lada Kalina starts working on only 2 cylinders, and sometimes refuses to start at all. You can cope with a similar problem in a stationary workshop. There they will remove the damaged element, wash and dry it. The second most common problem is board burnout. It is not difficult to detect such a defect: the characteristic blackening of the board will leave no doubt.
Is it possible to repair the ECU in this case? The answer to this question can only be given by a service center, but experience shows that repairs will not help here. A complete replacement is required. It happens that sometimes the brain circuitry is slightly damaged. If this happens, then the car owner can get off easy. To restore the car to working order, you will need some minor repairs:
- wipe the block with a dry cloth;
- rinse with WD-40 several times and blow it out with a compressor;
- rinse several times in alcohol and blow again with a compressor;
- dry well, otherwise the Lada Kalina will not move;
- drying takes at least 1-2 hours.
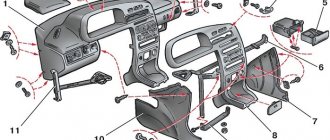
How to dismantle and install the Priora dashboard
To dismantle the module, you will need to prepare two screwdrivers – a Phillips and a flathead one. A complete replacement of the Priora tidy looks like this.
- Disconnect the wires from the battery.
- Pull the steering column all the way down and remove the steering wheel from the pin.
- You will also need to remove the cover covering the fuse box.
- Unscrew the 4 bolts holding the instrument panel and remove it.
- Loosen the two mounting bolts of the trim panel and remove it.
- Disconnect the wiring harnesses from the contact groups and completely remove the board from the machine.
Installation is performed in reverse order.
Interpretation of the symbols for the rear wiring harness of the VAZ Priora
The rear part of the electrical wiring chain is responsible for the vehicle's lighting and peripheral systems. This includes lights, locks and windows. The pinout of tips and terminals looks like this:
- 1 – dashboard response;
- 2 – power supply for the door behind the driver;
- 3/28 – power supply for the front passenger panel equipment;
- 4 – maintenance of power windows and door locks;
- 5-6 turn signals;
- 7 – interior lighting;
- 8 – handbrake indication switch;
- 9-10 – aft dimensions;
- 11 – temperature inside the car;
- 12-15 – circuit breakers for lighting the interior of the machine;
- 16/17 – power supply to the devices of the aft right and front left doors, respectively;
- 18/19 – voltage to the rear right and left speakers, respectively;
- 20 – cigarette lighter power core;
- 21 – EBN;
- 22 – contact group of the cargo compartment lighting circuit breaker;
- 23 – heated rear windshield;
- 24 – luggage compartment lighting lamp;
- 25 – additional stop;
- 26 – power line to the electric lock of the luggage compartment lid;
- 27 – power supply for rear number plate illumination;
- A1-4 – mass;
- ХР1/3 – electrical package power controller.
Stories from our readers
“Fucking basin. "
Hi all! My name is Mikhail, now I’ll tell you a story about how I managed to exchange my two-wheeler for a 2010 Camry. It all started with the fact that I began to be wildly irritated by the breakdowns of the two-wheeler, it seemed like nothing serious was broken, but damn it, there were so many little things that really started to irritate me. This is where the idea arose that it was time to change the car to a foreign car. The choice fell on the melting Camry of the tenth years.
Yes, I had matured morally, but financially I just couldn’t handle it. I’ll say right away that I am against loans and taking a car, especially not a new one, on credit is unreasonable. My salary is 24k a month, so collecting 600-700 thousand is almost impossible for me. I started looking for different ways to make money on the Internet. You can’t imagine how many scams there are, what I haven’t tried: sports betting, network marketing, and even the volcano casino, where I successfully lost about 10 thousand ((The only direction in which it seemed to me that I could make money was currency trading on the stock exchange, they call it Forex. But when I started delving into it, I realized that it was very difficult for me. I continued to dig further and came across binary options. The essence is the same as in Forex, but it’s much easier to understand. I started reading forums, studying trading strategies. I tried it on a demo account, then opened a real account. To be honest, I didn’t manage to start earning money right away, until I understood all the mechanics of options, I lost about 3,000 rubles, but as it turned out, it was a precious experience. Now I earn 5-7 thousand rubles a day. I managed to get the car buy after half a year, but in my opinion this is a good result, and it’s not about the car, my life has changed, I naturally quit my job, I have more free time for myself and my family. You’ll laugh, but I work directly on the phone)) If If you want to change your life like me, then here’s what I advise you to do right now: 1. Register on the site 2. Practice on a Demo account (it’s free). 3. As soon as you get something on the Demo account, top up your REAL ACCOUNT and go to REAL MONEY! I also advise you to download the application to your phone, it’s much more convenient to work from your phone. Download here.
- Electromagnetic relay, small-sized (12V). For example, Tianbo HJR 1-2C.
- Transistor KT 503. Can be replaced with almost any npn structure.
- Capacitor 100uF, electrolytic (16V).
- Resistors for 1koma, 6.8koma, 22koma.
The principle of operation of the circuit: the relay, with its normally closed contacts, closes the tidy button. When you turn on the ignition, the circuit starts working after half a second, and then turns on the relay, which opens the button.
To illustrate the operation of the circuit, a hanging circuit was assembled.
This test of arrows and dashboard indicators is already available on all modern models. The only thing is that it acts differently on different samples. For example, there may be 1 pass of the arrows, or three, or until the button is pressed, or even a pass only up to half the scales. The speed of the instrument panel arrows also depends on the manufacturer and version of the device.
In other words, an autotest is a test button that is automatically pressed when the device is turned on. If there is a test during the standard test, then there will be one during the autotest. Therefore, doing an auto test of the Kalina dashboard is not a problem.
Now, when you turn on the ignition, the arrows make a full revolution and all the lights come on. You can check the operation of the circuit by connecting the tidy at home.
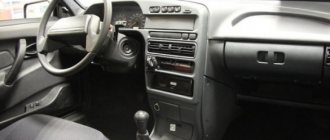
Do-it-yourself tuning and dismantling of the center console
Dismantling the center console on the Lada Priora is quite simple, but has a number of secrets.
First, you need to remove the “Open” cover and unscrew the two screws underneath it. Then remove the ashtray and also unscrew a couple of screws under it. Next, remove the tape recorder and take out the frame, under which again there will be two screws that must be unscrewed. The cover needs to be pulled towards you in order to remove the central nozzles from the stove at the top (overcoming some resistance). After the top disconnection, you need to stick your hand in and remove the connectors from the heating, clock, emergency lights, control system. The center console can now be completely removed. Car interior tuning
The Lada Priora, which came off the assembly line, has fairly light colors in the interior, which can be made darker by painting the center console, door handles, and replacing the upholstery. For painting we will need white spirit, varnish, acetone, primer for metal and plastic, and spray paint. The center console is degreased, primed in a couple of layers with drying between them, painted in 2-3 layers (also with intermediate drying), and varnished.
The situation is much worse if the instrument panel in the Priora is faulty and requires repair. In this case, pinout is needed, i.e., matching the contacts and wires to a particular device. The description of the combinations for the shield states that contacts 2,3,5,6,8,9,16, 17,22, 28-30 are reserve,
- while contact No. 1 goes to the power steering, No. 4 goes to the parking brake switch (both negative),
- No. 7 - to the lighting module (plus),
- No. 8 - on CAN_H,
- No. 9 - on CAN_L,
- No. 12-13 - immobilizer antenna inputs (a and b),
- No. 14 - to the “Reset” switch,
- No. 15 - to the brake fluid level sensor (minus),
- No. 18 - to the backlight adjustment module,
- No. 20 - to the terminal on the battery “30” (plus),
- No. 21 - to the ignition terminal “15” (plus),
- No. 23 - to the “menu down” key on the steering column switch, No. 24 - to the “up right” key on the steering column switch (both negative),
- No. 25-26 - to external temperature sensors (minus and plus, respectively),
- No. 27 - to the fuel level sensor,
- No. 31 - to the diagnosis of the instrument cluster.
Advantages of spacers under the hood of Priora Prosport
Existing instrument clusters for Lada Priora
Installation of additional Priora door seals
How to increase ground clearance (clearance) for a Lada Priora car?
Checking with a plug-in tester
More accurate and comprehensive diagnostics can be performed using a connected computer or a special tester. However, the data displayed on the screen is alphanumeric. The letters have the following meaning:
- P
– errors in the operation of the electronic systems of the power unit; - C
– problems with the functioning of the chassis; - B
– electronic malfunctions in the cabin; - U
– joint system errors.
In addition, the number 0 means OBD code 2, numbers 1 and 2 indicate the enterprise code, and 3 is the backup password.
Basic ignition system
(the letter P precedes the digital designation):
- 0300
– no spark in the cylinders of 16 valves; - 0326
– defect or short circuit in the knock indicator circuit; - 0337
– difference of the crankshaft controller to ground; - 0343
– high level in the headlight sensor circuit 0342 – a similar low indicator; - 0422
– signaling device malfunction; - 0444, 0445
– failure of the adsorber valve; - 0480, 0481
– problems with the fan assembly.
Fuel-air system
(the letter P is located before the numbers):
- 0030
– open circuit between the oxygen indicator and the exhaust gas converter; - 0116
– problems with thermal control of the cooling fluid; - 0102
– error in the air flow control circuit; - 0201, 0202, 0203, 0204
– break in the injector wiring; - 0217
– overheating of the power unit; - 0172
– excess amount of air,
0171
– gasoline, in the fuel mixture; - 0230
– malfunction of the electric fuel pump; - 0266 0269, 0270, 0272, 0274
– problems with injector drivers.
In principle, diagnostics using BC makes it possible to identify the main faults. Basic error codes for Priora 8 and 16 valves using a plug-in tester provide significantly more information. To understand it, you should study the decoding of indicators, which is not so difficult.
Modern Lada model
Like any modern foreign car, the Lada Priora has many different sensors installed. The condition of important vehicle systems depends on their correct operation. The problem is that if some sensors fail, the Priora can continue to move. Faults of this kind can lead to increased fuel consumption, unstable engine operation, and increased wear of parts, but the car will drive, and you will only find out about the fault when it means you have to make expensive repairs.
In order not to go into the engine compartment with a multimeter, the Priora has a controller that allows you to check faults using a special tester, a plug-in or built-in on-board computer. In order to diagnose the systems, just press 2 buttons and look at the error codes.
Lada Priora Hatchback Turbo › Logbook › Installing a daytime running lamp controller
Why is the exclamation mark on the instrument panel of the Lada Priora and what to do?
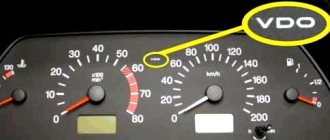
Dashboard pinout Connecting VDO on a Priora car
1 Pink-white To electric power steering 2 Blue-white To hazard warning light 3 Blue-gray To emergency oil pressure sensor 4 Brown-blue To parking brake switch 5 Yellow-blue To immobilizer control unit 6 Black To airbag control unit 7 Yellow To the exterior lighting switch 8 Blue To the right turn signal switch 9 Blue with black To the left turn signal switch 10 White and blue To the computer 11. To the brake pad wear sensor 12. To the seat belt sensor 13 Black To the traction control control unit 14 Red and blue “RESET” key on the steering column switch 15 Pink-blue To the brake fluid level sensor 16 Black To ABS 17 Green To the high beam switch 18 White To the instrument cluster light control 19 Brown Panel ground 20 White-red Terminal “30” 21 Orange Terminal “ 15" 22 Yellow-red To fuel consumption sensor 23 Orange-white MK “forward” key 24 White-black MK “back” key 25 Black-white Outside temperature sensor (-) 26 Yellow-green Outside temperature sensor (+) 27 Pink Fuel level sensor 28 Gray Speed sensor 29 Green-white Coolant temperature sensor 30 Brown-red Tachometer (low voltage) 31. Service. Panel diagnostics. 32 Brown-white Terminal “L” of the generator relay regulator
Here we connect: 1) Speed control, connect the white wire to the gray wire (pin 28 of the dashboard connector) 2) Ignition, connect the yellow wire to the orange (21 pin of the dashboard connector) 3) Dimensions connect the blue wire to the yellow (pin 7 of the dashboard connector)
Next we are interested in the mounting block, on the left under the panel, namely K7 - the relay for the high-beam headlights.
A mass is attached above the mounting block with a bolt.
We unscrew the screw from the bottom and take out the mounting block from the panel; we need the relay on the bottom left.
1) Connect the red constant plus wire to the pink wire going to the high beam relay. 2) The green wire in our case to the white-green wire going directly through the fuses to the lamps
What we end up with: 1) When autostarting, the lamps do not light up. 2) The lamps light up smoothly when you start moving. 3) When parked for a long time, the headlights first dim by 50%, then turn off. 4) When the headlights are turned on, the lighting goes into normal mode and the DRL turns off.
The dashboard contains the following parts, without which the car would not function:
- external lighting controller;
- switch for turning and lighting headlights;
- signal regulator;
- instrument cluster;
- wiper regulator.