Disassembly and assembly of the steering mechanism
We disassemble the steering mechanism when repairing it.
Remove the steering mechanism (see “Removing the steering mechanism”). Remove the steering gear boot (see “Replacing the steering gear boot”). Remove the steering rod support. We insert the bit into the groove of the crankcase pipe mounting nut.
We unscrew the nut, striking the beard (right-hand thread).
...and remove the crankcase pipe.
Use a screwdriver to press out the two clamps of the bushing located inside the pipe...
...and remove the bushing.
Remove the two rubber rings from the bushing (arrows indicate the bushing clamps).
If it is necessary to replace the nut, use pliers to remove the locking rings. . and remove the retaining ring... Remove the nut securing the pipe.
Remove the rubber plug from the rack stop adjusting nut. Using a scraper, remove the jammed metal in the locking areas of the stop adjusting nut.
Using a special 24mm wrench with an external octagonal head, unscrew the stop nut.
We take out the stop spring. Using a screwdriver...
...remove the O-ring.
By hitting the crankcase against a wooden block, we knock out the rack stop. Using a screwdriver...
...remove the liner from the stop. A rubber ring is installed in the groove of the stop.
Remove the rubber ring from the crankcase that seals the hole for the steering mechanism on the front panel.
Remove the boot from the gear shaft. Use a 6mm hexagon to unscrew the two screws (shown by arrows)…
...and remove the crankcase cover.
Remove the separator with the thrust bearing rollers.
Remove the sealing ring of the cover.
We remove the rack from the crankcase.
We press out the gear shaft by holding the shaft in a vice with soft metal jaw linings and pressing the crankcase upward with the mounting blade.
We remove the gear shaft with bearing from the crankcase. We pry it off with a screwdriver...
...and remove the bushing retaining ring.
We take out the gear shaft bushing assembled with the support plate.
If it is necessary to replace the needle bearing, use a drill with a diameter of 4 mm to drill two diametrically located holes in the crankcase so that they extend to the end of the outer ring of the needle bearing. Through the drilled holes, using a rod of the appropriate diameter, we knock out the outer ring of the bearing from the crankcase.
Using a puller, we press the ball bearing of the gear shaft with the inner ring of the roller thrust bearing.
Use a puller to press the inner ring of the needle bearing off the shaft.
Use a screwdriver to pry and remove the gear shaft seal from the crankcase cover. If the outer race of the roller thrust bearing needs to be replaced...
... use a scraper to remove the extruded metal in four places and take out the ring. We generously lubricate the bearings, rack and gear teeth, and the plastic rack bushing with Fiol-1 grease. We assemble the steering mechanism in the reverse order. We press the outer ring of the needle bearing into the crankcase using a mandrel of suitable diameter. To seal holes in the crankcase, you can use “fast steel” or “cold welding”. We press the gear shaft with the ball bearing into the crankcase using a piece of pipe of a suitable diameter or a high head, applying force to the outer ring of the bearing. You can press the gear shaft into the crankcase, resting the outer ring of the bearing on the jaws of a vice. Then we put the crankcase on the bearing...
...and press the crankcase with light blows of a hammer through a wooden block.
We press the gear shaft oil seal into the cover through a mandrel or head flush with the end of the cover. We insert the rack into the steering gear housing. We install the pipe.
After tightening the pipe fastening nut, tighten the nut. We rotate the gear shaft so that the flat on it is located on the right side. We move the rack so that the steering rod support mounted on the rack is located in the middle of the pipe groove. We insert the rack stop, the stop spring and tighten the stop nut. It is recommended to replace the stop nut with a new one.
Scheme for monitoring the gap in the engagement of the rack and pinion shaft
: 1 — dial indicator; 2 — indicator mounting bracket; 3 - nut; 4 - sealing ring; 5 — steering gear housing; 6 — needle bearing; 7 — gear shaft; 8 — bushing; 9 — crankcase cover; 10 - rack; 11 — liner; 12 — rack stop; 13 — indicator leg; 14 - spring
We adjust the gap in the engagement of the gear with the rack. To do this, set the rail in the middle position and block it from moving. Insert the leg of the dial indicator into the hole of the adjusting nut of the stop until the tip of the leg touches the stop of the rack. The diameter of the tip of the indicator leg must be at least 3.5 mm...
...so that the leg rests against the end surface 1 of the stop, and does not fall into its hole 2 (for clarity, shown on the dismantled stop). We apply a torque of 15 N m (1.5 kgf m) to the gear shaft, while the gear pushes the rack and stop. Based on the indicator readings, we determine the amount of movement of the stop, which corresponds to the actual value of the gap in the engagement. If it exceeds 0.05 mm, tighten the adjusting nut, achieving the specified amount of movement of the stop. After this, having unlocked the rack, we check the ease of rotation of the drive gear throughout the entire range of travel of the rack.
What is the steering rack for front wheel drive cars?
In cars with front-wheel drive, there is no way to install the classic, long-proven front wheel steering control system. The transverse installation of the motor and power drives to the wheels will not allow this to be done. Therefore, the cumbersome system of levers was replaced by a steering rack. Its main task is to transfer force from the steering wheel to the steering arms.
Important! Most Priors are equipped with electric power steering (EPS) and not power steering. This is a feature of this model.
Location and design of the Priora steering rack with EUR
To save space, this element of the Priora control system is located on the wall of the engine compartment. On the bulkhead between the engine and the interior of the Priora. The rack is connected to the steering column located in the cabin.
Steering rack device
This important Priora control unit is assembled from the following components.
- The rack is mobile.
- Frame.
- Splined shaft with bearing.
- Metal case (casing).
- Seals and seals.
- Fasteners and accessories (bolts, nuts).
- Springs.
- Rubber cover for the mechanism.
The basis of this mechanism is a metal pin (rail), so to speak. There are teeth on one part of it. They are mated to the steering wheel drive shaft, located at right angles to the supporting pin. This is, in fact, the well-known worm gear. The rotating shaft moves, engaging the teeth, the rack inside the casing. The protective casing has a special slot for attaching tie rod ends. In the center of the pin (rack) there are special holes for tips, which are connected through special levers to turning wheels.
Malfunctions and their symptoms in the Priora steering rack with ESD
Most often, the rubbing parts of this unit fail. It is quite easy to determine whether the steering mechanism is broken or simply worn out. This will be marked by the following signs:
- The steering wheel is difficult to turn.
- When entering a turn, tapping and grinding noises are heard from the mechanism.
- While driving, when using the steering wheel, sensitive shocks are transmitted from it to the hands.
In general, the handling of the Priora is significantly deteriorating.
During the inspection, the technician will determine the need to replace the Priora steering rack by visual inspection. Usually, he grabs the rod with his hand, and his partner turns the steering wheel. Based on excessive play and extraneous sounds, the technician makes a verdict.
About the rake
The steering mechanism on Lada cars, starting with model 2108, has a steering rack. It is designed to move steering rods along a horizontal plane, which helps turn the car's wheels.
The design of the slats is quite simple and reliable, with the exception of one small drawback - a plastic bushing.
This bushing is made by the manufacturer from low-quality plastic, which soon leads to play in the rasp in it and the appearance of an unpleasant knock when moving on paving stones.
There is a rail between the engine and the passenger compartment, perpendicular to the exhaust manifold and attached with two brackets to the engine shield.
Replacement and repair of a faulty steering rack
This not particularly difficult, but extremely important work is best carried out on a repair lift. As a last resort, on a wide inspection hole. But then the car must be positioned so that both wheels can be removed.
So, the car is installed according to the mentioned conditions. The wheels have been removed. We can begin. First of all, set the steering wheel of the Priora car to the position of driving straight ahead. That is, the wheels point straight ahead. After this, it is advisable to secure the steering wheel.
Loosen the electric power steering mount. Remove the cardan connecting the EUR to the splined end of the steering shaft. And go under the car. There are two options. You can unscrew the lugs from the wheel. But most craftsmen prefer to unscrew the bolts securing the steering rods to the rack. The fact is that it is much easier to remove it this way.
This is done as follows: two 17 bots holding the pressure plate are unscrewed. First, 1 is turned out, and the second is weakened. The pull moves to the side. Then the second one is removed, along with the plate, and the other rod is moved back.
Now the fastenings of the steering rack itself are dismantled. These are semicircular brackets with rubber seals. They are mounted on threaded rods in the Priora body and tightened with nuts 13. It is most convenient to unscrew them with a head. After removing the nuts, the staples are removed. The device being removed is pushed slightly towards itself. This is necessary for the worm device to come out of the hole in the passenger compartment. Now you can remove the steering rack. For this purpose, a technological window is provided in the left wing of the Priora. You can carefully push the edge of the knot into it and pull it out. Either for further disassembly and repair, or simply for replacement with a new copy.
As usual, the entire installation of the part is carried out strictly in the reverse order. But before you start, you need to meet several very important conditions!
Special attention! The new Priora steering rack must be strictly in the middle position before installation!
Well, the second point. The fact is that at the factory, no components of this mechanism, except the shaft bearing, are lubricated. It is imperative to remove the anthers and generously lubricate the internal parts of the mechanism with grease or lithol through the side plugs.
Once these requirements have been met, you can begin traditional assembly in reverse order. When everything is assembled, turn on the ignition to activate the amplifier and check the control status.
Necessarily! Upon completion of work, carry out wheel alignment adjustment! And you can hit the road!
Well, repairing this device is a separate interesting topic.
Useful video on replacing this important Priora control unit:
DIY steering rack and power steering repair
How to drain fluid from the power steering For convenience, you can remove the adsorber and move the power steering reservoir to the side.
We unscrew the return line (a clamp for a screwdriver), quickly plug the hose with a pre-selected bolt. We unscrew the high pressure hose (keys 17 and 19), plug it with a wooden stick. A similar process is shown in the report on replacing the power steering fluid. Removing the steering rack from the power steering
Now, to remove the steering rack, you can do one of the following:
Seals for repair of steering racks We work only with car services and wholesale buyers. Delivery throughout the CIS.rti-baltika.ru But it is worth noting that it is better to remove the rack and install it together with the steering rods. Then it is much easier to pull the edges of the holes in the boot onto special flanges on the steering rods. Otherwise, the anthers will not be installed tightly, which means that you are guaranteed dust and dirt in the rail. Dismantling the steering rack with power steering. Unscrew the steering rods from the rack. We unscrew the rack stop nuts with a special wrench. Remove the spring and o-ring.
The rack stop itself can be examined through the crankcase (when the crankcase and crankcase pipe were disconnected) without even pulling it out. We check its condition, and then proceed to unscrew the tube from the crankcase.
Now about the difference between the steering rack support bushing with and without power steering. If you haven’t found a repair kit for a rack with power steering, then you will have to install a bushing from a regular rack. We cut off the ears with a hacksaw blade and grind the outer diameter a little using sandpaper.
Installing the bushing: remove one rubber ring, and use this edge to snap the bushing onto the retaining ring (as the old one was). We place it so that the second rubber ring on the bushing “looks” at the edge of the rack (not to the side where the steering gear housing is attached!) The length of the steering gear housing tube is the same as a regular rack. Use a rag with gasoline to wash all parts of the rack. Next, assemble the steering rack in the reverse order.
Repair of the steering rack with power steering from Wizard2112
Removing the steering rack with power steering: 1. Pumped out the fluid from the power steering reservoir (photo1)2. Disconnected the hose from the power steering reservoir to the pump.3. I hung up the front wheels and turned the steering wheel left and right until the liquid from the hose stops flowing (this procedure is done with the engine turned off)4. I unscrewed the return hose from the rack (a clamp for a screwdriver, in the photo the hose is on the left) (photo 2)5. I unscrewed the high pressure hose (keys 17 and 19). It’s worth making a special effort here (photo 3). I didn’t plug up the return line or the high-pressure hose, I just lowered it lower and drained the remaining fluid (change it anyway)
6. Using a special puller, I unpressed the steering tips (photo 1).7. Unscrewed the rack protection from the exhaust manifold (3 nuts per 10). Because they stick due to the temperature, be careful (I picked one) (photo 2).8.
I advise you to immediately (until the rack fastenings are unscrewed and it is firmly fixed to the body), unscrew both tie rods (I don’t remember how long the key is). You will have to work hard, the tightening of these bolts is very strong. Here you will kill two birds with one stone: it will be much easier to pull out the rack and you won’t have to fuss with these bolts later, because it will be more difficult with the rack removed.9. I unscrewed the bolt securing the shaft under the steering column (photo 3). Steering rack Quick search for a steering rack throughout Ukraine. Auto partszapchast.com.ua 10. Unscrewed the steering rack fastenings (4 nuts for 13)11. Pulling the rack towards himself, he brought the steering shaft out of the cabin and turned the rack.12. I unscrewed the supply and return pipes from the rack (two 6 or 8 hex bolts). I plugged the holes with foam rubber.
Because the front wheels are hanging out, a hole is formed under the left wing. He pulled out the rail.
Disassembling the steering rack with power steering: 1. Unscrewed the hydraulic tubes from the rack. (on one side there are two hexagon bolts, on the other side, i.e. from the end of the rack, I think the key is 10, I don’t remember exactly)2. Loosened the clamps and removed the boots (the central corrugation and the boot from the end). 3. I unscrewed the rack stop nut with a special wrench. I took out the spring and the sealing ring. The condition of the rack stop (thrust bearing) can be checked without removing it. But, since you’ve already taken it apart, it’s better to replace it with a new one.4. I unscrewed the crankcase pipe nut with a homemade “wrench” (since I couldn’t find a special one) I had to ruin the flat-head screwdriver.
Clamping the rack housing in a vice, I placed the end of the screwdriver against the nut and hit the screwdriver with a hammer.
5. On the other side (from the end), I unscrewed a 10-point bolt with a plate holding the crankcase pipe cylinder. It is necessary to mark the position of the plate so that during assembly the hydraulic tubes and their holes are not mixed up.6. I tapped the cylinder with a hammer through a piece of wood to slightly press it into the crankcase pipe. I pulled out the retaining ring, poking it through a special hole (visible in the photo).7. I pressed the cylinder out of the crankcase pipe with a homemade puller. A problem arose when pulling it out - the cylinder is held tightly by an elastic band, so pull harder. cylinder in pipe.8. From the side from which the cylinder was removed, I unscrewed the piston from the steering rack. (bolt 17).9. And he pulled the rack itself in the opposite direction (the crankcase side), having previously pushed the support sleeve with his finger through the hole in the crankcase pipe. The hole in the support sleeve turned out to be badly broken.
10. Now on the cylinder side in the crankcase pipe there remains an additional bushing (I called it a petal bushing) and a high-pressure oil seal. The bushing seems to be in the guide. I carefully pressed them out with a long screwdriver through the hole in the crankcase pipe (I did slightly damage the additional bushing, but this is not critical; I installed it back during reassembly).
From left to right: additional bushing, old oil seal, support bushing.11. It turned out to be a big problem to find these very details. Almost in despair, I found the seal on the Internet on the website “salnik-reiki.rf” (not for advertising purposes). On the website you can find it by searching by its size: 26*38*9/10. Please note that the seal must be high pressure. I used a support bushing from a regular strip, having previously ground it in a circle on sandpaper and removed one rubber band (by the way, the second rubber band also needs to be ground with sandpaper along with the bushing). I installed the bushing like this: using the groove where I removed the rubber band, I placed the bushing on the retaining ring, so that the second rubber band looked at the edge of the rack. Add. I installed the old bushing. I also bought an elastic band for the cylinder (it’s not difficult to find).
Priora steering rack device
Removing the Priora steering rack
You will need : remove the front wheels and prepare tools (a 13mm socket, a 15mm wrench, a 19mm spanner, a large slotted screwdriver, pliers, a mounting blade and a hammer).
Inside, remove the lower part of the intermediate shaft from the splines of the gear shaft:
- Unscrew the fastening bolt nut using a 13mm socket.
- Pull out the bolt.
- Release the terminal connection using a large slotted screwdriver.
- Remove the lower part of the intermediate shaft from the splines of the pinion shaft.
To remove the Priora steering rack without tie rods, disconnect the inner tie rod ends from the steering mechanism:
- Remove the retaining plate for the inner tie rod ends by using a flathead screwdriver.
- Unscrew one bolt completely using a 15mm spanner and loosen the other bolt.
- Turn the connecting plate downwards.
- Remove the steering rod. We remove the second steering rod after unscrewing the second bolt.
To remove the Priora steering rack along with the steering rods , you will have to disconnect the outer tie rod ends from the swing arms of the shock absorber struts:
- Unbend and then remove the cotter pin using pliers.
- Unscrew the ball pin fastening nut partly using a 19mm spanner.
- Press out the finger using a special puller. If it is not there, then insert a mounting blade between the swing arm and the outer tip, and then hit the end of the swing arm with a hammer.
- Press the ball joint pin all the way out using a large slotted screwdriver.
Now, to pull out the steering rack with or without rods:
- Unscrew the two nuts securing the steering rack bracket to the front panel using a 13mm socket.
- Remove the two brackets.
- Remove the steering rack through the window in the left wheel arch, having first moved it forward to remove the gear shaft from the hole in the front panel.
If you remove the Priora steering rack yourself, then you will need at least 1 hour.
What is needed for work and how to tighten the steering
To perform the tightening you will need the following tools:
- Slotted screwdriver (in simple terms, a “flat” screwdriver);
- Wrench 13;
- A special 17mm wrench designed to adjust the steering rack.
To make the work more comfortable and faster, it is recommended to drive the car into a special inspection hole or overpass, and also use an assistant, whose role even a child can handle.
To get to the rail, you should perform a number of simple steps:
- Disconnect the battery terminals and dismantle it;
- Using a 13mm wrench, unscrew the bolt securing the battery stand, and then remove it;
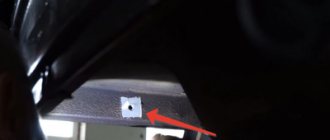
- Directly under the steering rack, using a slotted screwdriver, you need to pull out the small plug of the adjustment system.
After this, you will have access to the nut responsible for adjusting the thermal gap in the rail.
Next, you need to put your hand under the steering rack and try to put the rack wrench on the nut. It is necessary to tighten the nut clockwise, but since the rack itself is located upside down, from the outside it may seem that the nut must be tightened counterclockwise. Experts recommend tightening the nut no more than 25–30 degrees at a time, after which you should try to rotate the steering wheel, which should turn without jerking or biting.
It is also necessary to listen to the sounds coming from the steering wheel - if there are no knocks when turning the steering wheel, and there are no other noises, then the rack is tightened correctly, and you can put the battery and rubber plug in their place.
The tightening process on video
Installation of steering rack Lada Priora
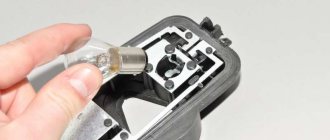
Before installation, check that the rail is installed in the middle position. To do this, using sliding pliers, use the flat on the gear shaft to rotate the shaft in any direction until it stops, then turn the shaft in the opposite direction two full turns and turn the shaft so that the flat on the shaft is located vertically on the right side along the direction of the car. Otherwise, the installation of the rack is carried out in the reverse order.
The steering rack of the Lada Priora is the same as the rack of the Kalina or VAZ 2110-2112 of the new model and has a catalog number: 11183-3400010 (rasp inside 21100-3401068). Price approximately 3500 rub.
The Priora steering rack with power steering is no different from the usual one, but the Priora steering rack with power steering has a different catalog number (see interchangeability of VAZ steering racks).
Replacing the steering rack on a Priora - video
If an incomprehensible knocking noise occurs from the steering rack, you just need to tighten it. If the knocking does not disappear or appears again after a while, then the steering rack must be repaired or replaced. Let's talk about this.
Removing the steering rack
1. First, remove the front wheels. 2. Stock up on all the necessary tools.
3. Remove the lower part of the intermediate shaft. It is connected to the shaft splines. The fastening bolt must be unscrewed and pulled out. After this, open the terminals with a slotted screwdriver. 4. Remove the intermediate shaft.
5. Disconnect the steering rod from the steering rack by disconnecting the inner ends of the mechanism. There is an option to remove the steering rack combined with the rod, but then you will have to tinker and remove the outer tips from the struts, and this is very time-consuming and not as easy as it seems.
6. Pull out the steering rack. This is done by unscrewing the steering rack nut.
7. Remove the brackets and pull out the rack through the hole between the wheel and the arch.
The entire amount of dismantling work takes about an hour if you are going to do it alone. Let us remind you that in the previous article we told you how to change the clutch on a Priora with your own hands.
Steering rack repair on Priora - video
Installing the steering rack
1. The rack must be fixed in the middle position. 2. Rotate the shaft in one direction until it stops. 3. After it rests, rotate it in the opposite direction two circles. 4. Position the flat vertically. 5. The following steps are the reverse of dismantling steps.
Tips for use
A complete replacement and repair is a series of actions, for the implementation of which you need to have not only special knowledge, but also a considerable amount of free time, so if the car owner does not have either the first or the second, it is preferable to go to the nearest service station.
At the same time, in order not to become their regular guest, you should know some secrets for operating the steering rack, which can significantly extend its service life.
- We strongly do not recommend “jumping” your car on curbs, or driving at high speed on rails, since each such trip causes cracks to appear on the rack itself, as well as deformation of the shaft that is part of the steering mechanism.
- It is not recommended to frequently turn the steering wheel all the way. Of course, in this case it will be very difficult to demonstrate your maneuvering capabilities, but this will significantly increase the life of one of the most important parts of the machine.
- Carefully monitor the condition of the protective anthers, which must maintain their tightness. Replacing anthers is several times cheaper than replacing the entire rack.
- It is also worth monitoring the level and condition of the hydraulic fluid, since its decrease or change in color is associated with problems in the vehicle’s hydraulic system, which can result in rack failure.
From time to time you need to undergo a full maintenance, which will allow you to eliminate faults in advance, which can cause irreversible consequences, injury to yourself, your loved ones and other road users. And also, if problems are detected in the operation of the car, it is better not to take risks and go to the nearest car service center as quickly as possible.
DIY Priora steering repair
Replacing the steering rack on a Prior
Welcome! Steering rack - due to bad roads it becomes loose, the bearings inside it are deformed and it is necessary to disassemble it and replace all worn parts, in addition, over time, the teeth of the gears located inside the steering rack grind down (this happens due to frequent turns of the steering wheel), from -for this, play appears at the steering wheel and the rack will first need to be tightened (How to tighten the rack, it is written in the article: “Adjusting the steering rack on the tenth family of VAZ cars”), if the adjustment does not give anything, and the play does not disappear, then the rack needs in replacement, otherwise, soon the steering rack, namely its teeth (When they are worn down) will simply disengage and the connection with the wheel will disappear and nothing else will spin except the steering wheel.
Note! To remove and put the rack in place, you will need: Screwdrivers and all kinds of wrenches, as well as tools with which you can remove the wheels from the car!
Summary:
Where is the steering rack and is it difficult to get to? The rack is located on the engine shield, this is a partition that separates the interior and the engine compartment of the car; through the engine shield, such details as: Throttle cable (On old Priors, a gas pedal with an electronic drive is installed on new ones), all wiring from the controller Other parts also come out through this shield into the engine compartment.
It won’t be easy to get to the rack right away, because on 16-valve cars the cylinder head is large and it will get in the way, all the front fender liners will most likely have to be removed (If they interfere with access to the rack) and of course good wrenches will be needed, because with ordinary wrenches you You won't be able to do much, and by the way, it's very easy to strip threads with nuts, so be careful.
When should you change your steering rack? If the rack has already come quite a long way, if tightening the rack does not lead to anything good, then it needs to be replaced, a damaged steering rack will have play in the steering wheel, and also if the rack suddenly starts to jam (This happens, but very rarely) then in general we recommend that you refrain from driving a car until it is replaced, because if the rack is stuck in one position and the car is moving at that time, then very, very sad consequences can happen and, finally, with play in the steering wheel, the rack will still knock (When you hit a bump, especially on the steering wheel, all this knocking will be transmitted), this should not happen either and such a rack needs to be replaced.
Design and operating features of power steering and power steering
To make steering easier to turn and increase comfort, either hydraulic or electric power steering can be used. Both amplifiers have both pros and cons.
Power steering device
Structurally, power steering is a system of high and low pressure hoses containing oil driven by a pump. Power steering fluid must be poured into the reservoir near the pump. It only works when the engine is running. The driver turns the steering wheel, and at this time the fluid flows through the distributor under pressure created by the pump to the steering mechanism. It enters the working cylinder, puts pressure on the piston, which begins to move, and facilitates the rotation of the steering wheel. When moving in a straight line, the liquid flows back into the system reservoir.
Power steering diagram
Advantages and disadvantages of power steering
In the case of a hydraulic booster, the main disadvantage is the bulkiness of the entire system. But it is cheaper to produce and maintain, and this affects the price of the car. At the moment, power steering is found mainly on budget class cars, which include Priora. An amplifier of this type is also installed on expensive, powerful SUVs. This is explained by the fact that the power steering is capable of transmitting greater torque transmission power to the steering. In this regard, it outperforms an electric booster, but there are still more disadvantages:
- In a car equipped with a hydraulic booster, it is not recommended to hold the steering wheel in the extreme right or left position for more than 5 seconds. Otherwise, the oil in the power steering on the Priora begins to heat up, which can lead to system failure.
- The mechanism requires constant monitoring of the oil level, inspection and replacement of drives, hoses, and pump.
- The pump depends on the operation of the engine, which means it takes a certain percentage of power from the power plant. If the power steering does not work when driving in a straight line, this percentage of power is wasted.
- Such a system does not imply setting operating modes depending on the speed of movement or the angle of rotation of the steering wheel.
- At low speeds, the steering mechanism provides good sensitivity, but at high speeds it becomes less pronounced.
Engineers compensate for the last drawback by using a steering rack with a variable gear ratio. Power steering has already become an outdated system; designers are no longer involved in improving it.
Electric amplifier design
The design of the EUR is simpler than that of the power steering. It consists of an ECU, a torque sensor, a steering angle sensor and an electric motor. There are no hoses or fluids here. The electric motor is mounted directly on the steering rack itself, and torque is transmitted to it via a torsion shaft built into the steering mechanism system.
In the case of power steering, the force is facilitated by liquid, and in the electric booster the current is responsible for this. When the driver turns the steering wheel, force is transmitted to the steering rack. At this time, the torque sensor transmits data to the electronic control unit. The controller calculates how much current needs to be sent to the electric motor to optimally facilitate steering rotation. Since the force must be uniform, the speed of movement and the angle of rotation of the steering wheel are taken into account.
If the steering wheel rotates without the vehicle moving or at low speed, as when parking, the electric motor receives maximum current and the steering wheel turns easily. When driving at medium and high speeds, such force is no longer required, and the controller supplies a lower current.
Pros and cons of EUR
The electric booster is a more modern system with high potential for modernization. It is not without its shortcomings, but there are fewer of them than the power steering:
- high price,
- The electric motor cannot provide high power, so it is installed only on passenger cars.
The disadvantages are leveled out, since the design of the electric amplifier is constantly being improved.
The EUR for the Priora has many advantages. The system is easy to maintain due to its simple design. The only part that requires inspection is the rolling bearing. The ESD mechanism has more compact dimensions and can be installed on the steering shaft in the cabin, freeing up space in the engine compartment. Due to this, the durability of the structure increases, since there is no exposure to temperature changes and high humidity.
The electric booster does not take power away from the engine, which saves fuel. The drive only operates when the steering wheel is turned. The ECU is responsible for the operation of the amplifier, with the help of which you can adjust the operating mode of the EUR, taking into account the operating conditions of the vehicle. The electric booster is not afraid of extreme steering positions. Driving at high speed makes the steering wheel with ESD more sensitive.
How to replace the steering rack on a VAZ 2170-VAZ 2172?
Note! The Lada Priora car was equipped with several types of racks, namely: On the first cars, a steering rack with hydro power steering was used, and on the second, with an electric power steering (On new Priors, with a modified appearance, with a different interior, etc.), but the power steering was not I also bypassed the Priora in the old body, it was used on it too, only not on all trim levels, all amplifiers are removed according to the same type, you just need to pump out the fluid from the power steering reservoir in the power steering, and remove the minus terminal from the battery in the power steering before starting work ( After removing the terminal, the rail is removed from the EUR in the same way as a regular rail; how to remove a regular rail is written in another article, which is linked in paragraph 3 below), quite a few words will be said about the first amplifier in this article!
1. Well, let's start, in order to remove the rack from the power steering, you need to do preparatory work, in which you will need to drain the fluid that is needed for the power steering, to carry out this work, pick up a syringe or a rubber bulb and use one of these tools , pump out all the fluid from the power steering reservoir (This reservoir is shown in the photo below), then disconnect the hose going to the pump from the reservoir and lower it into an empty container, and plug the hole in the reservoir with some kind of rag, as soon as this is done, get into the car , turn the key in the ignition so that the steering wheel is not blocked and rotate it from one end to the other until all the fluid has completely drained from the entire system.
Lift
If knocking is detected in the steering wheel, it can be tightened, but tightening will be effective only if there is knocking from the worm gear. If the knocking noise comes from a broken plastic bushing, then tightening is useless.
As is known from practice, the worm mechanism is quite reliable and is very rarely the culprit of knocking. Most often the bushing is to blame.
You can determine the culprit of the knock by pulling the steering rods one by one.
- If there is a knocking sound when applying forces to the right link, then the bushing is to blame.
- If there is a knocking sound when you apply force to the left linkage, then the worm gear is to blame.
In the first case, a lift is not advisable. Since the tightening nut only tightens the worm mechanism. To eliminate the knocking noise, it is necessary to remove the steering rack from the car and have it repaired.