How to install an electric engine heater on a UAZ 409
Installation kits have been developed for all heaters of Leader JSC. They can come in a single package with a heater or be sold separately. The installation kit is a set of all necessary parts for installation. Everything is at hand! No need to run to the store and urgently look for spare parts! Each installation kit is supplied with detailed installation instructions with photographs. By following its requirements, you can install the heater yourself. As practice shows, even self-installation takes only 2-4 hours (even faster for professionals at service stations). You can also find instructions for installing heaters right now on the website. Select the installation kit number or car brand you are interested in.
Purpose and main differences
The engine starting heater is designed to maintain the required coolant temperature at a certain level. For example, a temperature of 40°C will provide the necessary conditions in the cylinder for a quick start of the engine, regardless of external conditions.
Structurally, the electric heater is an affordable design compared to independent engine starting devices. A conventional heater with the prefix “electro” is a heating element with power wires located in the engine body. Among the advantages of such a device are:
- A simple design that allows you to install it yourself.
- Low cost, which is due to the design features.
- Possibility of later modernization. If necessary, for passenger cars it will be possible to add a timer, fuse sensor and other optional devices.
Before installing an engine heater from a stationary 220V network, get acquainted with the design features. The design is based on a tungsten heating coil located in the cylinder block. Depending on the power, a small volume of antifreeze can be heated relatively quickly.
The main disadvantage is the high energy consumption. In just one night, individual models consume up to 10 kW of electricity. That is why progressive samples are equipped with sensors to periodically disconnect the device from the network.
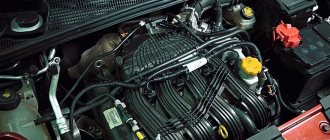
It is worth noting that the type of engine does not affect the performance of the device. Whether a gasoline or diesel engine is installed on the UAZ, the device is installed in the same way. Here the difference is not as great as matching the tire and wheel sizes for SUVs. With some skill and compliance with safety measures, it is not difficult to assemble an engine pre-heater with your own hands. To avoid unsuccessful experiments, consider the example of an original 220 V car heater.
Installation of pre-heater on UAZ 3303
As usual, winter crept up unnoticed and it was urgently necessary to resolve the issue of installing a pre-heater on the UAZ 3303.
Let's look at the main steps for installing a heater on a UAZ 3303.
- Selecting a preheater
- Pre-heater installation location
- Installation of pre-heater
- Choosing an autonomous heater for a UAZ :)
Selecting a pre-heater for UAZ 3303
The Chinese Xin Ji (Longfei) (power 2 kW) with a pump was chosen as the engine heater. It should be noted that the pump significantly speeds up engine warming up. In addition, the pump eliminates overheating of individual engine elements due to uniform heating.
Device (photo from instructions)
Usually, heaters with a pump are simply plugged into the stove line.
You just need to take into account the direction of movement of the coolant so that when the engine is running, there is no backflow for the running pump. This is necessary in case you forget to turn off the heating and start the engine.
see the diagram of the movement of coolant in the UMZ 417 engine
As you can see from the picture, the coolant comes from the tap on the engine and goes to the pump.
Installation location of the pre-heater on UAZ 3303
For a very long time I could not decide on where to install the heater. Despite the fact that there is a lot of free space in the engine compartment of the UAZ))
The heater is embedded in the heater return hose
A suitable bolt behind the master cylinder is selected as the location for the heater.
Installation of pre-heater on UAZ 3303
With this installation you will not need an additional hose. Only two clamps are needed.
It is worth noting that a heater with a pump warms up the engine much faster compared to a conventional boiler (a conventional heater is in my wife’s Toyota car, I’m now thinking of changing it to a heater with a pump too).
The issue price is 1000 rubles. (took from Fortuna in Irkutsk)
Choosing an autonomous engine heater for a UAZ
For those who need an autonomous heater for a UAZ, they can use the hint in this photo.
The photo shows the interior of a UAZ Bukhanka car. The antifreeze is connected to the stove and circulates during the fire to warm up the engine.
Features of UAZ Patriot heater control
The intake of air entering the SUV interior from outside is carried out using a blower fan through the air intake. Before entering the heater, the air passes through the radiator of the cooling system, where it heats up and flows into the cabin through a cleaning filter. Depending on the position of the regulator, this air flow, hitting the heaters, either cools down or heats up. The interior heater of the UAZ Patriot has special nozzles through which warm air enters the cabin when the heater is turned on. They are located in the central area of the instrument panel and on its sides.
To regulate the air flow in vertical/horizontal directions, the deflectors have curtains that can be rotated in the desired direction to the required angle. There are such deflectors on the rear heater. If the back row of seats in the car is empty, the additional heater can be turned off, which will relieve the engine a little - there is a special button for this.
Flow-through heater with pump - installation
In principle, with a pump, everything is simpler, because you don’t need to go into the laws of physics - the pump does its job, and very well, most often the pump costs about 700 liters per hour.
Errors when installing a flow-through heater
Parallel with the stove. Not a single flow-through heater has a check valve, so it is absolutely impossible to install it in parallel with the stove, because the liquid will circulate not through the radiator, but through the heater. If there are no other options, you need to install at least one tap either at the inlet or outlet of the heating.
The outlet pipe must be strictly at the top. That is, it must be unfolded so that the pipes are aligned along the vertical axis. This is necessary so that the pump can expel air, otherwise the heating element will burn out.
This point is rather advisory in nature. Do not turn the heater pump against the fluid circulation in the engine. This means that the heater installed in the return of the stove should push water into the pump, and not into the radiator. This is necessary so as not to accidentally start the engine with the heating running.
Can you imagine what will happen to the stove radiator or just the pipe if two pumps start pumping into it at the same time?
That's right, both of them will most likely be torn apart.
These are the simplest things that every car enthusiast should know. Subscribe to the channel to know. Well, give me a thumbs up, I will be pleased.
Blog about UAZ
On all UAZ-3151 vehicles and on individual UAZ-31512, UAZ-31514, UAZ-31519 and UAZ-31513 vehicles, a starting heater was installed, designed to facilitate engine starting at ambient temperatures below minus 15 degrees by heating the coolant in the cooling system and oil in the engine crankcase. The fuel for the starting heater was gasoline used for the engine.
Starting heater UAZ-3151, general device.
The main part of the heater is a boiler of non-dismountable design, the cavities of which are permanently connected to the engine cooling system using inlet and outlet fittings and rubber hoses with clamps. The liquid jackets of the boiler are surrounded by two gas ducts, through which the gas formed during the combustion of the air-fuel mixture passes, heating the coolant.
At the bottom of the boiler there is a drain valve and a drain pipe connected to the combustion chamber of the boiler. In the combustion chamber of the boiler there are two threaded holes, into one of which a glow plug is screwed, and into the other - a fuel line fitting. To fill the coolant, the heater has a funnel with a stopper connected to the boiler liquid jacket with a rubber hose.
Air enters the combustion chamber of the boiler from a fan through a hose. A nozzle with a folding extension is connected to the boiler outlet pipe. Hot gas is removed from the gas ducts through it and, using a tray, is supplied to the engine oil sump.
Diagram of shielded electrical equipment of UAZ-3151 and UAZ-31513 vehicles with inclusion of the electrical circuit of the starting heater.
Operating principle of the UAZ-3151 starting heater.
Fuel is supplied to the starting heater boiler by gravity from the carburetor float chamber through a tap with an adjusting needle. In earlier versions of the heater, it was equipped with its own separate fuel tank. To supply air to the heater, a fan with a single-speed electric drive is installed on the radiator trim panel.
Fuel is pumped into the carburetor by an electric fuel pump installed on the left front part of the engine. The electric fuel pump is connected to the power system in parallel with the main pump and is designed for short-term operation, so after starting the engine it is necessary to turn it off.
Since the electric fan of the heater has one speed, when initially igniting the boiler, it is recommended to turn it on intermittently with a period of 1-2 seconds, not allowing it to develop a high rotation speed, so as not to overcool the glow plug and extinguish the resulting flame. When a stable combustion occurs, which is determined by noise, the fan must be turned on constantly.
The air-fuel mixture is ignited by a glow plug, which remains turned on until a stable combustion process is achieved in the boiler. Further ignition of the mixture occurs from the heated parts of the combustion chamber.
Hot gases give off some of the heat to the heated liquid, ensuring its thermosiphon circulation in a circle: boiler - outlet pipeline - engine cooling system jacket - supply pipeline - boiler. The exhaust gases leaving the boiler heat the oil in the engine crankcase.
The heater is controlled from the control panel. The glow plug on the panel serves to reduce the voltage in the glow plug circuit to 4 Volts and visually monitor its activation.
The procedure for starting the starting heater UAZ-3151.
If water is used as the coolant.
In exceptional cases, water may be used as a coolant for the UAZ-3151 engine. In conditions of low ambient temperatures, after the end of the day's operation of the car, when parking it for a long time, water is drained from the engine cooling system. In this case, before starting the starting heater, you must first prepare 10 liters of clean water in one container and separately another 3 liters in another.
Before starting work with the starting heater, you need to unscrew the plug from its filler funnel and remove the radiator cap, then clean the hole in the drain tube to ensure that excess gasoline drains when the heater starts.
After this, fold the exhaust pipe nozzle extension into the working position and turn on the electric fuel pump using the switch on the control panel, pumping fuel into the carburetor. Turn on the fan electric motor for 10-20 seconds, this will purge the combustion chamber and heater flues with air. Turn off the fan motor and turn on the glow plug.
UAZ Patriot with engine 409.10 from 2011 (MK No. 33)
RECOMMENDATIONS FOR HEATER INSTALLATION
Operation
INSTRUCTIONS FOR IMPLEMENTATION
Preparing the heater for installation
Cut the rubber sleeve into pieces: output sleeve L2=390 mm; inlet sleeve L1=350 mm. Secure the bracket to the heater with studs through the bushings using washers and nuts (see Appendix PRM-0033, Fig. 1). Place the sleeves on the corresponding heater pipes and secure the connections with clamps.
Remove the protection (engine splash guard) on the left side. Unscrew the drain plug from the engine block (Fig. 3) and drain the coolant. Clean the hole. Unscrew the front bolt securing the steering gear (Fig. 2 arrow B).
Installation of fitting K1/4''
Apply sealant to the threads of the fitting and screw it in instead of the drain plug (Fig. 3).
Secure the bracket with the heater with the steering gear bolt through the washer from the kit (Fig. 2 arrow B).
Cut the hose connecting the expansion tank to the lower radiator hose at the lowest point that allows you to install a tee, see fig. 4. Having first put on the S20-32 clamps, install the tee into the hose gap, so that the side outlet is directed to the heater.
Connection of the heater to the engine cooling system
Place the outlet hose with a clamp on the fitting installed instead of the plug, secure the connection with a clamp (it is possible to trim the outlet hose to avoid kinks). Pour 250 ml of coolant into the heater through the inlet sleeve. Place a clamp on the inlet sleeve and put the sleeve on the tee outlet, then secure the connection with the clamp. Fill the cooling system.
Fixing the network cable
The power cable should be laid and secured with straps to ensure its safety from mechanical damage, as well as to prevent possible contact with moving and heated parts of the engine.
Check connections for coolant leaks and repair if present. Start the engine for 3-5 minutes, and after stopping the engine, add coolant to the required level.
Checking the heater operation
Turn on the heater to a 220 V network (after a few seconds you will hear the noise of the heating coolant), check the heating of the outlet hose. After 3-5 minutes, turn off the heater. ATTENTION! The heater can be operated only after the engine has warmed up to operating temperature (the thermostat must be open) and the efficiency of the interior heater has been checked. This must be done to eliminate air locks in the cooling system.
Source
Characteristics
Start-M is designed for pre-heating of the coolant of internal combustion engines of vehicles and units during the cold season.
Installation recommendations:
Sleeves should not have kinks or “humps”!
Operating principle of the electric heater:
The coolant (antifreeze, antifreeze) is heated in the heater housing. Due to the lower density, the heated liquid begins to circulate directionally and enter the engine cooling jacket. The place of the heated liquid is taken by a colder one. This establishes natural thermosyphon circulation of the coolant. The thermostat automatically maintains the coolant temperature within specified limits, and the emergency thermal switch prevents failure of the heater if there is no coolant in it (double degree of protection). The engine warm-up time depends on climatic conditions (temperature, wind), as well as on the parking conditions of the car (open parking, garage).
Installation and Maintenance:
The electric heater is built into the engine cooling system of domestic and foreign cars (external installation method), the power supply is from a 220 V electrical network. It is recommended that the electric heater be installed at a car service station. Due to their simple design, electric heaters do not require frequent maintenance (see Operating Manual).
Technical data of the electric heater:
- Rated voltage - 220 V
- Power consumption - 1; 1.5; 2 kW
- Degree of protection - IP 34
1) The horizontal design eliminates the possibility of coolant getting into the electrical part of the heater; 2) The ball valve ensures the direction of coolant circulation, protects the electric heater from overheating and makes heating more efficient with various installation schemes; 3) The thermostat ensures that the electric heater is turned on and off within the specified temperature limits, which protects the device from overheating and saves energy; 4) Thermal switch (emergency) ensures that the electric heater is turned off in emergency situations (insufficient amount of coolant or lack thereof), if the thermostat fails; 5) The thermal switch reset button ensures that the thermal switch is turned on in case of emergency operation, which makes the operation of the electric heater safer, more durable and convenient.
Advantages when using:
- Guaranteed starting of the car engine in the cold season
- Saves time when warming up the engine
- Fuel economy
- Protection of engine rubbing parts when starting in the cold season from premature wear, which increases the life of the internal combustion engine
- Protecting the environment by reducing exhaust emissions
- The double degree of protection includes a thermostat and an emergency thermal switch built into the electric heater.
- Convenient activation (return to operating position) of the emergency thermal switch.
- The cast aluminum housing and small dimensions allow the engine heater to be conveniently placed in the engine compartment.
- Optimally selected power of the heating element of the heater for all types of car engines and vehicles.
- The heater is supplied in a single package with an installation kit.
- The installation kit, adapted to a specific vehicle, includes all the necessary parts and components for installation.
- Detailed step-by-step installation instructions.
- An affordable price compensates for the costs and hassles associated with starting the engine in the cold season.
- Simplicity and ease of installation.
Installation kit for installing the Sibir electric heater on a UAZ car with a UMZ 414,417,421 carburetor engine
ATTENTION ! Installation of the Siberia electric heater on UAZ vehicles with a UMZ 414,417,421 carburetor engine is recommended to be carried out by specialists at a service station.
Before installing and operating the Sibir electric heater, carefully read the installation manual.
Electric heater delivery set:
Spring washer 6
Installation Guide
Note: if necessary, the company can produce and send the parts required for installation according to your order.
Recommendations for installing the heater
Attention! The electric heater must not touch the engine or other parts of the vehicle. The electric heater must be installed in a vertical position with the outlet pipe up (see Fig. 1), while a slight tilt (not > 15 degrees) is allowed.
- Drain the coolant by unscrewing the drain plug of the cylinder block and clean the hole.
- Apply sealant to the threads of the K1/4 fitting and screw it in instead of the drain valve (Fig. 1).
- Secure the bracket to the electric heater with M6*45 bolts using spring washers and nuts.
- Cut the sleeves to length: inlet L=400 mm and outlet L=600 mm.
- Unscrew the bolt securing the right engine mount cushion, then secure the bracket with the heater with this bolt (Fig. 1).
- Place the inlet hose onto fitting K1/4 and connect it to the inlet pipe of the heater. Tighten the clamps (Fig. 1).
- Cut the sleeve connecting the heater radiator pipe and the valve in the cylinder head at a distance of 60 mm from the point where the sleeve exits the hole in the body. Shorten the piece of sleeve on the tap side by 25mm. Insert a tee into the section of the sleeve and seal the connections by tightening the clamps (Fig. 1).
- Connect the tee and the outlet pipe of the electric heater with the outlet sleeve, tighten the clamps (Fig. 1).
- Make sure that the hoses are at a sufficient distance from the exhaust pipe and exhaust manifold.
- Fill the engine cooling system with coolant.
- Secure the power cord to the car body so that there is no contact with moving and heated parts of the engine.
Preparing for work
- Check connection for leaks.
- Start the car engine and let it run for 5-10 minutes. Then stop the engine and add coolant if necessary.
- Connect the electric heater to the network.
- After 2-5 minutes of operation of the electric heater, check the inlet and outlet hoses. The outlet sleeve must be warmer than the inlet sleeve
ATTENTION ! The electric heater can be operated only after the engine has warmed up to operating temperature (the thermostat must be open) and the efficiency of the interior heater has been checked. This must be done to eliminate air locks in the cooling system.
Source
Types of heaters, features
The company offers a choice of a number of models with different designs and technical characteristics. In most cases, the devices are intended for use on domestic cars and trucks - VAZ, GAZ, UAZ, GAZelle, etc. But at the same time, installation of the Alliance heater is quite possible on foreign cars.
The catalog of preheaters from this company includes the following models:
"Alliance-2-PC"
The only tank-type model on the list, the design of which includes a pump that circulates coolant through the system while the heater is operating. Thanks to this, it ensures more uniform heating of the cylinder block. The equipment has a vertical design. The power of the heating element is 2 kW;
This model comes in two types - 1.5 and 2.0 kW. Externally, it is identical to the model with a pump, but this version does not have a pump. Liquid circulation – gravity;
"Alliance -07"
Horizontal flow-type model with perpendicular pins. Designed for installation on vehicles that use a shortened cooling system return pipe and an angled antifreeze supply to the thermostat housing (VAZ classic models and some front-wheel drive models). The power of the heating element is only 0.7 kW, so it is more suitable for maintaining temperature rather than heating coolant;
"Alliance-08" and "08 Universal"
Flow model with horizontal position of terminals. The first version is intended for installation on GAZ cars, while the second is universal and can be used on foreign cars. Heater power – 0.8 kW;
Horizontal tank-type model with perpendicular outlets and a power of 3 kW. This heater is designed for use with truck engines;
The type of device affects the principle of operation. If everything is clear with a tank heater equipped with a pump - when turned on, the pump provides circulation, then gravity-fed ones should be considered in more detail, since the scheme of its operation is quite interesting.
General recommendations for installing Start-Mini
1. Clean the nest from dirt.
2. Apply sealant to the heater seat and press the heater into the socket with hammer blows through the mandrel, orienting the heating element leads with the cord down. When pressing, do not allow the heater body to distort.
3. Secure the electrical cord with ties so that it does not touch moving or very hot parts of the engine.