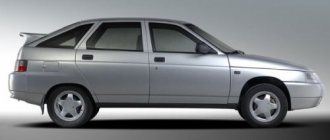
The question of how to remove the fuel pump on Lada Kalina cars can often be found on the World Wide Web. But the thing is that the quality of our gasoline and the ability for stable operation of this part cannot “get along” in a peaceful environment. Therefore, the need for a complete replacement or repair of this device for owners of Lada Kalina occurs with enviable frequency.
In the video, replacing the fuel pump on a Lada Kalina:
Replacing the fuel pump
To access the Lada Kalina fuel pump, you need to fold back the rear seat, remove the insulation (if any), and then begin dismantling the device.
Tool for the job
- Screwdriver with flat and Phillips blade.
- Hammer.
- Pliers.
Step-by-step work order
- Disconnect the negative terminal from the battery.
- We open access to the protective cover.
To avoid losing, we put the bolts in one place.
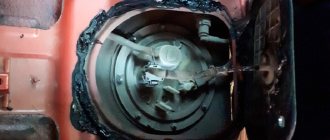
Under the decorative cover you can see the fuel pump and DUST!
The block is marked with a red arrow, and the fittings with a green arrow.
Strikes should only be made on the ring.
Successfully dismantled fuel pump.
Replacing the fuel pump mesh
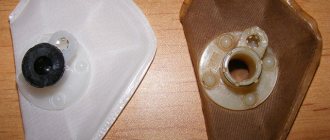
Fuel pump mesh close up
When the fuel pump is removed, you can inspect the filter mesh. This is the so-called coarse filter. To do this, you need to disassemble the fuel pump and replace the filter element.
On the left is the new one, on the right is the old fuel pump mesh.
How to replace the fuel pump on a VAZ 1117-VAZ 1119?
Note! The fuel pump can be changed either separately from all other parts, or it can be completely replaced with a module; replacing the entire module with the entire module will be more expensive because the new module will have a Fuel Level Sensor, a pressure regulator and many other parts (Just why would you change them if they you are already in normal condition, most likely, if your sensor has become unusable and the regulator is still acting up, then change everything together), and separately, if you replace the fuel pump, then this is only one new part, and all the others will remain in place, if If you decide to replace the fuel pump separately, then in this case, after removing the pump itself, read the article entitled: “Repairing the fuel pump” in which everything is described!
We recommend: Replacing rear shock absorbers of VAZ 2114
Removal: 1) At the very beginning of the operation, fold back the rear seat cushion so that it does not interfere, this is done very simply, by hand pull out the hinges from under the inside of the seat (see photo 1) and then by pulling these loops, the rear seat cushion reclines like this shown in the figure under number 2, this gives you access to the fuel pump hatch and to the pump itself. As soon as access opens, fold the standard carpet to the side (it will be cut there specifically for the fuel pump, see photo 3 for more details) and remove the four screws which secure the hatch that closes the pump itself (see photo 4) and then remove it.
2) Now disconnect the block of wires from the pump itself, this is done by hand, that is, the latch that holds the block is pressed by hand and then the block is disconnected (see small photo below), then disconnect the two fuel pipes, to do this, press the latch with one screwdriver fastening one of the tubes, and with the other, slide the tube along the fitting and thereby disconnect it (see large photo), carry out exactly the same operation with the other tube and most importantly, after disconnecting them, do not confuse the tubes with each other, because they must be connected strictly in their places and if you connect them the other way around, the car simply won’t start, by the way, on some models (Depending on the year of manufacture of the car), the fuel pipes are secured not using plastic clamps on which you need to press and remove the tubes, but using metal spring clamps, So, if you have metal clamps, then you will need to wring them out and then disconnect all the tubes.
Note! Before disconnecting the pipes, do not forget to relieve the fuel pressure, this can be done in several ways, one of them is to remove the fuse that goes to the fuel pump (This fuse is not located in the mounting block where all the others are located, but under the cover which is located next to the gearshift knob, you can lift this cover with a screwdriver and the pump fuse is located in the very middle) and start the car and let it run until it stalls, the second method is described in detail in the article entitled: “Bleeding the pressure in the fuel rail on a VAZ”, well the last third method (Actually there are a little more of them, but these are the most basic of them) is very simple, disconnect the wire block as shown in the small photo above and start the car in the same way and wait until it stalls, when it stalls you can again just in case, start it up and the pressure in the power system after these procedures will be 100%!bled (The time you spend on bleeding off the pressure is a little more than one minute, but not everyone does this, but in vain, it’s safety first thing, just if you don’t bleed off the pressure in system, when the fuel pipes are disconnected, a little gasoline will flow out of them and your car will get dirty due to this, in addition, if a spark gets on the gasoline, then this will already ignite, which will not lead to anything good)!
3) Then, using two screwdrivers, rotate the plate that holds the fuel pump in one place counterclockwise until its cutouts align with the protrusions on the flange (see small photo below), once aligned, remove the plate and put it aside, and then After that, remove the fuel pump itself from the tank, but only remove it carefully without damaging the Fuel Level Sensor (The sensor just has a float, so you will have to carefully remove this float from the tank), by the way, as soon as the fuel pump is removed from the tank, look in that place where it was attached with a plate, a sealing rubber ring, if it is damaged in any way (compressed, everything is in cracks, for example, or even torn in some place), then in this case replace the ring with a new one because this ring is responsible for the tightness and if it will be damaged, then when driving over strong bumps, gasoline will flow out little by little (drop by drop) through this ring to the outside.
Installation: The new fuel pump is installed in its place in the reverse order of removal, the plate that secures the fuel pump during installation will need to be tightened a little more with light blows of a hammer through a drift and something else, there is an arrow on the fuel pump (you will see it right away), so install the new pump on its place so that this arrow points clearly to the rear of the car.
Additional video: You can briefly see the process of replacing the fuel pump with a new one in the video below, everything is shown there in pictures and in descriptions.
We recommend: Opel Astra H fuses and relays in a complete set
Note! If you want a live video clip, and not pictures, then in this case watch another video in which the fuel pump is removed using the example of a VAZ 2110 car (On Kalina it is removed a little differently and it is not secured by a plate but by nuts , but you have to look at everything so that you at least know approximately how to replace the fuel pump on a car)!
In order to get to the location of the fuel pump on the Lada Kalina, you must first recline the rear seats and remove the insulating trim on the floor.
We find the lace between the rear seat belt buckles and pull it up, raising both seats. Below I will tell you what tools may be needed for this repair:
- Phillips and flathead screwdrivers
- Hammer
- Pliers
conclusions
All of the instructions described above are designed so that even the most unprepared car enthusiast can independently remove the fuel pump on his Lada Kalina; the most important thing is not to rush, do everything consistently and carefully!
The Lada-Kalina submersible fuel pump, as in other cars, is necessary to supply gasoline to the combustion chamber of the internal combustion engine. The pump is activated immediately when the ignition is turned on and maintains operating pressure until the car is turned off or the fuel runs out. The fuel pump is part of a module that includes a fuel pressure regulator, which changes the supply parameters when the driver operates the accelerator pedal. The module also contains a sensor that sends data to the dashboard, to the fuel level indicator. In addition, the design of the fuel filter includes a fine-mesh mesh for coarse fuel cleaning.
How to dismantle the fuel pump
There is a gas tank under the rear seat of Kalina-2. Fold the seat cushion up and then remove the split sections of the carpet located above the hatch. To make the issue easier to understand, here is a drawing:
The part marked “3” is a hatch that protects the pump. First, the hatch needs to be dismantled, for which four screws “1” are unscrewed. The unit itself, referred to as the “fuel pump module,” is attached to the tank with a clamping ring “5”:
Parts catalog VAZ-2192/94, fuel tank
The steps to dismantle module “6” are illustrated in the photo:
Any of the considered actions does not require special qualifications:
- The four self-tapping screws are unscrewed with a Phillips screwdriver;
- The wired connector is disconnected by squeezing the plastic latch;
- By squeezing the lock buttons, remove the fuel hose from each fitting;
- By prying the protrusions on the ring with a flat screwdriver, they try to unscrew it.
When pulling the fuel pump module upward, it is easy to damage the level indicator sensor. To prevent this in practice, the module is tilted away from the cross.
Remove the plastic module from the tank
We hope no questions arise here.
Signs of trouble
There are several signs by which you can determine that the Kalina fuel pump is not working:
- the car does not start or stalls almost immediately;
- “Kalina” twitches when moving;
- the car does not develop maximum speed;
- extraneous noise or grinding noise coming from the fuel tank.
Similar symptoms are also observed when the fuel filter is clogged. Therefore, before removing the fuel pump on the viburnum, first replace the filter element. If the “symptoms” do not disappear, repair or replace the fuel module.
Common fuel pump malfunctions on Kalina:
- interruptions in the power supply to the unit: the fuel pump relay may fail. In this case, a diagnostic icon will be displayed on the instrument panel. Also, a power failure may be due to a loose connection in the fuse box;
- Fuel system blockage: most often occurs due to poor quality fuel containing small debris and impurities. Excessive contamination of coarse and fine filters leads to fuel pump failure;
- contamination of the fuel injector: leads to the fact that the car spontaneously turns off at idle.
The types of malfunctions described above require replacement of the fuel pump. The only type of work available to the car owner is cleaning the filter mesh.
Fuel pump device
Modern cars use two types of fuel pumps - mechanical or electric. The former are used in carburetor engines, the latter in injection engines.
The mechanical pump is usually installed on the body of the gas tank, while the electric pump is installed inside the tank. Some automakers use both types of pumps at once.
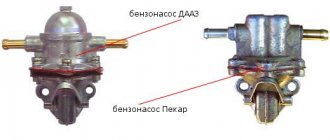
Mechanical pump
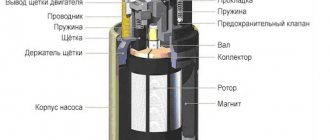
The mechanical fuel pump is quite large. Its main elements are:
The fuel supply system of the VAZ 1118 Lada Kalina car has 2 stages of fuel filtration - coarse and fine cleaning. The first is a fine mesh made of plastic, the second is an “accordion” made of porous paper. Both cleaning elements gradually become clogged during operation and after a certain period of time require replacement. Many car enthusiasts perform this operation on their own, because it is quite simple. You too can take on this work once you have read the instructions for its implementation.
Replacing the fuel pump Kalina
Before replacement, read the operating manual to learn the location of the fuel system element, the specifics of the adjacent fuel lines and the types of fasteners. When working, it is important to follow the outlined algorithm so as not to disrupt the functioning of the fuel supply system. Damage to the fuel line or improper assembly of the fuel module can lead to engine damage and even a car fire.
To carry out the work, the car owner will need:
- pliers;
- hammer;
- screwdrivers for flat and Phillips slots.
Sequence of replacing the fuel pump Lada Kalina
Before starting work, you need to “de-energize” the Kalina by disconnecting the battery terminals. Repair procedures should be carried out away from fire and places where sparks could be generated.
- We dismantle the rear seat and floor trim;
- Under the seat there is a fuel tank cap secured with 4 “cross” bolts. Unscrew;
- Now the car owner has access to the top cover of the fuel pump;
- Now you need to “unhook” all the plugs and fittings from the pump. To remove the power plug, press the latch upward and pull the plug to the side. The power plug itself is located on the left side of the fuel pump cover;
- To remove the fittings, you must use pliers. The locking clamp is pressed out by hand, after which the fitting itself is removed using pliers. The main thing is not to confuse the fittings: the lock on the top is green, the lock on the bottom is metal;
- After dismantling the fittings, clean the fuel pump cover as much as possible - dirt will not get into the gas tank;
- Removing the fuel pump cover retaining ring: take a flat-head screwdriver, place it against the outline of the ring and lightly tap it with a hammer so that the ring moves clockwise. The latch should pop out and the cover will be accessible;
- Open the cover and carefully pull the pump up so as not to damage the adjacent elements. Additionally, make sure that no sand gets into the tank;
- We take the new pump and carefully immerse it in the technological hole. We attach the lid. Next, assembly is carried out in reverse order.
Changing the mesh with your own hands
So, the mesh located in the fuel pump is forced to constantly come into contact with dust and dirt, because the pump itself is located between the seats, and dust constantly settles on its body.
That is why experienced motorists are not lazy to wipe the pump body with a damp cloth from time to time to avoid untimely clogging of the system.
To replace the mesh you need to go through several steps:
- The very first thing we do is buy a new filter.
- Raise the rear seats to provide access to the pump.
- We unscrew the four fasteners on the hatch cover to the pump and put it aside.
- Carefully remove the hoses. They are dismantled in the following way: press on the latch (you can use a screwdriver) and pry up the hose itself (with another screwdriver) in the direction of the arrow. We judiciously balance our strength so as not to break fragile parts and remove the hose. Unfasten the connector.
- We thoroughly wipe the pump from dust and continue to disassemble the structure. Remove the retaining ring. Let us warn you right away that the ring is difficult to remove, you will have to work hard here or even use a hammer, but again, do not overdo it.
- We remove the pump (in order not to flood the interior with gasoline, lay some unnecessary cloth).
We recommend: How to change the oil in a Toyota Hilux automatic transmission yourself?
The first part of the work is completed. Let's proceed to the most important part, disassembling the pump:
- There is a sensor and wires attached to the pump; you need to disconnect them.
- Next, we remove the intake tube and bend the clamps (there are 4 of them) in order to be able to remove the glass.
- We check the glass for dirt, if there is any, clean it.
- And now we’re doing what we did such a large-scale job for – we’re removing the mesh. She usually looks creepy. But don’t be scared, just replace it with a new one and assemble the system in reverse order.
Purpose of the fuel pump
In short, the main task of a gas pump is to supply fuel from the gas tank to the car engine. In other words, the fuel pump is the “heart” of the car’s fuel system. And if problems arise in any of the departments of this “heart,” the car will not start, since gasoline will not reach the injectors.
Fuel pump of the Lada Kalina car
The design of the pump may seem primitive to some, but not everything is so simple: the gas tank in the Lada Kalina (and in many other cars) is located far from the engine, so the gas pump must be very powerful in order to supply gasoline at the required pressure to a large distance.
Gasoline pumps are either mechanical or electric. The Lada Kalina has an electric fuel pump (since at the moment it is considered the most modern and efficient). Like any other device, the Lada Kalina electric fuel pump has both advantages and disadvantages.
Let's start with the positives. This pump is reliable, its design is very simple, and most importantly, it is safe because it stops working immediately after the machine engine is turned off.
What is a fuel pump
The gasoline pump is a key component of the power system; its job is to ensure an uninterrupted, timely supply of fuel to the system.
In each model, the design and location of the fuel pump is unique; for the Lada Kalina, this device is located on the opposite side of the power unit.
On the one hand, this arrangement allows you to benefit from the technical capabilities of the machine, but on the other hand, the device requires more powerful operation than models in which the fuel pump is located closer to the engine.
In order for Kalina’s fuel pump to cope with its job, it is presented in an electric version. Its advantages are:
- simplicity of design;
- good fuel supply;
- safety.
But, as one might expect, Kalina’s electrics are not yet a strong point; they often break down, which is the main disadvantage.
In addition, the disadvantages of the Lada Kalina gas pump include increased noise levels, sensitivity to the quality of gasoline, and the fact that it requires cooling.
The issue of high-quality gasoline in our country, unfortunately, still remains unresolved; this is one of the reasons why the fuel system of the Lada Kalina fails.
Filters become clogged, which disrupts the operation of the entire mechanism and ultimately leads to pump failure.
This is why filters, or meshes as they are also called, need to be changed regularly.
We’ll talk about this, but first, let’s figure out what malfunctions happen with the Kalina fuel pump?
Types of faults:
- One of the most common pump malfunctions is a rapid decrease in pressure after the engine starts. This fact indicates serious violations that can be caused either by a valve defect or a breakdown of the pressure level regulator; it is quite possible that the injectors are also clogged. A sharp drop in pressure leads to problems in starting the engine , which, if the breakdown is not corrected, can even lead to engine failure.
- It also happens that the engine loses power, or the engine does not start at all, even when cold or hot. All this happens when a membrane or spring breaks, a rod wears out, or filters become clogged, and the latter happens more often than anything else.
- In any case, having discovered that there is something wrong with the fuel system, you should first check the condition of the filters, because, due to low-quality gasoline, they become clogged quite quickly, and it is better to change them in a timely manner, without waiting for problems. Now let’s talk about how to change the mesh from the pump yourself.
Why might the mesh need to be replaced?
Two grids - dirty and clean
First of all, because of bad gasoline. If you regularly refuel at dubious gas stations, then it’s only a matter of time before the fuel pump fails . Purification of gasoline from impurities in the gasoline pump occurs in several stages, and the mesh of the gasoline pump is the first line of defense, so to speak. It is the first to absorb all large particles of impurities and dirt. After passing through the mesh, gasoline enters the fine fuel filter, then passes through another mesh (which is located near the fuel pressure regulator), and finally goes through the third mesh (located directly in front of the injectors). If problems arise in any of these areas, you won’t be able to go far. The car engine simply will not start. Or it will start, but will work unevenly and jerkily.
recommends changing fine filters every 30,000 kilometers . But he doesn’t give any recommendations about the fuel pump mesh. Therefore, many car owners forget to change this grid, and remember about it only when the engine begins to behave strangely.
The general rule is: if the car has traveled 60,000 kilometers, the mesh should either be cleaned or replaced. It is advisable to clean it only if there is no serious mechanical damage to it. But if the machine has traveled the distance indicated above, then the mesh in the pump is often worn out to such an extent that it is easier to throw it away than to clean it.
