VAZ 2109 fuel pump malfunction, types of VAZ gasoline pumps
On a VAZ 2109, signs of a fuel pump malfunction are a complete or partial cessation of the supply of gasoline to the carburetor, this entails the inability to start both a cold and hot engine, it will start and stall, in addition, unstable idling is possible. If you suspect that the fuel pump in the VAZ 2109 is not working, then you should check it. It's not difficult to do it yourself, just read this article.
Checking the fuel pump
So:
- Let’s immediately look at the two most common types of gasoline pumps, “Pekar” and DAAZ. They are installed on both rear-wheel drive and front-wheel drive cars. To check the serviceability and functionality of the entire fuel supply system:
- Remove the gasoline hose from the outgoing (discharge) fitting of the gasoline pump
- Then press the fuel pumping lever manually several times
- If the VAZ fuel pump is working properly, then a powerful stream of fuel should come out of the fitting
- If there is no stream, or there is a weak stream, perform a second check
To check the serviceability of the intake valve:
- We disconnect the fuel hose from the suction fitting of the pump (it turns out that now we have removed both fuel hoses from two fittings)
- Then we plug the suction fitting with our finger and press the lever for manual pumping several times
- At the same time, you should feel a vacuum on your finger (it should be sucked to the fitting)
- When there is a vacuum, this means that the fuel pump is working, look for faults in the gas tank or fuel lines
- If not, the fuel pump on the VAZ 21093 does not work, remove the pump, disassemble and change the intake valve
To check the exhaust valve for leaks:
- Place your finger on the hole in the injection fitting (the one that supplies gasoline to the carburetor), then press the lever several times to manually pump
- At the same time, a very noticeable stream of air comes out of the fitting hole, it pushes the finger away from the fitting
- If the stream is weak or absent, it means that the fuel pump on the VAZ 2109 does not pump, then remove the pump, disassemble and replace the exhaust valve
- If the filter is deformed or clogged:
- Remove the cap from the fuel pump, take out the fuel filter, clean it, rinse it in gasoline, then blow it with compressed air
- If the filter is deformed, then change it
- In the Pekar brand fuel pump, as well as similar pumps, the filter is removed by unscrewing the suction fitting from the cover, so you don’t have to remove the cover itself
- In case of malfunctions (leaky, torn) of the diaphragm:
A characteristic sign of such a malfunction may be the presence of fuel leaks on the fuel pump housing or the appearance of a gasoline smell in the engine oil. However, these signs may not appear:
- Remove the upper part (cover) of the fuel pump housing
- Take out his diaphragm assembly
- Unscrew the nut on the rod, then remove the diaphragms (there are three in total)
- Replace the diaphragms with new ones (you will need to purchase a repair kit)
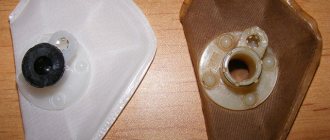
- Then put everything back together, the diagram is in the photo below
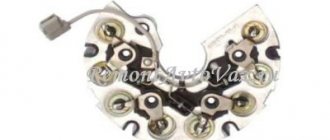
Scheme of the diaphragm assembly
- The Pekar brand fuel pump has only one diaphragm.
- It can be removed after removing the cover.
- To disconnect the diaphragm assembly, rotate it 90 degrees.
If the valves are faulty, the VAZ 2109 does not pump the fuel pump, therefore:
- Remove the cap from the fuel pump, as well as the fuel pump strainer.
- Visually inspect the intake valve and fuel pump cavity
- Remove the upper body, inspect the exhaust valve
- When the valves are not pressed into the housing tightly or are not pressed tightly, or have lost mobility, then the pump must be replaced
- If blockages are found, they should be removed and then the housing should be blown out with compressed air.
- In the Pekar pump, both of its valves are located in the cover, so in order to assess their condition it is necessary to remove it from the body
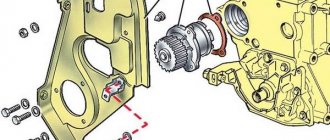
- VAZ 21093 fuel pump does not work, if the pusher is damaged:
- Remove the fuel pump from the studs, while unscrewing the nuts that secure it
- At the same time, its gaskets, heat-insulating insert and pusher remain on the engine
- We rotate the crankshaft so that the pusher extends as far as possible
- You should measure how much the pusher protrudes above the plane of the topmost gasket
- The protrusion should be 0.8 - 1.3 millimeters
- When the protrusion of the pusher does not fit into the given size, then you should try to adjust it by selecting shims of smaller or greater thickness (depending on whether the length is not sufficient or it sticks out strongly) or change the pusher
- Replace only the outer thickest gasket located between the thermal insulation insert and the fuel pump
- Although repair kits for fuel pumps with ready-made gaskets are sold, you can also save money and cut it yourself from a piece of paronite
- If the spring under the diaphragm is broken:
- It is necessary to remove the upper part (cover) of the fuel pump housing, then remove the rod with diaphragms, carefully inspect the condition of the spring
- We replace broken, or compressed, lost elasticity
Fuel pump repair for VAZ 2109 (carburetor)
Content:
If the fuel pump on a VAZ 2109 malfunctions, the fuel supply to the carburetor is completely or partially stopped. Therefore, it is not possible to start the engine cold or hot. It will start at first, but then immediately die. Plus, instability at idle is often observed.
Before changing the fuel pump, it is recommended to first check the condition of the device. It is not uncommon for a breakdown to be corrected with minor repairs.
Checking the general condition of the fuel pump
First of all, let’s check whether the supply system of your VAZ 2109 is working at all. To do this, you need to take the following steps:
- Remove the pump fuel hose from the source or discharge fitting;
- Manually press the fuel pump lever several times;
- If the pump is operational, a strong stream of fuel will immediately flow through the fitting;
- If there is no jet or it is very weak, it will be necessary to carry out other checks.
Intake Valve Check
- Disconnect the hose from the suction fitting so that both hoses are eventually removed, each from its own fitting.
- Simply plug the suction fitting with your finger, then pull the lever several times to manually pump fuel. If everything works fine, your finger will begin to be sucked into the fitting. This effect indicates that the pump is working properly. Therefore, we look for the problem in the tank or lines.
- If there is no suction, you will have to disassemble the device to replace the inlet valve. Its tightness is most likely broken.
Leak test
To check the tightness of the intake valve, you must:
- Place your finger on the hole from the injection fitting and pump up the fuel several times using manual pumping;
- In this case, a stream of air should come out of the hole, significantly repelling the pressed finger;
- If the stream turns out to be weak or does not exist, the fuel pump simply does not pump.
In this situation, there are two options - look for the problem inside the fuel pump device, disassembling the pump, or change the entire unit.
The filter is clogged or damaged
To fix the situation, you need:
- Remove the cover from the fuel pump, remove the filter, clean and rinse it with clean fuel. Then be sure to blow out with compressed air;
- Check the condition of the filter. If it is deformed, no repair will help. You will have to change the filter device;
- If you have a Pekar pump or a similar one, the filter can be removed by unscrewing the suction fitting from the cover. That is, it is not necessary to remove the cover at all.
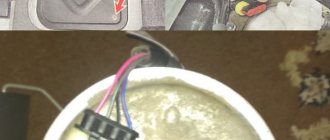
Pump diaphragm failure
A malfunction of the fuel pump diaphragm is indicated by traces of fuel leaks on the pump body and the presence of a fuel smell in the engine oil of your VAZ 2109 power unit. Just keep in mind that these signs do not always appear, although the diaphragm may be broken.
You need to do the following for your fuel pump:
- Remove the upper part of the fuel pump housing and remove the diaphragm assembly from there;
- Unscrew the nut on the rod, and then pull out the 3 diaphragms;
- Replace faulty elements with new ones. They are available in any repair kit for the VAZ 2109 fuel pump;
- Reassemble the assembly in reverse order;
- If you have a Pekar pump, there is only one diaphragm. It can be removed by removing the cover;
- To disconnect the diaphragm assembly, rotate it 90 degrees.
Be sure to simultaneously check the condition of the spring located under the diaphragm. To do this, you need to remove the upper part of the pump housing, remove the diaphragm rod and look at the current state of the spring. If it is broken, deformed or lacks elasticity, replace the element.
Node elements
Intake and exhaust valve malfunctions
If both valves raise doubts about their functionality, certain measures will have to be taken.
- Remove the cap from the fuel pump and remove the strainer.
- Visually assess the condition of the pump cavity and inlet valve.
- With the top of the pump body removed, you can take a look at the outlet valve.
- If both valves are not installed tightly enough, they are not pressed well or have become motionless, replace the entire pump completely.
- If you find traces of clogged valves, remove them and blow out the housing with compressed air.
In the case of the Pekar pump, two valves are located in the cover, so to assess their condition, simply remove the cover from the fuel pump housing.
Damage to the pusher
It is not uncommon for a fuel pump to fail to operate due to damage to the pusher. We have prepared separate instructions for this case.
- Remove the pump from the studs by unscrewing the fastening nuts. The thermal insulation insert, pusher and gaskets remain on the motor.
- Rotate the crankshaft to extend the pushrod as far as possible.
- Measure the distance that the pusher protrudes relative to the top gasket. Normally, the figure is 0.8-1.3 millimeters.
- If the protrusion is smaller or larger, try adjusting it using thicker or thinner shims.
- Between the thermal insulation insert and the pump there is an external gasket with the greatest thickness. It is this that needs to be changed when adjusting the protrusion.
- New gaskets are available in repair kits, although many make their own. To do this you will need a piece of paronite.
Fuel pump characteristics
In order to determine the presence of malfunctions in the fuel pump, you must know about the optimal parameters of this device.
| Characteristic | Required parameters |
| Fuel pump rod length | 82.4 millimeters |
| Protrusion of the rod above the top gasket | 0.8-1.3 millimeters |
| Thickness of the first gasket | 0.3 millimeters |
| Fuel pump rod stroke | 2.5-2.8 millimeters |
| Pump pressure at idle speed | 0.20-0.35 atmospheres |
Buying a new fuel pump will not cost that much - up to 1000 rubles. However, such costs are also high for many. And for some, their conscience simply will not allow them to buy a new pump right away, if it is possible to get by with a repair kit and return the pump to functionality for literally pennies and a couple of hours of work in your own garage.
Replacing the device
Disassembling and replacing the fuel pump
So, now we’ll tell you specifically about how to properly disassemble, replace damaged elements of the fuel pump, or completely replace this device with a new one.
Hatch
- In any case, we recommend purchasing a repair kit. It doesn't cost much. But there is no need to rush into buying a fuel pump. Who knows, maybe a simple repair will bring the pump back to life.
- Remove the air filter along with its housing.
- Disconnect the fuel supply and return hoses from the fuel pump fittings.
- Unscrew the mounting nuts that hold the pump itself.
- Carefully remove the pump, being careful not to damage the gaskets.
- Inspect the pump parts for cracks or damage. Check the fuel pump valves for leaks and perform all the operations we described above.
- Assess the current condition of the suction and discharge fittings. When dismantling, they must remain motionless in their seats. They break extremely rarely, but nothing should be ruled out.
- Check the fuel pump diaphragm. The presence of ruptures and peelings indicates that it must be replaced.
- Look at the current filter. Damage and excessive contamination are clear signs of wear and warrant replacement.
- Treat the filter components with clean gasoline and blow with compressed air using a compressor.
- If you find damaged elements, replace them with new ones using a repair kit.
- Replace the pump gaskets if necessary.
- When installing new gaskets, be sure to first treat their surface with Litol 24.
- If the pump housing itself is damaged or there are other serious problems, you will have to completely replace the fuel pump. Repairs won't help him.
- Next, when partial repairs are completed or you decide to take a completely new pump, it’s time for reassembly.
- Be sure to adjust the feed using shims of the required thickness so that the pusher output has an optimal indicator. We talked about this above.
- If the pushrod protrudes too much, it will cause the fuel pressure to be too high, causing your carburetor check valve to break.
- If the distance is less than required, as the load increases and the vehicle speed increases, the engine will not be able to receive enough fuel.
- Reassemble by following the reverse sequence of dismantling the fuel pump.
- Make sure the arrow on the body points towards the carburetor.
- When installing the diaphragm pump assembly, the holes in the gasket are located away from the muffler pipe.
Well, you figured out how you can repair and replace the fuel pump yourself. The task is really not difficult, although this unit plays a very important role in the performance of the entire VAZ 2109 car.
No Comments Yet! You can be first to comment this post! Close Window
Loading, Please Wait!
This may take a second or two.
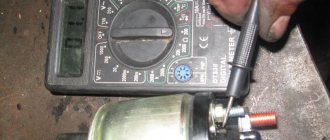
Checking and adjusting pump pressure
It's no secret that any car part has a certain resource. So the “nine” fuel pump, like any part, eventually stops pumping gasoline properly, our instructions will help you figure it out:
- Moreover, on the VAZ 2109 the problems with the fuel pump are always the same
- As a rule, the reasons are not tightness of the valves or housing, fuel wire, or diaphragm, perhaps the fuel filters are clogged, or the fuel supply lines are overheating
- The main problem is ultimately insufficient gasoline pressure at the outlet of the fuel pump.
- And in the case when your fuel pump initially could not show the appropriate (required) output pressure, then all the problems stated above only aggravate the situation
- You need to know exactly the output pressure (immediately before the carburetor) that the fuel pump should develop when the engine is idling.
- As a rule, all fuel pumps - both cars and trucks - must produce a pressure in the range from 0.20 atmospheres to 0.35 atmospheres. When your gas pump has a similar output pressure, then you should not have problems with gasoline supply
- The pressure is measured with a pressure gauge that has a scale with divisions of 1.6 atmospheres - on such a pressure gauge it will be possible to record the pressure of the fuel pump
- When the pressure is measured and it turns out to be below normal, you may just need to adjust the pump
- It is possible to adjust the fuel pump either by moving it closer or further from the engine block (by changing the thickness of the gasket)
- The second method is to strengthen the spring (washers are placed under it, the operation is performed taking into account the wear of existing parts and the strength of the spring)
- The third option is to change the length of the rod
- Any of the listed measures (or all in combination) make it possible to increase the pressure of the fuel pump to the level of 0.20 - 0.30 atmospheres
- The best thing, of course, is to bring the figure to 0.30-0.35 atmospheres at idle speed
- When the engine starts running at higher speeds, this figure will increase a little more.
Characteristics of the VAZ 2109 fuel pump
To understand how a working pump works and check its operation, it is important to know its operating characteristics:
- The length of its rod is 82.4 millimeters
- In this case, the rod protrudes above the gasket by 0.8 - 1.3 millimeters
- The thickness of the very first gasket is 0.3 millimeters
- And, the stroke of the rod is 2.5 - 2.8 millimeters
Useful tips
A couple of very useful recommendations for beginners on what to do if a fuel pump malfunction occurs on a VAZ 2109:
- It is important to note that on machines with a return line, the problem may arise due to the release hole being too large, then most of the pressure is relieved by the return line
- If the installed pump on your machine cannot be adjusted, you will have to replace it
- Today, dozens of models of pumps for VAZ from different manufacturers are sold on the market.
- In order not to buy a fake, you should approach the purchase very responsibly - choose a branded store and a reputable manufacturer, purchase only fuel pump models recommended by the VAZ plant
- And the most ideal option is to contact an official VAZ spare parts dealer in your region, then you will receive the necessary part quickly, and you won’t worry about whether you got a bad quality fuel pump, and you won’t have to look for and buy a new pump a second time
Electrical circuit of the fuel pump in the injection VAZ 2110
The VAZ 2110 car with an injector system, even several years after the model was discontinued, is still very popular among car enthusiasts. The main reasons for this are the ease of maintenance and reliability of the machine. However, there are also negative aspects: the VAZ 2110 with an injector system very often has problems with electronics. The electrical circuit is quite complex for a Russian car and has 75 elements.
However, the weakest point is the fuel pump.
Its electrical circuit looks like this:
- The main one is the fuel pump relay; all the necessary fuses are installed there.
- Next, the electrical circuit diverges from one of the fuses to the diagnostic block and the device itself.
- From the next to the main relay and injectors.
- Next, the electrical circuit goes to the electronic control unit.
- Also, the fuel pump electrical circuit goes to the battery.
Thus, it turns out that the VAZ 2110 with an injector, the pump contains 4 electrical parts. In case of failures related to the operation of the pump, they should be checked first.
Principle of operation
To make it easier for you to understand the electrical circuit of the 2110 with the injector system, let’s consider its structure and the principle of operation itself.
So, the following take part in the process:
- Electronic control unit.
- Relay for turning on the fuel unit.
- Fuses that protect the electrical circuit of the device from overloads.
Wiring diagram VAZ 2110
In practice, the fuel unit starts working when the key is turned and ignites one turn. Before starting the engine, listen - at this moment you can hear the device starting to work and pumping gasoline.
Malfunctions in the electrical circuit
Now that you know the structure of the unit, let's figure out what to do if it malfunctions. So, if it shows no signs of life, the problem is most likely in burnt-out electrical parts.
You need to look for them not in the electrical unit, but directly in the interior of the VAZ 2110 with an injector system. The process looks like this:
- First of all, find the fuses. They are located near the front console on the right passenger side. There you need to find the plastic shield and dismantle it. (The part is secured with three self-tapping screws).
- There you will find three fuses and the same number of relays.
- The relay located in the center feeds the fuel. To the left of it is the one that protects the injectors. It must be removed and checked for functionality. If the part is oxidized, clean the contacts. If there is no visible damage, the fuse may have blown and will need to be replaced.
If the above methods do not help, you should not interfere more actively with the electrical system of a VAZ 2110 with an injector system. Unknowingly you can only damage the car.
The fuel unit will stop working and then more expensive repairs will be required. Therefore, it is better to entrust the process to professionals.
Correct procedure for disassembly and replacement
To remove the fuel pump, you need to perform the following sequence of actions:
- Buy a repair kit right away, its price is cheap
- Remove the air filter and its housing
- Disconnect the fuel supply and return hoses from the pump fittings
- Unscrew the nuts that secure it
- We remove it carefully, as there is a possibility of damaging the gaskets.
- Then you should inspect all the parts for cracks, check the tightness of all its valves
- Make sure that the discharge and suction fittings do not rotate in their sockets
- Diaphragms should not have peeling or ruptures
- The filter must be undamaged and absolutely clean
- Wash all its parts with gasoline and then blow them out with a compressor
- After checking, replace all damaged parts; it is recommended to change the pump gasket as well.
- When installing the gasket, apply lubricant like Litol-24 to its surface
- If the housing is damaged or the main parts are irreparably damaged, replace the pump completely
- Then you can proceed to installing it back
- In this case, immediately adjust the feed using shims
- And for this we measure the protrusion of the pusher
- Since with a strong protrusion, increased gasoline pressure will be pumped, which will easily break the carburetor shut-off valve
- In the case when the distance is lower than necessary, when the load increases and the vehicle speed increases, an insufficient amount of gasoline will flow into the carburetor
- The procedure for installing the pump is the reverse of removal.
- Also make sure that the arrow located on the body points towards the carburetor
- When installing the diaphragm unit, it is important to place the holes in its gasket away from the muffler pipe
Here we have outlined more detailed instructions for removing and disassembling the fuel pump to make it easier for you to do it yourself if a fuel pump malfunction occurs on your VAZ 21093. We conclude here, there should be no difficulties; in addition, you can, of course, watch a video lesson on this topic.