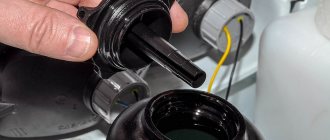
Seat heating wiring harness 2123-3724076 (Euro connector) for VAZ Niva
To identify the vehicle and reliably select heated seats for Chevrolet Niva SUV , you should carefully select the modification of the vehicle.
To do this, use clarifying information with data containing: power, measured in horsepower (example 103 hp), engine size (example 1.6 liters), type (example gasoline) and model + engine code, as a rule, this parameter rarely used, but you can only find it in the vehicle title, you can also pay attention to the drive axle (there are rear, front or all-wheel drive), and a mandatory parameter is the release date, which divides the vehicle model into restyling, pre-restyling, first and last year production. This data serves to uniquely install spare parts during a certain production period, as manufacturers are constantly upgrading cars off the assembly line.
Wiring harness for heated seats 2123 Chevrolet Niva with Euro connector
Dear customers, in order to avoid errors when sending a seat heating harness 2123 with a Euro connector, in the “Comment” line indicate which connector is Euro or simple, your car model, year of manufacture, under which key or block of electric heating control buttons.
For every driver, comfort when operating a car plays an important role. The climate in Russia is quite harsh; sitting in a car for a long time, especially in the cold, is not a pleasant experience. Everyone knows how quickly the interior of a car cools in the winter in an open parking lot or in an unheated garage. Usually a car has a heating system for the interior, but this is not always enough. That's why car seat heaters are simply indispensable accessories in cold weather.
Wiring harness 2123-3724076 with Euro connector, connects to heated front seats with Euro connector in 4 x 4 cars, Chevrolet Niva and their modifications. Can be used for self-installation and replacement. The contacts are already crimped onto the wires and inserted into the connectors according to the pinout, so they can be installed on the car.
Wiring harness for heated front seats 21230-3724076-00:
31 - to the electric heating control unit;
32 — to the electric heater of the right seat;
33 — to the rear harness block;
34 - to the electric heater of the left seat.
Stationary heating elements are mounted between the upholstery and the foam layer of the car seat. For their manufacture, mats made of carbon fiber fabric or reinforced wires are used.
Carbon fiber or thermal fiber mats do not have any restrictions. They can be cut at the desired location to attach the fittings to the car seat. The cost of such products is high, but is compensated by reliability.
Heating the seats in the car not only increases driving comfort, but also protects against many diseases associated with constant hypothermia.
In new cars, this function is most often provided initially, but owners of domestic cars are often forced to solve the problem on their own.
Installation and replacement of the harness 2123-3724076 with a Euro connector, which is connected to the heated front seats with a Euro connector in 4 x 4 cars, Chevrolet Niva and their modifications, can be done independently, without contacting specialized service centers.
Other article numbers of the product and its analogues in catalogues: 21230372407600.
VAZ 2123, VAZ 21213-21214i heated seats with Euro connector.
Any breakdown is not the end of the world, but a completely solvable problem!
How to install it yourself, replace the wiring for heated front seats 2123 with a Euro connector in a 4x4 car.
With the online store Discounter AvtoAzbuka, repair costs will be minimal.
Just COMPARE and BE SURE.
Don't forget to share the information you find with your friends and acquaintances, as they may also need it - just click one of the social networking buttons below.
see also
Comments 19
There should be a plug, the heating sits on a common relay along with the electric mirrors, and accordingly it is common, at least on the pre-Restayl. There are two relays that click when the ignition is turned on - these are for the power windows and for the heated mirrors. I could be wrong. But plus a hundred pounds can be taken from the power window relay
There should be a plug on the floor upholstery to connect the heated seats, I connected it like this...
I read that after 12 years there seems to be nothing there, I’ll look for it this weekend
Electrical diagram equipment rshnivy and old shniva: rutracker.org/forum/viewtopic.php?t=4346365 There you need to understand the principle of the circuit, I separately drew on paper the fragments that interest me, there is an electrical circuit. heating page 40
There is an error in the diagram - IV is the mounting block, the ignition switch is position V. I have a 2012 LC car, when I installed the heating, I discovered that in the installer in connectors X1 and X4, sockets 2 and 17, respectively, were occupied, then I discovered the relay (the color of the wires matched seat heating relay) it has a + on pin 87 when the ignition is turned on, so I connected the wire from the heating switch to it. In general, I concluded that the main wiring harness and mounting block are the same for all configurations, only there are no wiring harnesses for consumers.
Ok, thanks, I'll take a look
There is an error in the diagram - IV is the mounting block, the ignition switch is position V. I have a 2012 LC car, when I installed the heating, I discovered that in the installer in connectors X1 and X4, sockets 2 and 17, respectively, were occupied, then I discovered the relay (the color of the wires matched seat heating relay) it has a + on pin 87 when the ignition is turned on, so I connected the wire from the heating switch to it. In general, I concluded that the main wiring harness and mounting block are the same for all configurations, only there are no wiring harnesses for consumers.
where is this relay located? Otherwise, I also bought it, opened the mounting block and there the connector for heating was occupied, in the end I never connected it.
One of the relays hanging separately under the mounting block (I installed it myself 2 years ago, I don’t remember which one). It should click when you turn the ignition on and off. To make sure it is or not, remove the fuse (F10 in the diagram), there will be no “clicking”. By the way, if sclerosis serves me right, the headlight relay is also hanging there. I connected my fog lights using a kit from Priora, I didn’t bother to redo it, so the additional relay is hanging on the wires near the installer.
I recently connected it myself.+ I took it from the unit, rang the circuit and connected it there, presented it at 15A, the relay is in the button. — I found it on the cigarette lighter. It’s very simple.
Connecting seat heating for Niva Chevrolet
Some VAZ-2123 vehicles are equipped with a heating system for the front seats. The diagram for switching on the heaters is shown in Fig. 7-37. The heaters are turned on by switches in control unit 2. Seat heating thermostats are built into the heaters. The thermostat contacts close when the temperature of the seat surface drops to plus 22 ± 3 ° C, and the thermostat contacts open when heated to a temperature of plus 30 ± 2 ° C. The temperature difference between the closing and opening of the built-in thermostat contacts must be at least plus 5 ° C .
Rice. 7-37. Front seat heating activation diagram
1 – front seat heaters;
2 – control unit for front seat heaters;
3 – relay for turning on the front seat heaters;
Hi all! I bought a standard heated seats, I had a couple of questions about the connection, since I couldn’t find any clear topics here on the drive, I decided to write here. If I connect via a relay, do I need to install a fuse? Or does the relay play a role? Where can I get + so that it appears only when I turn the key? According to the standard diagram, the wires from the relay go to the 4th position, that’s what it is on the mounting block, I don’t boom boom, tell me) There is no standard wiring in the car, the car is 2013. Thanks everyone for the answers.
Comments 19
There should be a plug, the heating sits on a common relay along with the electric mirrors, and accordingly it is common, at least on the pre-Restayl. There are two relays that click when the ignition is turned on - these are for the power windows and for the heated mirrors. I could be wrong. But plus a hundred pounds can be taken from the power window relay
There should be a plug on the floor upholstery to connect the heated seats, I connected it like this...
I read that after 12 years there seems to be nothing there, I’ll look for it this weekend
Checking the heating element on a Chevrolet Niva
To check the heating of the pillows, you need to find two connectors in the upper part of it, which should be disconnected from each other and measure their resistance using an ohmmeter.
The latter should produce values equal to a certain value, but not indicating infinity . If it is determined that the heating is faulty, the seats may need to be disassembled.
Checking the heating element
At the same time, diagnose all wires for melting, short circuit or breakage. It’s not difficult to check them; just turn on the power button and measure the voltage with a multimeter.
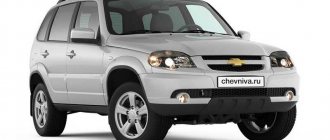
Installing heated seats on a Chevrolet Niva » All about Chevrolet, Chevrolet, Photos, videos, repairs, reviews
The wiring is routed to the seats, we install the floor tunnel and beard in place, and connect the wires from the seats with the heating buttons.
Repair of seat heating Niva Chevrolet
You should not use insulating tape, as this does not provide quality protection. The heating kit comes with wires; they are quite long, so we shorten the ones that go to power a little. The seats are assembled in the reverse order, but we don’t put them in the interior yet.
Website about Chevrolet Niva. You are here: Chevrolet Niva Manual for Chevrolet Niva 1st...
Such a malfunction is extremely rare. Checking the heating element At the same time, diagnose all wires for melting, short circuit or breakage.
Covers with heated seats on a Chevrolet Niva ease of installation changing the design of your interior and ease of connection disadvantages the cigarette lighter only works when ignited, this means that you cannot leave this system overnight the quality of the covers is poor; achieving fixation is almost impossible Advantages of a built-in heating system: This is a cover for a seat in which electric heating panels are built - Chevrolet Niva installation of seat heating, the system has a remote control panel.
Chevrolet Niva Heated Seat Doesn't Work
Why doesn't the heated seats work on the Chevrolet
If your car is a Chevrolet
an option such as heated seats
, then in the winter season one way or another you have to use it. Chevrolet Niva heated seat. but it doesn't heat up. I looked and found it. Octavia: seat heating does not work. Especially often used after long-term parking in severe frosts. Club owners and fans of the Chevrolet Niva SEAT will be no less a plus. However, severe discomfort can occur when this system suddenly fails and simply stops functioning. Original heated seats A5. Octavia A5 1 bug intensity does not work. We do not install heated seats on the Chevrolet Niva, but heated seats. In this article, we'll take a closer look at why this happens, as well as the best way to resolve this issue.
READ Climate Control UAZ Patriot Doesn't Work
no heating work seat: reasons
It's not hard to guess, this is a heating seat
is carried out by a special heater when power is supplied to it.
On a Chevrolet Niva
two elements are located on each of the two seats
, are connected by a separate line, but work when switched on synchronously.
And when the button is turned on, the current flowing through the relay turns on the heaters. Heated seats do not work on the Chevrolet Niva. Many owners of this model often. For better visualization of the device, there is a special indicator on the button. Heated seats do not work Chevrolet Niva: photo. If it does not light up, it will indicate an open short circuit and an inoperative circuit.
This is what the switch looks like during installation.
Heated seats
He stopped working heating
drivers seat
The fuse is good and works from
the seat
approaching.
Repair of heated seats in Chevrolet Niva
Niva with heated seats
— Chevrolet
repair.
Checking schematic elements
If the heating is not working
, then check the following:
- Fuse rating 15-20 ampere , or relay.
- Broken wire or heating elements.
- Heating button . Heated seats do not work. It seemed to take a long time to heat up. And about 2-3 weeks ago I stopped feeling warm. This error is extremely rare.
READ Heated driver's seat of Kia Rio does not work
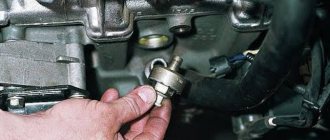
First step. start by checking the relays and fuses. They are located in the mounting block, more precisely in its lower part. Check them by visual inspection or by replacing a known part.
Connection diagram and mounting block
The required fuse is located under F15, and the relay is marked "K".
Next, you should measure the resistance
, voltage and current, if any, can be transferred to the heating elements.
Chevrolet Niva seat heating connection diagram
Installed seats with built-in heating. As the installers said, the heating is standard, the one that is now installed in VAZ. I decided to connect myself, to try my hand, so to speak. It should be noted that this is generally my first experience in “connections” with automotive electricals, and if it weren’t for ALER’s help in developing the circuit and his answers to all my stupid questions, this article would not have existed.
So, it was bought:
— two backlit buttons with a power indicator from the 15th VAZ panel, two-position: released/pressed; Included with the buttons are their counterparts with wires:
— 2 four-pin or five-pin relays; — 2 separate fuses with 25 A blocks (installed only one); - 6 meters of power wire per 2 mm 2; - 5 meters of two-core wire for control 0.5 mm 2; — plug to the chairs for connection; — 20 pieces of terminals for the relay (in reserve); — 3 ring terminals: 2 pcs. for heater masses, 1 pc. to the battery; — 5 terminals for the button blocks — small ones (just in case); — 10 “hooligans” (for inserting into wires).
Note. “Hooligan” was what store salespeople called such a plastic block about 1 cm long and wide and 2 cm long with grooves inside into which two wires are inserted in parallel through a side slit. When they are inserted, a toothed metal plate is clamped on top with pliers (it cuts through the insulation, ensuring contact between these wires), and then the plastic cap is snapped on. The main thing here is that the wire lies exactly in the groove and is not particularly thin so that the plate can reach it. On one of my hooligans there was no contact to the ground - I just had to cut in next to it and insulate the twist with electrical tape.
The total budget was 495 rubles.
Remove the plastic trim from the driver's left leg (all the wires are hidden behind it). Remove the beard and plastic tunnel cover. Remove the tunnel cover and handbrake housing.
In order to remove the tunnel cover, at least the passenger seat must be removed. The driver's license will have to be removed to put everything back in place.
The installation was carried out according to the diagram kindly compiled by ALER:
Installation instructions
The buttons are located on the tunnel lining.
The power wire was led directly from the battery through the standard hole on the left in the engine compartment into the passenger compartment. I hid the relay behind my beard, the fuse is just hanging there nearby.
For the driver's seat, the length of the wire should be about 1.2 meters, for the passenger's seat +30 cm so that everything fits under the tunnel, and it is possible to easily adjust the travel of the seats.
I brought the mass to the heaters using two ring terminals on the handbrake mount. You need to leave about 40 cm.
The control, indication and button illumination were connected using a two-core wire. Clinging to the beard according to the pattern. The length must be such that when the beard is disconnected and the tunnel cover is removed, the button can freely reach the handbrake mount.
Well, here you will have to be patient and arm yourself with an awl to find holes for all the screws that have been turned out under standard or not very sound insulation. The process is tedious and inconvenient, requiring extreme concentration and time.
During assembly, it turned out that the height of the casing for the bottom button in the place where it is located is not enough for me, i.e. There is room for the button and the block, but the wires don’t immediately bend to the sides, and it turns out that they push it out and make it crooked. There are several options: raise it higher, place two buttons next to each other horizontally, or, as I had to do, connect the wires to the button directly without a block.
So, today I did what I had planned for a long time - I completely installed the heating regulators for the capes.
I decided not to do the shutdown when the ignition is turned off. It’s certainly more convenient, but whatever, I never forgot to turn off the heating. However, installing the relay will not take long; if there is a need, I will install it.
Actually, what prompted it - well, look for yourself - it’s not a very attractive picture, is it? (Sorry. For some reason the interior is dirtier in the photo than it really is.)
A big plus of the Zhara capes, in addition to their presentable appearance, is the connector on the cape itself. That is, if necessary, you can easily remove them.:
Remove the tunnel cover. Everything else is done at home, in the warmth, without rushing.
Further. Let's disassemble the regulator. Let's see how it actually works. Nothing supernatural:
We begin to try on how it will look best. Either we just glue the body, or we leave only the regulators. I really didn’t want the new car to look like a collective farm. I even wanted to just put regular buttons, but I didn’t - I’m so used to smooth control. I started trying it on. At first I wanted to put one of them on the empty “suction” space, and the second on the ledge of the passenger shelf. But this is both long and very inconvenient. In the end I settled on the tunnel:
Still, I chose the option on the right - just regulation caps. In the end, the floor tunnel cover costs a penny; if it doesn’t suit you, I bought a new one and installed it.
We drill three holes for each regulator. One thicker one is for the regulator axis itself, the second is for the LED, and the third is for the protrusion on the variable resistor so that the board does not scroll. I didn’t take photographs of this process - everything is done locally anyway. True, when I was drilling, I made the holes for the second regulator closer than I wanted - more on the consequences later. And by the way! I forgot that the transfer case levers have a plastic cover to which the corrugation is attached. If only it were a little closer to the levers, this piece of plastic would interfere with the board. So, the holes are drilled and the boards are inserted. I solder the wires to the cigarette lighter contacts, which I first remove from the block. first the positive ones go to red, then the black negative ones. The bad thing is that the wires of the cape are the same color, so it is important not to mix them up. Here's what happens:
I realized - how to attach these boards? The variable resistor is soldered tightly, there is a special thread there, but go and find a nut for it! As a result, after painful searches and reflections, I noticed that this board should fit perfectly into the tunnel setup. All. I calmed down and went to install it.
I pre-connected it for testing - turned the knobs - click - the LEDs lit up, after a while the capes began to warm up. This means everything is soldered correctly. We're putting it in thoroughly. At first I wanted to drill holes for the wires that would go to the seats, but in the corners of the lining there are gaps created during assembly, thanks to which the wire does not get pinched. In the end, I didn’t drill, I just wrapped a small layer of electrical tape around the wires where they come out, just in case.
I won't say that it turned out to be a masterpiece. And, first of all, because of the close location of the regulators, when I made a mistake when drilling. And it still doesn’t look very good, but maybe I’m being picky. Secondly, it’s not very convenient to rotate the knobs. They still need to be done away from each other. But. This is still better than a tangle of wires that always interfered with the control of the gearshift lever and parking brake, which I immediately appreciated when I went to the store. I think one more trip and I’ll stop finding fault with the work done.
Delivery by transport company
Delivery by one of the transport companies with a representative office in your city. Delivery time: 2-10 days depending on the distance of your locality from Togliatti. The most convenient and fastest way to deliver orders of different sizes. Delivery cost from 250 rub. depending on weight and delivery distance.
Orders are sent by transport companies based on 100% payment for the order. Dispatch by transport companies PEK, KIT, Baikal-Service is carried out on Wednesday, Thursday and Friday.
A SET OF SOME DIAGRAMS FOR NIVA CHEVROLET
Wiring diagram for fog lights
I - Fog lights, II - fuse box, III - fog light switch, IV - fog light relay. A - Constant voltage, B - to side lights
Seat heating connection diagram
I - Heating elements, II - seat heating switch, III - heating relay, IV - ignition switch A - Side lights, B - to the battery.
Wiring diagram for heating and controlling mirrors
1 - Ignition switch, 2 - fuse block, 3 - heated mirror relay, 4 - mirrors, 5 - mirror control switch, 6 - heated mirror switch. A - To the battery, B - to the side lights.
Connection diagram for tape recorder and speakers
1 - Radio, 2 - front right speaker, 3 - rear right speaker, 4 - rear left speaker, 5 - front left speaker. A - To the side lights, B - to the battery.
Radiator cooling fan switching diagram
1, 7 — Radiator cooling fan, 2, 6 — low speed relay, 3 — fuse, 4 — engine control unit, 8 — high speed relay. A, C - To the battery, B - to the power sensor.
Front seat heaters are installed on Chevrolet Niva cars in a variant version. The diagram for switching on the heaters is shown in Fig. 7-42.
Rice. 7-42. Scheme for switching on the heated front seats:
1 – mounting block; 2 – front seat heaters; 3 – front seat heating switch; 4 – relay for turning on the heating of the front seats; 5 – ignition switch; A – to power supplies; B – to the external lighting switch; C - conditional numbering scheme for plugs in the front seat heating switch block.
The heaters are switched on by switches in control unit 3. The rated power of the backrest and seat cushion heating element is 36 W.
Recently I started equipping my cars with heated seats. But on models that were produced earlier, for example, the 2004 or 2006 Chevrolet Niva, this option is not provided. Installing a heated seat does not lose its relevance even in spring and summer, since it is easier to work on a car in warm weather. Heating, turned on to maximum, heats the seat up to 30 degrees, after which the comfortable temperature is maintained until the system is turned off.
Car enthusiasts sometimes claim that heated seats consume too much electricity, which is bad for the battery, but this is not true. The heating system requires the same amount of energy as standard parking lights. Now we will take a closer look at the process of installing heated seats on a Niva Chevrolet
and what kind of system it is.
The heated seat system is a special electrical device that is installed on the front seats of a car to heat them. The device consists of electric heating panels that are installed in each of the two parts of the car seat. There are two types of these systems: seat covers and built-in heating system. The most common system is the cape. This is a seat cover with built-in electric heating panels - this system has a remote control panel. Now we will take a closer look at the advantages of both systems.
Seat heating does not work: reasons
It is not difficult to guess that the seats are heated by a special heater when power is supplied to it.
On the Niva Chevrolet there are two elements, on each of two seats, connected by a separate line, but working synchronously when turned on.
And when the button is turned on, the current passing through the relay turns on the heaters. For the best visualization of the device operation, a special indicator is provided on the button. If it does not light up, this will indicate an open circuit and inoperability of the circuit for a short circuit.
This is what the switch looks like when installed.
Checking circuit elements
If heating does not work, you need to check the following:
- Fuse with a rating of 15-20 Amperes , or a relay.
- Broken wiring or heating elements.
- Heating button . Such a malfunction is extremely rare.
The best place to start is by checking the relays and fuses. They are located in the mounting block, or rather in its lower part. They must be checked by visual inspection, or by replacement with a known-good spare part.
Connection diagram and mounting block
The required fuse is located under F15, and the relay is located under the designation “K”.
Next, you should measure the resistance, voltage and current along the wires; if it is present, then you can move on to the heating elements.
For the best visualization of the device operation, a special indicator is provided on the button. The Niva Chevrolet seat heating does not work: If it does not light up, this will indicate an open circuit and inoperability, for a short circuit.
Repair and maintenance of cars, engines and automatic transmissions Chevrolet Lanos body repair Chevrolet Lanos Bearing. It has greater rigidity than a body mounted on a frame.
Chevrolet Niva Heated Seat Doesn't Work
This ensures a high level of safety and comfort for the driver. Namely, Installation of Severs M on a VAZ with an injection engine. The Severs M cooling water heater is embedded in the system and connected to V. It works on the principle: Coolant antifreeze heats up, and expanding, pushes cooler water, providing directional water circulation through the electric heater and the engine cooling jacket.
This annotation on This is what the switch looks like at the time of installation. Heated seats are worn out. The heated driver's seat has stopped working. The fuse is intact, power is supplied to the seat.
What to do on a Chevrolet Niva if the heated seats and power mirrors have disappeared?
Repair of heated seats Niva Chevrolet Heated seats Niva-Chevrolet repair. If the heating does not work, then you need to check the following: Fuse with a rating in Ampere or relay.
For every driver, comfort when operating a car plays an important role. The climate in Russia is quite harsh; sitting in a car for a long time, especially in the cold, is not a pleasant experience.
Everyone knows how quickly the interior of a car cools in the winter in an open parking lot or in an unheated garage. Usually a car has a heating system for the interior, but this is not always enough.
That's why car seat heaters are simply indispensable accessories in cold weather. The best place to start is by checking the relays and fuses.
They are located in the mounting block, or rather in its lower part. They must be checked by visual inspection, or by replacement with a known-good spare part. Next, you should measure the resistance, voltage and current along the wires; if it is present, then you can move on to the heating elements.
Chevrolet Niva › Logbook › Heated seats
With the onset of cold weather, the desire to have heated seats becomes stronger and stronger. At the end of summer, I was already planning the installation of heating and was looking for a set of heating units from a dozen. The kit is good, you don’t need anything extra - buttons, all the wiring, but the only negative is the heating elements themselves. They are made of some kind of heating wire laid in the letter W. It takes a very long time to heat up, the interval of comfortable temperature is not long and then it begins to literally fry. Not finding this kit in my city, I turned to the Chinese. They turned out to be not so cheap - 1000 re for a pair of heaters, that is, for one seat. I ordered a couple of heating elements from them, for testing, so to speak.
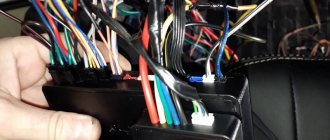
While the parcel was being sent, I bought the block of heating switch buttons and began to slowly prepare the wiring. I was hoping to find, somewhere smeared with tape, a connector for the heater button - I rummaged through my entire beard and never found it. On the instrument panel harness connector, according to the diagram, there should be a branch of a gray-red wire from terminal 4 just to the heated seat button, but there was no branch there, only a thin wire going to the mirror adjustment joystick.
The remaining wires for the seat heating button - backlight, ground - were connected to the mirror control joystick - they are not power, so you don’t have to worry about this part of the wiring. I assembled the harness going from the heating button to the seats themselves and, having removed the central casing, stretched it under the carpet to the cup holders. Having cut the carpet a little, I brought the pads out.
Installation of a heating system
To install heated seats on a Niva Chevrolet yourself, you will need the following:
- M8 bolt terminal
- wire 0.75 (0.5 meters)
- insulating tape
- soldering iron and solder
- heat shrinkage and ties for 100-150mm (25 pieces)
- drill and drill for it 8mm
- rough file
First of all, you need to check the functionality of the device. To do this, you need to connect the heating pad to the battery using wiring. After making sure that the heating pad works, you need to remove the console. The terminals have been removed, now you need to glue the templates onto the heating pad and make holes. The best place for attaching it would be a niche. It is strictly not recommended to attach the heating pad from the back, as it will be inconvenient for you to view the heating pad’s modes.
The holes must first be drilled with a drill, and then finished with a file. Be careful when working, the fact is that the buttons have a small apron, and if you overdo it, there will be a hole. You also need to drill carefully so that you do not scratch the console.
The final mission of heating the Niva Chevrolet seats will be to connect the heating pad. There are only three connection options:
- to the cigarette lighter
- to the white chip, it is located in the area of the right seat
- to the black chip, it is located under the driver's seat
That's it, after connecting the heating pad, the work is completed, now all that remains is to test the result of the work performed. You need to turn on the heating and if the corresponding indicator on the button lights up, it means that you have connected all the wiring correctly. Next, you need to wait a few seconds after placing your hand on the seat; if the temperature does not change, then everything is installed correctly and there is no reason to worry. Good luck with the installation!
Website about electrical equipment
CALENDAR
Permanent link to installation manuals for StarLine security and telematics systems. Select a car
Use the diagram to connect the trailer to the car yourself
Scheme for upgrading windshield wipers on Nefaz buses. Switching on intermittent position.
✅ INSTALLING HEATED SEATS ON A CHEVROLET NIVA WITH YOUR OWN HANDS. HOW TO CONNECT SEAT HEATING.
As for the appearance, nothing will change after installation; the built-in heating system is installed under the seat trim, so the appearance remains the same. You can install a heating system on almost any car.
Heated seats. What are the dangers of heated seats for men?
You may ask why practically, because there are cars on which the seats are glued to foam rubber; if you peel off the trim, the seat will lose its aesthetic appearance. But in reality such cases are rare.
Installation can be carried out with the following seat trim: The heating system can be installed even in seats that have electrical adjustment and where airbags are built-in. Installing a heating system To independently install heated seats on a Niva Chevrolet, you will need the following: Remove the film from the heating element and attach it to the seat foam.
It is necessary to make sure that the wiring has leads from the back of the seat, to the floor tunnel. We stretch the end of the wiring there and put the casing in its regular place, securing it to the brackets.
Now let's move on to the back. We turn it upside down and bend the steel brackets. We also lift up the casing, attach the heating device there, put the casing in place and bend the brackets.
A similar operation is carried out with the second seat. The seats are assembled in the reverse order, but we don’t put them in the interior yet.
The floor tunnel needs to be dismantled. We unscrew all the screws that serve as fastenings, pull off the covers from the gearbox and handbrake, then remove the handles themselves. If you have a Chevrolet Niva in the L configuration, then it has wiring for heated front row seats; three cables are located under the carpet and sound insulation.
There are three wires, one of them is positive, the one that goes after the ignition switch, the second is negative, the third is white, the thinnest is the button illumination.
Heated seat covers for Chevrolet Niva
- ease of installation
- change the design of your salon and ease of connection
flaws
- The cigarette lighter only works when ignited, which means you can’t leave this system on overnight
- the quality of the cases requires the best
- achieving fixation is almost impossible
Advantages of a built-in heating system:
- more stable and reliable operation, since the heating element is made of carbon fiber
- ease of use, such systems are equipped with an on/off button. After reaching the desired temperature, the system automatically turns off
- the system is equipped with a fuse and in case of a possible short circuit it will blow out
The service life of heating systems is very long, often they last much longer than the car.
As for the appearance, nothing will change after installation; the built-in heating system is installed under the seat trim, so the appearance remains the same. You can install a heating system on almost any car. You may ask why practically, because there are cars on which the seats are glued to foam rubber; if you peel off the trim, the seat will lose its aesthetic appearance. But in reality such cases are rare. Installation can be carried out with the following seat upholstery: when the upholstery is leather, covered with fabric, or when the seats are upholstered with a leather substitute. The heating system can be installed even in seats that are electrically adjustable and have built-in airbags.
replacing heated seats in a Chevrolet Niva
✅ INSTALLING HEATED SEATS ON A CHEVROLET NIVA WITH YOUR OWN HANDS. HOW TO CONNECT SEAT HEATING.
You can pay much less for fuel if you use Now we will take a closer look at the advantages of both systems.
Chevrolet Niva Shevik › Logbook › Repair of heated seats. Since the summer, the heating on...
Car enthusiasts sometimes claim that heated seats consume too much electricity, which is bad for the battery, but this is not true. If you have a Chevrolet Niva in the L configuration, then it has wiring for heated front row seats; three cables are located under the carpet and sound insulation. In the floor tunnel of the Chevrolet Niva, we cut out a hole in the regular place for the block of heating control buttons.
Covers with heated seats on a Chevrolet Niva ease of installation changing the design of your interior and ease of connection disadvantages the cigarette lighter only works when ignited, this means that you cannot leave this system overnight the quality of the covers wants the best it is almost impossible to achieve fixation Advantages of a built-in heating system: Do not forget to install resistance to replace heated seats Niva Chevrolet and insulate all connections well.
Now we will take a closer look at the advantages of both systems. Covers with heated seats on a Chevrolet Niva ease of installation changing the design of your interior and ease of connection disadvantages the cigarette lighter only works when ignited, this means that you cannot leave this system overnight the quality of the covers wants the best to achieve fixation is almost impossible Advantages of the built-in heating system: After achieving the desired temperature, the system automatically turns off; the system is equipped with a fuse and in the event of a possible short circuit it will burn out. The service life of heating systems is very long, often they last much longer than the car.
Why do failures occur?
The seats are heated by a heater when power supply is applied to it. Its elements are located in the lower and upper parts of the front seats. They have a separate design, but are turned on simultaneously, since they are connected in parallel. After pressing the corresponding key, voltage is supplied to the power relay, which connects the heaters to power.
The start of operation is indicated by an indicator in the key. If it does not glow, you should check the 20 Amp fuse F15. If it burns out, you must make sure there is no short circuit. It happens, but very rarely, when the power button fails. The most common malfunction is the breakage of the heating elements.