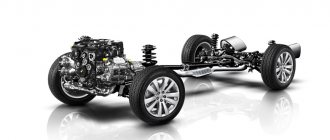
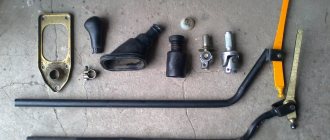
Front suspension device for VAZ 2109
The front suspension of the VAZ 2109 takes on the main load of the car.
Therefore, it is necessary to maintain special control over it. The front suspension is subject to load even at rest. Components of the vehicle chassis:
If you diagnose your car in a timely manner, you can avoid many problems with your car.
The front suspension of the VAZ 2109 is the front independent element of the car.
The main device of the front suspension of the VAZ 2109 is shock-absorbing struts on which springs are mounted.
Stretch marks
To prevent bending of the lower arm and relieve braking and accelerating loads from it, braces are attached to it, the second end of which is fixed through a silent block to the front suspension beam.
Front suspension of VAZ-2110.
The stretchers perform another important function: they help regulate the longitudinal inclination of the rotary axis. This angle greatly affects the stability of the vehicle and its behavior when maneuvering. Adjustment is carried out using washers installed at both ends of the stretcher.
We recommend: Wires for lighting - buy copper starter (starter) wires at a good price in the VseInstruments online store
The main problems of the VAZ 2109 front suspension
The front suspension of the VAZ 2109 requires constant monitoring. The main problems in the front suspension are considered to be abrasion of the hinge covers. This problem is mechanical. Also, an equally important problem with the front suspension is unevenness in the lever. This problem may lead to incorrect operation.
All these parts must be constantly inspected and, in case of breakdown, must be replaced with new ones.
The main problems of the front suspension can be:
Repair of the front suspension and replacement of parts with new ones may be required for such problems as:
In order to avoid frequent breakdowns of the front suspension of the VAZ 2109, you must adhere to several tips: do not overload the car beyond the maximum load, do not accelerate or brake with sudden movements, and most importantly, do not exceed other indicators, information about which is in the instructions for your car.
Visual fault diagnosis
Among the methods for identifying faults, the visual method is good because it allows you to identify minor damage to parts long before they lead to a serious breakdown. In this case, emergency repairs to the front suspension will not be required, and most importantly, there will be no risk of creating an emergency situation.
It is better to inspect the chassis parts of the VAZ 21099 on a clear sunny day. If this is not possible, you should prepare a powerful flashlight. In addition, it is necessary to have a rag and a brush with soft bristles in advance to wipe off dust and dirt from the surfaces being inspected.
Replacing suspension silent blocks
If no damage is found, don't feel like you wasted your time. Such an inspection must be carried out every 5,000 kilometers. It will help you avoid serious problems while driving.
If you don’t want to waste time, do a little tuning - install a front stabilizer from a Lada Priora during diagnostics. It is perfect for the VAZ 21099. With it, the chassis of your car will become more rigid, but the car’s stability at high speeds will improve.
Where to start repairing the chassis? That's right, by inspecting all the components))) After the inspection, I determined what I would need to buy for repairs and made a list:
Examination
To prevent you from having problems while driving on the road, it is strongly recommended to check the front suspension for preventive purposes, and also to respond immediately when the first signs of trouble appear.
- Experts recommend paying special attention to the protective covers of the joints, monitoring their condition, and also checking the front suspension for mechanical damage.
- Make sure that neither the front suspension arm of the VAZ 2110 nor any other element has cracks or other visible damage. Pay attention to checking the connection points of the elements.
- If the components are deformed, the angle of the wheels will most likely be disrupted and they will no longer be able to be adjusted.
- Check ball joints, hinges, upper stack mounts, cushions. If there are breaks in the rubber elements, they must be replaced.
- Measure the distance between the lower arm and the brake disc. This way you can check the condition of the suspension joint. If the distance is more than 0.8 millimeters, the hinge must be replaced with a new one.
- If the buffer shows signs of destruction, it should be replaced immediately.
- The spring is replaced if it has failed or sagged.
- Ball joints are replaced when they are worn or deformed. Other hinges must be replaced if they or the stabilizer bar struts are worn out.
- All rubber elements change under conditions of deformation or failure.
- If the fastening of the upper strut mount to the body is loose, simply try to tighten the fastening. Most likely, no major intervention will be required.
Understanding the structure of the front suspension, as well as audibly or visually identifying its malfunctions is quite simple, despite the apparent complexity of the assembly. But you should approach the issue carefully and periodically check the condition of the suspension, even if its malfunction is not indicated by any noise, knocking or behavior of the car on the road.
For any car, it is better to organize preventive maintenance than to later pay exorbitant prices for a full repair. Like a disease, it is better to prevent problems with the front suspension of the VAZ 2110 from occurring. It is cheaper, simpler and more correct on the part of the car owner.
Loading …
Close Window.
How to replace the front suspension arm of a VAZ 2109
The lever is one of the main elements of the entire unit in the front suspension of the VAZ 2109. The lever must be replaced, as a rule, only in the event of severe collisions of the vehicle, or if it falls into a hole or hatch. The lever should be changed using a special pit; in such conditions it will be more convenient for you to work and see all the details. But if this is not possible, then you can use a regular jack.
Replacing the lever is not a very difficult process, and it is quite possible to replace it yourself. First you need to remove the wheel and at the same time secure the car by resting it on something stable. The next step is to unscrew the ball nut and remove it from the lever. Next, loosen the rear nut and unscrew the stabilizer strut mount. Then unscrew the bracket. Then you can pull out the lever with a slight movement.
Next, inspect the condition of the front suspension and check it for other defects and breakdowns. Then replace the joints and the entire lever. In the same sequence, only in reverse order, screw all the parts back.
Do-it-yourself repair of the VAZ 2110 front suspension Detailed instructions
During the operation of a car, its suspension takes on the greatest load. Not only safety, but also driving comfort depends on the technical condition in which it is located. Today we will try to figure out how to repair the front suspension of a VAZ 2110 at home.
DIY suspension repair
It is worth noting that most of the repair work can be done on your own, without involving expensive specialists and using the services of service centers or service stations. So, first of all, you need to put the car on the handbrake and secure the wheels with wheel chocks. The entire repair process can be divided into several stages. Let's look at each of them in detail:
Repair of ball joints - remove the wheel and clean the suspension elements from accumulated dirt. Using a jack, slightly raise the front of the car. Unscrew the upper ball joint pin nut and press the pin out of the steering knuckle. After it comes out, remove the fastening of the ball joint and remove it from the upper arm along with the protective casing. Install a new device and assemble it in reverse order. The lower support changes in a similar way; Front suspension arms - work begins by removing the upper element, for which the steering knuckle pin is pressed out of the ball joint. Remove the bracket bolt from the bumper and unscrew the fastening nuts from the axle, then remove it, and remove the lever itself from the car. Using a special puller, damaged silent blocks are removed and new ones are installed in their place. Assembly is carried out in reverse order. It is not necessary to remove the lower element, just unscrew the nuts on its axis and, using a puller, remove the rubber-metal hinges, put new ones in their place and tighten the nuts. Removal is carried out only if the part is damaged, which, however, is quite rare;
Shock absorber - to replace this component, unscrew the fastening nut located on its rod. Remove all installed washers and the upper rubber cushion from it. Unscrew the lower shock absorber bracket, which connects it to the lower arm. Remove the broken part through the technological hole. Remove the mounting bracket and install a new shock absorber. Assembly is performed in reverse order.
It is important to remember that even if one shock absorber is broken, both must be replaced;
Spring - first of all, remove the shock absorber and disconnect the stabilizer bar from the lever. Loosen the fastening nuts on the lower axle, lightly jack the lower arm and use a lift to remove the ball joint pin from it. Lower the jack, slightly weakening the spring, and use a spatula to remove it from the support cup located below. Compress the new spring using special ties and put it in place. Using a jack, slightly press the lower arm up and insert the ball joint into the steering knuckle. Fix it and then remove the clamps from the spring. The remaining parts of the suspension are assembled in the reverse order in which they were dismantled.
Checking the chassis
It is necessary to check the technical condition of rubber boots and seals at least once a year. This includes ball joints, covers for struts, beam and rod bushings, silent blocks, stabilizers and other parts. Oil seals and anthers that are torn are replaced with new products. If you do not replace the boot in time, the suspension part will quickly fail. There is lubricant under the boots, and when dirt gets into the lubricant through a torn boot, it quickly increases the wear rate of the part. It works like sandpaper. You will find a more detailed description and vehicle chassis repair on our portal.
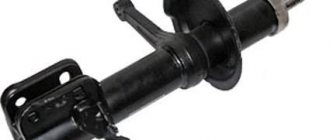
Replacing shock absorbers on the front suspension of a VAZ 2109
It is enough when repairing the front suspension of a VAZ 2109; it is also necessary to replace the shock absorbers. You can understand that it is time to change the shock absorbers by hearing shocks while driving. Most often this indicates that the springs have broken or the shock absorber has lost its elasticity. Springs and shock absorbers can only be replaced in pairs.
The front suspension of the 2109 can often break down, causing a lot of trouble for its owner. To avoid problems and frequent breakdowns of the 2109 suspension, it is necessary to promptly diagnose your car and, in the event of any malfunction, urgently check and inspect it, and if it is severely damaged, replace it. If you yourself are not able to repair the front suspension of the VAZ 2109, it is better to take the car to a car service center, where experienced technicians will quickly and efficiently repair your car. If this is not done in a timely manner, bad consequences may occur.
Front shock absorber struts VAZ 2110, 2111, 2112
Planned replacement of front suspension struts of VAZ 2112
I was tired of driving “like on waves”, so I bought:
2 VAZ racks = 1400 x 2 = 2800 rubles. Supports 2 pcs. (Balakovo) = 500 x 2 = 1000 rub. Anthers 2 pcs. = 150 x 2 = 300 rub. Chips 2 pcs. = 75 x 2 = 150 rub. WD-40 = 150 rub.
You will also need: Head 13 Head 19 Open-end wrench 17/19 Wrench 22 or 24 for the puller Pliers Mounting Key puller to unscrew the nut from the shock absorber rod Spring ties
We jack it up, unscrew the wheel, unscrew the two bolts securing the strut, one nut from the steering tip, there are 3 nuts under the hood that hold the support bearing and you can remove the strut.
We throw the spring onto the new stand and you can install it.
Let's go to the wheel alignment:
Camber/toe + work on the tip and camber bolt = 750+250 = 1000 rub.
Features when replacing the front struts of VAZ 2110, 2111, 2112
I won’t tell you how to change the front struts, since there is plenty of this information on the Internet. I will tell you what surprises you will have to face. After I jacked up the side on which I planned to change the strut and removed the wheel, I took a regular building level and pressed it to the disk
and set the level to “0”
(a level is needed with adjustable flasks). This is so that when assembling a new one, you can set the wheel camber to this level and then get to the service station for wheel alignment with minimal losses. There were no problems dismantling the rack, we proceed according to the Murzilka. But in disassembling it, I reached a dead end. When purchasing racks, you had to purchase special ones. key. I had to make a wrench to unscrew the top nut.
You need a piece of pipe suitable in diameter, insert a nut inside and tap it, making a 22mm head
Then we weld it to an unnecessary open-end wrench. Also, you need a tube to hold the rod from turning, making it oval
It's easier to remove the nut with a car. That's what I did with the second rack. You just need to rip it off and unscrew it a little. Then again along the Murzilka.
Struts and front springs SS20 Racing -50 Comfort
In these posts I will try to talk about the features of the SS20 Racing and compare them with the regular SS20 Comfort. There will be several parts. Next, under the cut.
(photos, as always, were taken with a KARKAM Q2 recorder)
I chose the racks with a -50 mm lowering for the comfort modification. There is also a sport modification, but according to reviews it turns out to be a stool. The racks have a one-year warranty.
The only thing I didn't like about the packaging was that there was nothing between the posts inside the box. They hit each other during transportation. The top cardboard in the previous photo doesn’t help with this, although it should. She is very thin.
Like these ones. I found this answer from an SS20 employee on Drive, a comment with this answer was written by a user with the nickname TeploVozniK, thank you. The SS20 Racing series shock absorbers have two settings: Comfort and Sport for each lowering value. Since shock absorbers are designed for operation as part of a lowered suspension (with lowered springs), their energy intensity is increased compared to stock ones. The Comfort settings for compression are practically the same as stock, while Sport has compression increased by 30% compared to stock. The rebound force of the Comfort is increased by approximately 60% compared to stock, while the rebound force of Sport is almost twice as high as stock. Best wishes. Shayakhmetov Vadim. Head of Service Programs Department Research and Production Enterprise
Only stands included. Standard SS20 shock absorbers are equipped with sound insulators.
Compared to conventional stands.
In details. Rotary... I'll call it a lever. So, the rotary lever is shifted a few centimeters down. This was done in order to minimize changes in wheel toe-in during suspension travel when lowering.
Not only the shock absorber rod was shortened, but also the body itself was shortened by several centimeters.
Stiffening ribs are welded to the bottom of the rack. According to the representative, the SS20 is made so as not to deform the struts during a side impact. There may be another purpose, I don’t know for sure. But because of these ribs, in the future I will not be able to install a TechnoMaster stabilizer with ball joints. But I’ll still think about what can be done. Maybe I’ll call the Bulgarian’s wife for help and cut them down.
The box contains information booklets, a warranty card and an SS20 SPORT sticker. Such booklets are in all boxes. But stickers are only found in boxes with shock absorbers and supports.
Springs with variable coil pitch and lowering of -50 mm. Cold wound. Initially I wanted to take the Eibach Sportline, but then I decided to assemble the suspension using components from one manufacturer. Four year warranty
They are quite light, which is good. According to the manufacturer, they are made of some kind of Japanese steel.
The springs have a transparent silicone braid that prevents knocking under strong compression.
Compared to a regular SS20 spring.
The box also contains a bunch of booklets and a warranty card-instructions!
It describes in detail how to remove shock absorbers and replace old springs. And what tools are needed for this.
We recommend: Chip tuning - what is it, advantages and disadvantages
Installation of a 20mm suspension stabilizer on a VAZ 2110, 2111, 2112
Participated in local amateur rally-sprint competitions. It was a great opportunity for me to experience
Scheme
The diagram below will allow you to determine what components the assembly is divided into and what it represents in the assembly. The table will help you figure out where each suspension element is located.
Node diagram
| Item number | What is |
| 1. | Upper shock mount |
| 2. | Spring support cup (upper) |
| 3. | Compression stroke buffer with protective cover |
| 4. | Compression Buffer Support |
| 5. | Spring |
| 6. | Spring support cup (lower) |
| 7. | Tie rod joint (ball) |
| 8. | Swivel lever |
| 9. | Strut (shock absorber) |
| 10. | Eccentric washer |
| 11. | Adjustment bolt |
| 12. | Shock absorber bracket |
| 13. | Rounded fist |
| 14. | Brake disc guard |
| 15. | Brake disk |
| 16. | Retaining rings |
| 17. | Hub cap |
| 18. | Splined shank of the wheel drive joint housing (outer) |
| 19. | Guide pin |
| 20. | Wheel bearing |
| 21. | Control arm ball joint |
| 22. | suspension arm |
| 23. | Adjusting washer |
| 24. | Shock absorber (strut) of anti-roll bar |
| 25. | Anti-roll bar |
| 26. | Barbell cushion |
| 27. | Rod fixation bracket |
| 28. | Body bracket for fixing the suspension arm |
| 29. | Lever stretch |
| 30. | Stretch Fixation Bracket |
| 31. | Suspension arm joint bushing (rubber) |
| 32. | Suspension arm joint bushing (spacer) |
| 33. | Shock absorber rod |
| 34. | Upper strut housing (outer) |
| 35. | Upper shock mount housing (inner) |
| 36. | Support bearing |
| 37. | Rubber top support component |
| 38. | Travel limiter for upper shock absorber mount |
| 39. | Protective cap for upper shock absorber mount |
| 40. | Front joint bushing |
| 41. | Front joint cushion |
| 42. | Washers |
| 43. | Stabilizer link joint |
| 44. | Rear joint extension |
| 45. | Joint housing (ball) |
| 46. | Joint bearing (ball bearing) |
| 47. | Ball pin |
| 48. | Ball pin protective cover |
Bottom view
It’s not enough just to know the name and location of the suspension elements. Be sure to understand how the entire system works and how all the components interact with each other.
Source
Loading, Please Wait!
This may take a second or two.
Before you start repairing anything, you need to know how it works. Therefore, the first article in this section is the design of the front suspension. What is front suspension and what does it consist of?
The suspension is the parts, components and mechanisms that connect the car body to the wheels. The purpose of the suspension is to reduce dynamic loads on the supporting elements. The VAZ 2110 has an independent, telescopic front suspension.
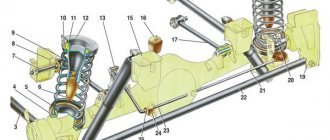
It is based on hydraulic shock absorbers, coil springs, levers with extensions, and a stability stabilizer. Let's look at the picture of everything that is included in it:
1 – ball joint 2 – hub 3 – brake disc 4 – protective cover 5 – swing arm 6 – lower support cup 7 – suspension spring 8 – telescopic strut protective cover 9 – compression buffer 10 – upper support cup 11 – upper support bearing 12 – upper strut support 13 – rod nut 14 – rod 15 – compression buffer support 16 – telescopic strut 17 – nut 18 – eccentric bolt 19 – steering knuckle 20 – front wheel drive shaft 21 – hinge protective cover 22 – outer shaft joint 23 – lower arm Let’s Let's see what the front suspension looks like when you look at it from under the car:
1 – suspension arm extension 2 – anti-roll bar 3 – suspension arm The upper support is attached to the car body, namely to the mudguard strut, with 3 nuts. Due to the fact that the support is quite elastic, the stand can swing during the suspension stroke. This is good because body vibrations are damped. And the bearing installed in it makes it possible to rotate the rack in the same way as turning the wheels.
There is a hydraulic shock absorber installed inside the strut housing; if it fails, it can be replaced. The steering knuckle 19 is connected to the lever 23 by means of a ball joint 1. The support is secured with 2 bolts; when unscrewing them, it is worth tapping them and spraying them with WD-40, since they often break when pressed hard.
Traction and braking forces are received by longitudinal braces, which are connected with silent blocks to the beam and lower arms.
In the middle part of the anti-roll bar there is a bend for the exhaust pipe. The lower arms are connected to the ends of the stabilizer by rubber-metal hinges. In turn, the stabilizer bar is secured with fasteners, inside of which rubber cushions are inserted.
(votes: 3, average: 5.00 out of 5).
Hi all!
Today I’ll tell you
about the front suspension
, there will be a little theory and the final result that I have.
So, the front suspension.
Our tens have single wishbone suspension at the front. Not the best option, but we are content with what we have. With a strong understatement (I mean -110 and below), the suspension geometry changes very much. Namely, in the stock state, the lever is raised very high (and if there is also a stabilizer, but it is generally compressed as much as possible), the steering rod, if not moved on the rack, also lifts up into the sky.
A little theory.
Before perceiving the information, I recommend reading
this book
, not necessarily all of it, but specifically the sections
“Chapter 2. Suspension Height”
,
“Chapter 3. Suspension Geometry”
and
“Chapter 6. Angles and Shock Control”,
it is advisable to study, maybe I’ll do something I didn’t understand it correctly, but I’ll try to briefly tell you how I understood it now.
When lowering the car, you must always remember the position of the lower arm and steering rod. Attention! All positions are considered from hinge to hinge, and not according to the geometry of the lever and rod itself.
Our task is to ensure that in the driving position the lower arm is as parallel to the ground as possible, and the steering rod is also parallel to the horizon, and at the same time, they must be parallel to each other. The permissible deviations in both cases are about 1.5 mm in each direction. In this case, we have the most correct front suspension geometry (in theory), with no “shock control”. When hanging, such a car will have a strongly negative toe-in, which also indicates that the geometry has been properly prepared. In theory everything is fine, but how it turns out in practice will be known later.
Let's move on to my car.
Having installed shortened racks and lowered the car to almost the lowest possible position, I got the following picture:
Full size The lever looks a few degrees up, the steering rod is also raised up. Thus, with a slight change in ground clearance, the toe-in goes away too much and the camber is a little bit. I borrowed spacers for balls of 20 mm and 10 mm from kolbasik01 for fitting. Then, with the help of small machinations, I found out that the spacer needed is about 50 - 60 mm (O_O), but Before doing them, I still want to drive like this (with a 20 mm spacer) and see how the car behaves. In theory, a large spacer that will return the lever parallel to the horizon will add a little coveted camber to the front (or maybe not).
Full size With a 20 mm spacer the situation is better, but the lever is still raised quite strongly. Now the steering rods. I decided to turn over and swap the tie rod ends, so that in the driving position the tie rods should be approximately parallel to the ground. But this is not without problems. The ends of the rods have a conical pin, and accordingly, in the rack there is a conical hole and the tip does not fit in any way. I drilled a hole on the back side and secured the steering rod. Now, in the driving position, visually the thrust has become almost parallel to the horizon. Done.
Full size As you can see, the rods are installed, almost identical to the stock version, but only upside down
None
Full size: Hanging condition of the machine. The most attentive will notice that the wheel arms are hung unevenly (why, you can guess for yourself?) Hell of a sandwich. Actually, I decided to take radical measures and get confused. I put the wheel on and measured that the distance from the ball bolt to the disk, with a 20 mm spacer already installed, is about 5 cm, which in theory is enough for a 60 mm spacer to fit there (will there be another centime in reserve?). But in order to protect myself and not make a mistake, I decided to order a 40 mm thick spacer from a friend, so that I could vary the overall thickness by playing with 10-20-40 mm spacers.
It was a long story with its production, but in the end, after 3 months I received my new spacers, from a completely different person, at a different price, and who made and sent it in a week, for which special thanks to him (and I’m a little burned by the irresponsibility of some people, without details), but that’s not what we’re talking about now, let’s move on.
While I was waiting for my spacers, it was time to look for bolts that could handle the load. I was looking for M10x1.25 bolts with a length from 80 to 90mm and a strength class of 10.9. At the AvtoVAZ auto parts store, they picked up an M10x1.25x85mm
, strength class. I can’t say anything specific about the strength of such a bolt in such a part of the car’s structure, but I will be happy to hear your opinions on this matter (it seems to me that it should withstand it, because this is the maximum that can be found in stores, then only to order). Oh yes, this bolt will be screwed 2 cm into the ball.
Finally these long-awaited spacers arrive for me, I run to install and measure them.
Full sizeActually, this sandwich turned out to be from the front
Full size As you can see from the photo, the lever has taken on an almost horizontal position. According to the iPhone, the steering rod is tilted by 3 degrees, and the lever by 2 degrees relative to the horizon (which is already much better), therefore, we conclude that the suspension geometry is in the “correct” form. When hanging, the toe also becomes slightly negative.
This is probably all with the front suspension; the rest will be known from the results of tests in practice. The plans are to lower the muzzle a little more to 6-7 degrees, but that will come later. I'm currently working on the right threshold and floor. Things are going slowly but surely. It turns out that I spend 5-6 hours a week on the car, unfortunately, but at least it’s better than nothing)) I’m waiting for everyone on my Instagram, everything appears there in near-real time. Peace for everyone ?
The rear suspension device of the VAZ 2110, 2112, 2111 consists of two longitudinal arms 13 welded together through amplifiers with connectors 12, to the rear of which brackets 14 are welded with places for attaching shock absorbers and with flanges 15. The wheel axles are attached to them along with the brake mechanisms . In front of the levers there are bushings 16 with rubber-metal hinges 1; bolts are threaded through them, which are connected to brackets 2, which, in turn, are attached to the body side members. Springs 11 are located at one end in the shock absorber cup 9, at the other - in the support through the rubber gasket 10, which is welded to the inner arch of the body. Double-acting telescopic shock absorbers. They are attached to the bracket with bolt 9. The rod is attached to the upper support 5 of the spring through rubber pads 6 and a support washer 3. A thrust bearing 12 is installed in the hub 13. It is similar to the front one, but is smaller in size and, unlike the front one, where the inner ring is installed with an interference fit, bearing 12 on axle 14 has a transitional fit. During operation, it does not need to be adjusted or lubricated; any play that occurs cannot be eliminated by tightening the nut, only replacement.
It is not recommended to disassemble the hub if the bearing is in good condition, since it is destroyed when pressed out.
Purpose and design of the front suspension
Suspension is usually called a system of mechanisms that provide an elastic connection between the chassis and wheels of a car. The main purpose of the unit is to reduce the intensity of vibrations, shocks and jolts that occur during movement. The vehicle constantly experiences dynamic loads, especially when traveling on poor quality roads and when transporting cargo, i.e. in extreme conditions.
It is at the front that the suspension most often takes impacts and shocks. It is rightfully the most loaded part of the entire car. On the “seven”, the front suspension is made better and more reliable than the rear - the manufacturer, of course, took into account the high load on the unit, but this is not the only reason. On rear-wheel drive cars, the front suspension has fewer parts than the rear, so its design is less expensive.
The front suspension diagram of the VAZ 2107 includes important parts, without which the smooth movement of the car would be impossible.
Front beam
The task of the front beam is to stabilize the car when cornering. As you know, during a maneuver a centrifugal force arises, which can cause the car to roll over. To prevent this from happening, the designers came up with a transverse stability beam.
The main purpose of the part is to twist the opposite wheels of the VAZ 2107 using a torsion elastic element. The stabilizer is attached using clamps and rotating rubber bushings directly to the body. The rod is connected to the suspension elements through double levers and shock absorber struts or, as they are also called, bones.
Levers
The front levers are the guiding components of the VAZ 2107 chassis. They provide a flexible connection and transmission of vibrations to the body.
The levers are directly connected to the wheels and body of the car. It is customary to distinguish between both suspension arms of the “seven”, since their replacement and repair are carried out in different ways:
Front shock absorber strut
The owners of the VAZ 2107 learned about the existence of racks when the VAZ 2108 model appeared. From that time on, the manufacturer began to gradually install new mechanisms on the “sevens”. In addition, the racks were chosen by specialists modernizing a classic car.
Front suspension malfunctions
Problems with the VAZ 2107 suspension occur due to bad roads. The first thing that suffers is the ball joints, then the struts and other elements of the shock-absorbing system fail.
Quite often, owners of the “Seven” complain about a knocking sound when driving at a speed of 20–40 km/h. Then, as you accelerate, the dull sound disappears. The area of noise is the front suspension.
First of all, it is recommended to put the car on a lift and check how the balls, shock absorbers, and silent blocks work. It is possible that the wheel bearings are worn out.
Detailed instructions for the actions of a driver who notices a knock are given below.
Video: what is knocking in the front suspension
The car is pulled to the side
If the car begins to pull to the side, the steering knuckle or suspension arm may be deformed. On old VAZ 2107 cars, loss of elasticity of the strut spring is possible.
Basically, if the car pulls to the side, this is due to brake pads, steering play and other third-party reasons not related to the suspension. Therefore, it is recommended to use the method of elimination, and only then test the suspension.
Noise when turning
The hum when turning occurs due to wear on the wheel bearing. The nature of the noise is as follows: it is observed on one side, appears up to a speed of 40 km/h, and then disappears.
Here's how to check a wheel bearing for play.
Suspension upgrade
The standard suspension of the “seven” is considered soft and imperfect. That's why many people decide to do tuning and modifications. This helps to significantly improve handling and overall comfort, as well as increase the service life of springs, balls, bushings and other elements.
Reinforced springs
Springs are the main element responsible for a smooth ride, directional stability and good handling. When they weaken or sag, the suspension is not able to compensate for the load, so breakdowns of its elements and other troubles occur.
Owners of the “Seven”, who often drive on bad roads or drive with a loaded trunk, should definitely think about upgrading the standard springs. In addition, there are two main signs by which you can judge that elements need to be replaced.
Spacers are the first thing that comes to mind for VAZ 2107 owners. But this conclusion is not entirely correct. Yes, they will restore the stiffness of the springs, but will have a negative impact on the service life of the elements. Soon cracks will be found on springs reinforced in this way.
Therefore, the only correct solution would be to replace conventional springs with reinforced ones or modified ones from the VAZ 2104. At the same time, it is necessary to change the shock absorbers to more powerful ones, otherwise the reinforced springs will easily damage the standard system.
Before you begin the replacement procedure, you need to arm yourself with the following tools.
Now more about the replacement.
Then you need to free both springs from the gaskets and check the condition of the latter. If they are in good condition, install the new spring using electrical tape. Install reinforced springs in place of the standard ones.
Air suspension
The “Seven” has great potential in terms of modernizing the front suspension. And many car owners decide to install an air suspension with an electric compressor, hoses and a control unit.
This is a real electronic assistant that makes it possible to change the ground clearance depending on driving conditions. Thanks to this innovation, the stability of the car at high speeds increases, trips over long distances become comfortable, the car goes over bumps more smoothly, in a word, it becomes like a foreign car.
The system modernization goes like this.
Video: air suspension on a VAZ, is it worth it or not?
Electromagnetic suspension
Another modernization option involves the use of an electromagnetic suspension. It is a set of mechanisms and components that serve as a connecting link between the road and the body. Thanks to the use of this type of tuning suspension, a smooth ride, high stability, safety and comfort are ensured. The car will not “sag” even during long-term parking, and thanks to the built-in springs, the suspension will remain operational even in the absence of commands from the on-board network.
Today, the most famous manufacturers of electromagnetic suspensions are Delphi, SKF, Bose.
The front suspension of the VAZ 2107 requires timely maintenance and control of the main components. Remember that road safety depends on this.
The design of the VAZ 2114 chassis - rear and front suspension
The chassis of the car includes two suspensions - front and rear. During operation of the machine, most of the load falls on the chassis. The quality and comfort of the ride, as well as the safety of the driver and passengers, depend on the condition of the front and rear suspensions. The main function of each suspension is to eliminate vibrations and soften the ride. Also, the tasks of the chassis include reducing roll when turning, ensuring a smooth ride, and providing high information content for the driver in the city and on the highway.
On the roads of the CIS countries, the chassis is subject to excessive load, since the condition of the road surface leaves much to be desired. As a result, motorists often turn to car service centers. Things are better with the VAZ 2114, since it has more modern systems compared to previous Lada models. Many motorists choose to solve the problem on their own. But in order to understand what has gone wrong, you need to know the suspension structure.
Rear suspension of VAZ 2107
Chassis front and rear suspension VAZ 2110 2111 2112 Removing the lever and extension of the front suspension VAZ 2110 2111 2112
The rear suspension of “classic” VAZ cars is directly connected to the rest of the chassis. The rear suspension of the VAZ-2107 includes a driving rear axle, which is connected to the car’s engine through a cardan drive and the rest of the transmission. The wheels are oriented strictly in the direction of travel of the car. These conditions determined the features of the rear suspension of the VAZ-2107. Like the front suspension, the rear suspension is a modernized version of the first VAZ model.
The figure below shows the rear suspension structure of the VAZ-2107. Number 1 shows the thrust spring between the axle (4) and the car body. Number 2, telescopic shock absorber dampening sudden vibrations. Transverse reaction rod 3 prevents the bridge from moving to the sides from the vehicle axis. Longitudinal rods 5 and 6 fix the position in the direction of travel. This arrangement of nodes allows you to compensate for road unevenness.
What's included in the rear suspension?
The image below shows all the main elements of the rear suspension that can fail.
The beam structure includes a connector and two trailing arms; these elements are indicated in the diagram as numbers “12” and “13”. The parts are fastened together by welding. In the rear part, flanges (number “15”) and brackets for attaching struts (shock absorbers) are attached to the levers. The axles of the rear pair of wheels along with the brake elements are screwed to the flanges. Bushings (16) are installed on the rear suspension arms at the front. They are fastened using rubber-metal hinges - number “1”. One end of the spring rests on the support through a rubber gasket, and the other on the shock-absorbing cup.
Front suspension device
The main element of the front chassis of the VAZ 2114 is the shock absorber strut, which is designated as number “9”. It is attached to the steering knuckle with two bolts. Compared to the rear system, the front suspension has a more complex design, which can be understood by the number of parts. Number “11” indicates a bolt that passes through the holes of the rack bracket; it has an eccentric washer and an eccentric collar. When the steering gear turns, the top bolt turns. The result is that the car turns. Most often, shock absorber struts fail, since they do the main job.
Disassembling and replacing the front suspension: instructions
When removing the bolts that secure the ball joint to the steering knuckle, you must use a socket wrench. Otherwise, the protective cover of the hinge may be seriously damaged, resulting in additional costs.
In the case of the front suspension, its assembly proceeds in the reverse order, with the exception of a few features. When installing the mounting bracket to the VAZ 2114 body, you need to make sure that the threads of the bushings are not damaged. To do this, you must perform operations carefully. Also, longitudinal displacement of the cushions on the bar must not be allowed. This can happen during installation of the anti-roll bar.
Source
Knocks
If you start to hear knocking noises coming from the front suspension, this could be caused by several reasons:
- The rack has certain faults;
- The ties on the cross member, the cushions are worn out or the bolts are loose;
- The attachment to the body was not strong enough;
- The springs have failed;
- The hinges are worn out;
- The rubber part of the suspension has broken its integrity. The knock should be clear, like the impact of metal on metal;
- Wheel alignment is out of balance.