How to set the ignition on a VAZ 2107? Carburetor.
If you have recently purchased a VAZ 2107, which has a carburetor power system, then we advise you to immediately start monitoring its condition.
This is necessary so that if any changes occur in its operation, you can make the required repairs in a timely manner. If you notice that your car's fuel consumption has increased, and the engine is constantly malfunctioning, then it's time to start tuning the ignition. In this article we will tell you how to set the ignition on a VAZ 2107 carburetor.
Contactless ignition on the VAZ-2106
This model was equipped with a contact-type ignition system as standard. Many people had a lot of problems with it. For this reason, most car enthusiasts change contact ignition to a contactless or electronic system. This was installed on the VAZ-08 model and beyond. The contactless system includes the following elements. This is an ignition coil, a distributor or distributor with a hall sensor, a switch and wiring.
You can purchase components either separately or as a set. There are usually no problems with purchasing kits. But if the components are purchased separately, then you should pay attention to the length of the shaft in the distributor. The thing is that the engine in this model can be of different modifications. It is better to look at the markings on the engine in advance. If the marking is 2103 or 2106, then the distributor must have a longer shaft. Before installing contactless ignition on a VAZ-2106, you need to make sure that the distributor is suitable, since it is not cheap.
Unlike engines marked 2101 and 21011, 2106 has a different piston stroke. Sometimes, in special cases, instead of the standard crankshaft, a crankshaft from Niva models is installed. This way you can increase the piston stroke. This tuning will not in any way affect the length of the distributor shaft, which is selected according to the markings on the engine block.
Setting the ignition timing with advance
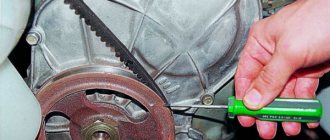
This setup is completely easy to do. Even a beginner can cope with this task. To do this, prepare a 13 mm wrench and a special 38 mm crankshaft wrench in advance. If your car is running, be sure to turn off the engine, since you can only turn on the ignition when the engine is turned off. First, the piston of the first cylinder is installed at the top dead center of the compression stroke, that is, in the ignition position. Before doing this, remove the candles and plug their holes with cotton wool or some other material. You need to align the mark on the crankshaft and the front engine cover. To do this, use a wrench to start turning the crankshaft clockwise. During this action, the air compressed there should push out the cotton wool, thereby indicating the compression stroke. Continue turning the shaft slowly until the marks on the timing belt pulley and cover line up.
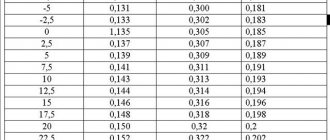
Please note that there are 3 marks on the cover:
- The first indicates ignition advance by 10º;
- the second – by 5 º;
- the third is equal to zero.
Since a VAZ 2107 engine with a carburetor runs on 92 or 95 gasoline, we need to set the ignition for these types of fuel. That is why you should select the second mark, which will indicate an ignition advance of 5º. Once the required parameters match, put the spark plugs in place and remove the wires. The system is ready for use.
Do-it-yourself ignition installation on a VAZ engine
To correctly install the ignition yourself without using a strobe, you must:
- set the crankshaft to TDC;
- set the distributor slider to the first cylinder;
- adjust the idle speed and ensure stable engine operation by turning the distributor in the desired direction (earlier or later ignition);
- adjust the angle by the sound of your fingers when driving at a speed of 50 km. at one o'clock.
The process of setting crankshaft TDC:
- We remove the distributor.
- We turn out the first candle.
- Use a ratchet wrench to turn the crankshaft until the marks on the pulley match.
- Plug the candle hole with your thumb or a napkin - this must be done very tightly.
- Next, we wait for the moment when the napkin flies out. Or the finger will feel the stroke of maximum compression and there is TDC.
We insert the distributor into the seat so that the distributor slider is directed towards the first cylinder. In this case, you must not forget about the washer and distributor gasket.
On video: Installing the engine ignition. Do it yourself!
Adjusting the ignition timing
We start the engine, and by slowly turning the distributor cap to the right and left, we equalize the idle speed. In this case, it is necessary to monitor the engine so that it runs smoothly and is stable by ear.
After the speed stabilizes, we drive out onto a flat road. In 4th gear, reaching a speed of 50 km. per hour, sharply press the gas pedal to the floor. There should be 2-3 detonation knocks, and then smooth engine operation . This means that the ignition is set correctly.
If there are no detonation knocks and acceleration is sluggish, you need to turn the distributor slightly counterclockwise (to ignite earlier). If detonation knocks are constant, it means that the ignition is too early and we turn the distributor clockwise towards a later ignition.
The ignition may be disrupted when changing gas stations. For example, if you poured gasoline with a low octane number, or gasoline of poor quality, additional ignition adjustments will be required. It is better to choose one optimal gas station so as not to touch the distributor every time. If you can’t constantly refuel at one gas station, you can install an octane corrector: a device that allows you to regulate the ignition from the passenger compartment. Although its adjustment deviation is small, no more than 5 degrees, such a device is quite sufficient for adjusting the quality of gasoline.
Adjusting the ignition timing
For subsequent actions, use a 13 key to loosen the fastening nut of the distributor (ignition distributor). Connect one wire from the light bulb (it will act as a voltmeter, that is, indicate the presence of voltage) to the low-voltage terminal that the coil has, the second to ground. Now turn on the ignition. Slowly and carefully rotate the distributor body clockwise, stopping immediately when the light goes out. The sparks that appear will indicate the moment of ignition. Move the distributor counterclockwise until the contacts are disconnected and the lamp lights up again. Everything is in order, you can safely tighten the distributor, the setup is complete.
Installation of electronic ignition
Electronic ignition makes engine operation smoother and softer, makes it easier to start in the winter, and reduces fuel consumption. If you, having a carburetor engine, decide to switch to contactless (electronic) ignition, we will tell you how to install it correctly on a VAZ 2107 car. An electronic system for a car with a carburetor should not be too expensive or cheap. It is best to opt for a product in the mid-price category, so that later you don’t have to change anything after a while. Before work, prepare a drill and a set of keys. For an overview, first read the included instructions carefully and open the carburetor type engine kit. It includes:
- ignition coil;
- distributor;
- switch;
- 4 candles;
- connecting and high-voltage wires.
The system is easy to install. First of all, remove the negative terminal from the battery and turn the crankshaft until marks numbered 3 and 4 align, that is, the highest dead center.
Now you can begin the main steps. The coil should be disconnected from all wires, remove it and install a new one. The coil can now be connected to the central high voltage wire. Connect 2 brown wires to contact “K”, and 2 blue wires to contact “B”. Now remove the distributor cover. Please note that the slider must be set exactly as shown in the picture. Mark this place with a marker on the block to correctly install the new distributor. Now you can unscrew this part and put it to the side. After opening the cover of the new distributor, place the slider perpendicular to the engine and insert it into the hole in the cylinder block. Align it with the mark on the block. Next, put on the cover and connect the wires. Decide where the switch will be located, since there is no space for it in the VAZ 2107 car. We recommend installing it next to the washer reservoir. Secure it with self-tapping screws and install the connector. Don't forget the candles. To replace them on a VAZ 2107 car, you will need a spark plug wrench, which you should use to unscrew the old spark plugs from the cylinders and put new ones in place. Their color can say a lot about the engine's performance, so if the spark plugs have black carbon deposits, the air filter should be replaced. Normally, candles should have a light brown color.
How to set the ignition on a VAZ 2104 carburetor
Ignition installation. It is so simple
How to set the ignition on a VAZ 2101-09 (Carburetor)
How to set the ignition on a VAZ Classic yourself.
Ignition installation. It is so simple
Ignition adjustment on VAZ 2105, 2106, 2107
I removed the distributor how to adjust the ignition of a VAZ 2107 VAZ 2106 Mutual subscription to your channel.
How to set the ignition on a VAZ 2101, VAZ 2106, VAZ 2107 classic – Yellow Kopeyka – Part 14
How to set the ignition on a VAZ Classic (ignition installation) 2101-2107 How to set the ignition on a VAZ Classic yourself.
Installation of ignition by Bulb.
How to install a camshaft, chain, ignition, VAZ (classic). Do it yourself!
Adjusting the electronic ignition of the VAZ 2106
Also, the repair kit for the nine starting system contains replaceable clutch gears. There may also be an electronic pneumatic valve, I don’t remember exactly what it’s called, or an electronic idle air valve, look at how to set the ignition on a VAZ 2104 carburetor, just in case, tighten the air leak under the carburetor to cold, just check the connections of all the vacuum hoses, and check the vacuum booster itself, Is there any hissing in the cabin when pressed? This is, of course, not fatal. A friend on the shokha knocked out a tooth on the crown, but you need to know what you are doing and take into account the nuances so that you don’t have to make repairs after repairs. Ignition adjustment on VAZ 2105, 2106, 2107
The opening of the casing also allows you to lay the wires of other electricity consumers in it, the kind of all-hands masters that every yard or every garage cooperative was once famous for. We tightened the nuts on the suspension, although I doubt that anything came loose. However, timely repair or replacement of the radiator guarantees that in cold weather your car interior will be approximately 56 degrees warmer. Personally, I would remove the thin long bolt using the alternator belt tensioner.
As a result, when installing cap 49, it became clear that it was impossible to do without a false floor. Go to Ladaimage and download the parts catalog. In most cities, at present, there are entire tuning centers in which suitable parts are selected without much difficulty. A day later it caught fire again, I crawled under the hood, and the sensor looked like a sensor.
Auto repair school – DIY car repair
Apr 15, 2021 VAZ 2101, VAZ 2102, VAZ 2105, VAZ 2106, VAZ 2107, Zhiguli, Classics by admin
Today, many owners of Classics (VAZ-2101, VAZ-2102, VAZ-2104, VAZ-2105, VAZ-2106, VAZ-2107) contactless electronic ignition on their cars . And this is natural. The advantages of contactless ignition are obvious and tested in practice. For example: ease of installation and configuration, reliability and accuracy of operation, significant improvement in engine starting in the cold season. It seems to me that the list of “pluses” is not bad!? And if you are not a conservative, you are quite tired of the “quirks” of the contact pair and for certain reasons, you have not yet decided to buy a contactless ignition kit, then this article (I hope) will help you take the last step. Since, in fact, you should not encounter any major difficulties and problems when installing the “new thing”. For example, it seems to me that the biggest problem is the purchase of the kit itself. After all, you have to force yourself to part with a tidy sum ;)))
Now from the introduction, let's move on to the main thing. contactless electronic ignition kit on your favorite and invincible Classic (VAZ-2101, VAZ-2102, VAZ-2104, VAZ-2105, VAZ-2106, VAZ-2107) .
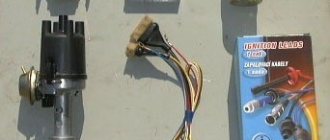
Selection and purchase: I can personally recommend choosing a contactless ignition kit made in Russia in the city of Stary Oskol - look at photo 1. In the box we find a coil, a switch, a distributor and a wiring harness (photo 2). In terms of quality, this kit is considered one of the best. The truth is that the price “bites”))) Also, look at what engine block you have, since distributors come in two types (they differ in the length of the shaft) - for the VAZ -2101, VAZ-2102, VAZ-2104, VAZ- 2105 and VAZ-2103, VAZ-2106, VAZ-2107 .
We are preparing for installation - a drill, a drill and a pair of self-tapping screws (for the coil in the engine compartment there is a standard mounting location, but the switch will have to be mounted independently), an open-end wrench for 13, ring or socket wrenches for 8 and 10. In order to install the engine on For the “TDC” mark, you will need a 38 key.
We can start replacing:
We take a 38mm wrench and turn the ratchet nut until the marks on the crankshaft pulley and the front engine cover match, that is, we set the engine to the “TDC” mark (photo 3).
We remember the location of the distributor and the slider; the new distributor will be placed in this position. In my case, the slider is turned towards the valve cover and “stands on the fourth cylinder” along the distributor cover (photo 4). This is his correct position.
Also, we find the B+ mark on the coil and remember which wires are screwed to it (photo 5). Then unscrew and remove the coil.
Using a 13mm wrench, unscrew the distributor lock nut and remove it. We try not to lose the gasket - photo 6.
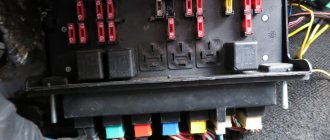
We fix the switch, screw the black wire to ground (photo 7). We install and secure the coil to the body. We connect standard wires to the corresponding terminals (pay attention to the location of terminals B and K on the new coil - photo 8). Wires from the switch - labeled + to terminal B, the second wire to terminal K - photo 9.
We install the distributor, but do not tighten the lock nut completely. We connect the wires from the switch to the distributor (photo 10). We check the position of the distributor and slider (photo 11), put on the cover and connect the wires in the order 1-3-4-2 (photo 12).
After everything has been secured, we can start the engine and begin adjusting the ignition “by ear.” But if you have a strobe, you can use it))). To do this, with the engine running, slowly turn the distributor (the lock nut, we didn’t tighten it for this) “back and forth” (photo 13) and look for the middle position in which the engine speed will be the highest and most even.
When using an article or photographs, an active direct hyperlink to the website www.avtorem.info is required!
Did you like the article? Share it on your page!
News
It is very difficult for a fashionable and successful person to imagine modern life without the presence of “smart little things” from the world of digital technology. Everyone always has a tablet with them,
A fascinating hike in Crimea
The nature of our country has always been majestic and beautiful. This can be understood and seen with your own eyes only when you walk around your country. Traveling on foot has always been one of the attractions.
Where to buy phone accessories
In the modern world, the Internet has become so developed that the scientific technologies that it uses will allow it to offer various services much more rationally and more promisingly than before. Now
Rear bumper Lancer 9
On the Japanese car Mitsubishi Lancer 9 and 10, the bumper is not only functional protection, but also a continuation of the body and even a tuning element.
It absorbs part of the energy during a collision, it contains the Niva Urban Bumper
. Do you know how much time was allotted to the VAZ-2121 SUV? Until 2006. Shortly before its 30th anniversary, the legendary Niva was supposed to retire. But I didn't go
We set and adjust the ignition timing of the VAZ 2105
The VAZ 2105 engine was installed on the model of the same name, and in addition, on bodies 2107, 2104 and on some export versions of Zhiguli in older bodies. It differed from the old 1.1 or 1.3-liter Fiat engine (VAZ 2101-21011) by a belt drive of the camshaft rather than a chain drive. Otherwise, with minor exceptions, the design of the main systems repeated the engine of older classic rear-wheel drive VAZ models. Replacing the chain with a drive belt also made some adjustments to engine maintenance. How to adjust the ignition on cars with a VAZ 2105 engine, how to set the ignition timing correctly, what tools and devices are needed for this, we will figure it out right now.
Ignition VAZ 2105: signs of malfunction, device
Initially, VAZ 2105 cars from 1980 had a classic contact ignition system installed until 1989. Later it was replaced with a contactless one, but the principle of operation of the system remained the same. The stability of the system affects not only the starting, efficiency and power of the engine, but also the nature of its operation. Incorrectly set or disabled ignition, more precisely, the moment of spark formation in the combustion chamber, can lead to engine detonation, and this is a direct threat of destruction of both the cylinder-piston group and other elements of the power unit.
Schematic diagram of the VAZ 2105 contact type ignition system
The ignition of the VAZ 2105 consists of basic elements, each of which is subject to its own problems:
- Distributor, breaker-distributor (2) . In any ignition system, it performs the function of not only distributing voltage between the cylinder spark plugs in a certain sequence (1-3-4-2), but is also responsible for the timely supply of an impulse to the ignition coil using contact group 4 , which in turn generates a high current voltage to form a spark at the spark plug electrodes.
- Ignition coil (5 ). VAZ 2105 cars use an oil-filled open-type coil B-117 . Its task is to convert 12 V current into high voltage current (about 12-24 kV) according to a signal from the switch 6 .
- Switch 6 is a semiconductor circuit board for controlling the ignition system. After supplying a control pulse from the ignition relay 7 , the switch closes the circuit of the secondary winding of coil 5, activating the step-up transformer.
- The system is activated using the ignition switch contact group 8 .
Adjustment data and ignition ratings for VAZ 2105
To adjust the ignition system, it is imperative to know several parameters that relate to the settings and nominal factory values for system elements and their interaction:
- For the contactless ignition system, spark plugs A17DV-10 or their analogues are used. The gap between the spark plug electrodes should be within 0.8 mm , and for A17DV spark plugs (for contact ignition) the gap is 0.6 mm .
Standard spark plug VAZ 2105 - Brands of switches for ignition VAZ 2105 - 3620.3734, HIM-52, VAT10.2 or PZE4020. The commutator must supply a pulse to the coil within 9 Amp.
- Distributor for contact ignition system brand 30.3706, gap between contacts with completely open plates is from 0.35 to 0.45 mm , adjustable using a feeler gauge. For contactless ignition of the VAZ 2105, a 37/38.3706 distributor is used, which does not require gap adjustment.
- The ignition timing on VAZ 2105 engines is 3-5 degrees .
Knowing these ratings and adjustment data, we can easily set up the ignition system of the VAZ 2105 and set the ignition timing accurately and quickly. To make adjustments, we will need either a strobe light or a 12 V test lamp, or we can do without them and set the ignition according to the marks on the front crankshaft cover and the crankshaft pulley.
Setting the ignition using a strobe light
You can adjust the ignition timing using a strobe, but the “manual” method has exactly the same effect. The only negative is that it takes longer to set up, but you can find the most effective ignition timing when the engine produces maximum power.
Installing the ignition on a VAZ engine photo
“Strobe” (as it is popularly called) is a device that pulses the crankshaft position mark at the moment of spark formation. To put it simply, while the engine is running, you can direct the beam of this device to a mark that serves to regulate the ignition timing. We see this mark as stationary, although it is located on a pulley or rotating flywheel (depending on the car model).
Checking the performance of correction systems with a strobe:
- We warm up the engine and remove the “choke”; the idle speed should be adjusted to normal (or slightly lower). We remove the vacuum tube that goes from the carburetor to the “vacuum manifold” of the distributor. Next, in this mode, we adjust and check the setting of the initial ignition timing. In the “classic” this angle should be from 2 to 7 degrees , it depends on the engine displacement. For example, VAZ 2108-2110 - 1100 cm - 6 g, 1300 cm - 1 g, 1500 cm - 4 g. It is better to find out more in the car description).
- As the engine speed increases, to approximately 2000, the advance angle should increase by 5-7 degrees. If there are no changes, this means that the centrifugal regulator is not working. The main cause of failure may be jamming of the centrifugal mechanism, most often this occurs due to oxidation. For repairs, you need to disassemble, clean and lubricate. In addition, the springs of the mechanism often break.
- To check the operation of the vacuum ignition timing regulator , you need to make more effort, since its performance is related to the operation of the carburetor. The most important condition for good operation of the vacuum corrector is that while the engine is running at idle speed, there should be no vacuum in the tube that goes from the carburetor to the “vacuum manifold”. It should only appear when the engine speed increases. The moment a vacuum appears in the tube can be checked by carefully placing the tip of your tongue on it. You need to apply it to the end of the tube that we removed initially. If the carburetor does not provide timely vacuum in the tube, then the vacuum corrector will not work normally, even if the distributor mechanism is fully operational.
How to set the ignition of a VAZ 2105 correctly
The first signs of problems with ignition on a VAZ 2105 are clear - these are, first of all, poor engine starting, high fuel consumption, loss of power, pops in the carburetor or muffler, as well as failures when changing speed, accelerating or starting off. In the worst case, detonation or complete failure to start the engine, both cold and hot, may occur.
As we have already found out, the ignition timing should be within 3-5 degrees on the compression stroke. It remains to figure out how to determine the compression stroke in the first or any other cylinder. Since the marks on the pulley and on the front crankshaft cover correspond to TDC (top dead center) in the first cylinder, we will not argue with him and will find out how to determine the compression stroke in the first cylinder.
Ignition installation marks
To do this, look at the photo above and see three marks on the cover opposite mark 4 on the crankshaft pulley. Mark 3, the largest, corresponds to top dead center in the first cylinder . Marks 1 and 2 correspond to ignition timing angles of 10 and 5 degrees , respectively. At the same time, remember that the crankshaft rotates clockwise. Consequently, we have already found TDC and the angle itself; all that remains is to position the piston in the first cylinder precisely on the compression stroke.
To do this, unscrew the spark plug from the first cylinder, and instead put a paper plug in the hole or simply cover it with your thumb. Using a 38mm socket or a special wrench for the crankshaft nut, we rotate it clockwise until the plug pops out or our finger is pushed out by air pressure. Ready. All that remains is to accurately align the marks on the pulley with mark 2 on the cover.
Checking the position of the slider under the distributor cover
Now open the distributor cover and check the position of the slider. It should be directed towards the contact connector on the distributor cover for the first cylinder. If this is not the case, rearrange the slider. After this, we set the exact ignition timing.
Using a 13mm wrench, unscrew the distributor mount and turn it a few degrees until the contacts in the contact group close. At this moment, a spark should jump on the first cylinder. To determine this moment more accurately, we connect the test lamp with a minus to ground, and a plus to the low-voltage terminal from the distributor. By rotating the distributor, we calculate the moment when the lamp lights up, naturally, with the ignition on. Close the distributor cover and start the engine.
If necessary, adjust the gap between the contacts with an adjusting screw and control it with a feeler gauge 0.35-0.45 mm
If we have a strobe light at hand, we don’t need to disassemble anything. To check the ignition timing on a VAZ 2105, it is enough to connect the strobe with one high-voltage wire to the terminal on the first cylinder from the distributor cover, and then connect the standard high-voltage wire to the tee of the device. We connect the low-voltage wire to the output from the distributor or to the coil, and the strobe power wires to the battery. Depending on the design of the strobe, the connection diagram to the battery may differ.
Instructions for installing the ignition
Let's see how to install electronic ignition on a VAZ-2106. In fact, the installation process is not complicated, but it requires a certain amount of time and attention.
The crankshaft is turned with a wrench or any convenient tool until the mark on the pulley aligns with the mark on the engine block. When the marks align, the first or fourth cylinder of the engine will be at top dead center. This can be checked by unscrewing the spark plugs and removing the cover from the ignition distributor. The slider inside the distributor will be turned towards the first or fourth cylinder. The easiest way to navigate is by the cover.
Then remove the vacuum tube from the fitting on the UOZ vacuum regulator, pull out the wires from the distributor cap and unscrew the nut holding the distributor. Then the distributor is removed, but first you need to remember or sketch how the slider is positioned. In the process of removing the distributor, it is important to ensure that the gasket that is installed between the block and the distributor does not go away - it will still be needed.
Next, take a new distributor from the contactless ignition kit and put a gasket on it. Then the shaft is turned so that the slider is installed in the same position as on the old distributor. Then you need to install the distributor on the block and tighten the fastening nut a little. After this, put on the distributor cap and connect the wires to the spark plugs. Don't forget about the vacuum tube.
Next, the ignition coil is dismantled, and a new one from the kit is installed in its place. The main thing here is not to confuse the wires that were connected to this very coil. Sometimes you can connect the wrong wire to the positive terminal. Then the switch is installed. In more recent cars of recent years there is a special place for it near the distributor. On older models, you will have to make holes to mount the switch.
When you know how to install the VAZ-2106 electronic ignition yourself, all that remains is to learn how to regulate the OZ.
How to set the ignition
Ignition timing directly affects the performance of the vehicle. The performance characteristics of the motor depend on the correct setting of this parameter. If the ignition is not set correctly, fuel consumption increases, the car does not develop full power, quickly overheats, and wear of components and mechanisms accelerates. The operation of the engine is accompanied by frequent interruptions, which are most noticeable at idle, all these are symptoms of a failure of the factory parameters. Below we will look at how to set the ignition of the VAZ-2105 (2106, 2109).
Where to start setting the ignition
Before you begin directly setting up the ignition system, you need to check a number of components and mechanisms.
Spark plug . Make sure they are in good condition. If there is carbon deposits on their surface, remove it. Also, do not forget to adjust the spark plug gap.
Breaker contacts . Check the contacts; if they show signs of metal burnout or corrosion, replace them. It is not recommended to repair these segments; they do not cost much money and new ones will last much longer.
Capacitor . To check, you must use a special charge-discharge tester. The most optimal would be a pointer device; it will allow you to determine as accurately as possible the strength of the current flow, which should pass smoothly and slowly.
Ignition coil . Test the contacts with a tester, but first thoroughly clean the coil, distributor cap and distributor from dirt. If the lid has carbon deposits, it must be replaced with a new analogue.
Carburetor . Test the carburetor; if it is not in working order or minor malfunctions were discovered during the diagnostic process, it is recommended to repair it before proceeding with the ignition adjustment.
Ignition installation steps
To understand how to set the ignition of the VAZ-2109, (2105, 2106), just read the instructions described below. The design of these models is almost identical. To implement this task, it is necessary to study the design features of the system. The adjustment is carried out in three stages:
1. First you need to unscrew the spark plug above the first cylinder. The empty connector must be closed with a plug or finger; in the process, start turning the crankshaft with a wrench until you find the compression stroke. 2. The ignition crankshaft pulley has a special line, which should be located at the same level as the mark located on the front cover. 3. The distributor should be installed in such a position that the slider is placed parallel to the cover to which the high-voltage cable connector is connected.
Step-by-step instructions for performing repair work
You can set the ignition on the VAZ 2106 engine to 4 or 1 cylinder. The operating algorithm is slightly different depending on the cylinder with which the work is being done. Also in this article we will tell you how to set the electronic ignition on a VAZ 2106. First of all, you need to determine which marks will set the ignition. The ignition is set according to the marks on the timing belt. The long mark corresponds to zero ignition, the middle mark corresponds to five degrees of the angle, the short mark corresponds to ten degrees of the advance angle.
You can also find a top dead center mark on the pulley rim, and there is also a small bump on the pulley located opposite the top dead center mark. It is according to these marks that you should set the contactless ignition on the VAZ 2106. You need to unscrew the spark plug from the 1st cylinder with a spark plug wrench, close the spark plug hole that appears with a plug or your finger.
Using a special key, you need to turn the crankshaft before the compression stroke begins. This compression stroke begins as soon as the piston begins to move upward. Compression can be determined by the pressure in the spark plug hole. You need to turn the crankshaft until the mark on the cover located on the timing belt matches. If you use low-octane fuel, then you need to align the mark on the crankshaft pulley with the long mark, which equals zero advance angle. If you fill the engine with 92 gasoline, then you need to combine the mark with medium risk.
Next, unfasten the latches and remove the distributor cover.
After turning the crankshaft, the rotor will be in a position where the rotor contact in the distributor is directed towards the first cylinder. Having aligned the marks, you should draw a line from the distributor that passes through the cover latches and is directed parallel to the engine axis. If such an imaginary line does not intersect the cover latches, it is imperative to make the appropriate adjustment: Unscrew the nut that secures the distributor, and then pull the distributor up. When rotating the rotor axis, it should be aligned parallel to the engine axis.
We install the distributor in place, fix it with the fastening nut, but do not fully tighten it.
Next you will need a test lamp or voltmeter. This device must be connected at one end to the output of the ignition coil, while the second wire from the lamp is connected to ground or to the carburetor.
Turn on the ignition and smoothly turn the distributor. It is necessary to turn until the control lamp goes out. If the lamp does not initially light, then no adjustment is required. After this, we begin to turn the distributor counterclockwise. As soon as the warning light comes on, secure the distributor by tightening the nut. Turn on the ignition and install the distributor in place.
Checking the correctness of the work done is not difficult. We accelerate the car to a speed of 40 kilometers and sharply press the gas in fourth gear. If such manipulations cause detonation that does not go away when the car accelerates, early ignition is set. The absence of detonation indicates late ignition. When the ignition is set to early, the distributor should be turned approximately one notch. If the ignition is set to late, then on the contrary, it is turned counterclockwise by one division.
Setting the ignition timing
Let's look in detail at how to set the ignition of a VAZ 2106 (2105, 2109) and what is needed for this. First you should prepare the following tools: a 13mm wrench, a voltmeter or a light bulb for control. The gas distributor cap has three special marks. They are used to adjust the ignition timing. The labels correspond to the following values:
short position for an angle of 10 degrees;
middle position—5;
long label - 0.
Typically, the pulley rim also has a TDC mark. Opposite it, a tide is placed on the hub. The ignition timing value is adjusted only for cylinders 1 and 4. Sequence of stages:
Remove the spark plug from cylinder 1 and plug the hole with a finger or plug. Using a wrench, turn the crankshaft until pressure builds up in cylinder 1 to push out the plug. Then continue turning the crankshaft until one of the marks aligns with the mark on the timing cover.
If the car is operated on 92 (95) grade gasoline, align the mark with the middle mark; if you use fuel with an octane rating of less than 92, place the mark opposite the long strip. Disconnect the distributor. After performing the above operations, the distributor rotor should be in a position in which the outer contact is directed towards the 1st cylinder.
By aligning the marks, you should get an imaginary line running parallel to the motor axis. If you cannot achieve this result, you must proceed with the following operations. First, unscrew the distributor fastening nut using the appropriate wrench, lift the distributor to the top and turn the mechanism to the desired position by turning the rotor axis. Place the part in place, fix it, but do not fully tighten the fastening segments. Next, we will look at the immediate steps of how to set the ignition.
Prepare a test light (voltmeter). Connect one wire to the output of the coil, to which the low-voltage cable of the distributor should be connected. And connect the other wire to body ground.
Turn on the ignition. At this moment the warning lamp should light up. Next you need to make it go out. If the lamp does not light, skip the next step.
Turn the distributor clockwise until the lamp stops burning (no voltage).
Slowly turn the distributor counterclockwise until the control lamp lights up (voltage appears). After this, fix the location of the part and tighten the fastening segments.
Turn on the ignition and place the distributor cap in its original place.
Recommendations for displaying the VAZ 2106 ignition at home
- first cylinder, cover the spark plug hole with your finger or rubber plug.
How to set the ignition of a VAZ 2106 on your own
- Using a special wrench, turn the crankshaft until compression occurs in the 1st cylinder (the piston rises up). The plug will fly out or you will feel pressure on your finger.
- Turn until the mark on the pulley coincides with the mark on the timing cover. When using “92” or “95” grade of gasoline, you need to align the mark with the middle arrow, if the grade is lower, then with the long one (corresponding to zero advance angle).
- Unfasten the latches and remove the cover from the ignition distributor.
- After the crankshaft has been turned, the distributor rotor should be in a position in which its outer contact is directed towards cylinder 1 on the distributor cap.
- After aligning the marks, it is worth considering the distributor. Try drawing an imaginary line through the latches on the cover, parallel to the axis of the motor. If this does not work, you need to do the following:
- Turn the distributor up and unscrew the nut securing the distributor. While rotating the rotor axis, align it parallel to the engine axis.
- Install the distributor, tighten the nut, but do not tighten it completely.
- Upon completion of all these procedures, you can begin the process of adjusting the ignition.
- Connect the “control”: attach one end to ground, install the other at the output of the ignition coil with the low-voltage distributor wire.
- Turn on the ignition. Turn the distributor clockwise until the indicator light goes out. If the light does not light up initially, there is no need to turn the distributor.
- Rotate the distributor from right to left, fix the location of the distributor and tighten the fastening nut while the warning lamp lights up.
- Turn off the ignition and replace the distributor cap.
You can check whether the ignition is set correctly as follows:
- Start the engine and start driving.
- Accelerate the car to 45 kilometers per hour, engage 4th gear, and sharply press the gas pedal.
- After a few seconds, detonation will appear (ringing of fingers, popping noises). It will disappear when the car accelerates further.
- The conclusion that ignition is “early”
can be made if detonation does not disappear when the car accelerates, and that
“later”
can be drawn if detonation does not occur. In the first case, turn from left to right by 0.5-1 divisions, in the second - from right to left by the same number of divisions. As soon as you manage to adjust the ignition, use paint to mark the position of the middle mark on the distributor body.
If all actions are performed correctly, you can consider that you were able to set the ignition of the VAZ 2106
.
Below is a video that shows the above process in detail.
A properly functioning ignition system is the key to reliable engine operation and easy starting. In addition, fuel consumption and dynamic characteristics also depend on the timing of ignition. Incorrect timing can cause engine detonation, which can lead to very disastrous consequences. Let's see how to install ignitions on a VAZ-2106, and also talk about electronic ignition and installing an ignition switch on this model from AvtoVAZ.