Necessary tools and accessories
Replacing the valve stem seals of a VAZ 2106 is done directly on the car, which significantly speeds up the work, since there is no need to remove and then reinstall the cylinder head. It is enough to place the car in a place protected from dust and precipitation. Apply the handbrake and place the gearshift knob in neutral. Replacing valve stem seals on a VAZ 2106 requires a set of caps and a new head cover gasket, standard tools, accessories:
- Carrying;
- Candle key;
- Spanners 17 mm., 13 mm.;
- Hexagonal internal heads 8 mm, 10 mm, 13 mm. with a collar;
- Pliers;
- Tweezers;
- Flat screwdriver;
- 8 mm thick soft metal rod;
- Torque wrench;
- Spring compression device
- Mandrel for installing caps
- Soft wire.
Different designs of special pullers for compressing springs
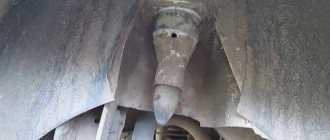
How to replace valve stem seals on a VAZ-2106
If you are here, then you are the proud owner of a VAZ-2106 car that has some problems. Perhaps you enjoy watching persistent foreign cars trail behind your “six” and swallow the gray exhaust, but small, unnoticeable caps, like a candle that burned Moscow, can lead to the death of the entire engine, and therefore turn your iron horse into a modest example of real estate. The decision to fix the car was absolutely correct, and with some skill you will quickly deal with the problem.
Before work
The combustion chamber of the engine must be protected from foreign substances, so the cylinders need protection from oil. This is where valve stem seals, or oil seals, come into play, protecting the combustion chamber as the valve stems move. Over time, they lose elasticity and the quality of their work decreases. Nothing prevents oil from getting where it shouldn't be.
If you notice that the exhaust has become bluish and thick, soot or even soot has appeared on the spark plugs, and your VAZ-2106 eats oil like gasoline, then it is very likely that the problem with the seals has affected you too. You need to have the courage to open the hood and examine the problem. Perhaps the entire gas distribution mechanism needs to be replaced, but for now we will only talk about the caps: if we really strain ourselves, then do it systematically.
How to make your own devices
It is convenient to use a special device, since there is no need to hold it with your hands; it holds the springs compressed with a bolt. If you don’t have such a device, you can make it yourself. To do this, it is enough to have two steel square bars 10x10 mm, 300 mm long. They need to be fastened at three points, at the ends and in the middle, so that there is a gap of 12 mm between them, like rails, then the price will be much cheaper. So:
- You can attach it in any way; bolts, clamps, welding, in the fastening points between the rods you need to place metal plates 12 mm thick, which will provide the necessary gap between the rods.
- The valve stem will fit into the gap when the springs are released. To install valves, instead of a mandrel, you can use a steel tube 120 mm long, with an internal diameter of 14 mm, and a copper washer with a hole matched to the rim of the cap.
Preliminary preparation
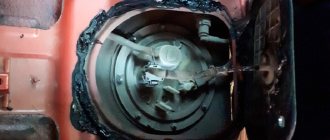
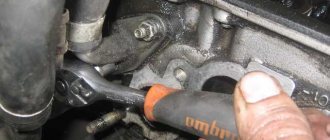
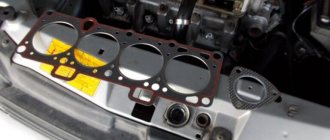
Before starting work, it is advisable to watch the video, replacing valve stem seals on a VAZ 2106; you definitely need to thoroughly wipe the surface of the upper part of the block and the head cover. For convenience, you need to remove the air filter housing. Cover the carburetor with film or cloth to prevent dirt from entering during operation. Unscrew the spark plugs, remove the cover with the gasket.
- Set the fourth cylinder to top dead center on the compression stroke. To do this, the crankshaft rotates to a position where the intake and exhaust valves of the fourth cylinder remain closed before and after the piston passes TDC. This is determined by the clearance between the valve and the rocker arm.
- The position of the piston is determined by measuring with any rod through the spark plug hole. Check the alignment of the marks on the sprocket and the housing.
Checking whether labels match
- Use a screwdriver to bend the lock washer using a 17 mm spanner. Loosen, but do not unscrew, the nut securing the sprocket to the camshaft.
- Using a 13 mm spanner, unscrew the cap nut securing the tensioner two turns.
- Free up the chain as much as possible.
- Unscrew the nut completely and carefully remove the sprocket from the camshaft axis.
- To prevent the chain from falling off the sprocket, you need to tie it with wire and hang it together with the sprocket on the edge of the cylinder block.
Disassembly sequence
So:
- Unscrew the nine nuts holding the camshaft housing and remove it along with the shaft.
- Using a screwdriver, lift the pressure spring, pull out the pressure lever with a little force, push the spring out from under the stopper and pull it out.
- A soft wire is tightly inserted through the spark plug hole between the piston bottom and the valve so that the valve does not fall when the springs are pressed. The higher the part of the rod into which the fixing nuts are inserted, the less the springs will need to be pressed to install them.
Attention! It is not allowed to hold the valves with hard objects; there is a risk of scratching the piston or cylinder.
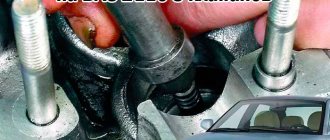
- A nut is screwed onto the camshaft housing mounting stud closest to the valve, as in the photo, to which a special puller or the end of a homemade device clings with a grip. It covers the stud on both sides, rests against the lower plane of the nut and rests on the upper plate of the springs.
- The valve stem with crackers is passed between the rods of the device.
Squeezing springs and removing crackers with tweezers
- We press the lever, the springs are compressed, the plate with crackers goes down, the crackers fall into the area of the narrower part of the rod, and are able to come out of the hole of the plate. You need to select them with tweezers or pliers.
Attention! It is forbidden to pull out the crackers with your hands, as you can get your fingers pinched.
- If the crackers are stuck and do not come out when the springs are significantly compressed, you need to knock them out with a weak hammer on the plate.
The device is released and removed sequentially:
- plate;
- outer spring;
- internal spring;
- inner spring lower washer;
- outer spring washer.
To remove the lower washers, you need to pry them off with a screwdriver.
- The cap is grabbed with pliers, rocked, and rises along the valve stem.
- Then a new valve stem seal is installed and the valve is assembled in reverse order.
- They are sequentially disassembled and reassembled with new valve caps for the fourth and first cylinders.
- After this, holding the sprocket, the crankshaft rotates until the pistons of the second and third cylinders reach TDC. Consistently, similar work is carried out on their valves. We can assume that the oil caps on the VAZ 2106 have been replaced.
How to know when it's time to change
Worn caps of a VAZ 2109 car
It's simple: if thick bluish smoke comes out of the car's exhaust pipe, then it's time to change the caps . As a rule, this smoke appears only when the engine starts and when it stops. But if the caps are very worn, thick smoke constantly comes out of the chimney.
However, smoke is not the only sign that the caps need to be urgently replaced. Sometimes smoke is practically not visible, but oil consumption in the car increases several times, while no external oil leaks (through various oil seals and gaskets) are observed. All this also suggests that it’s time to change the caps.
Assembly order
Pressing in valve stem seals using a bushing
- The valve stem, oil seal and cap are lubricated with engine oil; the valve cap corresponding to the valve is placed on the stem with the oil seal facing up. It descends down the stem, where it is pressed tightly against the hole with the valve guide.
- The end of the mandrel is pressed against the rim of the cap, by lightly tapping the top of the mandrel with a hammer, the cap is pushed into the hole until it stops. The cost of a mistake in case of strong impacts, damage to the oil seal or cap, will have to be replaced. The springs are installed in the reverse order of disassembly.
Attention! After installing the springs and removing the device for compressing the springs, you need to remove the plate from the spark plug hole and tap the end of the rod with a hammer so that the crackers sit in their place. This must be done carefully; if the crackers are positioned incorrectly, the springs may pop out.
Procedure for tightening the camshaft cover nuts
The camshaft cover, as required by the instructions, is pressed with a torque wrench with a force of 8 kg/m. tightening the nuts in the required sequence.
Device
Oil seals are a modern version of valve seals, which are equipped with a powerful steel sleeve inside and an expander spring. Springs are used to secure the edges of the caps and valve stems.
Actual size of the caps
Gaskets are made primarily of rubber, which becomes harder over time and wear occurs, so the element ceases to properly perform its functions. As a result, oil ends up inside the combustion chamber.
There is only one sign of wear on the valve stem seals - thick blue smoke begins to actively pour out of the exhaust pipe, plus oil consumption increases.
There is only one solution to this situation - replacement.
What are valve stem seals and where are they located?
Valve seals for VAZ 2109
These caps are located directly on the engine valves, in the cylinder head. Another name for these caps is valve seals. Their main task is to prevent excess oil from entering the engine. These caps are made of special rubber. And rubber, even special ones, deteriorate over time and oil begins to flow directly into the combustion chamber of the engine. In this case, it is worth changing these parts.
Sequencing
- There is a striker on the collet. You need to hit it accurately with a hammer. This will cause the cap to crumple and it will be possible to remove it from the collet with pliers.
The oil seal is removed from the guide bushing using a collet
- Once the crackers are removed, the valve plate and its spring are removed.
When the spring is fixed, the valve nuts are removed using medical tweezers
- After this, a tool is installed to decompress the valves and, with its help, the valve spring is pressed.
- After the piston reaches the dead center, the spark plug is unscrewed from the cylinder, and a tin rod with a diameter of 8 mm is inserted into the opened hole. The tip of the rod should be between the valve and the bottom of the piston.
- Now the crankshaft must be turned so that the piston in the cylinder where the caps are planned to be replaced reaches top dead center.
The camshaft is removed, then the oil seal is removed
- First of all, you need to remove the wires from the battery.
- The timing belt is removed.
- The pulley with teeth is removed from the camshaft.
- The wires are removed from the first fastening, and the nuts are unscrewed from the third fastening.
- Four nuts are unscrewed from the front cover, then the nuts from the rear cover are unscrewed (there are six of them).
- Both covers are removed.
- The camshaft is removed.
- The oil seal is removed from the camshaft.
The valve spring is pressed firmly using a collet
- After pressing the valve spring, the crackers can be removed using tweezers.
First, the valve plate is removed, and then the spring underneath it is removed.
- Now, using a collet, you need to remove the oil seal from the guide sleeve.
By hitting the handle with a hammer, the cap is compressed in the collet and removed
- The new cap is pressed into the valve plate, then a spring is installed on it.
- Similar operations are performed with all caps that need replacement.
- After replacement, the cylinder head is reassembled.
DIY video on replacing valve seals on a VAZ 2109
Important points
- After removing the worn cap, you should carefully inspect the walls of the guide sleeve, since any scratch on this wall left by the collet can lead to renewed oil leakage into the combustion chamber and will negate all efforts to replace the cap.
- Before installing new caps, you must remember to remove the springs from them.
- Before pressing in the new cap, the installation site is generously lubricated with oil. This helps to place the cap in place more accurately, without putting extra effort into it.
As can be seen from the article, it is quite possible to replace valve stem seals on a VAZ 2109 with your own hands. The main thing is to be patient, follow the sequence of operations and not make much effort when pressing the new caps into place.