The problem with the stove tap and its modernization
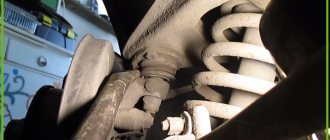
The first problem area of the VAZ 2114 is the valve at the antifreeze inlet into the stove. On the one hand, its undoubted advantage is that if you accidentally break off the fitting on which the pipe is placed, it is enough to replace the tap. For example, on most foreign cars produced in the 90s, these fittings are an integral part of the heater radiator. If they are broken during repairs, you will have to replace the entire radiator. But on the other hand, due to this design, the quality of coolant circulation is much worse. And that means comfort from being in the cabin.
In addition, the supply of hot antifreeze for the stove is controlled mechanically on the VAZ 2114 using a cable. And this cable becomes dirty and “pulled out”. The fastening of this cable itself may weaken over time. As a result, the stove will not work properly.
Usually, if problems arise with cold air from the stove, it is recommended to tighten the cable.
Adjusting the heater tap cable
The problem arises due to the general unreliability of the mechanical cable system for controlling the interior heating controls on the VAZ 2114. We have already talked about this. Loosening or pulling the cable over time leads to the fact that the stove tap no longer closes (opens) completely when moving the slider on the control panel.
To solve this problem, you need:
- Find the control cable for the stove tap. It runs under the panel near the gas pedal.
- Pull the cable so that when the damper is fully open, it also opens fully. Sometimes, with a strong stretch, the cable is shortened a little for this purpose. Do not overdo it, otherwise the tap will not close. Warm air will continue to blow in summer.
This basically works. But it may happen that you have to tighten it regularly. Often the problem returns periodically. The fundamental measure to solve it is the following method: removing the tap from the system.
Removing the stove tap
This modernization allows you to exclude an “extra” element from the system, improving the overall efficiency of the system (by improving circulation) of the VAZ 2114.
The operating procedure is as follows:
- Remove tap.
- Make (you can’t do without a lathe) a tube of the required shape, connect the pipes to it.
- To improve circulation, a pressure pump is additionally installed in the system (this is standardly installed on GAZelle, you can find it in GAZ spare parts stores). The pump runs on electricity. We recommend turning on power to it through a switch installed in the cabin in order to be able to forcibly turn on the pump if necessary.
We recommend using this tuning method only in regions with cold winters (where the temperature is around -20 degrees Celsius or lower for more than one and a half months a year). In all other regions, a standard stove should be enough!
Problems with stove dampers and their modernization
Another problem with the VAZ 2114 stove is the operation of the dampers. In the car, their position is regulated by three more cables. They also tend to become loose and malfunction over time. An indicator of a violation of their adjustment is the fact that hot air comes only from the central air duct, while cold air goes to the passenger seats and to the front window heater.
Adjustment of these cables is carried out similarly to the cable of the stove faucet. When the slider is moved to the extreme right, the dampers should be fully open.
If you plan to adjust the heater while replacing the radiator, you should also pay attention to the condition of the dampers themselves. If they are not airtight, they should be glued with foam rubber or any other insulation. Any leaks lead to the dilution of the hot air flow with cold air and, as a result, to a deterioration in the operation of the stove.
Correct modification of the left deflector
The left deflector (driver's) is located farthest from the hot air entry point. As a result, all losses affect him more than anything else. It also happens that there is warm air everywhere except it. Naturally, the driver will not like this much, especially if he usually drives alone in the car.
To improve the heating system and provide the driver's air duct with a sufficient flow of warm air, an additional fan is installed in it.
A computer processor cooling fan is ideal for this purpose (it can be bought at any computer store, it costs about 500 rubles). They come in different sizes and power, choose the right one based on the supply on the market. Or if there is an old computer somewhere in the garage, take it from there - it will do.
The order is:
- Pull out the deflector.
- Prepare a hole for installing the cooler.
- Prepare the wiring. If an additional pump is installed in the system, it is worth installing the power supply through the same switch. You can make a separate switch or, as a last resort, connect it from the ignition. It will turn on automatically when the engine starts.
- It is important to completely seal the remaining holes, otherwise the expected result will not be obtained.
By performing all these manipulations, you can achieve restoration or even significant improvement in the operation of the stove. If your work involves constantly moving around the city by car, these measures are simply mandatory.
Some checks and tests
However, before you start disassembling the stove and making technological changes to its operation, find out that other components of the system are working correctly. Improvements will not yield results if the problems lie elsewhere.
- Make sure the pump is working properly. Breaking off the impeller impairs heat transfer. If the car begins to overheat frequently in the summer, and the heater does not work well in winter, this may indicate this problem.
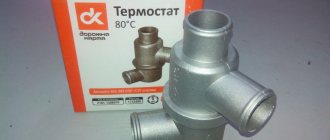
- Make sure the thermostat is working properly. If it is stuck closed, the stove does not heat up at all. Antifreeze does not go into a large circle. If it is stuck open, the car (and with it the stove) heats up very slowly, the air comes out only slightly warm.
- Make sure the stove fan is working. It should work in all speed modes.
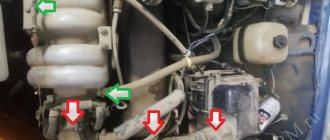
- Make sure your cabin filter is not clogged. Where is it? This is probably your problem. Open the hood, you will find it in the part between the engine compartment and the passenger compartment, approximately in the center.
- Make sure your heater core is not clogged. It is recommended to wash it periodically (every 2-3 years) using special products.
And only after making sure that modernization is necessary and everything else works, proceed to disassembling the VAZ 2114 stove and modifying it. This is quite possible and even necessary to do it yourself. Car service centers are unlikely to undertake such work.
Heater radiator tuning
Approximately 30% of uneven heating of the interior is a clogged VAZ 2114 heater radiator. To clean it, you need to perform the following steps:
- Remove the radiator and rinse with strong water pressure. In this case, disconnect the pipes and connect hoses instead. Water must be supplied to the outlet. Then the dirt will be “squeezed out”;
- Use any sewer pipe cleaner for flushing.
Pour it into the system and drain it after 20 minutes. After repeating this procedure three times, complete the rinsing with clean water.
- Attach the pipes in place and fill in antifreeze or antifreeze;
- When installing the radiator, seal it.
It is also important which heater radiator is installed on the VAZ 2114 - aluminum or copper. In the first case, it heats up quickly and also cools down instantly. But it has a larger number of fins and channel width, which gives better heat transfer at idle speed. Minus - cannot be repaired.
Copper heats up more slowly, but also cools down much longer. It has fewer ribs and narrower channels. At idle speed the air flow is cold. But if a leak occurs, it can be easily repaired.
A painted radiator is not suitable for tuning. It has little heat transfer and an unpleasant odor.
How to make a VAZ 2101 stove
Let's not make any big background stories, but let's get straight to the point. Previously, when I had already come across similar articles, the good advice there was to seal all existing connections in order to avoid air loss. This is partly good advice, but partly not, it doesn’t always just help. What to do in this case?
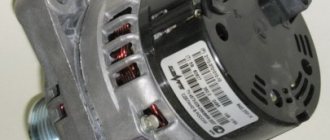
I would like to tell you about the improvement of the source of that very air supply, namely the fan. The radiator itself gives off more heat; there is simply not always enough air to heat the entire interior of the car. To solve this problem, it is worth operating the engine from the heater fan on a VAZ 2108 or VAZ 2109.
This is due to the fact that the standard VAZ heater engine produces only approximately 3000-3200 rpm and consumes a current of 4.5 A, and the “chisels” have, in some respects, more powerful engines that are capable of delivering approximately 4000 rpm minute, but also consume significantly more - 14 A.
As you can see, the consumption is very large, but at the same time the air flow is completely different, which is the fundamental issue in our case. What are we doing?
We disassemble and modernize the VAZ 2101 - 2107 stove
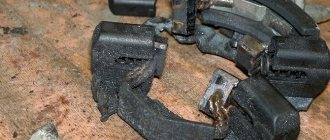
First, let's take everything apart. Next, you need to cut off the comb and then replace the fan speed control resistor. Why was it necessary to cut down the comb? This is explained by the fact that the dimensions of the chisel engine are larger than the usual classic ones. So, in order to completely cover the foot heating, it needs to be cut down. According to calculations, the result may be approximately a couple of times more air.
First, we drill a hole on the impeller with a diameter of approximately 7 mm. To do this, you should put the impeller on the shaft of the “seventh” engine as tightly as possible, it is advisable to experiment until the noise and vibration are completely eliminated. Before installation, do not forget to perform a test run and only then continue to work.
A question may also arise in terms of “why was it necessary to replace the resistor to switch speed modes?” The answer is simple (it is replaced after testing) with its help a greater air flow is supplied. You also need to remember to replace the fan rotation mode switch, since it is simply not designed for high current and often simply melts.
It is connected according to the usual scheme from a VAZ 2108, in short, you get a regular 3-speed switch, which is activated when the ignition is active.
How to improve the stove VAZ 2101 - 2107 (video)
Warming up of the interior is carried out much faster and, accordingly, the windows thaw faster; with an increase in efficiency, the interior immediately becomes warmer, even in such a large interior as in the VAZ 2104 there is rarely a need to turn on the heated rear window. There is, of course, a minus - the noise increases when such a fan operates, but this is understandable and tolerable. You can also flush the stove radiator, this will significantly improve its heat transfer.
Refinement of the stove pipe
When the air flow from the left deflector is too small, you can force its intensity. To do this, you need to insert a small (about 50 mm) fan into the pipe. A cooler used in computers is suitable for tuning.
First remove the deflector. Make a hole for the cooler and install it. Seal. Put the branch pipe with the fan in place. Restore electrical. An alternative is to connect the cooler directly to the heater contacts. In this case, it will only work when the ignition is on.
Properly carried out modernization will add warmth to the interior and save the owner of the VAZ 2114 from many problems.
Weak supply of warm air, stove modernization
One of the main problems of the VAZ-2110 - 2112 heater is leakage and poor-quality assembly, poor quality of air duct elements.
The stove can wildly heat up the air entering it, but the barely perceptible warm breath of the heater can reach the cabin. It's all about leaky air duct connections, and, unfortunately, there are quite a lot of them. Firstly, it is recommended to seal the primary air ducts; a leak of heated air is often detected between them and the stove itself; it simply warms the engine shield.
To eliminate this drawback, unfortunately, you will have to spend more than one hour, since it is impossible to get to the air ducts without dismantling the front panel.
It is necessary to check and seal each junction of plastic air ducts and their joints with the interior and glass air deflectors. Individuals who are particularly disappointed in the factory stove completely throw away the stock air ducts and replace them with corrugated hoses, which are abundant in hardware stores. The joints are sealed with polyurethane foam or modelin.
Of course, there is a lot of work, but the time spent is worth it - after modernization, absolutely all the warm air will flow only for its intended purpose.
Heater modification
Good day! I think what is written below will be of interest to the happy owners of SAMAR with a Euro-torpedo, as well as to some extent to the owners of all other chisels and the like.
I wouldn’t say that I complained about the stove in my 2114... I especially remember my four, where the stove is like the rest of the classics, and the interior volume is noticeably larger.
I just didn’t like one feature of the stove’s operation. In short, the essence of the problem is this. On a well-warmed-up car, very hot air always came out of the central air ducts, almost scalding. But at the same moment slightly warm air was blowing onto the glass and into the side air ducts. And even if the central air ducts were closed, the situation did not change. This state of affairs has not suited me for a long time, especially remembering that I once had an old nine with a low torpedo and there was no such problem.
After the first noticeable frosts this winter, I decided to try to correct the situation. I won’t describe the process for a long time; everything turned out to be extremely simple. It turned out that it was enough to adjust the heater cables. The same ones that come from the sliders and open/close the dampers in the stove and the heater tap itself. It turned out that it was enough to unscrew the side of the tunnel on the driver’s side and visually check how the dampers work. I’ll say right away that for this you need to take a position that is not even in the Kama Sutra... well, a small flashlight is simply necessary. There should be two cables on the driver's side. One closes the cold air damper.
Another regulating air flow either into the legs or up. So we lie on the floor and look at the cable, while simultaneously moving the heater levers. It will immediately become clear which cable is responsible for what. Well, then you should make sure that in the extreme positions of the lever the damper is completely closed or open according to the position of the lever. To do this, it is enough to leave the lever in the most extreme position and simply try to close or open the damper further with your hands. If you succeed, then you need to adjust the length of the cables.
Both of my cables were quite loosely tensioned... One was so tight that I was surprised how it didn’t fly out of its place. The cable at the end is wound into a ring and fits onto a pin in the damper. Where possible, I simply wound another turn and put it back on the pin. Where there was no chance, I simply bent the cable with pliers, thereby shortening it a little. Then, in order to achieve maximum results, you will have to remove the central part of the torpedo, since there is no other way to get to the other two cables.
One of them changes the air flow either to the windshield or on the sides, and the other opens and closes the heater valve itself. The principle of action remains the same. I would like to note that two cables are connected to the Cold/Hot lever at once. One closes and opens the cold air intake, the other opens and closes the heater valve. I think four cables are not difficult to figure out if you want.
After my acrobatic performances, I was pleased with the result. Now almost the same hot air is blowing from all air ducts. Of course, in the central air ducts it is hotter, but there the air travels the shortest and most direct path. The air flow in the side air ducts has increased quite significantly. And the flow adjustment itself now works more radically, that is, if it blows on the glass, then it blows on the glass, and not anywhere.
In short, I am now 100% satisfied with the stove. If I know that the trip will take more than 15 minutes, you can safely take off your jacket right away, even if it’s 20 below zero outside.
In general, a VAZ remains a VAZ. As always, the idea itself is excellent, and the execution is from the series “after assembly, modify with a file.” The heater is in good condition, but during assembly they either didn’t want to adjust the roofing felt cables or didn’t have time...
I apologize for the lack of photos, but there was nothing to take pictures with. To make it clear what I'm talking about, I added a few photos from the Internet. I hope it will be clear...
Connection diagram for the VAZ 2107 heater fan.
The diagram below shows how the stove fan (4) is powered. Power from the battery, through the mounting block (1), goes to the ignition switch (5) and again goes to the mounting block (1). In the mounting block (1) it passes through fuse F1 (10 amperes) and goes to the stove speed switch button (2). Next, power from the button goes either through the resistance (3) to the motor (4), or directly to the stove motor (4).
The VAZ stove fan will not work if any of its circuit components is faulty. You can determine the reason why the VAZ 2107 heater fan does not work:
- There is a fault in the mounting block.
- The contacts of the heater fan speed switch are burnt out.
- The speed control resistance has burned out.
- There is a malfunction in the heater motor itself.
Let's take a closer look at each of the faults.
There is a malfunction in the VAZ 2107 mounting block.
If the stove stops blowing air, then first of all look to see if fuse F1 in the mounting block is intact. Usually, if this fuse blows, then the heated rear window and reverse lights stop working along with the heater. This fuse must be rated 10 amps. No more and no less. If you install a fuse of less than the nominal value, it will constantly burn out, and if you install a fuse of a higher nominal value, it is possible to burn the mounting block. If you have a fuse of a higher rating (as in the photo below), then the likelihood increases that the mounting block has failed and the plus is not supplied to the speed shift button. How to find out, read the next paragraph.
The contacts of the heater fan speed switch are burnt out.
You checked the fuse and saw that it was intact. Let's dig further. Now we take and remove the gear shift button from the panel and disconnect the wires from it. Afterwards, we reliably connect one end of the indicator light to ground, and alternately insert the other end into the removed terminals of the wires disconnected from the button. The ignition must be on!
If the light does not light up, then power is not supplied to the speed switch and the mounting block is most likely faulty.
If the light comes on when testing one of the contacts, it means either the button or something else is faulty. How to find out? Very simple! To do this, we make a jumper from a regular wire, from the contact, during the test of which the indicator light came on, to one of the other two contacts. The stove motor will work if the button is faulty. If the motor does not work, then it is the motor that is faulty.
The stove only works at one speed VAZ 2107.
When the stove operates only at the highest speed, this means that the ballast resistance has burned out.
In this case, just change it. It is located under the dashboard approximately in the middle, closer to the driver's side.
There is a malfunction in the heater motor itself.
Before disassembling the panel and stirring up the interior, check whether the mass going from the heater motor to the body sits well. It often happens that this wire simply rots.
If you have a multimeter, you can ring it. To do this, take out the speed switch button and disconnect the contacts from it. Now, in the continuity mode, connect one probe of the multimeter to ground, and check the wires with the others one by one. If the motor and ballast resistance are working properly, the multimeter will beep when checking two of the three wires. If the ballast resistance is faulty, then the multimeter will beep when checking one of the three wires, and if the heater motor does not work or does not have contact with ground, then the multimeter will be silent.
If you want to learn how to replace the stove motor, read this article!