Replacing the generator yourself
Typically, the VAZ 2106 generator must be replaced only in the most exceptional cases, and in case of most malfunctions it is simply repaired. But if this device on your car has completely failed and cannot be repaired, then it is necessary to replace it. To make this repair procedure as simple as possible, below is a list of necessary tools that will help make this operation easier:
- Keys for 17 and 19
- Heads for 10, 17 and 19
- Ratchet handles and knobs
- Extension with universal joint
Removing and replacing the generator on VAZ 2101, 2102, 2103, 2104, 2105, 2106, 2107
Hello, in this article you will learn how to replace the generator on a VAZ 2101, 2102, 2103, 2104, 2105, 2106, 2107. The generator is needed to generate charging for the battery and provide voltage to all electrically dependent parts of the car. The generator does not have a specific service life; it can last 100,000 km, but it can fail even after 10,000 km. The first sign of a generator failure is a constantly draining battery (in rare cases, the cause may be in the battery itself). To check the operation of the generator, you need to use a tester to check the voltage at the battery terminals with the car running. The voltage values should be between 13.8 and 14.5 volts; if it is lower, then the generator definitely needs to be repaired or replaced with a new one. Most often, the generator can be repaired; usually the diode bridge or voltage regulator fails; replacing these parts will cost much less than buying a new generator, since its average cost in the automotive market is about 5,500 rubles. To remove the generator you will need: keys or sockets for 10, 13, 17 and 19. First of all, we remove the terminal from the battery. After this, unscrew the nut that secures the generator to the adjusting bar (depending on the type of generator, you will need a 13 or 17 socket here)
Next, move the generator so as to loosen the tension on the generator belt and remove the generator belt. Then remove the terminal from the generator
The next step is to unscrew the nut securing the positive wire using a 10mm wrench and remove the terminal
Now use a 19 mm socket to unscrew the generator mounting bolt and remove it by removing the bolt from the bracket
Installation of the generator is carried out in reverse order.
The procedure for removing and installing the generator on a VAZ 2106
Before attempting this repair, disconnect the negative battery terminal. Then you need to disconnect all power wires from the generator itself. First you need to unscrew the terminal securing nut:
Now you can pull out all the other wires and plugs, just pull them to the side with a little effort:
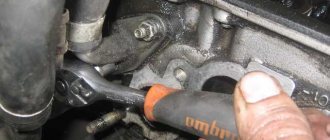
Then we tear off the upper mount of the generator with an ordinary open-end wrench 17, and after that we throw on the head with an extension and a cardan joint to unscrew this nut quickly and without unnecessary effort:
Next, you need to crawl under the car from below and tear off the nut with a spanner wrench and unscrew it completely using the ratchet handle:
After the nut is completely unscrewed, you need to knock the bolt out. To do this, you can use a wooden block, pointing it at the bolt and hitting it several times with a hammer. The photo shows it without a block, but keep in mind that the backing must be present so as not to damage the thread:
After which the bolt can be pulled out by hand. If it is difficult to move, you can resort to penetrating lubricant, spraying it a little in the right place.
Then you can remove the generator from below, as this is more convenient. If it doesn’t give in right away, you can turn it a little in the right direction so that nothing gets in the way when removing it. This is roughly what it looks like in practice, as shown in the photo below:
The price of a new generator for a VAZ 2106 varies from 2,500 rubles and above, it all depends on your wallet. The replacement process is not complicated and installation occurs in the reverse order of removal.
How to remove a VAZ 2107 generator
The VAZ 2107 is located in a rather awkward place. To make it easier to access, it is better to carry out work on a lift or pit. Before work, you need to de-energize the vehicle's electrical systems by disconnecting the battery terminals. Subsequent actions are performed in the following sequence:
- Remove the engine protection and the right front fender liner.
- Disconnect the wires from the generator (with all this, you need to understand how they were connected.
- Loosen the nut holding the generator and remove the belt from it.
- Unscrew the nut from the bolt securing the generator to the bracket. If it is rusty, use WD-40.
- Remove the mounting bolt. If it does not come out, it must be treated with WD-40 and carefully knocked out.
- Remove the generator.
Removing the generator VAZ (Lada) classic 2101-2107
Shown how to remove a generator without a pit
, overpasses, just in the courtyard of a private house.
How to remove a VAZ classic generator. (for beginners.)
how to remove the generator
from a
classic VAZ
Architecture of the VAZ 2106 generator
The VAZ 2106 generator of the G-221 brand produces alternating electric current and is designed to power on-board energy consumers and charge the vehicle battery. By its design, the generator on a car is a three-phase synchronous electrical installation with electromagnetic excitation of right rotation.
Since all consumers on the VAZ 2106 use direct current for their power supply, an electric rectifier, which is built into the VAZ generator, is used to convert the alternating current received by the electric generator into direct current. The electric rectifier circuit is based on the use of six silicon diodes.
The maximum current received from the electric generator at a voltage of 14 V and 5000 rpm is 42 A. The generator on a VAZ is mounted on the engine on the right. The rotation of the electric rotor is carried out by transmitting rotational motion using a V-belt from the crankshaft pulley to a pulley mounted on the rotor of the VAZ generator.
What is better - installing a new generator on a VAZ 2106 or repairing the old one?
There are two ways to solve the problem of a generator that is not working (or operating at maximum capacity). The first option is to reduce the number of consumers. Standard radio, dim headlights, no chargers for mobile gadgets and portable electronics, and leave the standard generator.
Among its main advantages are the following:
created and tested in the factory;
designed specifically for classic cars;
fits perfectly into the geometry of the fastening units;
has a very simple design;
automatically switches to self-excitation mode, after which the car’s electrical systems will be connected directly to the generator.
The disadvantages of this solution include the fact that it is quite difficult to find a “native” generator for the VAZ 2106 in good working order. It is called G-221, it produces a current of up to 42 amperes.
The second option: a radical replacement of a non-working or barely able to cope with the load generator with a new, more powerful generator. At the same time, it becomes possible to provide electricity to a powerful multimedia system and bright lamps in the headlights.
Electric generator mounting diagram and its design
To secure the generator to the motor housing, there are special ears on its covers. Fixation is carried out using a bolt to the bracket and a pin to the tension bar. To prevent damage to the cover ears when securing the electric generator, special rubber buffer bushings are inserted into their holes.
When securing the unit, the tightening force leads to displacement of the clamping steel bushing, after which the special buffer bushing is compressed between the metal bushings, and the axial force applied during tightening is not transmitted to the fastening eye. The design of the unit consists of several parts. The main components included in the electricity generating device are:
- rotor;
- stator;
- covers made from aluminum alloy;
- fasteners;
- generator drive pulley.
1 – clamping sleeve; 2 – bushing; 3 – buffer sleeve; 4 – back cover; 5 – screw for fastening the rectifier unit; 6 – rectifier block; 7 – valve (diode); 8 – rear bearing; 9 – slip rings; 10 – rotor shaft; 11 – brushes; 12 – pin “30”; 13 – brush holder; 14 – pin “67”; 15 – neutral wire plug; 16 – generator mounting pin; 17 – fan impeller; 18 – pulley; 19 – plates; 20 – ring; 21 – front bearing; 22 – rotor winding; 23 – rotor; 24 – stator winding; 25 – stator; 26 – front cover.
Almost each of these design components consists of certain individual elements. The rotor consists of a shaft having a corrugated surface, onto which a steel bushing is mounted. In addition, beak-shaped steel poles are placed on the rotor shaft, which together with the shaft and bushing form the core of the electromagnet of the unit.
A pulley and a fan impeller are placed on the rotor shaft, the air flow from which cools the rectifier block circuit and other internal elements of the electric machine. Air is sucked into the cover windows, after which the flow passes inside the electric generator between its stator and rotor and is thrown out through the fan impeller.
The unit pulley and its impeller are made of thin sheet metal. Connected by welding.
Diagram of the electrical windings of the "six" generator
The electrical winding of the rotor is located on a bushing, in a plastic frame, between the beak-shaped poles. It is called the electrical excitation winding. The ends of the electrical winding are brought out through special holes in the poles and soldered to copper slip rings mounted on a plastic sleeve.
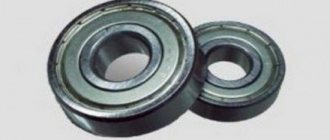
The rotation of the electric rotor is carried out on closed ball bearings. The lubricant placed in the bearing housing is sufficient for the entire period of operation of the electric generator. The bearings are pressed into the generator covers and are located between metal washers.
The unit's electrostator core is assembled from special plates made of steel. The inner part of the stator has 36 slots in which the three-phase electrical winding is placed. Plastic tubes are used as wedges to prevent it from falling out of the grooves. Each electrical winding contains six electric coils, the connection diagram of which is sequential.
Brushes and straightener for auto power generating device
The generator brushes are attached to a brush holder fixed on the cover of the unit. The brushes are made of a copper-graphite composition; they are pressed against the slip rings on the rotor using springs. Through the contact brushes, current is supplied to the excitation winding. The negative brush is attached to the ground of the generator by means of a metal plate, and the positive one is connected to the plug of the battery charge control lamp.
The elements that make up the electric rectifier are fixed on the back cover of the unit. An electric rectifier changes alternating electric current to direct current. The design of the electric rectifier is assembled on the basis of a three-phase bridge circuit. This electric generator component consists of six BA20 diodes.
These silicon diodes are semiconductor devices capable of passing electric current in one direction. The diode bridges are located in an aluminum housing. Three diodes from the rectifier block have a “plus” on their housing. These ends are pressed into the housing holder. Three more diodes of the rectifier block on the housing have a “minus” one. These diode bridge elements are connected to the ground terminal.
1 – “negative” brush; 2 – brush holder; 3 – “positive” brush; 4 – neutral wire plug block; 5 – insulating bushings of the contact bolt; 6 – rectifier block; 7 – contact bolt; 8 – stator; 9 – rotor; 10 – inner bearing mounting washer; 11 – drive side cover; 12 – fan assembly with pulley; 13 – outer bearing mounting washer; 14 – front rotor bearing; 15 – spacer ring; 16 – coupling bolt; 17 – clamping sleeve; 18 – cover from the side of the slip rings; 19 – buffer sleeve; 20 – bushing.
To ensure high-quality heat removal, the rectifier unit diodes are pressed into original holders made of aluminum. Repair of the rectifier unit is impossible; if any of its elements fail, the entire rectifier is replaced.
The generator is connected by connecting the negative terminal of the unit to the vehicle ground, and the positive terminal is connected to the on-board network. The operation of the electric generator is carried out as follows. When the ignition key is switched to the first position, an electric current is passed through the electrical excitation winding, creating a magnetic field.
As a result, when the rotor rotates, the south and north poles of the rotating part pass alternately under the stator teeth. This reversal of poles produces an electromotive force. The shape of the poles allows you to optimize the operation of the unit.
Generator VAZ 2106
A car generator is necessary to generate energy after the ignition is supplied to the engine. The principle of operation of the generator is to convert the mechanical energy of the motor into electricity by rotating the electric motor through the drive belt.
It is the operating conditions of the generator that determine its service life - for example, on a VAZ 2106, the service life of the device does not exceed 50,000 km, after which the unit, as a rule, needs to be repaired.
Generators for VAZ 2106 “Six”: select the appropriate model by article number
The standard generator on the “six” operates at a voltage of 14 Volts and produces about 42 Amperes. However, most drivers install generators of higher power - a stronger unit allows you to connect additional electrical equipment.
However, it must be remembered that a strong increase in the power of the generator requires replacing the main wiring in the car - otherwise there is a high risk of the cables catching fire due to overheating.
Note! Before purchasing a new generator, it is recommended to enter the part number and VIN code of the vehicle on the manufacturer’s official website. This type of verification will prevent the possibility of purchasing a counterfeit part - if there is no information about the part in the database, you must refuse the purchase.
Dismantling and removing the generator from a VAZ 2106: step-by-step instructions
The algorithm for extracting the generator on the “six” is not complicated and can be easily performed with one pair of hands. For dismantling, you will need a standard set of wrenches, as well as a small hammer or mounting blade, and pliers. Removal of the unit is carried out in the following sequence:
- First of all, it is necessary to remove the power terminals from the battery - this will prevent a short circuit in the wiring and electric shock;
- Next, we find the generator and unscrew all the wires leading to the unit. Depending on the cross-section of the wiring, some cables can be screwed to conductive parts with “19” nuts;
- After removing the wiring, you must carefully release the attachment of the unit to the upper bracket - this will allow you to slightly move the generator away from the seat, which will reduce the tension on the drive belt. The belt itself must also be removed, being careful not to damage the tensioner;
- Next, we go under the bottom of the car and remove the crankcase protection, if present. Then you need to unscrew the fasteners on the bottom of the fixing bracket, after which the generator can be removed.
- It will be most convenient to dismantle the unit through the bottom of the car.
Note! An old drive belt, soured or licked nuts, as well as oxidized terminals and torn insulation must be replaced during reassembly and installation of the generator. Otherwise, the resource of the unit will be reduced, and the risk of short circuit will, on the contrary, be increased.
Disassembling and repairing a generator on a VAZ 2106: a detailed guide for beginners
Alternator belt for VAZ 2107
"Seven" came off the assembly line of the Volzhsky Automobile Plant in the period from 1982 to 2012. Initially, the model was equipped with a drive belt of a currently outdated model, which had a smooth surface without any roughness. However, later VAZ 2107 began to be re-equipped to meet the requirements of the time, which led to the emergence of a new type of belt with teeth.
It should be emphasized that the most popular manufacturer of belt products for the domestic automotive industry is Bosch. For many years, the German manufacturer has been producing high-quality products that, both in size and service life, completely satisfy VAZ 2107 owners.
Alternator belt sizes
All parts used in the design of the car must have markings and manufacturer numbers. Design numbers and sizes of belts for the VAZ 2107 are specified in the operational documents for this model:
- 2101–1308020 (smooth surface), dimensions - 10.0x8.0x944.0 mm;
- 2107–1308020 (toothed surface), dimensions - 10.7x8.0x944.0 m.
How to properly tension the belt on the generator
When installing a generator on a VAZ 2107 yourself, the most difficult moment is considered to be proper belt tension. After all, it is through the belt that the generator mechanism will be launched, therefore, any errors and miscalculations when tensioning the rubber product will affect the performance of the car.
The belt tension is performed as follows:
- Place the new generator in its regular place, placing it on the studs.
- Tighten the fixing nuts only halfway, without over-tightening.
- Use a pry bar to install into the gap formed between the generator wall and the pump. Secure the mount in this position.
- Place the new belt on the alternator pulley.
- Hold the pry bar and begin tensioning the belt.
- Tighten the fixing nut in the upper part of the mounting of the generator unit housing.
- Afterwards, carry out a preliminary diagnosis of the degree of tension - the rubber product should not sag downward much.
- Tighten the lower stud nut until it ends without overtightening.
Next, the quality of the belt tension is checked. Using two fingers, press firmly on the free part of the belt and measure the existing deflection. Normal sagging should not be more than 1.5 centimeters.
The service life of a typical belt for a VAZ 2107 generator is usually 80 thousand kilometers. However, it is recommended to change the belt drive earlier if the generator set is being replaced.
Thus, the generator on the “seven” can be replaced with your own hands, but you must adhere to strict rules and observe safety precautions. If you have problems with the operation of the motor after replacing the device yourself, it is better to contact a professional.
VAZ 2106 car generator - device, design features
For bearing 6, the inner race is pressed onto the rotor shaft, and the outer race is pressed into the cover seat 1 with a rubber ring. The stator core 27 is made of electrical steel plates. In the grooves of the core there is a three-phase winding connected in a star circuit to the zero point output. This terminal is unmarked and serves to connect the battery charge warning lamp relay. The main three terminals of the stator winding are connected to a rectifier unit consisting of six silicon diodes. Since 1982, a rectifier unit has been installed, consisting of two plates with diodes pressed into them. If the diodes fail, the rectifier unit is replaced with a new one. The electrical connection diagram of the generator system is shown in Fig. 9.2.
WARNING The negative of the battery should always be connected to ground, and the positive should always be connected to terminal 30 of the generator. Incorrectly turning the battery back on will immediately cause increased current through the alternator diodes and they will fail. It is not allowed to operate the generator with the battery disconnected. This will cause short-term overvoltages to occur at terminal “30” of the generator, which can damage the generator voltage regulator and electronic devices in the on-board network of the VAZ 2106 car.
It is prohibited to check the functionality of the generator “for spark” even by briefly connecting terminal “30” of the generator to ground. In this case, significant current flows through the diodes and they are damaged. The generator can only be checked using an ammeter and voltmeter. The diodes of the generator rectifier unit cannot be checked with a voltage of more than 12 V or with a megger, since it has a voltage too high for the diodes - during testing they will be broken (a short circuit will occur). It is prohibited to check the electrical wiring of a VAZ 2106 car with a megger or a lamp powered by a voltage of more than 12 V. If such a check is necessary, you must first disconnect the wires from the generator. The insulation resistance of the stator winding with increased voltage should only be checked on a bench and always with the terminals of the phase windings disconnected from the diodes.
USEFUL TIPS If the alternator belt breaks along the way, and you forgot the spare one at home, a 20 mm wide ring cut from an old car inner tube can temporarily replace it. To reduce current consumption when driving a VAZ 2106 with a faulty generator, if possible, turn off the radio, unnecessary lighting, heater fan, heated glass, etc.
Rice.
9.1. Generator of a VAZ 2106 car: 1 - generator cover from the side of the slip rings; 2 - rectifier block; 3 — bolt for fastening the rectifier unit and the phase terminals of the stator winding; 4, 5 — slip rings; 6 — ball bearing of the rotor shaft on the side of the slip rings; 7 — rotor shaft; 8 — insulating sleeve; 9 — brush holder fastening screw; 10 — “positive” terminal bolt (pin “30”); 11 — insulating sleeve of the contact bolt; 12 — plug of the central output of the stator winding; 13 — brush holder; 14 - negative brush; 15 - positive brush; 16 — pin for attaching the generator to the tension bar; 17 — pulley impeller; 18 — beak-shaped pole piece of the rotor from the drive side; 19 — generator drive pulley; 20 — pulley fastening nut; 21 — bearing spacer ring; 22 — ball bearing of the rotor shaft on the drive side; 23 — generator cover from the drive side; 24 — rotor winding frame; 25 — rotor winding; 26 — stator groove insulation; 27 - stator; 28 — stator winding wedge; 29 — stator winding; 30 - rotor; 31 — coupling bolt; 32 — buffer sleeve; 33 — bushing; 34 - negative diode; 35 - insulating plate; 36 - phase output wire of the stator winding; 37 - positive diode; 38 — holder of positive diodes; 39 — insulating sleeve; 40 - negative diode holder
Rice. 9.2. Diagram of the G-221 generator system (the voltage regulator RR-380 of the electromagnetic type is shown):
1 — generator rotor winding; 2 - generator; 3 — generator stator winding; 4 — generator rectifier; 5 - battery; 6 — ignition switch; 7 — battery charge indicator lamp; 8 — battery charge warning lamp relay; 9 — fuse block; 10 - throttle; 11 — thermal compensating resistor; 12 — additional resistors; 13 - voltage regulator
Connection diagram for the VAZ-2107 generator
1 - battery; 2 - negative diode; 3 - additional diode; 4 - generator; 5 - positive diode; 6 - stator winding; 7 - voltage regulator; 8 — rotor winding; 9 — capacitor for suppressing radio interference; 10 — mounting block; 11 — battery charge indicator lamp in the instrument cluster; 12 - voltmeter; 13 — ignition relay; 14 - ignition switch.
Features of operation and connection diagram of the generator on the VAZ 2106
In order for a working generator in a VAZ to serve you for a long time, the main requirement is not to overload the device. It is important to periodically carry out preventive maintenance, replace consumables - brushes, and also monitor the tension of the strap. On car 2106, the generator is connected according to the electrical diagram below.
Connection diagram of the node to the on-board network of the “six”
Diagnostics
How to remove and disassemble the device on your car, how to repair connections? Before we tell you how to disassemble and reassemble the voltage device on a VAZ 2106 with your own hands, we’ll take some time for diagnostics. How to test a generator at home? In total, there are three testing methods - on the machine itself, on a stand, and also using an oscilloscope. The last two methods are not of interest to us, since they require specific knowledge and the use of equipment.
The VAZ 2106 generator cannot be diagnosed by disconnecting it from the battery, as this will lead to a voltage surge, as a result of which the rectifier unit may fail. If you have ever had to check the voltage regulator of a VAZ 2106, then in the case of a generator unit the diagnostic procedure will be identical.
First of all, you will need to start the engine, the engine should be running at 2500-300 rpm, and the battery should be maximally charged. Using a multimeter, measure the voltage at the battery terminals - this parameter should be 14 volts. If the indicators differ, the problem must be looked for either in the voltage relay or in the device itself. If you have adjusted the voltage relay, but the problem remains, the unit will have to be either repaired or replaced.
Checking voltage with a multimeter
How to install a VAZ 2107 radiator
Installing the generator is not particularly difficult, since there is no need to deal with rusted bolted connections. The procedure for installation is the reverse of removal. After installing the generator, you need to install the belt and tension it. If you tighten it too loosely, the belt will slip when the generator is loaded, producing a characteristic whistle. Excessive belt tension will cause premature wear of the alternator bearing. It is easy to check the correct belt tension: it must be turned by hand along the longitudinal axis by 90 degrees. If the angle is smaller, the belt will be tightened. If more, it is weakened.
After installing the generator, connecting the wires to it and tensioning the belt, you can connect the battery terminals.
Everything is ready for testing. You can start the engine. The functionality of the generator can be checked with a voltmeter by measuring the voltage on the battery. When the car engine is running, the on-board voltage should be 14 volts.
Common faults
What malfunctions of the VAZ 2106 generator exist and how to eliminate them?
The first type of breakdown is when the light on the dashboard is always on or lights up from time to time while driving, the reasons are as follows:
- The strap is slipping - its tension needs to be adjusted.
- Open circuit between the center of the star assembly and plug number 85 of the warning light relay.
- The charge indicator relay is damaged.
- Voltage regulator failure.
- Break in the field winding wiring.
- The generator brushes are worn out and the slip rings are oxidized. The problem can be solved by cleaning the rings, as well as replacing the generator brushes.
- There is a short circuit or break in the valve circuit of the mechanism.
- Short circuit in the wiring in the stator winding or open circuit.
If the warning light does not light up when the ignition is turned on, the reasons may be as follows:
- The filament has burned out - the light bulb can simply be replaced.
- Failure of the light bulb relay.
- Broken wiring or shorted valves.
- The stator winding is shorted to ground. Replacing the stator will solve the problem.
- The generator does not charge the battery.
Design and designation of node elements
If the generator unit is functioning normally, but the battery is not charging well, the reason may be:
- Poor belt tension or slipping when driving at high speeds. You can get rid of this problem by adjusting the strap tension.
- The terminals on the battery have oxidized, the wiring has been damaged, or the clamps of the wiring tips on the mechanism have become loose.
- If the battery fails, it must be replaced.
- Problems with the operation of the voltage regulator can be corrected by cleaning the contacts, as well as adjusting or replacing the element.
As for battery overcharging, it is usually caused by poor contact between the body of the regulatory element, as well as the ground. Much less often this is due to failure of the regulator itself, as well as battery failure.
If the generator unit operates very loudly, this is due to:
- By loosening the pulley nut of the unit - you just need to tighten it.
- By bending the fan blade - you just need to rebuild it.
- Incorrect operation of bearing elements.
- Short circuit or broken wiring in the mechanism.
- The brushes of the assembly can contribute to the appearance of noise - you just need to wipe them (the author of the video is Sergey Bakaev).
Dismantling and removal
How to remove a VAZ generator and how to disassemble the device? Which generator is better to install on a VAZ 2106?
To repair a VAZ 2106 generator, follow these steps:
- First you need to disconnect the plug from output 67 on the node.
- After this, the plug is disconnected from the output of the so-called neutral wire.
- Next, you need to move the insulating cover a little, after which, using a 10-mm wrench, you need to unscrew the nut that secures the wiring, in particular, we are talking about the thirtieth pin. The wiring can be disconnected.
- Now you can remove the strap. If you only need to replace it, then buy a good belt - check its condition, there should be damage on the strap. The size of the VAZ 2106 alternator belt must correspond to the nominal one; it is indicated in the service manual.
- Using a 17mm wrench, you need to unscrew the two nuts that secure the adjustment bar; it needs to be removed.
- Then unscrew the nuts of the lower mechanism clamp, remove the bolt, as well as the bushing. The assembly itself will be fixed on the bracket.
- After this, the unit can be dismantled. If necessary, the generator is replaced. Further connection of the generator is carried out in the reverse order of removal.
Sorry, there are no surveys available at this time.
And so first we remove the generator from the car. We place it on a workbench and, using a 10mm wrench, unscrew the nut on terminal “30” of the generator and remove the tip of the noise-suppressing capacitor from the bolt.
Unscrew the capacitor fastening with a screwdriver and remove it.
Next you need to remove the voltage regulator relay.
Remove the insulating sleeve from the terminal “30” bolt output.
Now you need to remove the impeller from the generator. To do this, use a 19mm wrench to unscrew the generator pulley nut. To prevent the rotor from turning, wedge it with a screwdriver.
Now, using a small chisel or screwdriver, remove the key from the shaft and remove the spacer ring.
Using a 10mm wrench, unscrew the four nuts from the bolts holding the generator housing together.
Remove the bolts and try to remove the front cover of the generator.
If it cannot be removed, then you need to use a soft metal attachment to knock the shaft out of the cover along with the rotor and the rear part of the generator. When knocking out, hold the generator by the top cover.
You won't be able to do this without a partner.
Remove the washer from the shaft. It's adjustable. When assembling the generator, be sure to install it.
Replacing the VAZ 2106 generator bearing is easy if you have pullers. To replace the front bearing, use a 8mm wrench to unscrew the 4 cover nuts.
Please note that the ends of the studs were squared. When unscrewing, the ends of the studs will be adjusted to the detriment of the nuts themselves. The latter will have to be replaced with new ones before assembly.
After unscrewing the nuts, you can remove the outer and inner covers.
The bearing can be knocked out of the cover using an adapter of a suitable diameter and a hammer.
We also drive the new bearing into the cover using a socket (you can use a piece of water pipe or a head).
Replace the bearing caps and tighten the nuts. Then use a small core to lock them.
Use a tool to knock the generator rotor out of the back cover.
It should come off along with the bearing. If you need to change the rear bearing, use a puller and press it off the rotor shaft.
But usually replacing the rear bearing of the generator is required much less often than the front one. The new bearing is pressed in using a mandrel, the diameter of which should be slightly larger than the diameter of the shaft (otherwise the mandrel will get stuck on the shaft).
To remove the diode bridge, unscrew the three nuts securing the stator terminals with a 8mm head and remove the stator and then the rectifier unit.
The rectifier unit is checked using a digital multimeter set to the semiconductor diode measurement mode. Negative diodes are checked by connecting the positive probe of a multimeter to one of the rectifier unit mounting bolts, and the negative probe to the negative plate of the generator rectifier bridge. If the device shows little resistance, then one or more diodes are broken. To check the positive diodes in the bridge, the plus of the device is connected to the positive common plate of the valves, and the other to one of the bolts of the rectifier block. If the diodes fail, it is recommended to replace the entire rectifier bridge assembly.
The stator winding is also checked for external winding damage. If the rotor clings to the stator, then you will clearly see abrasions on it. If the iron is slightly damaged, it can be used. If there is damage to the winding itself, then the stator must be replaced.
The rotor is also checked with a multimeter for the presence of a winding break and short circuit to the rotor body. If there is one, then we must replace the rotor with a serviceable one.