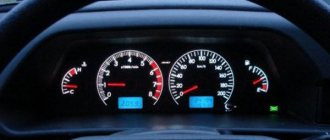
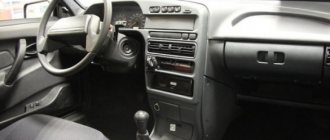
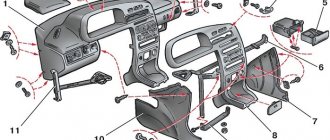
Description of the VAZ 2109 instrument panel (High panel): 1. Ignition switch, 2. Hazard warning switch, 3. Windshield wiper and washer switch lever, 4. Radio socket, 5. Central nozzles of the interior ventilation and heating system, 6. On-board computer ( installed as part of the package), 7. Instrument panel, 8. Glove box lid, 9. Side nozzles of the interior ventilation and heating system, 10. Loudspeaker trim, 11. Shelf, 12. Power window switches (installed as part of the package), 13. Cigarette lighter, 14 . Control panel for the interior ventilation and heating system, 15. Gear shift lever, 16. Parking brake lever, 17. Ashtray, 18. Carburetor choke handle, 19. Accelerator pedal, 20. Brake pedal, 21. Clutch pedal, 22. Horn switch, 23. Instrument lighting switch, 24. Hydraulic headlight leveler, 25. Front seat heating switch (installed as standard), 26. Rear fog lamp switch, 27. Fog lamp switch (installed as standard), 28. Heated glass switch tailgate, 29. Hood lock drive lever, 30. Turn signal and headlight switch lever, 31. External lighting switch, 32. Instrument cluster.
More information about the instrument cluster for the high panel (torpedo) VAZ 2109
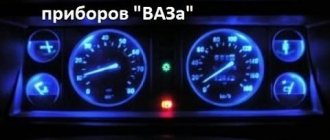
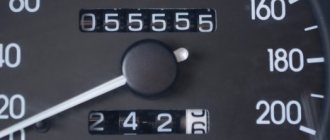
1. Speedometer, 2. Trip counter reset handle, 3. Trip counter, 4. Total mileage counter, 5. Fuel level indicator, 6. On-board control system light panel, 7. “TEST” display, 8. “Test” display STOP”, 9. Indicator lamp for failure of brake lamps and side lights, 10. Indicator lamp for low brake fluid level, 11. Indicator lamp for low coolant level, 12. Indicator lamp for front brake pad wear, 13. Indicator lamp for low level level in the washer reservoir, 14. Indicator lamp for low oil level in the engine crankcase, 15. Coolant temperature indicator, 16. Tachometer, 17. Indicator lamp for engaging the parking brake, 18. Indicator lamp “CHECK ENGINE” system injection, 19. Indicator lamp for closing the carburetor air damper, 20. Indicator lamp for reserve fuel remaining, 21. Indicator lamp for emergency oil pressure in the engine lubrication system, 22. Indicator lamp for turning on the right turn indicators, 23. Indicator lamp for battery charge, 24. Left turn indicator warning light, 25. Seat belt warning light, 26. Doors not closed warning light, 27. Side lights warning light, 28. High beam headlight warning light, 29. “CHECK ENGINE” warning light. engine”) toxicity reduction systems.
Step-by-step tuning steps
Before dismantling the VAZ 21099 panel, you will need to remove the terminals from the power supply by hand. Then the decorative steering wheel trim is removed. The nut should be unscrewed so that its end is flush with the similar element of the steering column shaft. You can’t turn it away right away. Then tuning the VAZ 21099 panel involves removing the steering wheel.
After unscrewing the 6 screws that secure the lower casing, you will need to remove it. The ignition switch trim is removed. The next step involves loosening the bolt that secures the base of the switches. The last element is removed from the shaft, and 2 blocks with the corresponding wires are disconnected.
In this case, you will need to label the washer and wiper switches. The block with wires is disconnected from the corresponding levers and direction indicators. The choke should be pulled out so that a draft occurs. At the same time, the handle of the first unit is pulled towards itself. Then the bolts securing the console trim are removed from the panel and the trim itself is removed.
The cigarette lighter cartridge and ashtray are pulled out of the socket. The VAZ torpedo is equipped with a heater fan that will need to be removed. To do this, it is recommended to use a screwdriver. The block and two wires are disconnected from the fan switch. They illuminate the europanel.
Tuning instrument panel
How to remove a high instrument panel VAZ - 2108, 09, 099 - Yakovlev Dmitry
Complete removal of the VAZ 2109 panel. Preparation for gluing. Part 1
You also need to disconnect the handles for the hydraulic headlight adjustment and the light switch. After unscrewing the nuts, the corresponding switch is pushed inside the panel. The side nozzles are removed with a screwdriver. The high panel provides for turning away the bolts for fixing the linings. The last elements are located on both sides of the torpedo.
Subsequent tuning is carried out taking into account the removal of the radio socket. Existing audio equipment is pre-dismantled. Then, using a screwdriver, the latches are removed and the cover is raised. The block and wires are disconnected from the cigarette lighter. A similar step is carried out in relation to the backlight and alarm switch.
Tuning VAZ 2109
Sometimes there is a need to remove only one visor on the high instrument panel of a VAZ 2109 without removing the entire panel. Often this point is not described in the manuals; the emphasis is on dismantling the entire dashboard and disconnecting it from the car body. At the same time, to access the instrument cluster, for example, to install LEDs for dial illumination instead of standard lamps or install another instrument combination, there is no need to dismantle the entire instrument panel; it is enough to remove only one visor.
In this article we will look at how you can do this yourself.
Before starting any work on the vehicle's electrical wiring, it is necessary to disconnect the negative terminal from the battery to avoid possible short circuits in the wires.
It will be useful: Changing the oil in the automatic transmission of a Mitsubishi Outlander
Remove the headlight/low beam switch button from the panel using a screwdriver. The button is tight, you need to be careful not to damage it.
Disconnect its connector from the button.
In the same way, remove the emergency button. It will be more difficult to pull it out, we also need to be careful.
Disconnect its connector.
Using a Phillips screwdriver, unscrew the two screws securing the tidy console trim, also called the “beard.”
Having unscrewed the screws, we bend the beard down, holding it from below with another self-tapping screw.
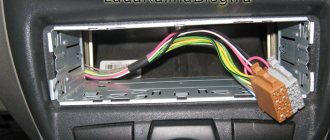
We take out the radio and disconnect all its connectors, or the standard plug if you do not have a radio in your car.
There are 3 metal latches (2) on the top of the visor, and 2 plastic tabs (1) on the bottom edges. To remove the visor, you need to press them out one by one and release the instrument panel visor.
We start with the two top latches, use a screwdriver to press them through the niche for the radio, and slide the visor towards you. Caution is also necessary here as the latches are fragile and can come off.
Next, use a screwdriver to press out the two lower plastic fasteners of the visor and lift the visor up.
Raising the visor, unhook the third upper mounting bracket, located on the left. Well, having disconnected the electrical connectors of the cigarette lighter, its illumination and the emergency signal lamp, we release the visor.
That’s it, access to the instrument cluster is free, just don’t forget that the connectors and speedometer cable are holding it at the back. If you need to remove the instrument panel combination, for example, in order to illuminate the instrument scales from the inside, do not forget to turn off the whole thing.
How to remove the instrument panel from a VAZ-2114
Before you finally remove the dashboard on the VAZ-2114, you need to understand the specific components that will have to be dismantled:
- a key component on which the BC is attached, a block of various devices, as well as all kinds of keys, switches and other components;
- a trim that is installed on the VAZ-2114 mainly for beauty, but also has air duct outlets;
- plugs;
- brackets;
- ashtray body;
- crossbars;
- shield;
- central bracket;
- console screens.
If you are going to remove the instrument panel from a VAZ-2114, you will have to remove all these elements separately. Moreover, each of them has its own fastening features and you will need to use different tools, since you will need to remove the shield and, for example, the brackets in different ways.
Tools and materials
To remove all the necessary elements, it is not at all necessary to have any expensive tools or special equipment. It is enough that the garage has a standard set of screwdrivers, as well as instructions for working with the VAZ-2114.
Sequence of operations when removing a torpedo from a VAZ-2114
In order to remove the instrument panel from a VAZ-2114, it is enough to do everything in accordance with the simple instructions given below:
- Using a Phillips screwdriver, remove the 3 screws securing the left console screen to the dashboard. It is recommended to get a short tool, as it is much more convenient.
- Carefully remove the lower part of the trim from the body bracket, removing the screen.
- Remove all screws securing the console screen to the panel. At the same time, do not forget to constantly belay the pad with your hand.
- Remove the screen. At the same time, be sure to ensure that it does not cling to any kind of cords.
- Disconnect the connectors to disconnect ground from the battery. If a radio is used in transport, then in this case it should also be separated from the main wires by removing the connecting block. If it is not in the car, it will be enough to remove the wires from the dashboard, making sure that they have a plug. Be sure to turn off the cigarette lighter and also remove the socket with the light bulb that illuminates the ashtray.
- Remove the handles from all levers that control the heating dampers. It is recommended to pry them off with a flathead screwdriver to make the procedure easier. There is a special protrusion on the lever, and when the handle is installed, it is combined with the lever through a special hole. That is why, when removing it, you should use a thin screwdriver to pick it up and lift it, freeing it from this protrusion.
- Remove the electric fan toggle switch (you just need to pull it out of the connector).
- Unscrew all the screws securing the VAZ-2114 dashboard to the brackets on both sides.
- Release the shield and trim by removing two self-tapping screws located in the window near the instrument unit;
- Take out the plug and remove the screw located behind it.
- Remove the two screws that hold the trim in place at the bottom, then pull it out.
- Label the wires to identify which switches they go to, then unplug them.
- Remove all bolts from the steering bracket.
- Unscrew the screws holding the lower bracket mount.
- Remove the light guide.
- Remove the element securing the heating control unit, and then remove the cartridges that are located behind it.
- Remove the decorative insert, removing any external components.
- Remove the hydraulic corrector lighting.
- Loosen all the fasteners of the panel, then remove the bolt with which it is secured to the crossbar, located on the left side.
- It remains to remove the VAZ-2114 torpedo.
How to remove the high type panel
If your VAZ-2109 has a high panel model installed, then you need to act differently:
- First remove the steering wheel to gain access to the instrument panel.
- If you have a carburetor engine, pull out the choke and remove the handle from it.
- Now you need to remove the decorative trim; it is held on by two screws.
- Remove the ashtray and cigarette lighter.
- Pull the fan control handle towards you.
- Use a screwdriver to pry off the decorative control knobs for the interior heater drive.
- Be careful when removing the power wire connectors that go to the heater switch and to the heating control light.
- Remove the handles for the headlight hydraulic adjustment and the instrument panel lighting control.
- Use a socket to turn these adjusters and gently push them inward.
- Remove the air deflectors for the left and right side windows, and also remove the fasteners that were located under them.
- Pry the headlight switch with a screwdriver and pull it out to the length of the wires, disconnect it from the power supply. Place the block back behind the plastic part.
- Remove the stereo or standard radio, and then unscrew the center mount of the decor.
- Along the edges of the decorative trim there are latches that will need to be pressed in order to remove the decorative part of the torpedo by moving upwards.
- Disconnect power from the cigarette lighter, backlights, and hazard warning lights.
- Remove the decorative trims and speakers, disconnecting them from the wiring. After this, turn off the power to the heated rear window and fog lamp switches.
- Unscrew the fasteners and remove the instrument panel, remove the central screw on the speedometer and disconnect it from the cables. De-energize the shield.
- Turn off the power and remove the ignition switch, disconnect the choke control rod from the power supply.
- Disconnect the illumination lamp of the compartment for personal belongings from the power supply. Unscrew the remaining fasteners on the left and right and remove the panel.
It will be useful: The fields in the PTS have run out, what should I do?
Reassembly is carried out in the reverse order; it is especially important to monitor the connection of the power supplies. We recommend watching the video before disassembling the panel.
The final stage of work
The high panel of the VAZ is dismantled carefully, since there are latches on the left that quickly break. After disconnecting the block from other elements, the entire instrument cluster is dismantled. The final step involves disconnecting the cable from the speedometer. If the Europanel is equipped with additional equipment, then you need to be even more careful. Tuning a torpedo involves disconnecting the block from the following units:
- on-board control system;
- ignition relay;
- remaining panel instruments;
- backlight lamps.
You will need to unscrew the screws for the lower fixation of the torpedo on both sides. Using a screwdriver, pull out the plug and unscrew the screws for the side fixation of the torpedo. The europanel is removed at the final stage. Installation of a new structure of this type is carried out in the reverse order. Upon completion of this procedure, the operation of the switches is checked.
Often, tuning a VAZ torpedo involves dismantling the plastic and removing the panel board. On the steering rack in How to remove and clean injectors on a VAZ 2110; How to check on a VAZ 2109. remove the golf dashboard 2 panel, when you remove about 2-3. In this case, you will need the following tools and materials:
- soldering iron;
- europanel or insert;
- ultraviolet light bulb;
- wires;
- light bulbs;
- cartridges;
- glue;
- marker.
Initially you will need to remove
old europanel, remove glass and existing trim. The insert and arrows are carefully pulled out. Particular attention should be paid to the new insert. It is recommended to make holes with some margin. This will prevent the arrows from sticking.
Further tuning is based on dismantling the standard backlight. This may break the plastic. Initially, the board is dismantled. Experts advise first drawing on paper the existing connection diagram and connections.
The standard lighting is replaced with neon lamps. Neon is glued to the panel. A plastic protection is fixed on top. In this case, you need to check whether this structure is securely held. How to properly remove a torpedo on a VAZ-2110 without damaging it: step-by-step instructions. The block with which the neon lighting is controlled should be glued to the europanel. To do this, you can use glue or double-sided tape.
Such tuning is easy to do with your own hands. An important point is the installation of the panel and the correct connection of its devices to the network. A detailed article with a video on how to replace the daytime running lights (DRL) lamp on a Lada Granta with your own hands, photos and videos, article numbers. For this, auto mechanics recommend using books on repair and operation of the VAZ 21099.
How to do easy tuning of the VAZ-2109 dashboard with your own hands
During the modernization of the interior of the domestic “nine”, tuning its “tidy” becomes a truly indispensable element. Beautiful modifications can be done with your own hands. To do this, you will need to make a new dial on a computer using special design programs and printing the picture on a printer.
However, first you need to clearly think through the appearance of the dials for the car's tachometer and speedometer, as well as for all the sensors that remain. Once the dials are printed, they need to be laminated, and then you can start removing the instrument panel.
To dismantle it correctly, you must first remove the steering wheel pads and also mark the steering position relative to the shaft. Then carefully unscrew the fastening nut.
Next, you can remove the steering wheel and unscrew the screws that are located in the area of the car lower casing. After this, you will have to disassemble the steering column. When the instrument panel is removed, you should unscrew the arrows from the old speedometer and tachometer. Subsequently, they will be attached to the updated dials.
When tuning a VAZ 2109 with your own hands, you can also repaint the dials and hands in bright colors. Regular spray paint cans are suitable for this. At the same time, it is better to make the dial a rich black color.
You can make it matte using special products. In this case, the arrows need to be painted in bright pink or original red-burgundy tones. After the painted plates of the machine dial have dried, they are completed with an old or pre-prepared scale and removed hands.
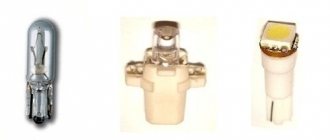
In a situation where the owner wants to modernize the instrument panel in a more modern way, he should also use a special (original, as in the video) backlight. You can add an original touch using a fluorescent marker, but more on that below.
Dashboard diagram
The VAZ 2109 panel is made of a special energy-absorbing material.
It consists of an overlay and, in fact, the panel itself. It is made of plastic. Its thickness is 3 mm. The overlay is essentially reinforced with a special metal frame. It has a reliable energy-absorbing layer made of polyurethane foam. On the outside it is lined with a special decorative film. The car can be equipped with low and high VAZ 2109 panels, as well as a “European panel”.
The high panel of the VAZ 2109, like the low one, has certain features that should be taken into account when installing them. The installation method and the high panel are almost identical, since the mounting points, as well as the connections of the air ducts of the automobile ventilation and heating system, are the same. The differences concern only the wiring harness connections. (The diagram of the VAZ 2109 instrument panel is shown in the photo below; follow the link to read even more about it).
How to remove a torpedo on a VAZ 2109 low
- Remove the three heater control knobs.
- Remove the heater fan switch handle by pulling it toward you.
- Remove two screws securing the instrument panel console trim on both sides of the console.
- Slide the cover towards you.
- Disconnect the block with wires from the rear fog lamp switch.
- Disconnect two connectors with wires and one wire from the heated rear window switch.
- Disconnect the block with wires from the hazard warning switch.
- Remove the wiring harness from the exterior light switch.
- Disconnect the connector with the cigarette lighter illumination wires.
- Disconnect the connector with the cigarette lighter wires and remove the console trim.
- Remove the four screws securing the heater control panel.
- Remove the two screws securing the instrument cluster visor.
- Remove the instrument cluster visor.
- Compress the spring clips.
- Remove the instrument cluster housing from the panel.
- Unscrew the fastening nut and disconnect the cable from the speedometer.
- Disconnect the white block with wires from the instrument cluster.
- Remove the hose from the econometric fitting.
- Remove the cotter pin.
- Disconnect the trip odometer reset cable from the speedometer.
- Disconnect the red connector from the instrument cluster.
- Remove the handles for the headlight hydraulic adjustment and the instrument cluster lighting switch by pulling them towards you.
- Unscrew the nut securing the instrument cluster lighting switch.
- Unscrew the nut securing the headlight hydraulic corrector socket.
- Remove the steering wheel and steering column switches.
- Turn the ignition key to position “1” to turn off the anti-theft device, and disconnect the ignition switch wiring harness.
- Remove the two bolts and two nuts securing the steering column pipe.
- Remove the steering column pipe along with the ignition switch.
- Pull the carburetor choke handle towards you until a draft appears, and remove the handle from the rod.
- Remove the two screws securing the air damper guide rod to the instrument panel.
- Remove the screw that secures the instrument panel on the left side.
- Unscrew the screw of the lower fastening of the instrument panel on the left side.
- Remove the screw on the side securing the instrument panel on the right side.
- Unscrew the screw of the lower fastening of the instrument panel on the right side.
- Unscrew the screw securing the instrument panel in the glove box.
- Unscrew one screw securing the instrument panel console on both sides and remove the instrument panel.
Installing a low torpedo on a VAZ 2109 is carried out in the reverse order of removal.
If your car has a low dashboard, we recommend installing overlays on the VAZ 2109 panel, they will give the car interior a more modern look and ease of use of the dashboard as a whole.
What to do if the instrument panel on a VAZ 2109 does not light up
:
- Types of panels
- Why doesn't it light up?
- Popular faults
When the instrument panel on a VAZ 2109 does not light up, this is one of the common malfunctions of this unit. To fix a problem, you first have to find the cause of its occurrence.
Tidying up nine
Types of panels
Instrument panels on the VAZ 2109 are of at least three types:
- Low panel;
- High panel;
- Electronic panel on nines with Europanel.
Europanel
On versions with a low panel, failure of the entire panel is extremely rare. This is due to the fact that here the speedometer and econometer are equipped with mechanical drives. Therefore, it is unlikely that they will fail along with the electrical component.
Dashboards with a high panel do not have an econometer, but the speedometer is also based on a mechanical cable drive.
Why doesn't it light up?
If suddenly electrical appliances and indicator lamps on the dashboard stop working, certain actions must be taken.
- First, remove the cover of the mounting block and make sure that the fuse is intact. The fuse markings are located on the inner surface of the cover. You should look for fuse F16 or F5, depending on the year of manufacture of your VAZ 2109.
- If the fuse is intact, be sure to check whether the contacts of the fuse you are looking for have not oxidized. It is not uncommon for shields to fail due to broken contact.
- Check if there is power to the dashboard. To do this, you will need a warning light and the ignition on. Disconnect connector X4 in the mounting block and check for voltage at pin 3. The disadvantage of the VAZ 2109 design is that when it rains, the mounting block immediately becomes wet. This causes oxidation of the contacts in the pads, which causes the electrics to stop working. Sometimes not only the contact is oxidized, but also the board of the Nine mounting block.
If none of the above actions yielded results, you will have to be disappointed. After all, now you need to remove the dashboard and check the condition of the wiring, contacts, and negative connections. Here it is better to trust a professional electrician or set aside a whole day to troubleshoot problems yourself. There is no need to rush here.
Where did the backlight go?
Popular faults
If we talk about the dashboard of VAZ 2109 cars, then they are characterized by certain problems. We will tell you about them, and also tell you how to act correctly in a given situation.
| Fault type | Your actions |
| Gasoline level and temperature indicator does not work | In most percent of cases, this situation occurs due to breakdown of devices, sensors of these devices, or an open circuit of the power supply. Therefore, first check the circuit for continuity, make sure that the fuses have not blown. If this is not the case, check whether the gas level and temperature sensors are working. Only if none of the actions allowed you to get rid of the breakdown, you can begin to replace the devices themselves. No options, the problem lies in them |
| When the fuel tank is full, the arrow points to zero | If you have worked on the fuel level sensor, the fault most likely lies with you. When manipulating this device, the float limiter is often knocked down. Either the limiter is installed incorrectly or adjusted, causing the resistor winding to end. To resolve the problem, remove the sensor and then adjust the limiter again |
| The fuel gauge needle regularly jumps and ends up at zero | Here, most likely, the resistor has weak contact with the current collector. Another possible option is that there is a break in the resistor. To resolve this situation, we recommend replacing the hot level sensor with a new measuring device |
| The fuel level lamp is constantly on | If this lamp is constantly on, there is probably a short circuit in the fuel level sensor supply wiring to ground. Another option is that the sensor’s flexible bus is shorted to the fuel intake pipe. You will have to disassemble the device to align the bus and get rid of the resulting short circuit |
| Indicator lamps do not work on the dashboard | There is a high probability that the light bulbs have simply burned out, or they are poorly held in their seats due to loose contact. Replace the bulbs, but first try tightening the contacts. Traces of oxidation may be detected. When cleaned, the light bulbs can work normally again. Also, do not exclude the possibility of wiring breakage or oxidation of the tips of the supply wiring. Try going over the wires with a tester, cleaning the contacts if necessary. |
| The speedometer does not work, the flexible shaft is noisy | In such a situation, you will have to change the speedometer drive cable or replace the entire speedometer assembly. But before you bother so much, check that the fastening nuts of the tips are tightened correctly and properly. The flexible shaft may make noise during operation due to deformation or violation of the permissible bending of the shell of less than 10 centimeters during installation |
Last resort - complete dismantling
The instrument panel of the VAZ 2109 is not so complicated that you cannot figure it out on your own. But in the absence of experience, it is better to entrust the repair to specialists, or to enlist the support of a partner who understands this matter.
No Comments Yet!
Source: https://luxvaz.ru/vaz-2109/343-chto-delat-esli-ne-gorit-panel-priborov.html