Why is additional heating needed?
When storing a car in open parking lots, the metal body of the car quickly cools down. The inside of the glass is covered with a thin layer of condensation, which later turns into an ice crust. Within a few hours of parking, almost all parts, including all rows of seats, reach ambient temperature.
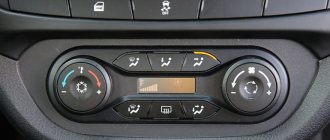
Heating adjustment from the passenger compartment
In the morning, the driver tries to quickly bring a cold car to normal temperature, but for such a stressful state of the car, one stove will not be enough . Even if you start driving in a poorly warmed car, you can wait more than one hour for it to reach normal temperature conditions.
If, from the very beginning, all the heat is taken from a cold car to heat the interior, then there will not be enough heat for the engine to return to normal temperature conditions, which means that the power plant will have less and less heat for the interior and will not be able to do without an additional heater.
A frozen driver is ineffective at driving. He is stressed and may lose attention and control of the road. This can lead to emergency situations.
ADDITIONAL HEATER
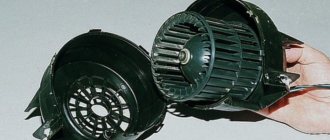
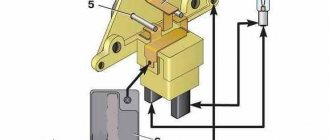
Diesel auxiliary heaters (dry hair dryers) Planar view
An additional stove (heater) is installed in a car if the standard heater cannot cope with heating the cabin or interior. Well suited for heating buses and minibuses (PAZ bus, Ford minibus, etc.), MAZ, KAMAZ, ZIL, UAZ, UAZ loaf, Bychok, GAZelle, GAZ, Sobol, Zubrenok, Volvo, Foton, Ford, Scania, Mercedes, Hyundai, etc. To operate, it uses engine coolant and the vehicle’s on-board network - 12 or 24 volts. The operating principle of the additional heater is the same as that of the standard car heater. Also, an additional stove can be installed not only in the cabin, interior, but also in an insulated van, kung, or car body so that products that require above-zero temperatures can be transported. If the coolant line is long enough or the water pump cannot cope with pumping the coolant, an additional electric pump (pump) powered by batteries is installed.
Additional radiator
Very often, motorists solve the problem of heating the vehicle interior with the help of another radiator and fan. It is connected to the standard heater, for which additional pipes are installed in the passenger compartment. This solution is quite common for the interiors of passenger minibuses, buses and vans, which have a large volume.
Autonomous heaters for minibuses
The advantages include:
- standard operating principle;
- efficient and fast heating;
- the ability to select a profitable option in any auto store;
- lower cost than analogues.
The disadvantages of this option are:
- the need for proper installation;
- heating efficiency depends on the degree of engine warm-up;
- additional consumables are required - hoses, tubes, insulating materials;
- interference with the appearance of the interior;
- there are no guarantees that the desired effect from the installation will be achieved;
- the volume of coolant increases.
Tools for installing an additional pump
Modernization of the VAZ-2115 heater consists of installing an electric pump, which will save passengers and drivers from the cold, especially when the vehicle is idling.
Before starting installation, prepare the following tools and materials:
- Electric pump suitable for a gazelle. Experts recommend this type of pump; it pumps heat into the cabin in the most efficient way. Externally, the device resembles a centrifugal pump, where the fluid flow is rejected from the center of the periphery using blades.
- Relay. Ideally, a starter or ignition device would be suitable; here the open contacts are more convenient.
- Small pieces of hose made of aluminum and reinforced material.
- Coolant with a volume of 2 liters or more. You can take antifreeze, antifreeze or, in extreme cases, ordinary water.
- 6 clamps.
We recommend: Sequential gearbox: what it is and how it works
Popular models of autonomous car heaters
We list the most popular devices, the operation of which requires connection to the on-board power supply:
- Planar 4D is an air-type heater that runs on diesel fuel. The 4 kW model allows you to regulate both the temperature and the speed of the air flow supplied to the cabin. Modification 4D-12, as the name suggests, is suitable for use in passenger cars, since it requires connection to a 12-volt battery. A more productive modification, Planar 4D-24, runs on 24-volt batteries and therefore can be used to heat buses and heavy trucks, as well as special equipment. Electricity consumption is at the level of 4 A/h, which is quite acceptable when using a battery with a capacity of 150 A/h. The cost of the heater is from 190,000 rubles;
- Webasto AIR TOP 02000ST is a series of popular air-type autonomous heaters from a well-known global manufacturer of automotive components. With a thermal power of 2 kW, these devices can operate on several types of fuel. It is possible to adjust the temperature and air flow speed. Electricity consumption, as in the previous case, is 4 A/h, so if used in a passenger car, it is recommended to install an additional battery with a capacity of 75 A/h. The average cost of heaters of this series is 450,000 rubles;
- Hydronic B04W SC is one of the few popular representatives of liquid-type heaters, which is often used as a pre-heater. It runs on gasoline, the thermal power of the device is 4 kW. During heater operation, this indicator can be adjusted in the range of 1.50-4.50 kW. Can be used on cars with a gasoline engine up to 2.0 liters. Electricity consumption depends on the level of generated power and averages 2-3 A/hour. That is, a battery with a capacity of 75 A/h will be drained in approximately 15 hours of continuous operation. The cost of the model starts at 32,000 rubles;
- Trumatic E02400 is an air-powered auxiliary heater powered by LNG and generating heat with a power of 2.5 kW. In this operating mode, gas consumption is 100 g/hour. An important advantage of the model is low energy consumption (about 2 A/hour). The obvious disadvantage is the complexity of installation. Can be used for heating both passenger cars and trucks. Costs about 100 thousand rubles.
We tried to include in our review the maximum number of varieties of autonomous heaters with a description of their main technical characteristics. Based on this data, you can decide which device will be most suitable in your case.
Country affairs
For example, at high outside temperatures or when parked in strong sun, ventilation allows you to create a pleasant microclimate inside the car.
When heating the car interior, depending on the outside temperature, warm air is first supplied to the windshield, and then through the ventilation holes into the cabin.
Adjustment of the distribution of warm air in the cabin using the ventilation holes is maintained.
The temperature to which the autonomous (additional or parking) heating system warms up the car interior depends on the settings of the climate control system.
Autonomous heating of the car interior is carried out by burning fuel from the fuel tank. When installing autonomous heating, some cars are additionally equipped with a larger fuel tank. If the fuel level in the fuel tank is low (minimum level), the on-board computer blocks the start of autonomous heating.
Please note that autonomous heating consumes battery energy. Roughly, we can say that autonomous heating consumes approximately the same current as low beam headlights. The on-board computer monitors the level of battery discharge and blocks the start of autonomous heating if the battery is significantly discharged.
The battery is discharged when using independent heating. When actively using the autonomous heating system, you can use the following rule of thumb: the operating time of the car engine (travel time) must be no less than the operating time of the autonomous heating. In this case, the battery will have time to charge to its normal charge level.
Characteristics of an autonomous heater
Installation of an autonomous heating system for the car interior
Let's start with the characteristics of a gasoline, diesel or electric 12-volt JSC. It should be noted that in practice, a gasoline autonomous heater is one of the most reliable. If necessary, the driver can only activate the interior heating, and not all elements of the vehicle. The auxiliary heater can be equipped with various functions, including a timer, as well as a pre-start device. When operating an AO, the cabin or interior of the vehicle can be warmed up in a few minutes.
What kind of AO device (let's look at the example of a diesel unit):
- Unit with combustion chamber. This component is one of the main ones in the operation of the system.
- The autonomous interior heater is equipped with its own gas line, which connects to a common line and supplies the system itself, depending on whether the engine is functioning or not.
- The exhaust system, which is equipped with an autonomous interior heater, is designed to release exhaust gases. The gas can be released behind the fender liners or under the engine.
- The device also includes clamps for installing it in the engine compartment.
- One of the main design elements of the parking heater is the control unit. This component can be push-button or remote; it is installed inside the vehicle.
- Other elements designed for correct operation of the system in various conditions. Their availability depends on the specific manufacturer.
This is a very convenient thing, which, moreover, extends the life of your engine!
Principle of operation
How does a 12 or 24 Volt petrol or electric parking heater work? The principle of operation of such a stove is similar to the principle of operation of a conventional hair dryer - the system simply heats the air flow entering the car interior as a result of fuel combustion. Depending on the type of system, fuel consumption during operation is around 100 grams per hour, but this figure may be different, depending on the manufacturer (video author - Alexander Termokirov).
The operating principle is as follows:
- First, thanks to the fan, cold air flow is driven from the vehicle interior.
- This air flow is heated in the combustion chamber of a gasoline, diesel or electric AO at 12 or 24 Volts.
- After heating, the air again enters the cabin.
As for the types of AO for a car, there can be three of them, depending on what part of the car they will heat:
- Air. Autonomous air heaters allow you to warm only the air inside the vehicle. As a rule, this type of AO is a traditional fan that simply heats the air.
- Liquid. A liquid-type parking heater is designed to warm up the cooling system if it is not started by the engine. It can also heat the fuel system, which is equally important for engine-powered vehicles.
- Oil. This parking heater is designed to warm up the oil line of the vehicle. The operation of such a system will speed up and also simplify the startup of the power unit during cold weather.
Interior heating kit
Also, stoves for warming up the cabin and interior of the car can be divided according to the method of power supply:
- gasoline ones, which run on gasoline;
- diesel, operating, respectively, on diesel;
- electric 12 or 24 Volts, powered by current.
Installation of an additional stove in the cabin occurs in several stages:
- Preparing the installation site. Most often, given the rather large dimensions of the device (depending on the power, respectively, the more powerful the larger in size) it fits into some niche. Since passenger vehicles are often provided with free space in the cabin, this place most often turns out to be the space under the seat. This arrangement allows, in addition to saving space in the cabin, to effectively distribute air flow and effectively heat the space; Then you need to lay pipes from the device to the standard ventilation system (connect one to the factory pump and the other from the cylinder head);
- Power supply in budget options is most often provided through a standard system (from the cigarette lighter). This ensures production savings, since products powered from an inverter or from a fixed network must have a different device with additional elements, and accordingly the cost of the entire device will be higher.
On - an additional stove in the car interior from the cigarette lighter:
How to make an autonomous interior heater with your own hands
Waiting for many hours in a car in a traffic jam or, worse, spending the night in an open field in the cold inevitably leads to the idea that an autonomous interior heater is by no means a whim of a hunter-fisherman or an attribute of a professional driver’s motor home.
In cold or slight frost, every hour we warm up the engine to a more or less comfortable temperature of 60-70 degrees. At -20°C you have to warm it up every 35-40 minutes at medium speed so that the battery does not die. If an additional electric pump was installed on the stove, we use the heated motor as an autonomous heat source. Depending on the level of insulation of the interior and the air temperature, the engine cools down in 2-3 hours, the interior of the car cools down twice as fast.
Fuel heaters
WEBASTO Thermo Top Evo Comfort Plus – keeps everything warm
The universal heater is designed not only to heat the car interior, but also to speed up engine starting and quickly reach full power of the heater. It is installed under the hood, so it has relatively small dimensions of 22x9x15 cm. To operate, the device independently pumps fuel from the system, consuming about 630-720 ml/h.
- Simultaneous warming up of the engine and car interior;
- High power 2.6-5.2 kW;
- There are modifications for gasoline and diesel engines up to 4000 cm3;
- It starts blowing already at a temperature of +60 °C, and upon reaching +80 °C it automatically switches to partial load mode;
- Suitable for large cars with a spacious interior;
- Continuous operation time reaches 60 minutes;
- Supplied complete with a timer that has a convenient display, simple controls and a Russian-language menu;
- Possibility of extending the warranty period to 2 years.
- Expensive - a set with a remote control will cost 40-42 thousand rubles, plus another 10 will have to be paid for installation.
Starting autonomous heating
Autonomous heating can be started in three ways:
- immediate heating button;
- from remote control;
- according to the programmed switching time.
Immediate heating key
The immediate heating button is usually located in the area where the vehicle's climate control controls are located. Typically, the immediate heating key is used for autonomous (parking) heating of the vehicle interior when parked with the engine turned off.
Remote control
start autonomous heating from a remote control when the car is parked in front of an office, in front of a house or in front of a country house. The launch can be done at any time.
Remote controls from different manufacturers provide different ranges. However, the usual range of the remote control to start autonomous heating is several hundred meters, reaching up to 600 meters for some models.
Programming the on time
In addition to the listed methods, autonomous heating starts according to the programmed start time . Depending on the manufacturer and the equipment of the car, the autonomous heating timer can be programmed to turn on at a certain time, on certain days of the week. At the same time, the duration of operation of autonomous heating can also be programmed.
The convenience of programming the time to turn on the autonomous heating is especially noticeable when storing the car in a parking lot in front of an office or on a site in front of a country house, in this case the car will be ready for a trip, and the interior will be warmed up (in winter) or ventilated (in summer).
Advantages of autonomous heating
- The ability to maintain the temperature inside the car regardless of the degree of engine warm-up (in winter);
- Possibility to ventilate the car interior before the trip (in summer);
- Possibility of turning on using the immediate heating key, remotely from the remote control or according to a programmed turn-on time;
- Unlike alarm systems with auto-start systems, the autonomous heating system does not increase the cost of CASCO insurance because does not require immobilizer exclusion;
- Equipping a car with a proprietary autonomous heating system does not void the car’s warranty;
- The engine resource is not consumed.
Disadvantages of autonomous heating
- Autonomous heating consumes battery energy;
- Autonomous heating consumes fuel;
- It is prohibited to start and operate autonomous heating in unventilated or enclosed spaces.
© 2011 abcIBC.com. All rights reserved.
Good luck on the roads!
See also
Description of the autonomous heater
To begin with, let's look at the basic description of the additional 21-volt car interior AO. Such devices can fall into the category of gasoline, diesel or electric, and the former, as practice has shown, are considered one of the most reliable . Such a device can have many useful functions, in particular, it can be equipped with a pre-start device, as well as a timer for turning on the joint stock at a certain time. If the heater is effective, then in practice, unlike a stove, it will be able to warm up the car interior in just 2-5 minutes after starting the engine.
We suggest that you familiarize yourself with the design of an autonomous heater using the example of a diesel engine:
- The main device equipped with a combustion chamber. The combustion process of fuel takes place here, which ensures good heating of the car interior.
- A fuel line is equipped with every diesel or gasoline company. This line is connected to the common fuel line. The operation of this line depends on whether the car engine is running or not.
- The autonomous device is also equipped with a special exhaust system, its purpose is to release exhaust gases into the environment. Depending on the design features, gas exhaust can be carried out both behind the fender liners of the car and into the engine compartment.
- Fastenings for mounting a heating device in the engine compartment.
- Control module - this component is considered one of the most important and basic of those found in the design. In essence, it serves as the “brains of the system.” The control module itself can be push-button; recently, remote versions of the units are increasingly used. That is, the system is controlled using the remote control. As for installation, this component is located inside the car.
- Also, the configuration and design of the AO may include other parts and components that will ensure optimal functionality of the system in any conditions. The list of these devices may vary, in this case it all depends on the specific manufacturer or model.
Principle of operation
Now let's move on to the question of the principle of operation of the stove. In general, the principle of operation can be compared with the principle of operation of a household hair dryer. In particular, the device allows you to effectively warm up the air that enters the passenger compartment or cabin of the vehicle; the heating itself is carried out due to the combustion of fuel. On average, fuel consumption when operating a parking heater varies around 100 g per hour, but this value can be higher, it all depends on the specific manufacturer.
As for the operating principle itself, it looks like this:
- First of all, the fan starts, with its help air from the car interior enters the combustion chamber.
- Next, the air is heated after it enters the combustion chamber.
- When the air flow is warmed up, it will again be sent into the car interior (video author - Alexander Termokirov).
Varieties
As mentioned above, heating systems are divided among themselves according to the method of power supply: gasoline, electric and diesel, but there are three more types of devices.
Faulty maintenance (Part 2). Installation of a second stove.
As I already wrote, I have been thinking about installing a second stove for a long time. And so I finally decided to implement my idea. Fortunately, there are Pradikov configurations with two stoves, and when installing a second stove in my car, I won’t have to do much “collective farming”. I timed the installation of the stove to coincide with work on vibration and noise insulation of the car, so as not to disassemble the interior ten times.
The following components were purchased via the Internet: in fact, the stove itself is assembled; air ducts; glove compartment-armrest with rear heater control panel (low); metal tubes; tees; buttons (ON/OFF - 2 pcs., HI/LO - 1 pc.); heater damper cable control rod; piece of iron on which the glove compartment-armrest is installed. Unfortunately, the seller turned out to be not very honest and sent me a broken cable control rod for the heater damper and the upper half of the heater body turned out to be broken in two (let him respond in the same way someday).
I repaired the control rod for the heater damper cable using parts from an iron children's construction set and epoxy)))
The most difficult thing is to correctly mark where to cut holes in the bottom for the outlet of the heater radiator tubes. Initially, I missed a little and had to widen the hole 10-15 mm to the side closer to the central tunnel.
The electric “braid” of the stove was in its rightful place, under the carpet, as I expected)))
I didn’t want to install a low glove compartment-armrest instead of my high one, so I decided to assemble one from two. It wasn't difficult. From the “low” glove compartment, the rear panel and a large inner box migrated to mine, the rest remained all original, including the hardware to which the glove compartment-armrest itself is attached.
Next, we return the carpet to its place, try on the stove, mark and cut out the carpet for the stove.
We “seat” the stove with air ducts in its place.
We cut out a patch from an old car inner tube, punch holes in it for the radiator tubes and place the patch on the bottom of the sealant.
Next, we assemble our modernized glove compartment-armrest into a single whole)))
We remove the panel under the steering wheel and on the left side we find the connector for the front heater switch. We insert the button instead of the plug and put everything back together.
Now you need to embed the stove into the heating main. I decided not to use the “original” main metal tubes because there were precedents that they rotted in people, and in cold weather they would have increased heat loss. Instead of tubes, I bought a rubber hose with an internal diameter of d=8 mm. It took 5 meters of hose. Well, the “original” tees also had to be slightly modernized))) The straight tee will go to our “input” in front of the heater valve, and we insert a curved tee instead of the original “corner” on the outlet pipe of the front heater
Well, the final touch: we lift Pradik’s face into the sky and expel all the air from the cooling system. I think everyone knows the technology of “de-airing” the cooling system and I won’t focus on this.
PS. Electrically, I didn’t have to do any “collective farming”; after connecting the stove to the side “braid” and installing all the buttons in place, everything worked as expected! There is also no need to install anything additional in the fuse block, neither relays nor predicators.
I am more than pleased with the result! The stove cooks like crazy! I think no one will freeze in my car in winter! )))
To be continued…
Is it that simple?
Given the apparent simplicity of the heating principle, an air-powered auxiliary heater can hardly be considered as an additional interior heater that can be manufactured with your own hands. In conditions of home-made production, it is practically very difficult to fulfill the requirements:
- to the quality of welding of elements, taking into account the specifics of the thermal load and deformation of the mating elements;
- to the reliability of control systems necessary for the operation of an autonomous heater;
- to prevent deviations from the specified combustion mode, the formation of a large amount of carbon monoxide, burning of the chamber walls and, as a consequence, mixing of combustion products and heated air;
- to ensure control of the launch procedure without the risk of fire.
Another heating option
The classic version of an autonomous heater is a scheme where two circuits are simultaneously assembled in the heating device - an engine antifreeze heating circuit and a heat exchanger for the coolant sent to the cabin heating system.
There are options for an autonomous heating system with minor modifications that have a connected thermally insulated container or hot water tank in the interior heating system. Such a boiler plays the role of both a heat accumulator and a source of hot water. An additional pump pumps and heats the container operating in boiler mode. This type of autonomous heater is most often used for mobile living quarters - mobile homes.
Another pump
An additional pump for the VAZ-2107 stove can also improve heating in the car. The pump is usually installed next to the battery and hoses. When installing, you need to remove one hose that comes directly from the unit. Connect this hose to the additional pump. The hose should go from the block to the bow of the pump, and the outlet hose should go to the stove.
We recommend: Car suspension. Types and types of car suspensions.
Power for the additional pump is taken from the heated rear window button. There is only one positive wire coming from the additional pump motor, and the housing itself is ground.
Powering the pump is simple:
- The very first plug with wires is removed, and the second gray wire, responsible for heating the rear window, will be our basis.
- We wind the power from the pump to it and bring it under the hood.
- To keep the wire more secure, you can solder it.
- After installing the plug back, you can say that the pump is ready for use.
Sometimes an additional pump is installed on the VAZ-2107 stove due to poor air circulation. In addition, at low idle speeds there may be no circulation at all, and the flow of antifreeze to the stove is poor.
Based on the results of operation, the additional heater on the VAZ-2107 will turn on every time the rear window heating is turned on.
But you can connect the pump in another way. To do this, you will need a connector from the injectors/knock sensor from the VAZ. It can be purchased at any auto parts store.
It is necessary to solder two wires to the ends of the connector of the part, after which everything is hidden in the corrugation and sealed with electrical tape.
Separately we bring out the wire for connecting the ground. We find it on a bracket nearby. We carry the harness up, connect the heater resistors to the block, where the plus was taken from.
As a result, when the heating is turned on, another pump is turned on, consuming only 1.5 A in operating mode. In this case, you can not install a relay and connect directly to the positive wire in the block.
DIY incandescent light bulb heater
To make the simplest home heater based on conventional incandescent lamps, you need to be able to connect the wires to the sockets and screw the lamps into them.
A simple heater option is an incandescent light bulb heater
Elements for assembly:
- Wooden plank;
- Two wooden blocks;
- Empty metal cans;
- Cartridges;
- Lamps;
- Power wire.
First of all, it is necessary to prepare the surface for mounting the cartridges. To do this, make holes in a board measuring 50 x 5 cm using a screwdriver and a pen of the required diameter. The cartridges must be held tightly.
Next, we connect the cartridges to each other (in series). We connect the power wire to the first cartridge. Once connected, the cartridges can be collected.
Then, to ensure free space under this structure, we screw wooden blocks along the edges to the board with cartridges, which will also serve to ensure stability.
Next, you should take care of the so-called radiators for this heater. The radiators are old cans in which coffee was previously stored. The inner diameter of the cans should be slightly larger than the diameter of the lamps. Due to the short distance, it is necessary to achieve heating of the metal surface of the cans.
To additionally heat a space, for example under a window, several 60-watt lamps will be sufficient.
Since the jar is closed on one side with a lid, you only need to get rid of the metal bottom. This can be done with any available tools. Next, the can is installed on the board, and an incandescent lamp is placed inside it.
After assembling the structure and installing it in the appropriate place, this device is connected to the network. For ease of use, the power cord can be equipped with a switch. Ready!
It is worth noting that using only infrared lamps, it is possible to create an excellent heater for a garage.
Features of the additional heater
Any stove can serve as a second heating, but it is advisable to use a more powerful one, so you can take the product, for example, from a Gazelle car. You can install additional heating on a UAZ Patriot SUV either independently, which will require some knowledge, or with the help of a repair shop.
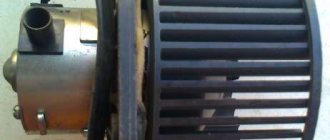
This is what the factory heater looks like
The second heating makes it possible to provide not only a positive temperature in the interior of the UAZ Patriot SUV, but also prevents passengers in the back seat from freezing. Such an auxiliary stove is installed under the following factors:
- if the UAZ Patriot car is used mainly in regions where winters are particularly harsh and the air temperature reaches -20 degrees or lower;
- if you often have to use an SUV;
- in the case of transporting children, for example, daily to school, kindergarten, etc.
The driver can also install a second interior heater if he feels that the standard stove cannot cope with its functions even with slight drops in temperature. That, however, in this case, it is necessary to check the serviceability of the standard heater, but that’s another story.
Operation and connection
If you decide to install additional heating in the UAZ interior, then you should know that the stoves should be connected in parallel. Parallel connection of the main and auxiliary stoves has the following advantages:
Pulling hoses around the cabin
- No additional load is created on the vehicle's energy system.
- It is possible to control devices independently of each other when installing the switch on additional equipment.
- Two functioning stoves will allow you to heat the interior in a matter of minutes.
- There is no need to worry about passengers riding in the back seat. After all, now heat will flow to them from below.
Using another heater has many positive aspects, and most importantly, it provides comfort in the cabin during the cold season.
When installing heaters sequentially, we end up with one drawback - the inability to turn off one of the stoves. When it gets hot in the cabin, of course, you should turn off the heating, since drying out the air is dangerous for the body.
It is recommended to place an additional stove in the following places: between the front seats; under the front seats. It all depends on the model of heater that you choose for your UAZ Patriot. There are many models of “underseat” heaters for car interiors, but it is important to consider not only the performance of the device, but also the size.
Thus, on a UAZ Patriot SUV you can install a regular radiator, which perhaps someone has lying around in the garage, or a special heater with a built-in fan. Let's look at the installation features of the product.
Installation features
Installation of an additional heater on an SUV is carried out in stages:
- Selecting a location for the unit. It is recommended to place an additional heater under the front seat.
- The engine cooling system is being depressurized. To do this, you need to drain the antifreeze into a special canister.
- The second heater tube crashes into the main heating system. In this case, it should be ensured that these tubes do not come into contact with engine elements that could melt them.
- Two holes are drilled in the engine shield through which hoses are passed into the passenger compartment.
- The heater hoses in the car interior are laid under the floor upholstery.
- The hoses are routed under the front seat. It is advisable to place the device under the passenger seat.
- The laid hoses are secured to the additional heater. In this case, it is imperative to use clamps.
- The interior heater is being installed and hoses are connected to it. After this, it must be secured under the seat.
- It is poured into the expansion tank with pre-drained antifreeze, but this will require a larger volume of coolant.
- The system is purged to remove air from it.
- It is imperative to install and connect the auxiliary heater fan switch to the vehicle network. We recommend installing it on the instrument panel. The switch is installed with the minus terminal removed from the battery.
Antifreeze will circulate in the additional heater, which is pumped by the standard pump. If desired, to ensure greater productivity, you can install an additional pump. At this point, the installation is complete and some disadvantages of such equipment should be considered.
A little about the cons
Of course, the main purpose of the additional heater is to ensure comfort in the cabin by maintaining a temperature of at least 18 degrees in severe frosts. But after installing new equipment, the following negative aspects arise:
- in winter, the engine warms up more slowly;
- the appearance of extra decibels of noise (from an electric fan);
- the appearance of dust that will circulate throughout the cabin due to the operation of fan heaters;
- heating of the floor upholstery where the hoses to the heater pass, which will cause inconvenience in the summer. This problem can be corrected by installing a faucet on the hose leading to the Patriot's heater.
Another disadvantage is the cost of the equipment. A special additional stove designed for installation under the seat will cost a decent amount, so not everyone is ready to go to such expense. Many craftsmen begin to invent heaters on their own, but this is not always safe.
Thus, to summarize, it should be noted that before deciding to install an additional stove, you need to weigh all the pros and cons. But the most important thing to consider is your region of residence. Residents of the northern and middle regions need the installation of such equipment.
>
Additional heating factors
Before installing a second heater in the cabin, it is necessary to insulate the car. Since with any number of heaters, they will all be useless if the bulk of the warm air simply escapes through cracks or weak spots.
All rubber bands must provide a seal inside the car. If some of them have lost their elasticity, then an urgent replacement is necessary. For high-quality heating in winter, it is necessary to remove the cold air suction. You can simply disconnect the cable from the control levers for the winter. It is better to open the stove tap in winter to the maximum position.
Types of additional heating device
If the owner of a Russian vehicle is thinking about how to install an additional heater on a VAZ-2110, then, first of all, he should know that the practical majority of currently existing designs fit directly into the standard cooling system of the power unit. The heated air flow is distributed throughout the cabin by a built-in electric fan.
Additional stove purchased at the store
An additional stove for the interior of the VAZ-2110 can be purchased at the store, however, in order to save money, such a unit can be made with your own hands. In fact, car dealerships sell completely different types of additional heaters. Depending on the budget and preferences of the motorist, you can choose both small and fairly large designs. True, not all presented models can be placed in the top ten without compromising passenger comfort. There is not much free space in a domestically produced car, so when choosing a unit, you should first decide on the location of its future installation.
If the car owner decides to install an additional heater under the passenger seat, then the purchased device should not be wider than 33 cm, higher than 20 cm and have a depth not exceeding 25 cm.
If you choose the optimal location for an additional heater, you should stop in the area of the car located between the seats (the unit will take the place of the tunnel), or directly under the front passenger seat.
In view of all the above conditions, the homemade additional heater VAZ-2110 must be an autonomous compact unit. Among the most popular models, it is worth noting the products of the TechnoMaster company, produced in Tolyatti. The cost of such a device ranges from 2500–3000 rubles. The products Helios, Xeros and Zenith, owned by the Eberspächer company, are of good quality. Their cost may be only a few hundred higher than the previously indicated models.
Eberspächer Helios
If the car owner decides not to waste time and not to upgrade the standard VAZ-2110 stove, but to place a new additional device in the cabin, when choosing a design, you should carefully study the characteristics and dimensions of the additional device.