Device
In order for the car to move, it is necessary to transfer the rotation of the engine to the wheels. But the engine speed is too high, and in order to correctly distribute the torque, a mechanism is needed that changes the gear ratio. Due to the gearbox and different engine speeds, the speed of movement changes, and the main pair of the rear axle takes over the rotation and transmits it to the wheels through gears.
- flange, it is fixed on the drive gear (shank) of the RZM, and is an intermediate link between the driveshaft and this gear;
- the shank of the main pair, at one end of which there are splines for pressing the flange, at the other end there is a bevel gear with a small number of teeth;
- driven gear (planet gear), it is in mesh with the drive gear, and it is with it that it forms the main gear;
- center differential, allowing the rear wheels to spin at different angular speeds.
The differential design is very simple - the mechanism consists of two axle gears, two satellites and a satellite pin. From the gearbox, the movement is transmitted to the axle shafts, on which the wheels are mounted.
Typical gearbox failures and their causes
The rear gearbox of the VAZ 2107 is a reliable device that is very resistant to mechanical wear. However, over time, parts gradually wear out even in the gearbox. And then the driver begins to hear a characteristic crunch or howl heard in the area of the rear axle or in the area of one of the rear wheels. Here's why this happens:
- one of the wheels jammed because one of the rear axle shafts was deformed. This happens extremely rarely, usually after a strong blow to one of the wheels. In this case, the axle shaft is so deformed that the wheel cannot rotate normally. If the deformation is insignificant, the wheel will rotate, but when rotating, a characteristic howl will be heard coming from behind the damaged wheel. It is not possible to fix such a breakdown on your own . To straighten the axle shaft, the driver will have to contact specialists;
- crunching sound in the gearbox when the car is moving. This is a more common problem that every driver of an old “seven” will face sooner or later. The gearbox begins to crunch after several teeth and splines on the axle shafts wear out in the main gear. If the wear is very severe, the teeth may break. This happens both due to metal fatigue and due to poor lubrication of the gearbox (this is the most likely reason, since the lubricant in the “seven” gearbox often escapes through the breather and through the shank flange, which have never been leak-tight). In any case, such a breakdown cannot be repaired, and gears with broken teeth will have to be replaced;
- bearing wear on the axle shaft. This is another reason for the characteristic grinding noise behind the wheel. If the bearing has collapsed, then you cannot drive such a car, since the wheel may simply fall off while driving. The only solution is to call a tow truck and then replace the worn bearing. You can do this either on your own or at a service center.
Differences in VAZ rear axle gearboxes
RZMs differ in the gear ratio of the main pair; in total, there are four types of gearboxes on the VAZ classic:
The slowest one is the RZM 2102, its drive gear has 9 teeth, and the driven gear has 40 teeth. To calculate the gear ratio, you need to divide the number of planetary gear teeth by the number of teeth on the drive shaft; for the VAZ 2102 the drive gear is equal to 4.44.
The “penny” gearbox (2101) accordingly has the number of teeth on the gears 10/43, so its IF is 4.3. The next, faster one is RZM 2103 - it has a ratio of 1041, which means the gear ratio is 4.1. And finally, the “fastest” will be the 2106 gearbox, with the number of teeth 11/43 and an inverter frequency of 3.9, respectively.
Many VAZ 2101-07 owners strive to install the fastest gearbox, but this is not always necessary. If the car often carries cargo, that is, the car is a “workhorse”, high speed is of no use, but high-torque power will be very useful. It should be noted that RZM 2102 was not supplied as spare parts; it was installed only on station wagons.
Disassembling the gearbox and replacing satellites
The satellites are additional gears installed in the differential gearbox. Their purpose is to transmit torque to the axle shafts of the rear wheels. Like any other part, pinion gears are subject to wear. After this, they will have to be changed, since this part cannot be repaired. To restore worn teeth, the car owner has neither the necessary skills nor the necessary equipment. In addition, any gear in a car undergoes a special heat treatment - carburization, which is carried out in a nitrogen atmosphere and strengthens the surface of the teeth to a certain depth, saturating this surface with carbon. An ordinary car enthusiast cannot do anything like this in his garage. Therefore, there is only one solution: purchase a repair kit for the rear axle gearbox. It costs about 1500 rubles. Here's what it includes:
- a pair of gears for axle shafts;
- a pair of satellites for the differential;
- satellite axis;
- support washer.
In addition to the repair kit for gearboxes, you will also need a set of regular open-end wrenches, a screwdriver and a hammer.
Sequence of operations
To disassemble the gearbox, it is best to use a regular bench vice. Then the work will go much faster.
- The gearbox removed from the machine is clamped in a vice in a vertical position.
- A pair of adjusting locking bolts are unscrewed from it, under which the locking plates are located.
So, an ordinary car owner is quite capable of removing the gearbox from the rear axle of the “Seven”, disassembling it and replacing its worn parts. There is nothing complicated about this. Certain difficulties may arise only at the stage of adjusting the new gearbox. But you can also deal with them by carefully reading the above recommendations.
Replacing the rear axle gearbox of VAZ 2106, 2107
The main disease of REM is increased noise (hum), and the gearbox can hum for various reasons:
- there is insufficient oil in the bridge, or it is completely missing;
- the gap between the gears of the main pair is not adjusted;
- the gears are worn out, they have chips and other damage;
- the main pair has a manufacturing defect, the gears are not ground in from the factory;
- the shank nut has become unscrewed or loosened;
- bearings are worn out.
The main malfunction of the center differential is the wear of the gears of the axle shafts and satellites, when the surfaces of the parts are heavily worn, play forms between the differential gears, but the rear axle usually does not make noise due to wear of the differential gears.
ZM gearboxes on VAZ classics can be repaired, but only if there is no wear on the gears. If the mechanism can no longer be repaired, it needs to be replaced. We replace the rear axle gearbox of a VAZ 2106 on a “seven” as follows:
- we install the car on a pit or a car lift; changing the gearbox on the ground is extremely inconvenient;
- if the car is installed on a pit, it is necessary to jack up both sides; in any case, the rear wheels must be removed. If the work is not done on a lift, you should install stops under each side of the car (in the rear);
- unscrew the drain plug in the REM, drain the transmission oil, having previously prepared a container for it;
- remove the rear brake drums (two guide bolts on each side), after first removing the car from the handbrake. The drums can be difficult to remove; they are dismantled by tapping them from behind with a hammer through a wooden block. You cannot hit the drum with a metal hammer; the drum may break;
- remove the brake pads;
- unscrew the fastenings of the rear axle axle shafts on each side, each axle shaft is secured with four nuts;
- we press out the axle shafts, for this you will need a special puller, you can also make a homemade device;
- remove the driveshaft by unscrewing the four bolts and nuts. If the same REM is installed, the cardan with the shank must be marked; this is done in order to put the shaft back in the same position. If you install the cardan incorrectly according to the marks, the shaft may begin to vibrate;
- unscrew the eight bolts securing the rear gearbox (key 13), remove the assembly.
At this point, the removal of the gearbox can be considered complete; now all that remains is to either repair the mechanism or install a new one instead.
Sequence of actions when dismantling the axle shaft
To dismantle the axle shaft and get to the bearing, you must perform the following steps in strict sequence:
- For convenience, the vehicle is placed on a flat surface.
- Secure all the wheels of the car with stops or other devices.
- The wheel bolts must be turned with a wheel wrench until they are slightly loosened before removal.
Removing wheels.
- Use a wheel wrench to completely unscrew all the bolts on the wheels.
- Use a jack to raise the car body and secure the lifting with supports.
Removing the brake drum.
Unscrewing the axle shaft bolts.
Little by little, without using much effort, turn the axle shaft to get to the nuts. The axle shaft mounting bolts can be unscrewed using a 17mm socket wrench. They are used to loosen and remove 4 fastening nuts, which are closed with a special flange.
Removing the axle shaft.
We turn the removed brake drum over (with the inner side facing us), screw it to the axle shaft with a couple of bolts and sharply pull it towards ourselves, thus pulling out the axle shaft. (Instead of the brake drum, you can use a previously removed wheel)
But if you have a reverse hammer, you can remove the axle shaft with it. The hammer is attached to the axle shaft with wheel bolts. If you sharply place a load in the opposite direction, then due to the appearance of a shock load, the axle shaft begins to move towards the load. Thus, the axle shaft is removed. Then unscrew the hammer from the axle shaft and remove the rubber sealing ring.
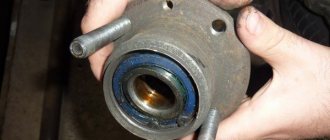
Removing the lock bearing from the axle shaft.
The axle shaft is clamped in a vice and a small cut is made using a grinder on the outside of the locking ring.
The clamped locking ring is finally split by alternately striking the cut from the grinder with a hammer or chisel. Thus, the bearing is removed from the axle shaft. The axle shaft is checked after removing the bearing for surface deformations or chips or other damage. If there are any, then the axle shaft will have to be changed.
Installing a new bearing and lock ring on the axle shaft.
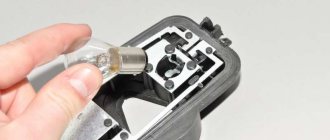
Replacing the axle shaft seal.
The oil seal to be replaced must be pulled out of its cell. To do this, lift its body with a screwdriver and remove the oil seal. The cell under the oil seal is wiped from the accumulation of dirt and dust, and grease is applied. The new oil seal is inserted into the seat with a spring to the beam. Use a special bushing and a hammer to drive the oil seal so that it is pressed tightly.
Installing the axle shaft.
Installation of the axle shaft is carried out in the reverse order from its removal. Put on the rubber sealing ring and bolt the axle shaft. Use small rotational movements to put it in place.
After installing the axle shaft, it is necessary to check it for the formation of gaps. They shouldn't exist. To do this, the wheels are rotated in all directions. If there are no gaps and no extraneous sounds appear during rotation, then the installation of the bearing and axle shaft was done correctly and correctly.
If necessary, replace the bearing on the second axle shaft in the same manner. Also, when carrying out these actions, you can immediately replace the brake pads and check the presence and level of lubricant in the axle housing.
Adjusting the VAZ rear axle gearbox
If the main pair in the gearbox is worn out, it must be replaced. But you can’t just put the gears back in place; the gaps in them must be adjusted. In total, two types of basic adjustments are made:
- The thickness of the adjusting sleeve (washer) is selected for the shank (drive gear). The washer can have a thickness from 2.6 mm to 3.5 mm;
- The gap between the gears of the main pair is adjusted using two adjusting nuts of the differential housing.
The washer for the shank is selected in such a way that the shaft with the drive bevel gear rotates in the gearbox housing without backlash with a force by hand (0.3-0.4 kg). In this case, the shank nut should be tightened with a force of 12 to 26 kg, usually 18-19 kg are tightened.
After installing the shank, the differential housing with the planetary gear attached to it is put in place. The housing is secured with two covers (4 bolts, a knob with a 17mm head). The adjusting nuts are tightened from the sides of the bearings, the differential is installed so that there is play between the gears of the main pair, and the planetary gear should not be clamped. By moving the adjusting nuts to the right and left, the shank gear is brought to the planetary gear. By adjusting, you select the moment when the gap between the gears practically disappears.
The last stage is to adjust the preload of the differential bearings; the adjusting nuts are tightened from the sides. This work must be done with an indicator; the device should show from 0.14 to 0.18 mm, the gap between the gears should be within 0.08-0.13 mm. After the operation, the adjusting nuts are fixed with plates so that they do not turn.
It should be noted that adjusting the VAZ rear axle gearbox is a very difficult matter, and it is better to trust it to professionals.
Differential device
The planetary gear is mounted on the differential housing. The differential consists of two axle gears, two satellites and a pin. The main, most common differential malfunctions are wear of the pinion pin (play) and wear of the splines on the axle gears.
On a car, the play of the pin of the satellites can be determined by turning the driveshaft by a quarter or more; if there is no play, then the shaft practically remains in place when you try to turn it in one direction or another.
It's also worth noting that there is never any noise coming from the differential. When moving forward (in a straight line), the differential rotates as one unit and it turns out that there is simply nothing to make noise there.
The cause of noise from the rear axle gearbox when gas is added and the noise disappears after releasing gas is (almost 99.9%) wear of the teeth of the main pair. This is clearly visible on the removed gearbox. The forward side of the teeth has significant wear, while the reverse side shows little wear.
If, after disassembling and troubleshooting the parts of the main pair, wear of the teeth is detected, then no repair will help and it will simply be a waste of time and money. Only the main pair needs to be replaced.
Home-couple
The gears of the main pair are selected at the factory based on contact patch, noise and other parameters and are marked. For example, on the planetary gears it is stamped - VAZ 2103 (model), 10 41 (gear ratio), 4091 (pair number). The main pair number 4091 is also marked on the bevel gear.
After marking these parts, they became the “main pair” and are not installed one without the other, that is, “family”. “- 6” is also marked on the “tip”; this is an amendment for assembling the main pair in the gearbox. When troubleshooting a differential, its bearings are also checked for wear and, if necessary, replaced. Bearing wear is often caused by unprofessional replacement of the gearbox seal.
For example, after replacing the oil seal, tighten the shank nut without observing the tightening torque (pull as much as possible) and the force is transferred not to the spacer sleeve, but to the differential bearings.
These are supports on rotating axes and shafts, which receive loads and transfer them to various structures...
As a result, after a short run after replacing the shank oil seal, noise from the gearbox appears. Only in this case, the “hum” noise in the gearbox is constant and unlike the noise from worn teeth of the main gear. In this case, the hum is constant, regardless of whether gas is added or released.
Rear axle gearbox assembly video
During assembly, the gearbox is adjusted according to 4 parameters:
1. Selection of the adjusting ring
Parameters from 2.6 to 3.5. The ring serves to adjust the depth of engagement of the teeth of the “tip” and “planetary gear”, which is strictly specified. This is where the “correction -6” is needed for this main pair, which was mentioned above. Of course, this amendment will be individual for each main couple.
In this video, the main pair will be adjusted using a special device. It is clear that the vast majority of motorists do not have such a device and this is just a clear example of adjusting the engagement depth parameter. An option will also be given for adjustment without a “device”.
A “device” with a micrometer is also installed on the device, simulating the gear of the main pair. The indicator shows zero. Then the indicator leg is transferred to the bearing bed and in this case the indicator shows a value of 3.25, which is not good, since it should be within the range of 3.0. On the second landing plane it turned out to be 3.45. The arithmetic mean is 3.3. To adjust, we will use the correction at the “tip” - “-6”. In this case (– 3.3) + (-6) = 3.36. The thickness of the adjusting washer required is 3.36 mm. Using a micrometer, select the washer of the required thickness.
Note. When the shank bearing wears out, it begins to rotate on the “tip” body. As a result, the bearing end, adjusting washer and shank gear bodies wear out. It turns out that when replacing the shank oil seal, even with the correct tightening torque, the adjustment of the depth of engagement of the teeth of the gears of the main pair is lost and the “howl” of the pair is ensured, as is its early failure.
Let's return to the gearbox assembly...
2. Adjusting the preload of the shank bearings
The shank bearing sits on the “tip” and a NEW spacer sleeve MUST be installed. The video clearly shows that the new bushing is smooth without any deformation, while the previously installed one is deformed. What happens is this: When the shank nut is tightened to the prescribed torque (from 12 to 26 kgf), the bushing takes on the tightening force and, when deformed, works like a spring, creating tension. The tightening force for the VAZ 2107 gearbox nut is significant and the shank must be secured against turning.
In the video we see what kind of “device” the master uses. It is necessary to tighten the shank nut until there is no play. When the nut is tightened correctly, the shank should rotate with a resistance force of 0.3-0.4 kg, therefore, the bearing preload is correct. This assembly rule applies to old (used) bearings.
The differential with bearings is installed and secured with covers (tightening torque is about 8 kgf) and the adjusting nuts of the differential bearings are tightened.
3 and 4. Simultaneous adjustment of the thermal clearance of the main pair and the preload of the differential bearings
For these purposes, another “device” with two indicators is needed. Using the adjusting nuts in the video and everything is shown well, we move the planetary gear towards the teeth of the “cone” to achieve the required clearance. Factory clearance adjustment data is from 0.08 to 0.12 mm. However, such a gap is provided for the new main pair (“tips” and “planets”). The gap is checked in 4 planes by turning the gear. The gap for the working main pair after adjustment is 0.13-0.14 mm.
After making the adjustment, the adjusting nuts are locked with special plates for this purpose, with one or two “antennae”. This completes the assembly and adjustment.
Video of adjusting the engagement depth of the main pair
In this case, it is necessary to select the thickness of the adjusting washer.
Repair or replacement, which is better?
Car owners of VAZ classics often cannot decide what is best to do - buy a complete ready-made REM assembled or purchase individual parts and repair the gearbox. It’s really difficult to decide here - the price of a new gearbox, of course, is higher, but the owner of the car is freed from the headache of adjustment. The thing is that it’s not so easy to find a good specialist in VAZ gearboxes, and there is no guarantee that the new main pair will not hum.
If a car owner buys a new gearbox, but it hums, the part can be exchanged under warranty, but the car owner loses money on removing and installing the gearbox. If you purchase a defective main pair, the repair itself will be more expensive - you will have to pay a technician for a secondary overhaul of the gearbox.
Important nuances in work
- When driving the oil seal using a mandrel, do not overdo it. Apply gentle blows and control the depth of the oil seal. If you hit it hard, you can easily damage the oil seal;
- Before installing the oil seal, lubricate the rim and sealing edge with fresh oil;
- Before installation, inspect the flange for wear in the area where the sealing lip of the oil seal meets. If there is a “groove,” the flange must be replaced.
As you can see, the process of replacing the VAZ 2107 gearbox seal is quite simple and does not take much time. The most important thing in this job is to properly tighten the rear axle flange nut.
VAZ rear axle gearbox locking
On VAZ 2101-07 vehicles, the factory does not provide locking of the center differential, but the industry already produces both differentials with locks and fully assembled 3M gearboxes. The most common today are REMs with screw locking; in them, the differential gears are locked depending on the load. In such rear axle gearboxes, a preload clutch is installed, it connects the wheel axle shafts with a certain force, and acts as a blocker.
Locking the VAZ rear axle gearbox provides the following advantages:
- increases cross-country ability, allows the vehicle to avoid slipping on difficult road sections;
- allows the car to accelerate faster at the start;
- The car corners more confidently.
But ZM gearboxes with screw locking also have their disadvantages:
- Fuel consumption increases slightly;
- when accelerating, the car handles worse;
- The differential and assembled gearbox with locking are much more expensive than standard parts (the price is approximately 2-2.5 times higher).
VAZ 2101-07 car owners should know that after installing the RZM with blocking, the car will not become an SUV, and it will not be able to move on severe off-road conditions.
Gearbox diagnostics
In order to finally make sure that there is no problem with the rear axle gearbox of the VAZ-2107, you must perform the following steps:
- Stop the wheel chocks under the front wheels.
- The entire rear of the vehicle must be raised using jacks so that the axle is suspended. Be sure to place the machine on supports.
- Start the engine, then shift into gear and add gas. The main thing is to ensure that the speedometer shows the same speed that you reached while driving.
Malfunctions of the rear axle of VAZ 2101, 2102, 2103, 2104, 2105, 2106, 2107 cars
Increased noise from the rear wheels
— The wheel mounting bolts are loose
The bolts need to be tightened.
— Wear or destruction of the axle bearing
The axle bearing needs to be replaced.
Constant increased noise from the rear axle
— The rear axle beam is deformed
Replace the rear axle stockings or the entire axle.
We replace bent axle shafts with new ones.
— Wear of splines on axle shafts
— The rear axle gearbox is incorrectly adjusted, its gears or bearings are damaged or worn
The gearbox needs to be repaired or replaced.
— Not enough oil in the rear axle
Bring the level to normal, eliminate leakage.
Noise when accelerating a car
— Shock absorbers are faulty
Check and replace shock absorbers.
— Incorrectly adjusted gearing of the main gears after gearbox repair
Adjust the engagement by selecting the drive gear adjusting ring.
— Damaged axle bearing
— Not enough oil in the rear axle
Bring the level up to normal.
Noise when the car engine brakes
— Incorrect lateral clearance in the mesh between the final drive gears
Disassemble the gearbox and set the gap to 0.08 - 0.13 mm.
— Increased clearance in the drive gear bearings due to loosening of the flange nut or wear of the bearings
It is necessary to check the technical condition and moment of resistance to rotation of the drive gear.
Noise when accelerating and braking the car engine
— Wear or destruction of drive gear bearings
They need to be replaced.
— There is no lateral clearance between the teeth of the main gear gears
Disassemble the gearbox and set the gap between the teeth to 0.08 - 0.13 mm.
Noise when cornering
— Tight rotation of the satellites on the axis
Disassemble the differential, replace damaged and deformed parts.
Adjustment and installation of the VAZ 2107 gearbox
Main pair engagement depth adjustments
In this case, it is necessary to select the thickness of the adjusting washer.
So: Instead of the device, we install the “original” shank and tighten the nut until it stops lightly, leaving a gap. The differential with planetary gear assembly, bearing caps are installed and their mounting bolts are tightened.
When replacing the shank oil seal, a number of incorrect actions are allowed, which ultimately lead to premature failure of the gearbox. Before releasing the shank nut, according to the technology for performing the work of replacing the oil seal, it is necessary to remove the axle shafts (which is almost never done, since the amount of work will increase many times). Although according to the price list, the removal of the axle shafts will most likely be included in the list and a fee will be charged for this, since this is required by the plant’s technology for replacing the oil seal. This is a necessary condition, since the axle shaft will create resistance when tightened and correct adjustment will simply be impossible to achieve.
Before releasing the shank nut, it must be secured against turning and the tightening force of the nut must be checked with a torque wrench, around 12 kgf. Before installing the oil seal, if its outer surface is not rubberized, then you need to use a sealant to guarantee it. Thus, a mark of 0.15 mm on the gearbox stocking will be sufficient to pass oil through the outer surface of the oil seal.
Back to assembly...
The adjusting nuts are installed, and the gap on the main pair is pre-selected (the final working gap is 0.08 to 0.12 mm). Then paint is applied to the teeth of the planetary gear from an aerosol can and, using a shank, it is necessary to make several movements in different directions in order to fix the contact spots in the paint.
Read, it may be useful: Replacing ball joints
Now, having turned the planet gear back, you can clearly see the contact patch on its teeth with the teeth of the pin. The contact patch (in this case) shows that the adjusting washer on the shank is thicker than the required thickness. We slightly tighten the shank nut, thereby moving its bearing, which makes it possible to move the gear teeth towards each other, that is, as if “reducing” the thickness of the adjusting washer. Using the differential bearing adjusting nuts, we set the approximate gap (reducing it slightly).
Then we again apply paint to the teeth of the planetary gear and again begin to rotate the shank (or gear) in different directions to print the contact patch between the teeth. It can be seen that the contact patch has risen a little, but still not enough and it is necessary to tighten the shank nut a little again. Similar actions with paint and turning the gear must be carried out until the contact patch is located exactly in the middle of the teeth, and the sound of the turning teeth becomes quieter.
After correct (final) adjustment, the sound will be almost inaudible.
Remember to tighten the differential bearing adjusting nuts every time you tighten the shank nut. As a result, the contact patch was located exactly over the entire surface of the teeth. It should be noted that this is the condition for the location of the contact patch for old (working) pairs. For new main pairs, the contact patch, as mentioned above, should be located in the center of the teeth.
Further. The planetary gear mounting covers are released and the differential is removed. The shank nut is unscrewed and removed. Since the shank was installed only with a bearing without an adjusting washer, there was a gap between the bearing and the shank gear where the washer would fit. This gap is measured with a set of feeler gauges, thereby calculating the required thickness of the adjusting washer.
It turns out, as in the case of using instruments and accessories, the size for the required adjusting washer was also 3.36 mm. The shank bearing is removed, an adjusting washer (3.36mm) is installed, the bearing is put in place and the gearbox is assembled. The shank is installed, the shank nut is tightened, min. 12 kgf. The differential with planetary gear is installed, the covers and bolts are tightened, but not completely.
By the way, the lids should not be mixed up. The adjusting nuts of the differential bearings are installed and the gap on the main pair is pre-set. Then the differential cover bolts are finally tightened. The gap in the main pair is finally adjusted and the adjusting nuts are secured.
The gearbox parts are assembled in the reverse order of disassembly. You can press in the bearing rings using a hammer and a special tool (a socket wrench head will do).
Adjusting the VAZ 2107 gearbox
What is an axle reducer?
The rear axle gearbox is a set of mechanisms designed to transmit the torque of the propeller shaft to the axles of the rear wheels. To understand that it requires a gearbox, you need to know how the engine energy is transferred to the wheels of the car.
During operation, the rotation of the engine crankshaft is transmitted to the vehicle's clutch disc, and then to the input shaft of the gearbox. The gear selected by the driver transmits rotation to the output shaft of the gearbox, and then to the crosspiece of the driveshaft, which extends under the car to the rear axle gearbox. The rear axle gearbox distributes torque from the driveshaft to the axle shafts, which, in turn, drive the wheels. Thus, the rear axle gearbox is designed to convert the torque of the propeller shaft to the two axle shafts of the rear wheels of the car.
How to determine a breakdown
The cost of the VAZ-2107 gearbox is very high, and repairs are difficult. Not every driver can handle servicing this mechanism. Therefore, before starting work, you need to make sure that it is this gearbox that makes the noise. Follow these steps:
- On a flat stretch of road, accelerate from 20 to 90 km/h. Listen for any strange noises coming from the rear of the car. Do this carefully, acceleration should be smooth.
- Then you need to release the gas and apply engine braking. Pay attention to whether any extraneous sounds appear from the rear gearbox.
- After this, accelerate the car to 100 km/h, turn on neutral speed and turn off the engine. At the same time, while the car is moving by inertia, note for yourself whether any extraneous noise occurs.
A continuing hum, both with the speed turned on and off, indicates that the gearbox is fully operational and there are no problems with it. In the same case, when noises are heard only while driving at high speed, it is necessary to replace or repair the rear axle.
Diagnostics and causes of malfunctions
The fact that the gearbox is in a faulty condition is indicated by the appearance of a characteristic noise (hum) when the vehicle is moving. To accurately determine the gearbox malfunction, there is the following experiment.
You need to accelerate the car to 25 kilometers per hour and gradually pick up speed, starting from this mark. If suspicious hums appear, be sure to record the speed at which you hear them.
Once you reach the desired speed, slowly release the gas pedal and apply engine braking. Again, listen for extraneous noises and pay attention to the speed at which they appear or disappear.
Certain noises should appear and disappear at the same speed. If this happens, it means that the rear axle gearbox is in a faulty condition. However, to be 100 percent sure, be sure to put the car on the parking brake, put the gear in neutral and try to gain speed, if the noise appears again, then the problem is not in the rear axle gearbox, and if there is no noise, then you can be sure that it is rear axle gearbox.
The cause of malfunctions, most often, lies in the use of low-quality oil, loss of its viscosity, as well as its complete absence. In addition, the gearbox may fail due to failure of oil seals, bearings and special gears. Sometimes, the cause of a rear axle gearbox failure is a broken axle shaft.
Repair and adjustment
Both repairs and subsequent adjustments require special skills and professional equipment; stands, pullers, special tools. Therefore, we will consider only the general principles by which repairs and post-repair adjustments of the gearbox are carried out in order to assess the required amount of work and the costs of purchasing spare parts.
The gearbox structure can be viewed in the following diagram:
Disassembling the gearbox begins with unscrewing the shank nut. After removing the flange, the drive gear with adjusting rings, oil seal, oil deflector, and inner bearing ring are removed. Then we press out the outer rings of the bearings. Lastly, the drive gear and differential are disassembled. When completely disassembled, the spacer sleeve is discarded.
It is not recommended to carry out the work described above related to disassembling the VAZ 2107 gearbox, due to its complexity. This is a rare case when you shouldn’t skimp on the services of specialists.
Most often, the bearings and the main pair of this unit fail, for which replacement with new ones is provided. It should be noted that it is the main pair that determines the gear ratio. There are three standard varieties of the main pair, with different gear ratios. The higher this number, the higher the power; the lower, the higher the speed of the gearbox. When replacing these parts, the spacer sleeve must be replaced, since it is disposable.
Some car enthusiasts use final drives as a way to tune their cars. By installing a main gear with a reduced gear ratio in the VAZ 2107 gearbox, they significantly increase the maximum speed of their car. In principle, the gear ratio can be selected for all rear-wheel drive cars without exception, guided only by your own needs. The gearbox of the VAZ 2102 had the largest gear ratio - 4.4. But after it was discontinued, finding a main pair with the same gear ratio became extremely problematic.
Repair is not advisable in all cases. For a rear axle gearbox that is too worn, it is more profitable to completely replace it with a new one. The difference in price will be compensated by the reduction in the cost of work performed by specialists and the durability of the new unit.
How to repair a gearbox on a VAZ 2107
If you decide to carry out repair work, you must remove the gearbox from the car. To do this, first of all, drain the oil from the gearbox: unscrew the drain plug at the bottom of the gearbox and place an empty container. At the end, the oil will need to be replaced with new one.
Now you need to unscrew all the screws that secure the gearbox shank to the driveshaft flange. Then lift the rear of the car and remove both wheels. Remove the brake drums and unscrew the bolts that secure the axle shafts. Pull out the axle shafts, thus completely freeing the gearbox. There will be 4 gearbox mounting bolts left, which also need to be unscrewed. After this, you can safely remove the gearbox.
To repair the gearbox, it must be disassembled. To do this, unscrew all the nuts that secure the shank, pull out the flange, gear with special adjusting rings, rubber seal and inner ring of the bearing. Then press out the outer bearing races and then disassemble the differential and drive gear. Once you have completely disassembled the gearbox, discard the locking spacer.
As you understand, the spacer sleeve needs to be changed in any case. This part is disposable and cannot be reused. Also, if the condition is unsatisfactory, it is recommended to change the bearings and the main pair. The pair allocates a gear ratio, and the larger it is, the higher the power of the gearbox. A small gear ratio increases the speed characteristics of the gearbox. What to choose is up to you. The selection of the gear ratio is precisely the adjustment of the gearbox.
After selecting the gear ratio, change all the oil seals and seals and reassemble in the reverse order.
If the gearbox is in very unsatisfactory condition, it is recommended to completely replace it with a new one. This is a good saving on the work of car service specialists.
Installation of a new or repaired gearbox is carried out in the reverse order. First, install the gearbox itself, tighten the fastening bolts and insert the axle shafts and secure them. After this, install the cardan to the shank and fill the gearbox with new oil.
Where is the gearbox located?
On the "sevens", as on all representatives of the rear-wheel drive family, the gearbox is located at the rear, under the bottom of the car. It connects the cardan to the VAZ 2107 axle and causes the wheels of the car to rotate. Rotation occurs thanks to axle shafts engaged in the gearbox, which, due to the technical features of the rear axle of the VAZ 2107, will have to be removed later. If the car is lifted, or when viewed from a garage pit, the gearbox is simply impossible not to notice.
Signs and malfunctions of the classic rear axle gearbox
Replacing a gearbox with your own hands is a labor-intensive process, which includes not only the purchase of a new unit (quite expensive), but also time costs. Therefore, before you start, you need to make sure that the gearbox is faulty. You can define the signs like this:
- gradually accelerating the car, listen carefully and remember at what moment the noise appears;
- while driving, start engine braking (remove your foot from the gas pedal at speed), at this time listen to the gearbox and note the moment the noise appears;
- accelerate the "seven" to hundreds, switch to neutral and turn off the engine - listen to how the gearbox behaves while coasting.
“If the bridge is noisy both in neutral and at speeds, the gearbox has nothing to do with it. If the hum occurs only at speed (regardless of the number), repairs, or, as a last resort, replacement of the gearbox are inevitable.”
When the signs are identified, it is necessary to carry out another check:
- park the car, secure the front wheels with shoes;
- jack up the rear so that the bridge hangs over (it is necessary that the wheels come off the surface);
- start the engine and accelerate the “seven” to the point at which noise occurs, while the wheels should spin without load.
If the noise has not changed, then the gearbox is clearly in good working order and it is not the cause of the trouble. Here other drive units are checked. Well, if there is no noise when driving without a load, then we are talking about worn gears of the gearbox, which make noise only when driving with a load.
The “seven” gearbox itself is a fairly reliable unit that can withstand a period of 100 to 300 thousand mileage, and there is no need to even look into it. Gears, gear spacer, differential adjustment - all these problems arise during improper operation:
- the use of oil with a low viscosity level, as well as failure to comply with the terms of its replacement;
- operating the “seven” with an amount of oil insufficient for this;
- During movement, the bridge is subject to extreme loads (frequent and unsuccessful slips).
Gearbox removal process
In order to repair or replace the rear axle gearbox of a VAZ 2107, you first need to remove it from the car:
- Drain the oil. This, by the way, may be a reason to replace it.
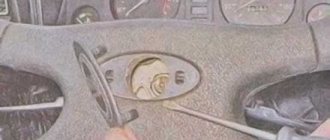
- Separate the flanges of the cardan and gearbox. To do this, you need to unscrew four bolts and nuts. At this time, it is necessary to fix and immobilize the cardan with a screwdriver or by holding the brake pedal. After unscrewing the nuts, you need to tie the cardan to the muffler. You can simply hang it, but this can also lead to negative consequences for the cardan.
- Remove the axle shafts, because without this the gearbox cannot be removed. At the same time, you can inspect the seals, and if they are worn out, replace them. This will save time and prevent possible malfunctions.
- Separate the beam and gearbox by unscrewing all eight bolts that secure it. When unscrewing the latter, it is necessary to hold the gearbox so that it does not fall. The bolts are unscrewed - carefully remove the gearbox.
Repair and adjustment of the VAZ 2107 gearbox
Before you start repairing the gearbox and its subsequent adjustment, you need to have certain skills, backed up by skills, observe all the nuances and subtleties of this process, and also strictly follow the technological nuances of the process. Therefore, if a person starts work for the first time, then it is better to abandon this idea. In addition, you must have all the necessary tools:
- pullers;
- stands;
- a set of keys, screwdrivers and other accessories.
If something is missing, it’s better not to take risks and trust the professionals. In fact, disassembling the “seven” bridge will not be difficult, but it is one of the few components that requires professional maintenance. The gearbox is disassembled step by step:
- First you need to unscrew the shank nut;
- then the flange itself is removed, the drive gear is pulled out, and the rings responsible for the adjustment are dismantled;
- the oil seal is removed, the oil deflector is dismantled, and using a puller, the inner ring of the bearing is removed;
- the drive gear is disassembled, and the differential is dismantled, and the spacer sleeve, regardless of its condition, is subsequently changed.
To facilitate subsequent assembly, marks are applied to the bearing caps - you can use a pencil, but it is much more reliable to use a core for this. Marks are applied not only to the covers, but also to the body, this will allow them to be assembled correctly later. As for the right and left covers, they also need to be marked, because they cannot be confused; numbers and letters are applied to the covers and body in the appropriate places. The only inconvenience is that you need to carefully clean the covers so that the marks remain in place - that is why, for convenience, it is better to mark the marks.
In order to remove the cage with inner rings, you must use a hammer and drift. By lightly tapping over the entire surface, the process of knocking out the rings occurs. If you only knock on one point, it is unlikely that you will be able to remove the rings.
As a rule, all gearbox repairs consist of replacing the main pair - it takes the main “blow”. The main pair is responsible for determining the gear ratio, and it is produced in various variations. The increase in traction of the “seven” occurs due to the larger gear ratio, and the lower it is, the higher the maximum speed the car gets. Which pair to choose is up to the car owner himself, but there are some tips on this matter.
VAZ 2107: replacing the rear axle gearbox
VAZ 2107, the last representative of the classics, which was equipped with rear-wheel drive. It had the same structure as its predecessors: gearbox, cardan drive, rear axle, etc. On newer models, VAZ 2108, 2109, 2110, instead of a gearbox, so-called CV joints were installed, which, over a long period of operation, proved to be less durable.
In general, the gearbox is considered one of the strongest mechanisms in a car. But, as they say, nothing lasts forever, and sooner or later, this mechanism will need to be repaired or replaced. So, let's look at the procedure for replacing a VAZ 2107 gearbox with your own hands.
Gearbox repair
When making adjustments and repairs to the rear gearbox, you must have certain skills, as well as follow technology. A mandatory requirement is that you must have special tools, pullers and stands at your disposal. If you do not have all these tools, then it is better to have the rear gearbox repaired by a professional.
If you have never tried to repair rear gearboxes, but really want to do it, it is better to first learn from experienced mechanics. Disassembling the VAZ-2107 axle gearbox is not difficult, but this is a vehicle component that requires very high-quality maintenance. You shouldn't skimp on this.
Device
The gearbox is one of the main mechanisms included in the design of the rear axle. It is responsible for transmitting torque from the gearbox to the drive wheels. His device includes:
- Two main gears: drive and driven;
- An axis with satellites located on it;
- Axle gear;
- Locking plate;
- Differential box;
- Adjustment screw;
- Carter;
- Gearbox housing.
It is worth noting that all the parts of this mechanism are basically in constant motion and are subject to heating. It is for this reason that they require special equipment and operating conditions, otherwise you will need to replace this unit very immediately.
Why does the gearbox break?
The gearbox on the “seven” is very reliable; on many cars it covers both 100 and 300 thousand km. Moreover, not a single repair was carried out during this period. But on some vehicles, gear wear appears much earlier, usually due to improper operation.
Reasons why gearbox gears fail:
- The lubricant in the gearbox is not replaced.
- Poor quality oil is used. Only high-quality transmission oil must be filled into the rear axle, as well as into the steering gear of the VAZ-2107.
- Extreme vehicle operating conditions, heavy loads and frequent slipping.
- Insufficient amount of lubricant in the gearbox.
In other words, if you monitor the condition of the VAZ-2107 gearbox seals, the oil level, and most importantly, do not allow excessive loads on the drive, then the mechanism will last for many years.