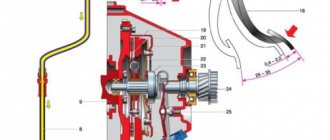
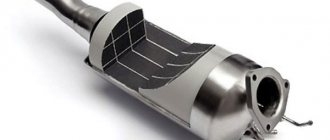
What does the generator on the VAZ-2114 consist of?
The generator is a three-phase device that operates with alternating current. All this is equipped with a specialized part of rectifiers that convert alternating current to direct current.
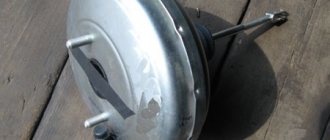
The generator on the VAZ-2114 consists of the following parts:
- Lids, of which there are only two. They are usually made of aluminum and have grooves in them into which bearings are attached. The back of the cover is also equipped with a specialized terminal, which is connected to the battery. There is also a connector where voltage is supplied to the excitation winding. There is a capacitor on the back cover, and it is used to remove various radio interference.
- Let’s not forget about another important detail – the stator core cylinder, which is made from special transformer iron. It also contains grooves where the winding is laid. There are also leads for connecting parts to the rectifier unit. The lid is screwed to it using screws.
- The equipment that is located on the cylinder shaft is called the field winding. It is connected to copper rings, which ensures contact. To install the drive pulley, you need to use a keyway, which is located in front of the shaft.
- Generator brushes, which are made from a single unit, combined with electronic relays. This is hidden behind a durable housing that is attached to the brush holder.
- There is a diode block on the back cover. Their approximate number is 9 pieces and 6 of them are basic. This device is mounted on semicircular plates, which are also made of aluminum. Thanks to this, the conductors cool quickly.
The main malfunctions that we have discussed more than once on the website provaz2114.ru of the generator are:
- The fuse has broken. To fix the problem, you need to change the fuse. Just first you need to find out the cause of the breakdown.
- The circuit that powered the devices broke. You definitely need to check the connection of the wire with other contacts.
- There was a breakdown in the ignition switch. It is imperative to make sure that the board from the ignition switch is working properly.
- The control lamp is not working correctly.
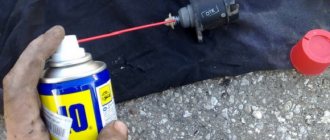
- The brushes are not working correctly. To get rid of the problem, you need to replace the brush holder and brushes. The slip rings must be cleaned with gasoline or treated with WD-40.
- The voltage regulator is not working.
- The alternator belt is damaged or begins to work poorly.
- The bearing is not working.
Removing the generator
The procedure for removing an electric generator from a car is simple, but its implementation requires basic skills in working with equipment and at least superficial knowledge of the units in the engine compartment. The stages of work can be divided into several steps:
- Disabling the electronic part.
- Removing the upper retaining device.
- Removing the lower mounting platform.
- Correct removal of the belt and tensioner.
You can remove the generator mount both on the VAZ 2110 and on other VAZ models if you follow certain instructions. Fundamentally, the process of working with autogenerators on VAZ cars is almost identical, and the main difference is only in the location of the power unit. On the VAZ family 2101 - 2107, 21213, 21214, the engine in the engine compartment is located longitudinally, and on front-wheel drive models the engine is installed transversely. The mount drawing for front-wheel drive models is identical, only the electric generators themselves, their power and pulley sizes differ.
Depending on the engine layout of your car, certain difficulties may arise. So, on classic VAZs, as well as Nivas, the procedure for removing the autogenerator is easier to carry out due to the accessibility of the components. While on front-wheel drive models, access to the components is difficult due to the transverse location of the power unit. There are often cases when it is not so easy to get to the soured bolts that fix the “gene”.
To carry out work on removing the generator on the VAZ 2115, 2114 and other front-wheel drive models, you will need a set of socket heads and open-end wrenches, a flashlight, WD-40 lubricant (or other similar) and a set of new components (belt, pulley, fasteners and bolts). It is worth remembering that on front-wheel drive VAZ models, access to the units is difficult, so an inspection hole or a lift may be required. If there is no access to a pit or a lift, you can jack up the car and remove the right front wheel (in the direction of travel) and after that access to the electric generator will be simplified.
First of all, with the car turned off, you need to remove the terminals from the battery and remove it. This procedure is done in order to protect yourself and the car’s electronics from short circuits. After that, two wires are removed from the autogenerator - one is power (usually red), and the second is control (a thin wire with a white or gray connector). The power wire is located in a special thermal casing; it must be moved, only then will access to the terminal on the unit be opened.
As soon as the wires are removed, we take them away so that they do not interfere with subsequent manipulations to remove the unit. Now you need to loosen the belt tension. To do this, unscrew the tension screw and move the generator to one side. While the generator is moving, check the degree of belt tension.
What causes the battery light on the dashboard to light up?
When the ignition key is turned, the system displays all instrument icons on the panel. This is done to check the operation of the machine, therefore the bulbs are fully working. Next, we start the engine and the lights go out when the machine is running properly. If one light does not go out, then this indicates a problem.
Battery icon on dashboard
Also, if the battery icon does not go out, this indicates that the generator has low voltage or no voltage.
Bearing sizes and manufacturers
Before replacing a bearing with a new standard product, you need to buy it. The marking of these standard consumables is complex; the numbers in it are deciphered using special tables. Moreover, bearing designations according to GOST 3189 do not coincide with the markings of foreign manufacturers, so the user needs to know the following nuances:
- the marking consists of three parts (main, left, right), and blocks inside them;
- in the left and main parts the blocks are located from right to left, and in the right block on the contrary, from left to right;
- in cars, the front bearing of the generator most often has the designation of the main part 302 or 303, and the rear bearing 202 or 203;
- usually radial ball modifications with code 0 (0302 or 0202) or angular contact balls with code 6 (6303 and 6203) are used;
- therefore, for the specified parameters, you can decipher the dimensions using the table below;
- For foreign-made bearings, similar markings are used.
This is interesting: How to replace exhaust valves with your own hands - setup and restoration
Marking of bearings according to GOST 3189
Table for deciphering bearing sizes by marking
Designation of imported bearings
The suffix (right side of the marking) of imported bearings contains additional information. For example, letters and numbers can represent:
- 2RS and RS – double-sided and single-sided rubber seals, respectively;
- N and NR – groove on the outer ring without a latch and with a latch, respectively;
- J – steel holder;
- Z – sheet protection on one side without seals.
The main problem for a car enthusiast when doing self-repair is the variety of bearing sizes inside the generator:
- it is difficult to guess the markings before disassembling, when the car is still running;
- after dismantling and disassembling the generator, the dimensions and markings are known to the owner, but he has to go to the store in a different car;
- in some stores, sellers practice a convenient system - the car owner takes 4 bearings 202, 203, 302 and 303, and returns two of them back.
These modifications have dimensions:
Generator diagnostics for VAZ 2114
Due to the fact that charging decreases, less and less current will flow into the battery. Thus, to power the entire on-board network, you will need another generator and a battery, which will discharge over a certain period of time. However, high voltage will be more dangerous. As a result, lamps and ECUs may burst and fuses may blow. In order to diagnose the VAZ 2114 generator, you will need a multimeter.
For the purpose of high-quality diagnostics, do everything carefully:
- Start the engine. If there is any damage in the rotor winding circuit, then you will see that the lamp located on the panel is lit.
- The engine needs to be warmed up to a certain temperature and the headlights must be switched on.
- We measure the voltage at the battery terminals. The main condition is that the rotation speed of the kolevana should be approximately 2600-2900 windings per minute.
- If the generator is faulty, the reading on the voltmeter will be about 13 V.
- When the lights and radio are turned off, the voltage should increase to approximately 15 V. This is the highest value.
Generator diagnostics
When you carry out diagnostics, you need to pay attention to the sounds with which the rotor rotates. Bearings can often fail.
Procedure for replacing the generator
If the electrical unit fails and repair is impractical, you must first find a replacement. It is recommended to buy a factory version that will fit the fasteners and terminals. Otherwise, the repair will be accompanied by changing the wires.
Replacement process for VAZ 2109-2115:
- Drive the car onto the overpass.
- Remove engine protection.
- Remove the (−) terminal from the battery.
- Move the protective cover away from the positive one, unscrew the fixing bolt and remove the terminal.
- Remove the wires (secured with a block).
- Remove the upper fastening element.
Upper mounting bolt
- Take off the belt.
- Unscrew the bottom bolt.
Bottom bolt
- Dismantle the device.
- Install a new unit so that the fasteners match.
- Secure with the lower and upper bolts.
- Install the belt (preferably a new one).
- Place the terminal, secure it, and return the protective cover.
Securing the terminals on the generator
- Connect the wire block.
- Adjust tension.
Attention! If you overtighten when adjusting the belt, the bearings will quickly fail. If the tension is weak, there will be no proper grip and the battery will not be able to charge.
To tighten, you need to turn the adjusting screw, which, when moving clockwise, is tightened, and when moved counterclockwise, it is loosened. It's easy to check - you need to gently press the belt so that it bends no more than 15 mm.
Checking the voltage regulator
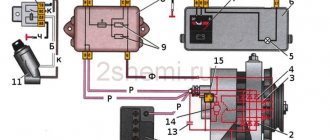
Along with the voltage regulator, we also check the brush holders, since if the circuit located between the brushes and the regulator is damaged, we will be able to see a non-working mechanism.
Circuits for testing the voltage regulator: a – produced since 1996; b – produced before 1996; 1 – battery; 2 – output “ground” of the regulator; 3 – voltage regulator; 4 – terminal “Ш” of the regulator; 5 – terminal “B” of the regulator; 6 – control lamp; 7 – terminal “B” of the voltage regulator
- First you need to check the brushes. If they are worn out or broken, then the generator brushes need to be replaced.
- Be sure to prepare the necessary parts for testing, such as wires, battery, 12V light bulb and AA batteries.
- A regulator that is working correctly will show a voltage of approximately 14V. If the voltage is higher, then be sure to stop the flow of voltage to the brushes. A burning light during testing tells us that the problem is caused by a broken regulator. A light that does not light indicates that the circuit that connects the regulator and the brushes is broken.
- The regulator needs to be changed if the voltage is less than 13.2V when the on-board system is operating. Too high voltage can also result from a broken regulator. The stage of cleaning and installing the voltage regulator is similar to the stage of replacing the generator brushes, because not only the brushes are removed, but also the voltage regulator.
Repair
So, you have decided to purchase new bearings and follow a difficult but fairly economical path. For cars like the VAZ 2114, self-repair is a common thing. Such work, even in the absence of impressive experience and knowledge, is not difficult to do. Simple follow the instructions.
- Disconnect the generator from the battery to deprive it of power.
- Remove the timing belt.
- Using wrenches of the appropriate size, remove the fastening nuts.
- The film is removed, after which the sleeve is removed.
- The generator itself is carefully removed from its seat.
This is interesting: Purpose, errors and checking the camshaft position sensor
Subsequent work is more subtle and complex. After all, you have to disassemble the generator in order to get to the bearings. The task is not an easy one, but you can handle it yourself.
- There are nuts on the generator housing that need to be unscrewed;
- Remove the cover and remove the regulator from under it. This element is responsible for brushes and tension;
- Disconnect the stator from the cover. This operation should be done as carefully as possible so as not to damage the copper winding;
- Sometimes the housing can become rusty, making the stator difficult or even impossible to remove. In such a situation, arm yourself with a hammer and an impact screwdriver. With the help of these tools it is necessary to deliver the most accurate blows. This way you will be able to divide the element into blocks;
- Separating the generator from the stator, you will see both bearings - front and rear;
- Remove the damaged component and install a new alternator bearing in its place. Don't forget that there are two of them. For prevention, you can replace both at once, even if one of them is in completely good condition;
- Assembly is performed strictly in reverse order.
Working as a puller
Important Tips
There are several questions that you should know the answers to before you begin the job of replacing alternator bearings.
- Installation must be carried out using a special press. Theoretically, it is possible to install a new element in place of the damaged one with an ordinary hammer, applying directed blows to the bearing. But this way you can damage the new spare part, plus additional damage to neighboring elements.
- Make sure the new element is firmly in place. Only after this proceed with installing the pulley and impeller.
- When purchasing a part, ask the seller what kind of vehicle this particular bearing is designed for. These parts differ in size.
- During the replacement process, be sure to check the tension of the timing belt. If the tension is not strong enough, voltage sag may occur.
If the above operations do not produce results, you should look for other potential problems with the generator.
Disassembled generator
Consequences of a malfunction
A faulty bearing, like any other failure associated with generator components, leads to its malfunction. It is impossible to predict the consequences of such a breakdown.
Let’s just say that both an inadequate and an excessive charge pose a potential threat.
- If the alternator does not provide sufficient charge, the battery will quickly discharge, so you will not be able to start the car or go anywhere.
- If a charge is too powerful, the consequences are even sadder, since this puts the entire electrical circuit of your VAZ 2114 at risk.
Problems and solutions
There are several common generator problems that are more than possible to repair. Here you just need to follow certain recommendations and rules.
We invite you to familiarize yourself with the malfunctions and methods for solving them in the corresponding table.
| Malfunction | Remedy |
| Regulator or brushes not working | The unit is non-separable, so the only way to solve the problem is complete replacement |
| The rotor bearing has failed | We looked at the first bearing. The second one is rolled on the rotor shaft. If damaged, it must be replaced. The device is removed with a special puller and a new bearing is mounted in its place. |
| Diodes don't work | You can unsolder the leads and pull it out of the holder. The area is cleaned with epoxy and reverse soldering is performed. Then the lead with the colored mark is soldered to the bus, and the diode body is mounted on the holder using epoxy resin |
| Alternator belt tension is loose | It needs to be adjusted. The work is done very carefully so that the tension is not excessive. If you make a mistake, the load on the bearing will increase and it will quickly fail. |
Some motorists consider a number of car-related problems to be trivial and not worth paying much attention to. But they can sometimes lead to very serious, unpleasant consequences, the elimination of which will require not only a lot of effort and time, but also an impressive amount of money.
The generator and its components, including bearings, are complex elements that are quite difficult to repair or replace. If you do not have experience and skills in such matters, it is better to entrust the work to specialists.
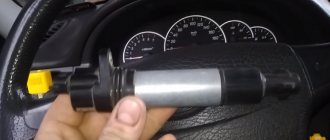
Replacing generator brushes
Replacing brushes in a generator is a fairly simple job; you only need a screwdriver and a little skill. You may also need a 10mm wrench or you can use pliers. They will be needed to disconnect the terminal from the battery.
provaz2114.ru
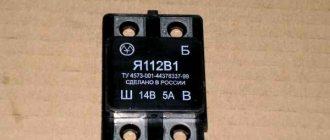
The reasons for replacing the VAZ 2114 relay regulator may be the following:
- No charging.
- The headlights glow dimly in the dark.
- Low tension.
The replacement will look something like this:
- Disconnect the ground wire from the battery.
- Disconnect all wires from the brush block.
- Unscrew 2 bolts and remove the brush block.
- The length of the brushes should be about 0.5 centimeters.
A relay-regulator is connected to the brushes, therefore, when replacing the first unit, you also change the second unit.
Signs of generator failure
There are several signs by which a driver can determine that the VAZ 2114 generator is faulty.
Here are the main ones:
- the corresponding lamp on the instrument panel indicates that the battery is not charging;
- insufficient or overcharging of the battery;
- weak headlights and poor performance of the wipers (with the engine running);
- excessively bright headlights;
- the electrolyte in the battery boils;
- appearance of extraneous noise in the generator set.
Replacing the VAZ 2114 alternator belt
The belt length for this model will be 700 mm. The replacement time will take you a little more than 10 minutes. When I replaced it, I checked it with a multimeter. I also added brake fluid.
It is especially important to monitor the tension of the belt. If you tighten it loosely, then you can reduce the voltage in the on-board system. In this case, a whistle will be heard and the light on the panel will begin to blink.
Possible malfunctions: signs and causes
The generator set is an electromechanical device. Therefore, two types of faults are possible: mechanical and electrical.
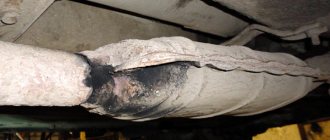
A sign of mechanical problems is increased noise during generator operation. The cause of the noise is the destruction of the bearing pressed into the cover. It constantly experiences large radial loads and therefore has a short service life.
An over-tensioned drive belt of the VAZ 2114 generator shortens its service life. Therefore, it is necessary to monitor its tension and condition. The generator will not work if the belt breaks.
Signs of electrical faults are:
- the generator does not charge the battery;
- charging voltage too low;
- charging voltage is too high;
- the unit is heating up.
You can determine the malfunction using a multimeter. You can judge an insufficient charge by dimly lit headlights and slowly working wipers, as well as by a control light that blinks or is constantly on. If the charge is too high, the electrolyte in the battery boils and the headlights shine too brightly.
Repair of VAZ 2114 generator
This process is quite complex and serious. To accomplish this, you must have certain knowledge and practical experience. Otherwise, you should contact specialists.
How to remove the generator
- Remove the protection from the engine.
- To repair, you need to loosen the tension roller.
- We remove the upper and lower bolt that holds the generator.
- Remove the compressor and air conditioner mounts.
- Remove the drive belt and remove the generator.
- Unscrew the top bolt that secures the air conditioning compressor.
- We take out the compressor and hang it, the tubes will easily support it.
- The bolts that hold the generator must be unscrewed.
- When the generator terminals are disconnected, pull the terminal holders down.
- We install the VAZ 2114 generator according to this diagram, only in the reverse order and do not forget to install the drive belt.
If there is a short circuit in the wiring, we will definitely find out the reason. Unsoldering of any slip ring could occur. In this case, we unwind the coil with the defect back, and then remove the broken end and solder the unwinded drive. You can also solder the wires.
If problems occur with the relay-regulator, which occurred due to a weak charge, then it should be changed. The operation of the diodes may also be disrupted, since this is located in the generator. They are replaced when replacing the generator.
If you hear strange noises, this is a sign of wear on the rotor bearing. It needs to be replaced. But violations can also be associated with the lack of play in the bearing. For it to work properly, you need to fill it with oil.
Installation of the generator with subsequent adjustment
When installing a generator on a VAZ 2109 (no matter the injector or carburetor) and other models, be sure to check whether the purchased clamps, bolts and nuts fit the installation locations. Also, we must not forget that the mounting holes on old-style electric generators are different from new ones. Therefore, when installing a modern autogenerator on front-wheel drive models of the first generations (08, 09, 99), you should purchase the appropriate fasteners.
The generator mounting mount cannot be taken from Grants or Prioras. You can take a new potassium generator and no additional modifications will be required, but the mounting plates must be type 21082. In addition, you will need to purchase a pulley 2110 and a tensioner type 21082.
The installation process is identical to the removal process. If the standard strips are worn out, they are replaced with new ones; this will require unscrewing several bolts and installing new strips.
When installing the electric generator, start from the bottom fastening plate, tighten (but not completely) the fixing bolt (do not forget to put the bushing), put the belt on the pulley and move to the top. To fix the generator, install the top fastening, but do not screw it all the way. Then the tension bar is inserted. Then tighten the tension bolt, checking the belt tension.
The belt should not bend more than 1-1.5 cm when pressed with a force of 10 kgf. It is quite difficult to maintain these indicators in garage conditions, so you should focus on the gap between the frame and the tension bolt of 15–20 mm. There should be a small gap (15–20 mm) between the tension frame and the screw (from the thread side). Then turn the engine crankshaft two turns with a wrench and monitor the position of the belt and its tension.
If, after checking the engine by turning the key, the gap changes, then the bolts securing the electric generator should be tightened. As soon as, after a control rotation of the crankshaft with a key, the gap remains the same, and the belt bends slightly when you press it, the bolts of the upper and lower fastenings are finally tightened, a control rotation of the crankshaft is performed two turns, the wires are connected to the electric generator and the engine is started.
If, when starting the engine, the belt does not make unwanted noise or whistle, and the charge level is normal, then the installation procedure was completed correctly. If a whistle appears, then most likely the belt is too tight and should be loosened.
Video about tightening and adjusting the belt:
Installation of generator from 2110 to 2109/08/99 – video:
Did you manage to solve your problem using the recommendations from the article?
Yes!
45.09%
No. More answers required. I'll ask in the comments now.
38.25%
Partially. There are still questions. I'll write in the comments now.
16.67%
Voted: 468